
Original Condition
The garage was in pretty rough shape. Related to the laundry room, the dryer vent exhausted into the garage. That obviously caused problems with moisture (drywall joint failures on the ceiling), and was a fire hazard. It didn't help that the wall between the garage and the laundry room was all hacked up. The previous owner cut a huge hole (more than 4 sq. ft.) in the 5/8" drywall, a big no-no since that's required by code as a fire barrier. Worse, he also cut an equally large hole right through the sheathing too. He didn't replace the drywall, and his sheathing cutout was just propped in place; no nails, no screws, no glue. It would fall out when the door to the house was opened.The basement was not sealed off from the garage due to hackery for a utility sink and sprinkler system. See my laundry room page for more details.
The south garage door opener was not functional, due to very poor installation (it would literally swing back and forth at the touch of a finger). The north garage door opener was intermittent for the same reason. I assume these were installed by the previous homeowner. For liability reasons alone, I think a professional would have done a much better job. When I removed the north garage door opener, I found that the lag screws did not hit wood; they were only in the drywall. Yikes, an accident waiting to happen.
The 8' long T12 HO fluorescent light strips were hung from the ceiling drywall with toggle bolts. This pulled the drywall off of the ceiling. Given that they were less then 3 inches away from the bottom of the trusses, my conclusion is that the previous owner was very inexperienced with home improvement. These were heavy lights due to magnetic HO ballasts. Not something you hang from drywall with two toggle bolts.
The original decorator-style switches for the lights and the garage door openers were intermittent. Partly because they're not intended for damp area use and the previous homeowner pumped moisture into the garage regularly (dryer venting). More importantly, they were also not rated for the current that was drawn by the garage door openers at startup and the 900+ watts was used by the fluorescent lighting.
The previous homeowner had installed a utility sink, but none of the pipes were insulated or heated. Both of the feed pipes had burst right off of the sink, and the waste pipe (PVC) was missing, probably because it cracked when not winterized.
The previous homeowner had installed schedule 40 PVC to feed a sprinkler system. It was cracked apart due to lack of winterization. I don't know which part of "NOT FOR PRESSURIZED APPLICATIONS" written repeatedly down the length of the PVC pipe was not understood. The sprinkler system was rendered unusable anyway, since the control box was removed and much of the irrigation system in the yard was ripped out or damaged (lacerated wiring, etc.).
My Changes
I bought two new Craftsman 3/4 HP garage door openers. Both are now installed. I did a much better job installing them than the original owner; they're mounted to the roof trusses instead of just the drywall, with proper trapezoidal bracing of 1.5" steel angle and an X on the trapezoid to prevent lateral movement. The trapezoid's plane is on an angle to reduce stress on the header when closing the door.Due to a messy installation of the original garage door openers, I created a 1/4" thick mounting plate for my new openers out of underlayment left over from the laundry room project. It is painted with appliance paint to make it easy to clean of dirty handprints.
I replaced all of the low-grade decorator light switches with Leviton 20A illuminated industrial toggle switches, and replaced the nylon cover plates with stainless steel cover plates. That includes the pair of switches that disable the garage door openers. Some of the original switches had failed. I expect the new industrial switches to last a very long time.
I bought new 13-ball nylon garage door rollers, I've installed them on both of the doors. A ten minute job for each door, and now the doors are nearly silent.
I bought new bottom seals for the doors, but I may decide to use different ones. I also bought new side and top seals that I have not installed yet.
I bought some 4' long T8 4-lamp fixtures with electronic ballasts, I am going to buy more. These were going to replace the 8' long T12 HO fixtures that were not hung correctly (previous owner) and buzz like crazy. However, I then bought new electronic ballasts for the 8' long T12 HO fixtures, which are instant-on and rated for 0F temperature. They are silent, and they're much lighter than the heavy magnetic ballasts they replaced. I moved each of these lights to under a truss, so they are no longer pulling the drywall off of the ceiling.
I bought twenty four 6" air-tight IC-rated Halo H7ICAT recessed light housings. I have now installed all of them. I put Cree 9.5W BR30 5000K LED bulbs in them. These lights are turned on and off by a Leviton commercial occupancy sensor; there is no light switch for them. I installed trim rings with white metal baffles on all of them.
I retaped and rejointed ALL of the ceiling joints. All had failed, largely due to the drywall not having enough fasteners (the construction adhesive that was used as a substitute for proper fastener spacing failed in many places). This work took eons. It's nowhere near perfect cosmetically, but my objective was to get the drywall resecured and to seal the garage from the attic.
I primed and painted the ceiling and all of the walls except the window cove. I'm working on that area right now.
I installed two 84" long Rubbermaid FastTrack rails on the north wall near the garage door. Most of my yard tools are now hanging from the upper one, and my fuel cans on the lower one. I also installed a 32" long one up high.
I bought three sheets of slatwall from Menard's but did not install any of it. It turns out that I won't be using it in the garage because the inserts sold for it can't be installed; they just don't fit. Hence the load rating is 30 lbs. for a 6" hook. I need a higher load rating in most areas.
I later bought Proslat slatwall, even though it has fewer slots. It's reasonably strong, and is made from PVC so it's not adversely affected by humidity and temperature cycling. It's also easier to install and delivery was free (Home Depot). I installed a 6' x 4' section of it on the wall shared with the laundry room. I installed most of a second kit on the south wall. I have one more kit. I like the ProSlat; it has concealed screws, so it looks nice.
I also installed a GearTrack channel on the south wall just to hold Gladiator Clean-Up Racks. These are paper towel holders with a shelf above. The shelf is handy for cleaning supplies and/or extra paper towel rolls.
I installed a pair of 8' long 20" deep Rubbermaid Tough Stuff shelves over the north garage door. They're rated for 100 lbs. per linear foot. I will use these to store infrequently used items. I installed two more over the south garage door, after repairing a drywall joint on this wall.
I put four 6' long ClosetMaid Maximum Load shelves above my tool cabinets (two rows, 12' long). I put two more on the south wall. I put a 4' long one above my Wright wrench displays near the door to the basement, and hung a 4' long 4-tube T8 shop light from the underside. I put pegboard below my Wright wrench displays, and made a fold-down bench below the pegboard. I put two 4' Maximum Load shelves on the east wall in the south end of the garage, and stainless steel pegboard beneath them.
I installed some FRP panels to protect the drywall in areas where I expect some abuse. Mainly under the Rubbermaid FastTrack rails where I hang yard tools and the like. It's much easier to clean than painted drywall, and is resistant to moisture and chemicals. The pieces behind the FastTrack rail for my yard tools are now installed. Another piece is installed under the window, and more in the corners of the garage where I have air filter/regulator/drain setups. I also installed some smaller pieces behind the filter/regulator between the garage doors, and one near the floor in the same location. There's also a piece below the ProSlat on the wall shared with the laundry room, and one next to the door to the house.
I ran Type L copper along the west wall of the garage at the ceiling, for air supply. Black steel is inexpensive, easy to use and reconfigurable, but Type L copper won't rust, is lighter in weight, and in my experience it's easier to get joints that don't leak over the long haul (as long as the correct flux and solder are used). It's also even easier to reconfigure, assuming I'm careful with the torch. I used 3/4" pipe for the mains and much of the drops, converting to 1/2" for the filters/regulators, manifolds and hose reel feeds. I installed automatic drains on each drop, and will probably run hose to the outdoors from the drains. I don't need 3/4" mains right now, and probably won't in the near future (I'd need a bigger compressor to come anywhere near the limits of 1/2" mains), but it's a little easier to install due to increased rigidity and the cost increase was neglible compared to the labor to install all of the plumbing the way I want it. And I don't want a full loop in the garage, mainly due to the very odd shape of the wall shared with the house and the ugliness of having plumbing on that wall. 3/4" stubbed is more than sufficient for my current needs as well as the foreseeable future. The most distant drop is about 50' of 3/4" copper from my compressor. The significant flow issues are in the 3/8" ID hoses on my three hose reels, not to mention the 1/4" couplers at the tools. I don't use more than one tool at a time, and given the fact that I'm installing manifolds at each drop, I can always plug in a bigger hose with 3/8" couplings for a tool that needs more air.
I installed two inexpensive, 50' long 14-gauge cord reels on the ceiling. One if them is behind the north garage door opener, the second is behind the south garage door opener.
I created corner guards out of 1x3 oak boards to protect the corners of the abutment of the laundry room. These corners were bashed up before I did all of my drywall repair, priming and painting. The new corner guards are attached with Loctite PL and screws, and are ludicrously strong. I won't be having any problems with drywall corners being damaged now. I caulked the edges of them and filled the countersunk screw holes. They look nice in addition to being functional. I created similar guards for the window and installed them.
I mounted a Kidde Pro 340 fire extinguisher on the east wall near the door to the house. It's a 3-A:40-B:C extinguisher, all metal, refillable. I bought a mount with a quick-release metal strap since the mount included with the extinguisher had no strap and was too risky to have in the garage. Since I hate the thought of using ABC dry chemical on one of my cars or an expensive tool, I left room underneath for a second extinguisher which will likely be a 5 lb. halotron but might wind up being a Coldfire. Something I can use on small underhood fires without spewing caustinc chemicals.
Adjacent the fire extinguisher are two of my 3D Maglite flashlights mounted with the Maglite plastic mounts. Attention to detail: I glued a piece of FRP to the mounting board behind the heads of the flashlights since the heads ding the plywood when yanking a flashlight out of its mount. The FRP will put up with a lot of dinging without damage.
I installed an 84" Rubbermaid FastTrack rail under the window. Right now my small Shop-Vac and 4' ladder are hanging on it.
I repaired the window casing, caulked the trim where it meets the wall, sealed the window casing with Zinsser B-I-N and painted the casing and trim with Rust-Oleum door paint.
I installed vinyl floor tile on the window sill, and grouted it. I was going to use porcelain, but I had the vinyl tiles left from the laundry room remodel and they don't require a wetsaw to cut.
Garage Wish List by Category
Heating
-
Part Description P/N Qty. Unit Price Total Modine HDS75-SS Hot Dawg 75,000 BTU/hour gas heater with stainless heat exchanger and separated combustion HDS75-SS 1 $1460.00 $1460.00 Vertical concentric adapter kit Allows single hole in roof for intake and exhaust VerticalConcentricAdapter 1 $280.00 $280.00 Quick swivel flush mount Allows easy installation to ceiling QSWI3000 1 $89.99 $89.99 Total $1829.99
Garage Door Opener
-
Part Description P/N Qty. Unit Price Total Liftmaster 8500 Elite mounts to wall, eliminates ceiling clutter Liftmaster 8500 2 $295.00 $590.00 Total $590.00
Garage Door Support Struts
-
Part Description P/N Qty. Unit Price Total Ideal 2" x 16' support strut support struts to eliminate door sag 2X16Ft_1007106_24G 4 $17.99 $71.96 Total $71.96
Parking Sensor
-
Part Description P/N Qty. Unit Price Total Striker Garage Parking Sensor ultrasonic parking sensor 00108 2 $24.95 $49.90 Total $49.90
Paint
-
Part Description P/N Qty. Unit Price Total Accubrush XT Deluxe Kit Paint edging kit with XT and MX edgers Accubrush Deluxe XT Kit 1 $124.95 $124.95 Total $124.95
Storage
-
Part Description P/N Qty. Unit Price Total Wallpeg plastic pegs for pegboard Wallpeg Store J & L Style flex lock peg hooks, 100 pieces Wallpeg J&L 2 $19.95 $39.90 Bench Solution QW00 folding 60"x24"x1.5" workbench with IdealWall QW00 1 $399.99 $399.99 Arlington BE2 Double-gang electrical box extender (for slatwall) BE2 2 $2.50 $5.00 Arlington BE3 Triple-gang electrical box extender (for slatwall) BE3 1 $4.04 $4.04 Festool Systainer SYS 2 for jigsaw 497564 1 $68.00 $68.00 Festool Systainer SYS 1 for Dremel, Bosch 12V impact & drill 497563 2 $63.00 $126.00 Tanos Systainer MIDI T-Loc II Anthracite for Porter-Cable hammer drill 158294 1 $70.00 $70.00 Total $712.93
Flooring
-
Part Description P/N Qty. Unit Price Total G-Floor GF85CN944SG 9' x 44' diamond tread industrial grade garage floor cover GF85CN944SG 2 $832.00 $1664.00 Total $1664.00
Finishing
-
Part Description P/N Qty. Unit Price Total kick plates stainless steel 8"x28" kick plate, adhesive mount HKP0828.S 4 $29.00 $116.00 Glasliner 665041 4'x8' .090" gray FRP panel to protect wall under FastTrack 665041 2 $25.97 $51.94 Marlite MFTF12IXA480009600 4'x8' .090" white FRP panel to protect drywall MFTF12IXA480009600 6 $24.97 $149.82 Total $317.76
Totals by Category
-
Category Total Heating $1829.99 Garage Door Opener $590.00 Garage Door Support Struts $71.96 Parking Sensor $49.90 Paint $124.95 Storage $712.93 Flooring $1664.00 Finishing $317.76 Total $5361.49
Garage Wish List by Vendor
www.h-mac.com
-
Part Description P/N Qty. Unit Price Total Modine HDS75-SS Hot Dawg 75,000 BTU/hour gas heater with stainless heat exchanger and separated combustion HDS75-SS 1 $1460.00 $1460.00 Vertical concentric adapter kit Allows single hole in roof for intake and exhaust VerticalConcentricAdapter 1 $280.00 $280.00 Total $1740.00
www.northerntool.com
-
Part Description P/N Qty. Unit Price Total Quick swivel flush mount Allows easy installation to ceiling QSWI3000 1 $89.99 $89.99 Total $89.99
www.amazon.com
-
Part Description P/N Qty. Unit Price Total Liftmaster 8500 Elite mounts to wall, eliminates ceiling clutter Liftmaster 8500 2 $295.00 $590.00 Tanos Systainer MIDI T-Loc II Anthracite for Porter-Cable hammer drill 158294 1 $70.00 $70.00 Festool Systainer SYS 2 for jigsaw 497564 1 $68.00 $68.00 Festool Systainer SYS 1 for Dremel, Bosch 12V impact & drill 497563 2 $63.00 $126.00 Total $854.00
www.menards.com
-
Part Description P/N Qty. Unit Price Total Ideal 2" x 16' support strut support struts to eliminate door sag 2X16Ft_1007106_24G 4 $17.99 $71.96 Total $71.96
www.lowes.com
-
Part Description P/N Qty. Unit Price Total Striker Garage Parking Sensor ultrasonic parking sensor 00108 2 $24.95 $49.90 Total $49.90
webstore.painthelpers.com
-
Part Description P/N Qty. Unit Price Total Accubrush XT Deluxe Kit Paint edging kit with XT and MX edgers Accubrush Deluxe XT Kit 1 $124.95 $124.95 Total $124.95
wallpegstore.com
-
Part Description P/N Qty. Unit Price Total Wallpeg plastic pegs for pegboard Wallpeg Store J & L Style flex lock peg hooks, 100 pieces Wallpeg J&L 2 $19.95 $39.90 Total $39.90
www.benchsolution.com
-
Part Description P/N Qty. Unit Price Total Bench Solution QW00 folding 60"x24"x1.5" workbench with IdealWall QW00 1 $399.99 $399.99 Total $399.99
www.homedepot.com
-
Part Description P/N Qty. Unit Price Total G-Floor GF85CN944SG 9' x 44' diamond tread industrial grade garage floor cover GF85CN944SG 2 $832.00 $1664.00 Glasliner 665041 4'x8' .090" gray FRP panel to protect wall under FastTrack 665041 2 $25.97 $51.94 Marlite MFTF12IXA480009600 4'x8' .090" white FRP panel to protect drywall MFTF12IXA480009600 6 $24.97 $149.82 Arlington BE2 Double-gang electrical box extender (for slatwall) BE2 2 $2.50 $5.00 Total $1870.76
www.platt.com
-
Part Description P/N Qty. Unit Price Total Arlington BE3 Triple-gang electrical box extender (for slatwall) BE3 1 $4.04 $4.04 Total $4.04
diamondlifegear.com
-
Part Description P/N Qty. Unit Price Total kick plates stainless steel 8"x28" kick plate, adhesive mount HKP0828.S 4 $29.00 $116.00 Total $116.00
Totals by Vendor
-
Vendor Total www.h-mac.com $1740.00 www.northerntool.com $89.99 www.amazon.com $854.00 www.menards.com $71.96 www.lowes.com $49.90 webstore.painthelpers.com $124.95 wallpegstore.com $39.90 www.benchsolution.com $399.99 www.homedepot.com $1870.76 www.platt.com $4.04 diamondlifegear.com $116.00 Total $5361.49
My To-Do List
- Paint the door to basement.
- Paint the access door.
- Install FRP between garage doors.
- Install stainless steel pegboard between garage doors?
- Pry up remaining plywood in garage attic that's in the way of insulation installation.
- Order a 20A cord reel?
- Install Rubbermaid FastTrack rail under window?
- Order G-Floor from Home Depot.
- Install G-Floor.
Pictures
Garage Parts by Category
Shelving
-
Part Description P/N Qty. Unit Price Total Rubbermaid 3F5118GRAY 96"x20" Tough Stuff TightMesh shelf 3F5118GRAY 4 $29.69 $118.76 Rubbermaid FG3Q7500GRAY 70" ToughStuff upright FG3Q7500GRAY 14 $13.49 $188.86 Rubbermaid FG3Q6800GRAY 20" Tough Stuff Bracket FG3Q6800GRAY 25 $8.99 $224.75 ClosetMaid 358500 Max Load standard for wire shelving, 48", silver 358500 8 $11.50 $92.00 ClosetMaid 9358500 Max Load standard for wire shelving, 48", hammertone 9358500 22 $11.27 $247.94 ClosetMaid 2358200 Max Load bracket for wire shelving, 16" 2358200 8 $6.50 $52.00 ClosetMaid 9358200 Max Load bracket for wire shelving, 16", hammertone 9358200 34 $6.63 $225.42 ClosetMaid 7357100 Max Load shelf, 72" x 16", gray 7357100 2 $22.00 $44.00 ClosetMaid 3571900 Max Load shelf, 72" x 16", charcoal 3571900 6 $23.64 $141.84 ClosetMaid 3570900 Max Load shelf, 48" x 16", charcoal 3 $15.88 $47.64 Total $1383.21
Paint
-
Part Description P/N Qty. Unit Price Total Olympic ONE Exterior Flat White Paint 5-gallon pail, tinted Snow Storm (bright white) for ceiling 73313A05 1 $99.86 $99.86 Total $99.86
Slatwall
-
Part Description P/N Qty. Unit Price Total ProSlat 88102 8'x4' white PVC slatwall with trims 88102 3 $134.10 $402.30 GarageEscape PLLIW01-03S-00015 4' x 8' slatwall panel, melamine white PLLIW01-03S-00015 3 $45.89 $137.67 Arlington BE1 Single-gang electrical box extender (for slatwall) BE1 5 $3.27 $16.35 Total $556.32
Pegboard
-
Part Description P/N Qty. Unit Price Total diamondLife Pegboard X2 2' x 3' 2' x 3' stainless steel pegboard, pair X2 2' x 3' SS 2 $127.00 $254.00 diamondLife pegboard backing board 2' x 3' 2' x 3' backing board for stainless steel pegboard, pair backing board 2' x 3' 2 $35.00 $70.00 Total $324.00
Lighting
-
Part Description P/N Qty. Unit Price Total Leviton 1223-0LC 20A 3-way industrial lighted toggle switch, clear 1223-0LC 4 $18.99 $75.96 Leviton 1221-0LC 20A single pole industrial lighted toggle switch, clear 1221-0LC 3 $14.99 $44.97 Lithonia Lighting 1284GRD RE 4-light T8 heavy duty shop light with 0F-rated electronic ballast 1284GRD RE 4 $49.97 $199.88 Halo H71CAT IC-rated 6" AirTite recessed light housing, 6-pack H71CAT-6PK 2 $49.97 $99.94 Halo ERT707WHT 6" trim ring with metal baffle, white ERT707WHT 24 $3.26 $78.24 Leviton OSC20-M0W 360 degree occupancy sensing switch OSC20-M0W 1 $109.99 $109.99 Leviton OSP20-D0 20A Power pack for occupancy sensor OSP20-D0 1 $28.03 $28.03 Cree BBR30-06550FLF-12DE26-1U110 BR30 9.5W 5000K LED flood light bulb, 4-pack BBR30-06550FLF-12DE26-1U110 6 $77.88 $467.28 Total $1104.29
Air
-
Part Description P/N Qty. Unit Price Total Milton 1108 filter/regulator combination 1108 2 $89.99 $179.98 ReelWorks 815 50' x 3/8" air hose reel 815 1 $99.99 $99.99 ReelWorks 159184 100' x 3/8" manual air hose reel, no hose 159184 1 $24.99 $24.99 Milton S99705 M-style safety coupler, 1/4" female NPT S99705 2 $12.99 $25.98 Total $330.94
Garage doors
-
Part Description P/N Qty. Unit Price Total Craftsman 53990 3/4 HP chain drive garage door opener with keyless entry 53990 2 $179.99 $359.98 Leviton 1221-0LC 20A industrial toggle switch 1221-0LC 2 $4.99 $9.98 garage door rollers 13-ball nylon garage door rollers, 4" stem, set of 10 1221-0LC 2 $14.79 $29.58 Total $399.54
Safety
-
Part Description P/N Qty. Unit Price Total Kidde Pro 340 5 lb. 3-A:40-B:C fire extiniguisher Kidde Pro 340 1 $49.97 $49.97 Kidde 420119 metal fire extinguisher bracket with quick-release strap 420119 1 $6.48 $6.48 Maglite ST3DGU6 3D LED flashlight ST3DGU6 1 $29.98 $29.98 Maglite ASXD026 D-cell flashlight mounting brackets ASXD026 1 $5.91 $5.91 Total $92.34
Totals by Category
-
Category Total Shelving $1383.21 Paint $99.86 Slatwall $556.32 Pegboard $324.00 Lighting $1104.29 Air $330.94 Garage doors $399.54 Safety $92.34 Total $4290.50
Garage Parts by Vendor
www.menards.com
-
Part Description P/N Qty. Unit Price Total GarageEscape PLLIW01-03S-00015 4' x 8' slatwall panel, melamine white PLLIW01-03S-00015 3 $45.89 $137.67 Rubbermaid 3F5118GRAY 96"x20" Tough Stuff TightMesh shelf 3F5118GRAY 4 $29.69 $118.76 Rubbermaid FG3Q7500GRAY 70" ToughStuff upright FG3Q7500GRAY 14 $13.49 $188.86 Rubbermaid FG3Q6800GRAY 20" Tough Stuff Bracket FG3Q6800GRAY 25 $8.99 $224.75 Total $670.04
store.closetmaid.com
-
Part Description P/N Qty. Unit Price Total ClosetMaid 7357100 Max Load shelf, 72" x 16", gray 7357100 2 $22.00 $44.00 ClosetMaid 3570900 Max Load shelf, 48" x 16", charcoal 3 $15.88 $47.64 ClosetMaid 358500 Max Load standard for wire shelving, 48", silver 358500 8 $11.50 $92.00 ClosetMaid 2358200 Max Load bracket for wire shelving, 16" 2358200 8 $6.50 $52.00 Total $235.64
www.lowes.com
-
Part Description P/N Qty. Unit Price Total Olympic ONE Exterior Flat White Paint 5-gallon pail, tinted Snow Storm (bright white) for ceiling 73313A05 1 $99.86 $99.86 ClosetMaid 3571900 Max Load shelf, 72" x 16", charcoal 3571900 6 $23.64 $141.84 ClosetMaid 9358500 Max Load standard for wire shelving, 48", hammertone 9358500 22 $11.27 $247.94 ClosetMaid 9358200 Max Load bracket for wire shelving, 16", hammertone 9358200 34 $6.63 $225.42 Total $715.06
www.homedepot.com
-
Part Description P/N Qty. Unit Price Total ProSlat 88102 8'x4' white PVC slatwall with trims 88102 3 $134.10 $402.30 Cree BBR30-06550FLF-12DE26-1U110 BR30 9.5W 5000K LED flood light bulb, 4-pack BBR30-06550FLF-12DE26-1U110 6 $77.88 $467.28 Lithonia Lighting 1284GRD RE 4-light T8 heavy duty shop light with 0F-rated electronic ballast 1284GRD RE 4 $49.97 $199.88 Halo H71CAT IC-rated 6" AirTite recessed light housing, 6-pack H71CAT-6PK 2 $49.97 $99.94 Kidde Pro 340 5 lb. 3-A:40-B:C fire extiniguisher Kidde Pro 340 1 $49.97 $49.97 Maglite ST3DGU6 3D LED flashlight ST3DGU6 1 $29.98 $29.98 Leviton 1223-0LC 20A 3-way industrial lighted toggle switch, clear 1223-0LC 4 $18.99 $75.96 Leviton 1221-0LC 20A industrial toggle switch 1221-0LC 2 $4.99 $9.98 Arlington BE1 Single-gang electrical box extender (for slatwall) BE1 5 $3.27 $16.35 Total $1351.64
diamondlifegear.com
-
Part Description P/N Qty. Unit Price Total diamondLife Pegboard X2 2' x 3' 2' x 3' stainless steel pegboard, pair X2 2' x 3' SS 2 $127.00 $254.00 diamondLife pegboard backing board 2' x 3' 2' x 3' backing board for stainless steel pegboard, pair backing board 2' x 3' 2 $35.00 $70.00 Total $324.00
www.platt.com
-
Part Description P/N Qty. Unit Price Total Halo ERT707WHT 6" trim ring with metal baffle, white ERT707WHT 24 $3.26 $78.24 Total $78.24
www.amazon.com
-
Part Description P/N Qty. Unit Price Total Leviton OSC20-M0W 360 degree occupancy sensing switch OSC20-M0W 1 $109.99 $109.99 Leviton OSP20-D0 20A Power pack for occupancy sensor OSP20-D0 1 $28.03 $28.03 garage door rollers 13-ball nylon garage door rollers, 4" stem, set of 10 1221-0LC 2 $14.79 $29.58 Kidde 420119 metal fire extinguisher bracket with quick-release strap 420119 1 $6.48 $6.48 Maglite ASXD026 D-cell flashlight mounting brackets ASXD026 1 $5.91 $5.91 Total $179.99
www.northerntool.com
-
Part Description P/N Qty. Unit Price Total ReelWorks 815 50' x 3/8" air hose reel 815 1 $99.99 $99.99 Milton 1108 filter/regulator combination 1108 2 $89.99 $179.98 ReelWorks 159184 100' x 3/8" manual air hose reel, no hose 159184 1 $24.99 $24.99 Milton S99705 M-style safety coupler, 1/4" female NPT S99705 2 $12.99 $25.98 Total $330.94
www.sears.com
-
Part Description P/N Qty. Unit Price Total Craftsman 53990 3/4 HP chain drive garage door opener with keyless entry 53990 2 $179.99 $359.98 Total $359.98
Totals by Vendor
-
Vendor Total www.menards.com $670.04 store.closetmaid.com $235.64 www.lowes.com $715.06 www.homedepot.com $1351.64 diamondlifegear.com $324.00 www.platt.com $78.24 www.amazon.com $179.99 www.northerntool.com $330.94 www.sears.com $359.98 Total $4245.53
Garage Diary
- March 16, 2025
- I finished assembling a simple stand for my bench grinder so I can move/remove the old long bench it's been sitting on forever. The new stand was made from scrap plywood and pieces of scrap 2x10 from when I sistered the floor joists under the den to meet deflection requirements for the tile floor. It's on casters co I can roll it around as needed, and all 4 casters have total lock brakes. They're not nice casters (Shepherd 3546M), in the sense that the brakes are difficult to operate. But the bench grinder won't get moved very often, so it shouldn't be a big deal. And it's unlikely I'll ever really need the brakes, since grinding doesn't involve any real force.
- March 5, 2025
-
The final light in my garage door openers stopped working. I mostly
unly use the light from one of them, and one of the two bulbs in that
opener stopped working about a year ago. I never got around to
troubleshooting because I didn't really need it; when I need more light
in the garage, I turn on the 24 recessed lights. I only needed one
bulb to work, to light my way when entering the garage at night.
I had assumed that the bulbs had all died, so I bought 4 new LED bulbs at Home Depot. Well, that didn't fix anything. It turns out that the contact in the base of each of the bulb sockets was no longer making contact with the bulb. I'm assuming this is long-term thermal exapansion/contraction. The contacts all looked super clean (like new), as did the sockets themselves. No signs of arcing or overheating. Which makes sense since I've always had low-current LED bulbs in them. I bent the contacts into position on all 4 of the sockets, and now all of them are working again. So I went from no lights to four lights with a trivial fix.
-
The final light in my garage door openers stopped working. I mostly
unly use the light from one of them, and one of the two bulbs in that
opener stopped working about a year ago. I never got around to
troubleshooting because I didn't really need it; when I need more light
in the garage, I turn on the 24 recessed lights. I only needed one
bulb to work, to light my way when entering the garage at night.
- March 14, 2024
- The RIDGID telescoping wand for my shop vac arrived. I like it.
- March 12, 2024
-
I picked up accessories for the RIDGID shop vac at Home Depot: a floor
brush, a dusting brush and an exhaust diffuser. I have needed the brushes
for decades, espcecially the floor brush. The exhaust diffuser is just
to help prevent the shop vac exhaust from blowing stuff all over the
place when I'm using the vacuum. I also picked up a 25' extension cord
that is coiled on the back of the shop vac cart on the cord wraps
I created. This facilitates leaving the shop vac's cord coiled on the
vacuum when it's in the cart, so it's much easier to remove the vacuum
and use it outside of the cart when desired.
I also ordered the RIDGID telescoping wand for delivery. It should be much more useful to me than the fixed wands. And by chaining the telescoping wand with a fixed wand, I can easily reach the ceiling of the garage.
I created the holders for the brushes inside the cart. Same as those I've already created: a piece of plywood with a 1.5" PVC pipe topped with a 1.5" coupling. The PVC pipe passes through the plywood. It just turns out that a 1.5" Schedule 40 Hub x Hub coupling fits snugly inside a 2.5" shop vac accessory, so it's ideal for creating storage solutions for shop vac acccessories. The ones I'm using are Nibco CP4801. A 10-pack is $6 at Home Depot. I didn't have to buy any since I had just enough left from a previous project.
I also picked up an inexpensive power strip from Menard's to install on my workbench. I've been meaning to do this for years since I'm tired of pluggin and unplugging tools when I'm working at the bench. The most common tools I have out at the same time are my trim router, one to three sanders and an old corded drill. So I bought a 5-outlet power strip with a metal housing. I looked at the RIDGID one at Home Depot that has USB charging and outlet dust covers, but it's all plastic and double the price, and I don't see the need for built-in USB charging. I can always plug in an Apple, Anker, UGREEN or other USB charger if I need it. And the reality is that I don't want my iPhone or iPad on or in my bench when I'm working; they're expensive devices best keptaway from things that can destroy them in a hurry. The only things I might want to charge at my bench would be small lights or my AirPod Pro earbuds.
-
I picked up accessories for the RIDGID shop vac at Home Depot: a floor
brush, a dusting brush and an exhaust diffuser. I have needed the brushes
for decades, espcecially the floor brush. The exhaust diffuser is just
to help prevent the shop vac exhaust from blowing stuff all over the
place when I'm using the vacuum. I also picked up a 25' extension cord
that is coiled on the back of the shop vac cart on the cord wraps
I created. This facilitates leaving the shop vac's cord coiled on the
vacuum when it's in the cart, so it's much easier to remove the vacuum
and use it outside of the cart when desired.
- March 10, 2024
-
I am almost done putting together a cart for my new shop vac. Background
story...
I've been using an old Craftsman 16 gallon shop vac that's about 30 years old (that's a guess). I don't have any of the attachments, or even a wand. Just a 7' hose. The casters are pretty much shot, and it's a pain in the butt to move around. But the big issue is that I am tired of cleaning and replacing filters just due to what I'm often doing with it: cleaning up piles of wood chips and sawdust. I want reasonable dust collection without all the hassle of regularly lifting an integrated motor/lid, emptying a big-ass tub and cleaning or replacing a filter, And I want a more flexible hose with a bit more length.
At the same time I don't have the space for a big 4" input dust collection system in my garage, especially since it's basically only useful for wood chips and sawdust. I also don't want to spend the money for a Festool dust collector, which doesn't really solve my need for general purpose vacuum anyway.
What I wanted was just a cyclone collector upstream of a shop vacuum, to make it much easier to dispose of the bulk stuff and greatly reduce the number of times I need to remove the motor/lid of a shop vac. There are a number of solutions here, but they're all unwieldy since they're separate from the vac and connected via a hose. And some of the ones that use a 5-gallon bucket are tall and prone to tipping over.
For some of the RIDGID vacuums, you can put together a low-profile cyclone on a 5-gallon bucket with PVC pipe that utilizes the accessory storage that's designed into the feet of the vac. This is OK but it's flimsy and you lose the accessory storage. And in the end I have more accessories than can be stored on the vacuum or on any of the PVC pipe solutions I've seen. And I don't want something that's tipsy.
I built a cart from 3/4" plywood. It has storage for all of my accessories inside, 3" casters and a hole in the top that holds a 5-gallon bucket topped with a Dustopper cyclone. So far it works great, but I'm still in the process of adding accessory storage.
-
I am almost done putting together a cart for my new shop vac. Background
story...
- February 27, 2024
-
I started building a simple rack to hold my parallel clamps. I've
never had a good spot for them, and given that I use them in spurts,
they don't need to be on the slatwall. And to be honest they're a PITA
to store on the slatwall.
It's pretty simple to make a decent rack. 3/8" wide 2" deep slots in a 3" wide piece of 3/4" plywood (cut with dado stack on the table saw), every 2", accomodates the brands I own (Jet and Bessey) and probably most others. I cut and slotted the 3/4" plywood that holds the weight and the bottom piece that keeps them straight at the same time so I know the slots line up. I cut and glued on some triangle supports underneath the weight-supporting piece, and pinned them in place with 18 gauge nails. I also cut a 6" wide piece that will just be a shelf above the rack for the accessories (the Jet framing blocks, Bessey KR-AS jaw adapters, etc.). I only own 8 parallel clamps but the rack will hold 16. That's dictated by the space I have available on the wall. I should be able to clamp most of my quick clamps to the bottom piece, but those are also OK on the slatwall.
I'm going to let the glue cure overnight before I attach things to the plywood backing. I don't intend to do anything special finish-wise; I'll probably just paint the whole thing white, or just leave it unfinished.
-
I started building a simple rack to hold my parallel clamps. I've
never had a good spot for them, and given that I use them in spurts,
they don't need to be on the slatwall. And to be honest they're a PITA
to store on the slatwall.
- June 16, 2018
-
Workbench continued...
I installed oak plugs in the pocket holes of the top trim. I then sanded the legs and faces.
I moved my stacked double fan into the back door of the garage and turned both fans on high to exhaust dust. I opened the garage window and turned my wall-mounted dock fan on high for intake. I then used my electric leaf blower to blow some of the dust out of the garage.
Once the dust was gone and settled, I put a coat of polyurethane on the new workbench. I don't expect to put a second coat on it, since it's just a workbench; I just want it reasonably sealed. All of the surfaces I coated today are vertical except for edges, and hence won't ever have liquid pooled on them. The top is laminate, and when I'm working on something wet, I'll be covering the workbench.
-
Workbench continued...
- June 14, 2018
-
Workbench continued...
I drilled, chamfered and filed 21 of the bench dog holes that are aligned with the end vise. I'll likely stop here, since I don't foresee a need for more holes. I can clamp anywhere on the perimeter of the bench top,
-
Workbench continued...
- June 13, 2018
-
Workbench continued...
I sealed the bench dog holes for the front vise with a coat of polyurethane. This is just to help prevent spills from seeping between the plies of the plywood.
-
Workbench continued...
- June 12, 2018
-
Workbench continued...
I drilled, routed and deburred the remaining 12 bench dog holes that are aligned with the front vise. It's a slow process with the drill guide. I sped things up a bit by creating a 1/4" plywood sled to hold the wood block that holds the drill guide. This will also be used for the holes that will be aligned with the end vise.
-
Workbench continued...
- June 10, 2018
-
Workbench continued...
I filled some of the dimples in the top of the bench with water putty. This was just so they don't telegraph through the surface of the laminate.
I also filled the remaining pocket holes in the legs with water putty. They'll likely need a second application.
I set up my sawhorses and some scrap plywood to hold the laminate for the application of contact cement. I put a coat of Weldwood contact cement on the plywood bench top, then a coat on the back of the laminate, then a second coat on the plywood bench top since it soaks into the plywood a bit. Once it dried to slightly tacky, I put 6 3/4" dowels on top of the bench and then put the laminate on top of the dowels in order to position it. Once positioned, I removed the dowels one at a time, working from the center outward, and rolled it flat with my laminate roller. I then trimmed it flush with a 3-flute flush cutting bit in my router.
I drilled the laminate where the vise mounting bolts will be countersunk. I messed up a bit on the ones for the end vise, but it's no big deal. It's a workbench, not a piece of furniture. I didn't make any mistakes on the ones for the front vise.
I mounted the vises in order to figure out the edge trim. The vises are nice, and very secure.
I cut the trim pieces to length for the front and sides of the top. They're solid oak. I drilled the pocket hole screws to hold the side pieces to the front piece. I drilled countersink holes for the mounting screws at the drill press. I installed the trim pieces using screws and Titebond III. I ran my flush cut bit around the trim pieces once installed, to make it flush with the laminate, then used a wood chisel to trim the tiny strip I intentionally didn't cut with the router bit (to avoid hitting the laminate). I sanded a bit with 100 grit sandpaper, but didn't do all of the sanding since I need to plug the pocket holes. I'm debating whether or not I'll plug the screw holes in the edge trim of the bench top.
I drilled 6 of the bench dog holes for the front vise, then chamfered the top edges of the holes with a 25 degree router bit. They work nicely with the Kreg bench dogs.
-
Workbench continued...
- June 9, 2018
-
Workbench continued...
I rounded the edges of the foot pads with my palm sander, just to prevent snagging the outer ply with something in the future.
I installed the casters, cut the carriage bolts to length with a metal EZ-Lock cutting wheel on my Dremel, then smoothed the cuts and top of the nuts with a 3" Roloc sanding disk on my die grinder.
I installed more pocket hole plugs. I miscalculated the number of pocket holes, so I'm out of the 100 plugs I bought. I'll probably fill the remaining holes with water putty, since I'm not looking for beauty here; I just want a flush surface. I used my die grinder to sand the plugs flush.
I turned the bench upright again. It rolls very nicely on the new casters.
I drilled the countersinks for the vise bolts a little deeper so I can use a router bit with a bearing guide to trim the laminate around these holes once the laminate is installed. It will also let me stack washers inside the countersinks, which will help prevent the washers from becoming conical.
I think I'm ready to apply the laminate. I haven't done this in a very long time, and the piece will be a little big to handle solo, but it should be possible. I cut the laminate slightly oversized so I can trim it with a flush cutting bit in my router once it's installed.
-
Workbench continued...
- June 8, 2018
-
Workbench continued...
The Schioppa GL 412 NTE G L12 casters arrived from Amazon. I think these will work well.
I drilled the holes and countersinks for the 5/16" carriage bolts in the remaining foot pads, using the drill press. These will hold the casters to the legs of the bench. I then put the carriage bolts into the first layer of the foot pads and installed the first layer of the footpads on the bench legs with the carriage bolt heads sandwiched in the joint. I used Loctite PL Premium adhesive, pocket hole screws and deck screws to bond the feet to the legs. For the most part, it's the Loctite PL Premium that I expect to hold the pads to the legs. I then used Titebond III and deck screws to attach the second layer of the foot pads. I'll let this cure overnight before attaching the casters in order to cut the carriage bolts to length.
-
Workbench continued...
- June 7, 2018
-
Workbench continued...
I glued and screwed the remaining plywood foot supports to the sides of the workbench legs.
I also drilled 5/16" holes in one of the 1.5" stacked plywood feet to match the pattern of the new casters. My intent here is to use 5/16" carriage bolts with the heads hidden inside the feet, so I can change the casters if ever necessary without compromising the feet of the bench. The downside is that like most casters, the Schioppa L12 casters don't have enough clearance for a standard height nylon locknut, and I'll have to grind off the carriage bolts to just the right height after I install the casters. Not a big deal, and I think it's worth the effort to make it easier to swap out casters if ever necessary. I expect the new casters to last a long time, but I'd rather have bolts and nuts here rather than lag screws.
-
Workbench continued...
- June 3, 2018
-
Workbench continued...
I installed The first layer of 3/4" plywood for the top of the bench. I used Loctite PL Premium and 1-5/8" deck screws to fasten it to the base.
After letting the first layer cure for about an hour, I slathered about a pint of Titebond II on the top and installed the second layer of 3/4" plywood.
Later I glued down the 1/4" final layer, and used my 18-gauge brad nailer to keep it in place while the glue cures.
I patched the chipouts in the 1/4" plywood that happened when I drilled the holes for the vise bolts. I just used Loctite PL Premium.
I ran my Freud flush-cutting bit around the top of the bench to bring the 1/4" top piece flush. I'll be using it again when I install the laminate.
I ordered some 3/8"x4" 316 stainless steel button head hex drive screws, 316 stainless steel washers and 316 stainless steel serrated flange locknuts from McMaster-Carr to secure the vises. I decided against the carriage bolts because I want to be certain that I can fully tighten the fasteners, and I want washers to better distribute the pressure on the plywood under the head of the screws.
I've decided that the Everbilt casters I bought a long time ago to use on the bench aren't sufficient. I learned this the hard way from the smaller version of these casters on my router table. Their brake levers are weak and bend if you activate the brake with the wheel in a position where the teeth for locking the spindle are not aligned. So I ordered some Schioppa L12 casters from Amazon. I ordered some with nylon wheels that have a load rating of 375 pounds, and some with polypropylene wheels rated at 275 pounds. Hopefully slipperiness will not be an issue, but we'll see. I considered polyurethane wheels, but they're all rated at 275 pounds or less. I don't know the total weight of the bench, but it's probably close to 300 pounds once the vises are installed. I generally prefer my casters to be able to handle a lot more weight than what they're supporting, since there will be times when I'm rolling it over uneven surfaces (in/out of the garage) or working on something heavy on top of the bench. And in the garage, the bench will occasionally be used as a platform when working on something on the ceiling.
At any rate, I intend to use the nylon wheel casters. I bought the polypropylene ones because they were really cheap at $9.32 each. I will likely wind up using them for my basement bench.
-
Workbench continued...
- June 2, 2018
-
Workbench continued...
I trimmed and sanded the pocket hole plugs that I installed in the interior of the torsion box last night. I also sanded the remainder of the interior of the torsion box and applied one coat of polyurethane and then a second coat on the bottom of the interior. This doesn't need to look pretty, it just needs to be sealed reasonably well.
-
Workbench continued...
- June 1, 2018
-
Workbench continued...
I installed the remaining 1x2 supports for the bench top, and also installed the 1.5" thick support for the end vise. Everything feels pretty solid at this point.
I glued most of the pocket hole plugs in place (paint grade). I stopped after my new box of 50 was empty.
Tomorrow I hope to do some sanding of the inside so I can put a coat of polyurethane on the interior of the torsion box. I can then start installing the two sheets of 3/4" plywood and single sheet of 1/4" plywood that will be the top of the bench. The first piece will be glued to the base with Loctite PL Premium and then screwed down. The second piece will be glued and screwed to the first using liberal amounts of Titebond II, and the final piece will be glued and screwed to the second using liberal amounts of Titebond II. I basically want the top to behave as a solid 1.75" thick piece of plywood. Dimenstionally stable and strong. For the top finish, I have a very dark gray piece of Formica brand laminate that I'll glue in place with Weldwood contact cement. I bought some 3/4" dowels that I'll use to position the laminate once the contact cement is tacky.
After I trim the laminate, I'll drill the bench dog holes using the drill guide bushing and drill bit I bought for this purpose.
The end goal is a bench I can use for woodworking.
-
Workbench continued...
- May 31, 2018
-
Workbench continued...
I finished installing the front vise support. It's very solid, and will be even more so once the 1.75" of plywood top is installed. I used Loctite PL Premium as the adhesive, and several pocket hole screws to secure the 1.5" block to the vertical plywood parts of the torsion box. There are also four Simpson GA2 gussets as additional support.
-
Workbench continued...
- May 28, 2018
-
I glued and clamped the two pieces of 3/4" thick plywood for the
front vise support, and marked it for cutting. I also cut the vertical
pieces that will act as stands for this piece.
The second vise arrived today. I finished drilling the mounting holes for both vises, through the total of 3" of plywood. I also marked the 1/4" plywood so I can later cut larger holes in it to let the carriage bolt heads pass through it. I haven't drilled these holes yet since I want to glue the laminate to the 1/4" plywood before I drill those holes.
I have a 3/4" drill guide bushing and precision 3/4" drill bit that I am hoping to use to create dog holes in the top of the workbench. As of yet I'm not sure how well the bit will work for laminate. But it looks much like the one sold at leevalley.com that's intended for dog holes, but I bought mine from McMaster-Carr. I'll test it before I start making holes in the actual benchtop.
-
I glued and clamped the two pieces of 3/4" thick plywood for the
front vise support, and marked it for cutting. I also cut the vertical
pieces that will act as stands for this piece.
- May 27, 2018
-
I cut the plywood for the bottom of the torsion box of my new workbench.
I then drilled all of the pocket holes. I ran a bead of Loctite PL Premium
around the bottom frame, dropped the new plywood piece in place, clamped it
and then installed all of the pocket hole screws.
I cut the interior pieces of plywood, notched the corners to allow 1x2 to pass through, and drilled the pocket holes. I then applied Loctite PL Premium on the bottom edge of these pieces and some Titebond III to the sides, tapped them into place with a mallet, then installed all of the pocket hole screws.
I cut the two 3/4" thick pieces of plywood that will support my end vise. I then clamped them together and drilled the holes for the Wilton 79A vise. I then glued them together with Titebond III and clamped them for curing with the carriage bolts in place to keep them aligned.
I cut the three pieces of plywood for the bench top. Two 3/4" thick pieces and a 1/4" thick piece. I drilled the holes for the end vise carriage bolts in the 3/4" thick pieces. The 1/4" thick piece will get larger holes that will allow the head of the carriage bolts to be countersunk (and visible from the top of the bench).
I cut the rear oak 1x2 that will be installed at the top of the rear face on the inside, to provide more screw area for the top and to provide a little more strength against flexing.
-
I cut the plywood for the bottom of the torsion box of my new workbench.
I then drilled all of the pocket holes. I ran a bead of Loctite PL Premium
around the bottom frame, dropped the new plywood piece in place, clamped it
and then installed all of the pocket hole screws.
- May 26, 2018
-
I am slowly but surely making progress on my new torsion box workbench.
Today I cut the holes for storage in the front face and routed the edges
with a roundoff bit. I then cut the front 4x4 legs and glued and screwed
the front face in place. The 4 legs and 4 side faces are now assembled.
I ordered the second Wilton 79A vise. Amazon says it will arrive Monday, but I'm not inclined to believe that since Monday is a holiday.
I also cut and installed the support framework for the bottom of the torsion box part of the bench.
-
I am slowly but surely making progress on my new torsion box workbench.
Today I cut the holes for storage in the front face and routed the edges
with a roundoff bit. I then cut the front 4x4 legs and glued and screwed
the front face in place. The 4 legs and 4 side faces are now assembled.
- May 16, 2018
- I installed the remaining door support struts on the north garage door.
- May 12, 2018
- I finished installing the door support struts on the south garage door. I still need to install 2 on the north door.
- May 7, 2018
- I picked up 4 more garage door support struts at Menard's. These are more beat up than the first two I bought years ago, so I'll probably need to tweak them a little bit before I install them. But they will help with the stability of my doors, which still flex more than I'd like when they're open or moving.
- May 6, 2018
- I picked up plywood, 6 pieces of 1x2 oak, a piece of dark laminate, deck screws, Kreg 1.5" screws and some T25 bits from Menard's. These are most of the pieces I need to build my torsion box bench so I can get rid of the old fixed bench in the garage. The new one will be much more rigid, and give me a place to install woodworking vises that I need.
- October 4, 2017
- I bought some PVC pieces to make a mouse bait/poison feeder for the driveway. Not something I want, but after a $900 truck repair bill from mice chewing harnesses, I need it. My traps inside the garage seem to be attracting ants but not mice, and as much as I dislike using poison, it's always been more effective than traps for me. I need a habitrail sort of feeder to keep squirrels and woodchucks out. So I assembled a simple but larger-than-necessary setup and put some Tomcat bromethrin
- February 18, 2017
- I finished the router table enclosure. The front is hinged on the bottom edge, and a magnetic catch keeps it closed. I installed A small cheap knob for opening/closing.
- February 4, 2017
- I installed the left, right, back and bottom panels of the router table enclosure. They all have multiple coats of polyurethane inside and out.
- January 29, 2017
-
I continued working on enclosing the underside of my router table.
I don't think I need a polycarbonate front; I don't need to see inside
when the front is closed. All I need is a full-width front door for
router access. And I'd like to finish this with parts and scrap I
have on hand.
I cut and glued some oak supports on the side and back panel of the new enclosure just to provide more glue/screw area for the bottom. On the buttom panel, I glued a 1/2" thick piece of plywood near the front edge to provide more support for the front door hinges. The front panel will hinge downward so it stays out of my way when it's open. I'm using some door hinges I bought for something else but wound up not using.
I cut and glued together some pieces of 1/2" plywood to hold the commonly used router tools: the allen wrench for above-the-table height adjustments and the two wrenches for bit and collet changes. I'll glue this to one of the side panels.
I put a coat of polyurethane on some of the panels. This isn't for beauty, it's just to seal the plywood.
-
I continued working on enclosing the underside of my router table.
I don't think I need a polycarbonate front; I don't need to see inside
when the front is closed. All I need is a full-width front door for
router access. And I'd like to finish this with parts and scrap I
have on hand.
- January 28, 2017
-
I started enclosing the underside of my router table. I needed to get
the plywood out of my way. I need some tool storage, and a means of
providing dust collection from under the table. I also needed to mount
the safety switch.
I cut 1/2" plywood pieces to create the router enclosure. I tested the fitment of the sides and the back, and drilled the holes to mount the sides to the table. The fitment of the rear piece is really tight, I need to shave it down a bit. I am not going to install this piece until later, after I buy and install a dust collection port. For the front, I need a piece of polycarbonate and some hinges since I need access to the router when changing bits or locking/unlocking the router height adjustment.
-
I started enclosing the underside of my router table. I needed to get
the plywood out of my way. I need some tool storage, and a means of
providing dust collection from under the table. I also needed to mount
the safety switch.
- February 6, 2016
- I have started working on a Raspberry Pi based garage door opener that will be usable from my cell phone. Secured with SSL, of course.
- January 10, 2016
- I have continued to tweak my workbench design. I _think_ I'm close to done. I can think about buying materials now. I bought some inexpensive 4" locking casters at Home Depot and cut the support blocks for them from scrap 3/4" oak veneer-core plywood.
- January 3, 2016
- I refactored my workbench design in SketchUp. I got rid of the butcher block top, and replaced it with sheets of 3/4" plywood. Mainly because my experience with butcher block in Michigan garages hasn't been all that great in terms of dimensional stability. It's also pricey, and for my use it won't look pretty for more than a week. It's a workbench, not a table. I move the legs and torsion box 3" inward on the front and sides, and the top is now 30" wide. This gives me a little bit of clamping space on the edges for quick clamps and the like, and will make it a little bit more comfortable to use without losing the benefit of the at-hand tool storage. For the top, I'm thinking of using high pressure laminate (Formica or Wilsonart). I ordered some samples in orange and dark gray with a matte patterned finish. Yes, it's a little slippery, but that's what bench cookies and bench dogs are intended to solve. And when I'm lazy enough to not protect the top with roll paper when doing glue-ups, I know I can easily scrape Titebond off of high pressure laminate with a wood chisel. And the slippery aspect will be a good thing when I'm using the workbench as an outfeed or infeed table for the table saw.
- December 20, 2015
-
I think I'm done with my workbench design. I will need to order casters
next month, and pick up the plywood and other supplies to construct it.
And given the number of holes I intend to drill in the top, I should
probably buy a sacrificial 3/4" Forstner bit.
The height of the bench is intended to match the height of my table saw so I can use it as part of an outfeed table.
-
I think I'm done with my workbench design. I will need to order casters
next month, and pick up the plywood and other supplies to construct it.
And given the number of holes I intend to drill in the top, I should
probably buy a sacrificial 3/4" Forstner bit.
- December 14, 2015
- I am nearing the completion of a workbench design. It will be mobile so I can move it around and also use it as an outfeed table for the table saw. It is loosely based on the Ron Paulk design, but stronger and with integrated torsion box legs. And of course casters. I will likely build two of them, and install draw latches so I can lock them together for a larger workspace.
- January 1, 2015
-
I finished installing some Azek trim around the north garage door, using
my new cordless drill and impact driver. For the top piece of trim, I
had to rip two additional pieces 1/2" thick. These were glued and
screwed to the full pieces of trim to bring the edge closer to the top
of the garage door. Again I used the new drill and new impact driver to
install them, and the adhesive was Loctite Premium 3X. I used stainless
steel screws.
I then my smaller impact driver to install the brush-type garage door seals. It's a good thing that I bought three kits instead of just two; even if you don't make any mistakes, there isn't enough seal in one kit to complete a 7'x16' garage door. False advertising. I bought three kits to avoid additional shipping charges in case I made any mistakes, but it turns out I'll need three kits to cover two doors even without any errors on my part.
I will need one more piece of Azek trim in order to do the same work on the south garage door.
The tape and mud work I did on the ceiling has failed at the joint with the east wall. I believe this happened from moisture that was still in the drywall from the vent boot leak I fixed. I'm reluctant to just redo the mud and tape work, especially now that I have some shelf stays in the way. I will likely install some trim to help hold everything in place and avoid having to do more drywall work. I'm also suspicious of the laundry room cantilever setup. It's a bump-out addition (bumping into the garage), and to me it doesn't look like it's up to code in terms of joist support below. That probably explains the drywall joint crack between the laundry room bump-out and the door to the attic. I think I want to put an LVL beam in the basement to tie the other end of the laundry room joists to the basement floor.
-
I finished installing some Azek trim around the north garage door, using
my new cordless drill and impact driver. For the top piece of trim, I
had to rip two additional pieces 1/2" thick. These were glued and
screwed to the full pieces of trim to bring the edge closer to the top
of the garage door. Again I used the new drill and new impact driver to
install them, and the adhesive was Loctite Premium 3X. I used stainless
steel screws.
- December 21, 2014
- I finally ordered some brush seal kits from Summit for the garage doors. Last year, there was a lot of heat escaping from the garage in the winter due to the typical problems with vinyl garage door seals. It's aggravated by the angled corners of the garage door openings, which cause the seals to get beat up in those spots every time the doors open or close. I'm not sure what architect or builder thinks those angles are a good idea. They might look nice to someone, but functionally they're a disaster; they make it impossible to get a good seal without destroying vinyl seals because they encroach on the path of the folding door. In all likelihood I will remove those angles before new siding is installed.
- May 26, 2014
-
I cleaned up more of the yard today. I cut up two more large ash trees
that had fallen near the driveway and moved the wood to the wood pile.
I cleaned up two more piles of sticks in the yard that were here before
I bought the house, then raked them clean of leaves. I raked up five
other areas where I had removed stumps or stick piles left by the
previous owner. I filled one of the stump holes with dirt from the fire
pit, and planted new grass seed and added fertilizer. I did the same
where one of the stick piles formerly resided. I will try to put some
grass seed and fertilizer on other areas tomorrow.
I cut some of the vines that were strangling trees on the east edge of the lot. Some of them are too big to but with my loppers, I'll need to get those with the chainsaw next weekend.
I have been on my feet the entire day, starting with the parade this morning. My feet are very sore since my work boots are not comfortable enough for all-day work and I did a lot of stomping on branches to break them.
-
I cleaned up more of the yard today. I cut up two more large ash trees
that had fallen near the driveway and moved the wood to the wood pile.
I cleaned up two more piles of sticks in the yard that were here before
I bought the house, then raked them clean of leaves. I raked up five
other areas where I had removed stumps or stick piles left by the
previous owner. I filled one of the stump holes with dirt from the fire
pit, and planted new grass seed and added fertilizer. I did the same
where one of the stick piles formerly resided. I will try to put some
grass seed and fertilizer on other areas tomorrow.
- May 25, 2014
- I trimmed and mowed today. I cleaned up most of the fallen tree mess near the road, but I have more to do tomorrow. I had a fire in the fire pit to get rid of some wood. No leaves or brush, just a nice smoke-free fire.
- May 24, 2014
-
I bought a propane weed torch and chainsaw blade sharpener from
Harbor Freight. I bought
a 20 lb. propane tank from Home
Depot and had it filled at the Mobil at the corner of M59 and
Teggerdine. I also bought 10 gallons of 91 octane gas for my yard
tools.
I sharpened my chainsaw's chain. The Harbor Freight chain saw sharpener is rickety but it works fine for my purposes. The saw cut through wood like a new blade after sharpening, and I think I removed less blade material than what Weingartz usually removes. And given the price of the Harbor Freight chain saw sharpener ($35), it will have paid for itself after the second sharpening.
I spent several hours torching dandelions and weeds in the driveways. The weed torch works fine, but given that it can blow itself out fairly easily, I'm glad I got the one with the piezo igniter.
I cleared more of the fallen tree messes on the west side of the driveway. I still have plenty to do here, but I made a decent dent in it. Many trips with the John Deere dump trailer full of wood. I have several more fallen trees to cut up, and I want to clear out the saplings in front of the rock near the fork in the driveway.
-
I bought a propane weed torch and chainsaw blade sharpener from
Harbor Freight. I bought
a 20 lb. propane tank from Home
Depot and had it filled at the Mobil at the corner of M59 and
Teggerdine. I also bought 10 gallons of 91 octane gas for my yard
tools.
- May 18, 2014
- I've been spending time getting the tractor ready to mow. See my SLTX1050 diary.
- April 23, 2014
- I put the first coat of paint on the corner protectors and sill trim of the window. It will need a second coat. I also notices a spot I missed on the window trim (lower left corner), which I'll paint with the Rust-Oleum door paint.
- April 22, 2014
- I received a 3-pack of ProSlat heavy-duty locking hooks for the ProSlat slatwall. The intent of these at the moment isn't confirmed, but I may use two of them to hang my Bosch jobsite radio when it is not hanging on GearWall.
- April 21, 2014
- I cut and installed the piece of FRP near the door to the house using 3M 90 spray adhesive.
- April 17, 2014
- I grouted the joints of the tiles on the window sill, using the special grout for vinyl flooring.
- April 16, 2014
-
I cut and installed vinyl floor tiles on the window sill. The deciding
factors versus porcelain were labor and cost. The vinyl tile was free
since it was leftover from my laundry room. And easy to cut and fit, and
no need to retrim the edge. I'll grout it tomorrow, I have plenty of
vinyl tile grout left over from the laundry room.


I removed the masking tape from the window.
-
I cut and installed vinyl floor tiles on the window sill. The deciding
factors versus porcelain were labor and cost. The vinyl tile was free
since it was leftover from my laundry room. And easy to cut and fit, and
no need to retrim the edge. I'll grout it tomorrow, I have plenty of
vinyl tile grout left over from the laundry room.
- April 15, 2014
-
I caulked the top of the window trim and most of the east side. I
caulked both of the drywall corner protectors that I crafted and
installed months ago.
I laid out some 18" vinyl floor tiles on the cove sill. Five tiles will do the job exactly. However, I'm still considering porcelain tile since it would withstand abuse better. It's not like it would cost a fortune to do such a small space... $40 for the tile, and probably around $25 for epoxy grout.
-
I caulked the top of the window trim and most of the east side. I
caulked both of the drywall corner protectors that I crafted and
installed months ago.
- April 14, 2014
- I put the second coat of paint on the drywall in the window cove. I also lightly sanded the first coat of paint that was on the window casings, and put the second coat of paint on them. While I was at it, I put a coat of paint on the surrounding window trim. I decided to use the Rust-Oleum Door Paint on the surrounding trim, mainly because it's very durable, but also because it means I don't have to fuss with transition lines by using the Olympic ICON semigloss. This trim probably doesn't need a second coat, since it was painted before I started and I then primed it. So all I have left to do on the window is paint the corner protectors, caulk, paint the panelizers and tile the sill. I've decided I'm going to use vinyl tile on the sill since I have plenty left from the laundry room project and I can install it without special tools. It also saves me a little bit of money, and will save me a lot of time since it's so easy to install.
- April 13, 2014
- I put the first coat of Rust-Oleum Door Paint on the window casings. It might not need a second coat, given that I put a coat of Zinsser B-I-N primer on them first.
- April 12, 2014
-
I put the first coat of paint on the drywall in the window cove.
Two trees came down across my driveway late in the evening. We had 55 mph winds, the two trees were dead ash trees. I had to cut the parts that were across the driveway with my chainsaw, in the dark and in the rain. It was fast and easy, just not something I had foreseen. I knew we had thunderstorms in the forecast, but not 55 mph winds.
-
I put the first coat of paint on the drywall in the window cove.
- April 11, 2014
-
I taped off the windows and primed them along with the surround trim,
using Zinsser B-I-N. Normally I'd use a more flexible primer here, but
I wanted to stop the mildew in its tracks without multiple coats of
primer. I also sanded and primed the plywood sill, despite the fact
that I'm just going cover it with tile. I'm hemming and hawing on the
tile; I don't want to buy a tile saw yet, and I have a good amount of
vinyl tile left over from the laundry room work. But I did see some
through-body porcelain tile that I like at Home Depot in White Lake
tonight that I could likely lay without a saw since it's 2x1 tiles on
12x12 sheets. The color scheme would go well with the FRP panels.
I believe it's a discontinued tile, so I would need to buy it soon.
Tomorrow I'll paint the bit of drywall in the window cove, and put the first coat of paint on the window and trim. The window itself will get Rust-Oleum door paint, since it's very durable and easy to clean. The surround trim will get Olympic ICON semi-gloss to match the other trim in the garage.
-
I taped off the windows and primed them along with the surround trim,
using Zinsser B-I-N. Normally I'd use a more flexible primer here, but
I wanted to stop the mildew in its tracks without multiple coats of
primer. I also sanded and primed the plywood sill, despite the fact
that I'm just going cover it with tile. I'm hemming and hawing on the
tile; I don't want to buy a tile saw yet, and I have a good amount of
vinyl tile left over from the laundry room work. But I did see some
through-body porcelain tile that I like at Home Depot in White Lake
tonight that I could likely lay without a saw since it's 2x1 tiles on
12x12 sheets. The color scheme would go well with the FRP panels.
I believe it's a discontinued tile, so I would need to buy it soon.
- April 10, 2014
- The window surround trim at the top of the window is not flush with the wall. As near as I can tell, it's been this way since installation, and is the fault of the drywall crew (like most of the issues in the garage). The top surround trim was about 3/16" further away from the wall at the top edge than the vertical surround trim. I fixes it with some Loctite Premium 3X adhesive, and a pair of finish nails. The adhesive was necessary because there's no wall stud nearby and it was the outer edge of the surround (hence not tacked into the window frame). Plus I wanted to fill some of the gap. To hold it in place while the adhesive set up, I used one of my wood clamps that doubles as a spreader, bracing it against the corner guard I installed a while ago. It worked well, the trim is now even.
- April 9, 2014
-
Second night of cleaning the window cove area in preparation for primer
and paint. I had to do a little spackling work, hence couldn't prime
tonight. The faux panes are off the windows, so I wiped the glass
(but didn't really clean it). The third faux pane has been MIA since
I bought the house, so I'll be leaving the center window pane-free for
now.
This window cove was a mess. Not sure what the previous owner did in this area, but there were greasy handprints on the trim almost to the ceiling. Many dark scuff marks everywhere. And a lot of dead mildew on the lower parts, probably form the windows being left open in the rain too many times. The sill, which is just painted plywood, is heavily stained. I'll be putting porcelain tile on the sill, with epoxy grout. I haven't decided how I'm going to adhere it yet. Thinset with polymer additive is the obvious answer, but there's probably no reason I couldn't use Loctite PL Premium 8X.
-
Second night of cleaning the window cove area in preparation for primer
and paint. I had to do a little spackling work, hence couldn't prime
tonight. The faux panes are off the windows, so I wiped the glass
(but didn't really clean it). The third faux pane has been MIA since
I bought the house, so I'll be leaving the center window pane-free for
now.
- April 7, 2014
- I cut and installed a piece of FRP below the ProSlat on the east wall. I expect to install shallow fold-down benches here, but I also wanted to protect this wall from dings.
- April 6, 2014
-
An 84" long piece of FastTrack is now installed below the window.
It is currently holding my 4' stepladder and my small Shop Vac.
After a trip to Lowe's, I put the first coat of Rust-Oleum Door Paint on the inside of the door the back yard. I later applied a second coat. It's not perfect, but that wasn't my objective; I just wanted a cleanable surface (satin paint) versus the very scuffed flat paint that was on it before.
I put two coats of Olympic ICON semigloss on the trim around this door. More work needs to be done here; on one side, there was never any paint on the portion between the foundation and the door. That will need a good primer (probably Zinsser B-I-N) before painting.
-
An 84" long piece of FastTrack is now installed below the window.
It is currently holding my 4' stepladder and my small Shop Vac.
- April 5, 2014
-
I removed the 32" section of FastTrack from the north wall, and
replaced it with an 84" long piece. I then reinstalled the
32" piece lower on the wall, along with a second 32" long
piece.
I then reorganized the items on this wall a bit to accomodate my grain shovel, push broom and furniture dolly that I use for the tractor's snowthrower attachment.
-
I removed the 32" section of FastTrack from the north wall, and
replaced it with an 84" long piece. I then reinstalled the
32" piece lower on the wall, along with a second 32" long
piece.
- April 4, 2014
- I bought a quart of Rust-Oleum door paint (white) and a quart of Zinsser B-I-N. I also bought another 84" piece of Rubbermaid FastTrack and another 5 lbs. of 2.5" long coated Torx-drive construction screws since I was running low.
- April 3, 2014
-
I installed some 1x2 pieces on the wall in the stairwell to the
basement to serve as a ledger to install a full sheet of slatwall.
I then installed the slatwall. It was NOT easy; the sheet weighs
85 lbs, and a lot of the work was over my head. I managed to get
it installed without damage, other than squishing the pinky on
my right hand. The lower edge of the sheet is just above the
handrail at the top of the stairs, and the sheet is level. Hence
the sheet is high on the wall by the time you reach the bottom of
the stairs. This is fine, I will be putting shorter tools near
the top of the stairs and longer tools like brooms at the bottom.
Nothing heavy will be here; paintbrushes, drywall joining knives,
paint rollers, caulk guns, etc. I suspect the slatwall sheet
weighs more than the total of what will be hanging on it.
I used my new iPhone holder on the wall of the garage tonight. It works well.
-
I installed some 1x2 pieces on the wall in the stairwell to the
basement to serve as a ledger to install a full sheet of slatwall.
I then installed the slatwall. It was NOT easy; the sheet weighs
85 lbs, and a lot of the work was over my head. I managed to get
it installed without damage, other than squishing the pinky on
my right hand. The lower edge of the sheet is just above the
handrail at the top of the stairs, and the sheet is level. Hence
the sheet is high on the wall by the time you reach the bottom of
the stairs. This is fine, I will be putting shorter tools near
the top of the stairs and longer tools like brooms at the bottom.
Nothing heavy will be here; paintbrushes, drywall joining knives,
paint rollers, caulk guns, etc. I suspect the slatwall sheet
weighs more than the total of what will be hanging on it.
- April 2, 2014
-
I started marking the location of the studs in the east wall of the
stairwell from the garage to the basement. I'm going to install
slatwall here. I'm not all that excited about the slatwall here,
it's more about getting the slatwall sheets out of the garage so
I can finish the garage work. the sheets are in my way at the
moment.
I glued one of my homemade iPhone holders to the wall above one of my tool cabinets. It should work fine for my purposes. Gravity will keep it in the mount while it's plugged in to one of the USB charging ports in the nearby AC outlet. It's at a somewhat odd angle, but that was intentional. It's easy to get the iPhone in and out of the mount, but it shouldn't fall out.
I washed the houseward side of the door to the basement, in preparation for painting. I'm going to put a piece of pegboard on this side of the door, which will likely hold more can racks. Unfortunately, Racor no longer makes the racks I have now. Griot's has the same design, but they want $25 each. That's about 4X what I paid for the racks I have now. Rockler has the same design for $20.99. The Allstar Performance ALL12200 holds six cans instead of 5, which would be nice. $28.99 at Amazon. But at these prices, it's pretty tempting to make my own. I can get a 10' long piece of 4" base, 1.125" legs FRP U-channel from McMaster-Carr for $68. Or I could just make one out of plywood and pine. I could borrow the design of the Pitpal one to achieve high density storage: PIT-V99
-
I started marking the location of the studs in the east wall of the
stairwell from the garage to the basement. I'm going to install
slatwall here. I'm not all that excited about the slatwall here,
it's more about getting the slatwall sheets out of the garage so
I can finish the garage work. the sheets are in my way at the
moment.
- April 1, 2014
- I installed a 48" x 45" piece of FRP on the wall in the stairwell to the basement. I then installed a 32" long piece of FastTrack and two double S-hooks on the FastTrack. My mops are now hanging here.
- March 31, 2014
- I cut a hole for the outlet in the piece of FRP I trimmed yesterday, and then installed it behind the filter and regulator between the garage doors.
- March 30, 2014
-
I did some cleaning last night. Unfortunately I got a little
compulsive and spent entirely too much time cleaning the expansion
joints in the south half of the garage. But I'm glad I did it, since
there were a few screws deep in the expansion joints (from before I
bought the house). I'd like to install some slab gaskets, but they're
pricey and at the moment I have more important things on the to-do
list.
I cut and framed two pieces of FRP today. One is going behind the filter and regulator between the garage doors. I still need to cut the hole in this one for the electrical outlet. The second one is larger, and will be installed on the wall in the stairwell from the garage to the basement. I intend to hang my mops on this wall, and I want to be able to hang them wet without damaging the wall. They don't drip after wrung out, but they will be damp. Of course I still need to tile the sill at the bottom of that wall.
-
I did some cleaning last night. Unfortunately I got a little
compulsive and spent entirely too much time cleaning the expansion
joints in the south half of the garage. But I'm glad I did it, since
there were a few screws deep in the expansion joints (from before I
bought the house). I'd like to install some slab gaskets, but they're
pricey and at the moment I have more important things on the to-do
list.
- March 29, 2014
-
I cut the Great Stuff foam at the bottom of the drywall between the
garage doors. I wanted it flush with the wall, so I used my Bosch
oscillating tool with a round cutter. I then installed the piece of FRP
I had prepared last night. I used 3M 90 spray adhesive to adhere it to
the wall, since it's still cold here in Michigan and FRP adhesive
doesn't like to cure correctly in cold temperatures.
I installed the obstruction detectors on the north garage door. I put them at about the level of the M Roadster's bumper, since I've seen cases where a car has been hit by a closing garage door due to the beam going under the rear bumper.
I started to install the obstruction detectors on the south garage door. The one near the center of the garage is installed. I needed to spray some Great Stuff on the other side of the door, so I'm waiting for it to dry before installing the detector on that side. I also fixed the door seal on that side of the garage, whose bottm had curled away from the trim. I just put a few 1-5/8" deck screws in it to keep it in place until I install new seals.
I broke up the old piece of unfinished pegboard that I removed from the wall a very long time ago, and put it in a box for trash collection.
I'm going to do some more cleanup tonight and possibly get to work painting the window cove and trim. I need to move some full sheets of slatwall to the basement, which won't be easy alone. Given that I don't currently have plans for these sheets, I may cut them down to 4' x 4' before moving them.
-
I cut the Great Stuff foam at the bottom of the drywall between the
garage doors. I wanted it flush with the wall, so I used my Bosch
oscillating tool with a round cutter. I then installed the piece of FRP
I had prepared last night. I used 3M 90 spray adhesive to adhere it to
the wall, since it's still cold here in Michigan and FRP adhesive
doesn't like to cure correctly in cold temperatures.
- March 28, 2014
-
I installed some ProSlat next to the door to the house. This will
likely be used to hang gloves and safety glasses and maybe some of
my flashlights that have lanyards.

I cut a piece of FRP to 34" x 22.5" to install on the wall between the garage doors. This piece will be placed at the bottom of the wall to protect the drywall from dings and moisture. I drilled two holes in it for the wires to my garage door opener obstruction detectors. I cut trim pieces for the top and side edges, and pre-glued them to the FRP just ot make the installation easier. I'll be installing this pieces with 3M 90 spray adhesive, so there won't be any time for shifting it around and fussing with the edge trim.
I sprayed some Great Stuff Pest Blocker expanding foam between the edge of the drywall and the concrete floor. There was a 3/4" gap there, and the fiberglass insulation in the wall doesn't meet the concrete. The foam should help prevent drafts and help keep insects out of the garage. When it dries, I'll trim it flush before installing the FRP. Of course, I still have other areas to foam and caulk, namely between the cinder blocks and sill plates. In the summer I intend to install all new garage door seals and Green Hinges. I also want brush-type garage door seals.
-
I installed some ProSlat next to the door to the house. This will
likely be used to hang gloves and safety glasses and maybe some of
my flashlights that have lanyards.
- March 27, 2014
-
I installed some ProSlat above the garage door openers.

-
I installed some ProSlat above the garage door openers.
- March 26, 2014
-
I mounted the Kidde Pro 340 fire extinguisher and a pair of 3D Maglite
flashlights.


-
I mounted the Kidde Pro 340 fire extinguisher and a pair of 3D Maglite
flashlights.
- March 25, 2014
-
The mounting bracket for the Kidde Pro 340 fire extinguisher arrived.
It fits fine. The Maglite mounting kit arrived too, along with some
ProSlat locking 8" hooks. I like the ProSlat locking hooks, I
will be buying some of the 4" ones.
I cut a piece of 3/4" plywood to 16.5" x 48" to mount on the east wall next to the ProSlat. This is where I will be mounting the Kidde Pro 340 and some flashlights. I routed the edges of the plywood and put a coat of Zinsser B-I-N on it. I later put a coat of Olympic ICON semigloss on it, and mounted it to the wall. I put the first coat of spackling on the screw heads to hide them. I'll sand tomorrow and put another coat of paint on it before mounting the extinguisher and flashlights.
-
The mounting bracket for the Kidde Pro 340 fire extinguisher arrived.
It fits fine. The Maglite mounting kit arrived too, along with some
ProSlat locking 8" hooks. I like the ProSlat locking hooks, I
will be buying some of the 4" ones.
- March 24, 2014
-
I put two coats of paint on the poplar 1x2's I will be using to mount
a piece of pegboard to the south of the ProSlat on the east wall. I
also put a coat of paint on the back of the pegboard piece.
I installed a piece of GearTrack up high in the southwest corner of the garage and my 2' stepladder is now hung there.
I installed the pegboard to the south of the ProSlat on the east wall.
-
I put two coats of paint on the poplar 1x2's I will be using to mount
a piece of pegboard to the south of the ProSlat on the east wall. I
also put a coat of paint on the back of the pegboard piece.
- March 23, 2014
-
I finished the air tool rack on the south end of the garage.
I picked up a Kidde Pro 340 fire extinguisher at Home Depot. I also bought some 2" long panhead screws to install more ProSlat.
The crossbeam adapter for my floor jack is now mounted above the door to the basement with a section of FastTrack.
I did a bit of cleaning up, but I have a lot more to do.
-
I finished the air tool rack on the south end of the garage.
- March 22, 2014
-
I put a coat of Zinsser B-I-N and a coat of Olympic ICON semigloss on
the plywood for the air tool rack support for the south end of the
garage. I put two coats of Olympic ICON semigloss on the 2x2 pieces
that will support it.
I cut five ClosetMaid Maximum Load shelf standards to 29.25" in length and then installed them above the ProSlat on the wall shared with the laundry room. I then installed ten brackets and two shelves. No idea what I'll be putting on these shelves, but I wanted to stop hemming and hawing about what to do with this space. The lowest shelf is high enough to never be an issue for someone walking under it unless they're an NBA center.
Tomorrow I will finish the air tool rack on the south end of the garage and start the rack for the north end of the garage. I will also be doing some cleanup and install some more of the ProSlat and GearTrack. I also need to pick up a Kidde Pro 340 fire extinguisher at Home Depot and install it.
I ordered a metal mounting bracket for the Kidde Pro 340, a Maglite flashlight mounting set, and some ProSlat double 8-inch locking hooks from Amazon.
-
I put a coat of Zinsser B-I-N and a coat of Olympic ICON semigloss on
the plywood for the air tool rack support for the south end of the
garage. I put two coats of Olympic ICON semigloss on the 2x2 pieces
that will support it.
- March 21, 2014
-
I put 2 coats of Olympic ICON semigloss on the remaining air supply
supports. I then intalled them. All of the filters and regulators
are now supported, as well as all of the automatic drains.
I installed 1/8" NPT to 3/8" barbed fittings in all of the automatic drains at the filter/regulator drops. I then attached some 3/8" ID, 9/16" OD PVC tubing with hose clamps. This is probably temporary, but for now it will keep any drain water off of the walls and sill plates.
I started creating the air tool rack support for the south end of the garage.
-
I put 2 coats of Olympic ICON semigloss on the remaining air supply
supports. I then intalled them. All of the filters and regulators
are now supported, as well as all of the automatic drains.
- March 20, 2014
-
I put the second coat of Olympic ICON semigloss on the 2x2 support for
the filter and regulator at the north end of the garage.
I put two coats of Olympic ICON semigloss on the support for the filter and regulator at the south end of the garage.
I created the supports for the drains at the north and south ends of the garage. I also created the support for the drain at the input from the compressor; that one is a 1x4 oak piece with a 1x3 oak piece on top. All of these pieces now have a coat of Zinsser B-I-N on them.
-
I put the second coat of Olympic ICON semigloss on the 2x2 support for
the filter and regulator at the north end of the garage.
- March 19, 2014
-
I cut and routed a 2x2 to support the filter and regulator on the north
end of the garage. I primed it and put the first coat of Olympic ICON
semigloss paint on it.
I cut, routed and glued some 1x2 pieces to support the filter and regulator on the south side of the garage. I didn't use a 2x2 because I need to bend the support very slightly since it's going over the edge of the FRP trim. I glued a piece of 1/4" thick plywood on the back of the 1x2 where it transitions to the wall, just to avoid crushing and cracking the FRP trim. It's all clamped and drying now.
I ordered some more silicone-cushioned pipe clamps from McMaster-Carr. P/N 3225T67 are for the 3/4" pipe, P/N 3225T65 are for the 1/2" pipe. I also ordered some brass 1/8" NPT to barbed fittings for 3/8" ID hose (P/N 5346K17). For now I'll be putting these on the automatic drains and using flexible hose to run into catch bottles. I ordered some worm drive hose clamps (P/N 5415K11) to hold the hose on the barbed fittings, but I probably won't really need them. There's not a ton of pressure involved when the drains open, and with 3/8" ID hose fed by a 1/8" NPT fitting, there would be a pressure drop even if there was something on the other end of the hose. I think I have some 3/8" ID clear hose in my PC watercooling supplies.
-
I cut and routed a 2x2 to support the filter and regulator on the north
end of the garage. I primed it and put the first coat of Olympic ICON
semigloss paint on it.
- March 18, 2014
-
I secured the automatic drain that's between the garage doors. It's
fastened to the wall via the 1x2 pieces I painted yesterday.
I finished mounting the second air tool rack between the garage doors. I'm done with the air supply in this area but for deciding what to do with the output of the automatic drain and fastening the 1/2" piping on the output of the regulator.
-
I secured the automatic drain that's between the garage doors. It's
fastened to the wall via the 1x2 pieces I painted yesterday.
- March 17, 2014
-
I put two coats of Olympic ICON white semigloss on the front of the
3/4" oak plywood piece for the second air tool rack. I also put
two coats on the front of the 1x2 pieces I'm going to use to secure
the center automatic drain to the wall. When these pieces dry, I
can install the air tool rack on the plywood and install the plywood
on the wall, and install the support for the automatic drain.
I would have done more, but I was sidetracked by light switch work in the master bedroom.
I am planning to intall an H3R HalGuard fire extinguisher on the wall next to the center air drop. Probably an HG250B (black) or HG250C (chrome). I don't really care much how it looks, I just want it to be a color other than red since I intend to also install a dry chemical extinguisher that will most likely be red. I don't like using dry chemical extinguishers on cars since they leave a corrosive mess, but it's good to have one when needed. I'm more interested in saving lives and the house than an engine bay. The halotron extinguisher would be my first grab for a minor engine bay fire. A primary extinguisher should be rated at least 2-A:10-B:C, and the Kidde Pro 340 would fit the bill.
-
I put two coats of Olympic ICON white semigloss on the front of the
3/4" oak plywood piece for the second air tool rack. I also put
two coats on the front of the 1x2 pieces I'm going to use to secure
the center automatic drain to the wall. When these pieces dry, I
can install the air tool rack on the plywood and install the plywood
on the wall, and install the support for the automatic drain.
- March 16, 2014
-
I put a coat of Olympic ICON white semigloss on the back of
the 3/4" plywood piece I am going to use to mount an air tool rack
above the filter and regulator between the garage doors. Once it dried,
I measured and mounted the air tool rack on the plywood. It is ready to
be installed to the mounts on the wall. But I need to prime and paint
the mounts first.
I'm going to create another air tool rack mounting board below the filter and regulator between the garage doors.
I went to Home Depot for some more items to finish my air supply work. Some 2x2's, some copper pipe straps and some more 3.5" long #10 torx head construction screws. I also bought another Lutron Maestro occupancy-sensing dimmer and two companion dimmers for the master bedroom, since they had the companion dimmers in stock (very rare at my nearby stores).
The first air tool rack is mounted. I like it.

I secured the input of the air plumbing using two pieces of oak (routed, sanded, primed and painted) and a silicone-cushioned pipe strap.
I secured the plumbing above the center filter and regulator with some pine 1x2's (primed and painted).
I cut, primed and painted the 2x2 mounting pieces for the second air tool rack. I cut, routed and sanded the piece of plywood for the second air tool rack. I cut, routed, sanded, glued and primed pieces of 1x2 to support the center air drop's automatic drain. I put a coat of primer on the plywood for the second air tool rack.
I mounted the support 2x2 pieces for the second air tool rack, above the center automatic drain.
Tomorrow I should be able to wrap up the second air tool rack installation and secure the center drain.
-
I put a coat of Olympic ICON white semigloss on the back of
the 3/4" plywood piece I am going to use to mount an air tool rack
above the filter and regulator between the garage doors. Once it dried,
I measured and mounted the air tool rack on the plywood. It is ready to
be installed to the mounts on the wall. But I need to prime and paint
the mounts first.
- March 15, 2014
- I put the first coat of Olympic ICON white semigloss on the front of the 3/4" plywood piece I am going to use to mount an air tool rack. I used a small roller to apply it. After drying, I can still see the grain of the wood, which I like. I may or may not apply a second coat.
- March 14, 2014
-
I finished the plumbing of the Parker 06D1NA automatic drain at the
northwest corner of the garage.
After much internal debate, I decided how to mount a piece of oak plywood above the air filter and regulator between the garage doors. I want a board here so I can mount one of my air tool racks on it to hang the common air tools: blow guns and tire inflator with gauge. I will be hanging another rack in a similar manner below the filter and regulator but above the automatic drain. That one will hold things like die grinder, ratchets, or whatever I happen to be using on a given project.
Since the air piping is 1.5" from the wall and is 7/8" in diameter, I used stacked pieces of 1.5"x1.5" select pine to space the board 3" out from the wall as to not interfere with the piping. I mounted the first pair to the studs using 3.5" long screws that I countersunk, then mounted the second set to those using 2.5" long countersunk deck screws. The board itself is 18" tall by 24" wide, 3/4" thick oak plywood. I ran a 1/4" roundoff bit around the edges that will face the garage, just to help prevent chipping. I sanded it lightly and applied a coat of Zinsser B-I-N to the back. When it dried, I applied a coat on the front and edges. It will later get Olympic ICON white semigloss paint. I'll mount the air tool rack on it before mounting the plywood to the pine standoffs that are already on the wall.
I need to order more pipe mounting straps from McMaster-Carr so I can finish strapping the air piping in place.
-
I finished the plumbing of the Parker 06D1NA automatic drain at the
northwest corner of the garage.
- March 13, 2014
-
I sweated a 1/2" threaded to 3/4" cup fitting on a piece of
25.675" long 3/4" type L copper pipe. I sweated a 3/4"
threaded to 3/4" cup fitting on the other end. I then used this
piece to connect one of my Parker automatic drains to the valve in the
leg for the south air filter and regulator.
I did the same with a 31.675" long piece of 3/4" type L copper pipe for the drain for the center filter and regulator. I want this one a little lower because I intend to place some panels in this area to install air tool racks and I don't want the drain to be in the way of the bottom panel.
I fabricated a similar setup for the Norgren automatic drain at the input leg from the compressor. I need to fabricate one for the remaining Parker 06D1NA at the north drip leg. I will then have automatic drains at each leg, and should have water-free air at every location. I'll need something more elaborate for a blast cabinet or any serious painting, but for now the drains and drip legs are sufficient.
-
I sweated a 1/2" threaded to 3/4" cup fitting on a piece of
25.675" long 3/4" type L copper pipe. I sweated a 3/4"
threaded to 3/4" cup fitting on the other end. I then used this
piece to connect one of my Parker automatic drains to the valve in the
leg for the south air filter and regulator.
- March 12, 2014
-
I mounted the third hose reel and connected it. No leaks found.
I created a short piece of 1/2" copper to feed the north hose reel and connected it.
All three air hose reels are now mounted and functional. I still need to connect the automatic drains and decide whether or not I'm going to exhaust them outdoors. I also need to install supports for the filters and regulators.
-
I mounted the third hose reel and connected it. No leaks found.
- March 11, 2014
-
I finished enough of my air plumbing to pressurize the main runs and
the drops to check for leaks. No leaks found at 125 PSI. Hence I
firmly attached the portions near the ceiling with the
silicone-cushioned metal pipe straps I've been using. I installed the
first support for the center drop, and connected the hose reel since
I can't go any longer without air supply in the garage.
I'm good to go on finishing the remaining air supply work: install some supports for the filters and regulators, install the third hose reel, install the couplers in the manifolds for the remaining two hose reels, and install the lead hoses to the remaining two hose reels.
-
I finished enough of my air plumbing to pressurize the main runs and
the drops to check for leaks. No leaks found at 125 PSI. Hence I
firmly attached the portions near the ceiling with the
silicone-cushioned metal pipe straps I've been using. I installed the
first support for the center drop, and connected the hose reel since
I can't go any longer without air supply in the garage.
- March 10, 2014
-
More work on the air plumbing...
I put a second thin coat of Olympic ICON semigloss on the 1x2 pieces I intend to use to support the piping on the south wall.
I suspended the pipe near the ceiling on the south wall, just to make sure it's the correct length. It looks OK.
I attached some of the output piping on the regulator in the northwest corner: the tee, the short downpipe with a ball valve, and the short upward pipe with the manifold.
I removed my old filter and regulator from the temporary black iron setup, as well as my old 4-port manifold. I then assembled the output for the southwest corner of the garage, and installed the input valves, filter, regulator, output ball valve and my old manifold on the drop there. Now all three drops have filter, regulator, ball valves and manifolds.
If it was not going to snow tomorrow, I'd say I could finish things up tomorrow night and pressurize the system to check for leaks. Unfortunately it looks like we're going to get a lot of snow, which means I'll be preparing to clear snow and installing the new snow tires on the MINI.
-
More work on the air plumbing...
- March 9, 2014
-
I continue to work on the air plumbing. I thought I had more threaded
ball valves, but needed to go to Home Depot to buy more. I also bought
some Rectorseal Tru Blu sealant, which is a soft-set sealant that allows
easy disassembly long-term. Finally, I bought a 12-pack of Dremel
EZ-Lock cut-off wheels since I was running low.
I soldered together another 3/4" feed and drain valve setup: a 3/4" ball valve followed by a 3/4" x 1/2" c 3/4" tee. Out of the 1/2" part of the tee is a very short piece of 1/2" pipe with a female threaded connection that will connect to a filter. Out of the 3/4" leg of the tee is a short pipe of copper, a 3/4" threaded fitting and a 3/4" ball valve. Out of this ball valve I will connect more 3/4" pipe, a 3/4" to 1/2" adapter and a Parker automatic drain.
I connected the filter and regulator to the center drop.
I connected the filter and regulator the north drop.
I put a coat of Zinsser B-I-N on a couple of 1x2 pieces of pine to use as supports for my pipe hangers near the ceiling on the south wall. I later put the first coat of Olympic ICON semi-gloss on these pieces.
I installed a 45-degree brass elbow on the center hose reel. It's not really necessary on this reel, but it's also harmless.
I soldered together the piece that will run along the ceiling on the south wall. The union on one end, a coupler in the middle, then a 90-degree elbow, a short piece of pipe and a female threaded adapter. The threaded adapter will let me put the input together piecewise, and I can then tighten the union at the southwest corner.
I have some more 1/2" work to do for the south drop. I also need to decide what I want to do for input at the compressor. I don't need a manifold or output here, but it would be wise to have a drain. In other words, I should pipe in my old Norgren drain here.
I need to take stock of my various connectors to figure out if I have enough to complete my work. I have the connectors to do the input in the manner I would like (a 3/4" x 1/2" x 3/4" tee), but I think I need more 3/4" solder to 1/2" NPT adapters for my drains.
-
I continue to work on the air plumbing. I thought I had more threaded
ball valves, but needed to go to Home Depot to buy more. I also bought
some Rectorseal Tru Blu sealant, which is a soft-set sealant that allows
easy disassembly long-term. Finally, I bought a 12-pack of Dremel
EZ-Lock cut-off wheels since I was running low.
- March 8, 2014
- I cut, join and soldered a bunch of copper today. I now have the west wall air piping up, with the three drops in place. The clamps are still loose and I have not placed them all, because I know I need to be able to swing the drops a bit to attach the filter/regulator/drain setups. But it feels good to have the hardest part done. This work has been holding up a lot of other work, and if I finish it tomorrow, I can do some real clean-up in the garage. Fingers crossed that none of the joints leak...
- March 6, 2014
-
I mounted the protective piece of oak to the bottom front of the
laundry room overhang. Loctite PL Premium adhesive, finish nails driven
with my pneumatic finish nailer. I caulked the top edge with DAP 3.0
exterior white caulk. I wish I had been fussier about the protector
height on the north corner, since it extends beyond the bottom of the
wall. Maybe I'll cut it off later. At the moment, I'm just happy to
have all of the garage-facing drywall edges protected from being crushed.
I mounted the main mounting board for the air hose reel at the north end of the garage. I used 3.5" long Spax lag screws with stainless steel large diameter washers to prevent crushing the plywood. I need to figure out where on this board I will mount the secondary board that has the carriage bolts to hold the hose reel. I need to leave room for the 45-degree adapter and lead hose.
My plan for the space above the door to the basement: two strips of GearTrack. One will hold my floor jack's crossbeam adapter, the other will likely hold my moving dolly or Festool carts.
-
I mounted the protective piece of oak to the bottom front of the
laundry room overhang. Loctite PL Premium adhesive, finish nails driven
with my pneumatic finish nailer. I caulked the top edge with DAP 3.0
exterior white caulk. I wish I had been fussier about the protector
height on the north corner, since it extends beyond the bottom of the
wall. Maybe I'll cut it off later. At the moment, I'm just happy to
have all of the garage-facing drywall edges protected from being crushed.
- March 5, 2014
- Change of plans for tonight. A nasty pothole on I75 gave me a flat tire and a bent and cracked wheel on the way home from work. It happened near my exit, only a few miles from home. My sweetie was kind enough to pick my grumpy butt up at the gas station and take me to fetch my jack and a spare wheel. Unfortunately, said spare wheel is wearing a summer-only tire and we continue to have snow in the forecast. Hence I had no choice but to order new snow tires. It's not that I didn't need them (I'm due for new tires), but no one sells snow tires for 17" wheels that will fit the MINI anymore, and TireRack no longer has a 17" Sport Edition CD for the MINI to replace my destroyed wheel. So it wasn't an option to buy a single replacement wheel and 4 tires; I had to buy 4 new wheels (16" instead of 17") and have those shod with snow tires. I ordered the cheapest alloy wheel available: the Rial Milano, painted silver. For tires I went with the Blizzak WS70.
- March 4, 2014
-
I attended George Miller's funeral today. I'm so sad for Craig and
Sandy. :-( But the service was nice. The military part at the cemetery
was nice also, though it was very cold outside.
I removed the hose reel from my old cart and then traced its mounting hole pattern o a piece of 3/4" plywood. I drilled the holes for the M8 carriage bolts, countersinking the heads. I cut this piece to size, and then cut the larger piece of plywood to which it will be mounted. I put two coats of Zinsser B-I-N on these pieces. Why two coats of primer? Over the years I've learned that when priming wood for a light colored paint, two coats of primer (letting the first one cure before the second coat) is a good idea. It greatly decreases the odds of wood tanins staining the final coat. I consider it cheap insurance.
I later put two coats of Olympic ICON exterior semi-gloss on these pieces. This is different than what I had done for the other two hose reel mounts, where I painted them after installation and used the same paint as the ceiling. Painting these pieces on the ground is much easier, and the semi-gloss will be easier to clean if needed. They're now ready to be screwed together and mounted on the ceiling.
I put the second coat of Olympic ICON semi-gloss on the protective piece of oak for the bottom of the laundry room overhang. When it dries, it will be ready for installation. I will of course be touching it up after installation, but it's nice to have it mostly painted before installation. I expect this piece to get a little abuse, since I'll probably store some things under the overhang. At the moment my intent is to build a pair of shallow roll-out boxes to go under the overhang. These would be a good place to store things like body tools, hammers, chisels, files and shop supplies like paper towels.
I need to think about where I'm going to store my jack's crossbeam adapter. It weighs around 25 lbs, so I can certainly hang it on ProSlat, Gladiator GearTrack or Gearwall, or Rubbermaid FastTrack. I don't use it very often, do I have room at the top of the Gearwall by the door to the basement?
I need to make some progress on my air supply setup so I can ditch the carts in the garage as well as the black iron piping and filter/regulator/drain that's hanging in an awkward place on the south wall. Tomorrow I should be able to mount the pieces for the third air hose reel, mount the guard for the bottom of the laundry room overhang, and do a little air plumbing work.
I keep forgetting that I need to leave room in the garage to stash my sliding compound mitre saw and a Bosch 4100-09 table saw. Hence I think I should not put another piece of pegboard in the southeast corner, and I should use a 48" long bench there instead of a 60" long bench. Or buy another Vika Twofold?
-
I attended George Miller's funeral today. I'm so sad for Craig and
Sandy. :-( But the service was nice. The military part at the cemetery
was nice also, though it was very cold outside.
- March 3, 2014
-
I installed the power strip mounting board and a power strip in the
southeast corner. This power strip was one I had from my previous
workbench, and was lightly used. It matches the one I have near my dock
fan now.
I installed a piece of GearTrack on the south wall of the laundry room overhang, near the ceiling. I installed a short piece between the new shelving and the wall, from which I'll probably hang my axe. I installed one of my framed 2'x4' pieces of white pegboard below the GearTrack on the south wall of the laundry room overhang. I then installed the 4' shop light on the underside of the lowest shelf in this corner. This corner is now ready for a bench and probably one more piece of stainless steel pegboard.
-
I installed the power strip mounting board and a power strip in the
southeast corner. This power strip was one I had from my previous
workbench, and was lightly used. It matches the one I have near my dock
fan now.
- March 1, 2014
-
I finally installed a 15" x 26" piece of FRP below the bit of
ProSlat in the west corner of the south wall. This area has the
potential to get a little wet since there will be an air supply
automatic drain here. The FRP will prevent the drywall from getting wet
and/or banged up. I installed it using 3M Super90 spray adhesive, since
it's much faster than using FRP adhesive. It is very unforgiving
though, since it doesn't allow movement while installing. Not advised
for large pieces of FRP, but for small pieces it works fine.
I am preparing some more pegboard for the stairwell to the basement. I primed the wood of a framed 2' x 4' piece of pegboard. I went to Lowe's and bought 13 poplar 1x2 pieces, an 8' long 1x3 piece of oak to protect the laundry room overhang at the bottom, a 6' long 1x3 piece of oak to mount another power strip, some cheap 2" paint brushes, five more ClosetMaid Maximum Load shelf brackets, another 6' ClosetMaid Maximum Load shelf, and a 3/4" brass union that I think I can use to help make my air piping easier to finish.
I framed two more pieces of 2' x 4' pegboard, and then primed the back of them with Zinsser B-I-N to help prevent deterioration from moisture. While I really like the look of the stainless steel pegboard from diamondlifegear.com that I've used elsewhere, I like the flexibility of having pieces of regular pegboard that I can cut to size and frame as desired.
I cut a piece of 1"x3" oak to 45" to make a mount for a power strip in the southeast corner. I ran a roundoff bit around the edges and sanded it, then put 2 coats of Zinsser B-I-N on the back (that will be in contact with the wall). I'll prime the front tomorrow and mount it to the wall.
I cut another piece of 1"x3" oak to 95.5" to serve as protection for the bottom edge of the drywall on the laundry rooom overhang. I ran a roundff bit on the edges of the piece too, sanded it, and put a coat of Zinsser B-I-N on the back. I'll prime the front and install this piece tomorrow.
-
I finally installed a 15" x 26" piece of FRP below the bit of
ProSlat in the west corner of the south wall. This area has the
potential to get a little wet since there will be an air supply
automatic drain here. The FRP will prevent the drywall from getting wet
and/or banged up. I installed it using 3M Super90 spray adhesive, since
it's much faster than using FRP adhesive. It is very unforgiving
though, since it doesn't allow movement while installing. Not advised
for large pieces of FRP, but for small pieces it works fine.
- February 26, 2014
-
I installed two more pieces of GearTrack in the southeast corner, next
to the shelves.
I finally spent some time to find the studs in the south side of the laundry room abutment. I can now install whatever I'd like there. I'm leaving toward another stainless steel pegboard at the same height as those on the southeast wall, and some GearTrack above it. I'd also like a third piece of stainless steel pegboard on the southeast wall, next to the two pieces I installed recently.
I replaced the dedicated single outlet for central vacuum with a duplex GFCI outlet. I'm not a fan of central vacuums and hence don't intend to install one. A GFCI outlet here is much more useful to me.
-
I installed two more pieces of GearTrack in the southeast corner, next
to the shelves.
- February 25, 2014
-
It's all in the details...
I improved my Gladiator Clean-Up Racks. for each one, I cut a piece of 3/4" PVC pipe to 26.2cm and a 1/4"-20 316 stainless steel threaded rod to 29.0cm. I installed a 1.5" diameter black threaded ball on one end of the stainless steel rod using Loctite blue thread locker. I drilled a 5/16" hole in the center of each of the paper towel holder nubs on the Gladiator Clean-Up Rack.
The PVC gets dropped into the new paper towel roll when replacing a roll, then placed in the Clean-Up Rack. The stainless steel rod then gets run through, and I screw on a 1.5" diameter red threaded ball on the other end (no Loctite). It works perfectly, and the total cost to do two of them was $14.18 plus the PVC pipe (cheap, but I don't have a price since I had some 2' pieces on hand). So $7.09 to resolve the issue that has drawn complaints from reviewers (the paper towel roll can come out of the holder too easily).


-
It's all in the details...
- February 24, 2014
-
I installed a second 4' long shelf in the southeast corner, on the
standards I installed last night.
I installed the remaining two pieces of stainless steel pegboard below the shelves in the southeast corner. A rolling bench will later be installed below the pegboard.
The stainless steel threaded rod, threaded ball ends and UHMW tube to improve the Gladiator Clean-Up Racks arrived from McMaster-Carr. Unfortunately, the UHMW dimensional tolerance is terrible; I should have looked at the numbers before ordering. The inner diameter is MUCH smaller than .25" and hence I can't easily use it. Looking at the tolerance listing, it says +/- .17". Yikes! For now I'll use some 3/4" schedule 40 PVC I have on hand.
-
I installed a second 4' long shelf in the southeast corner, on the
standards I installed last night.
- February 23, 2014
-
I went to Lowe's and bought 4
more pieces of Gladiator GearTrack, and some 2" long #10 screws
to install my second ProSlat kit.
I started executing a plan for the southeast corner of the garage. I installed three ClosetMaid Maximum Load standards after cutting them to 34" length and drilling an additional hole in each one. I then installed a single 4' shelf. I need a second 4' long shelf to go above it. I will be hanging a 4' long quad T8 light from the bottom shelf, and installing my remaining two stainless steel pegboards on the wall under the shelves. This area is where I intend to put a rolling bench of some sort. I like the WB253975BTN from globalindustrial.com; the height is fixed, but it has 2" square 14 gauge tubular steel construction with a weight capacity of 2000 pounds. It also has a power apron with 3 15A duplex outlets.
-
I went to Lowe's and bought 4
more pieces of Gladiator GearTrack, and some 2" long #10 screws
to install my second ProSlat kit.
- February 22, 2014
-
I installed two strips of GearTrack above the ProSlat on the south
wall. There is now more stuff hung from the wall; my long Irwin
clamps, my small corner clamps, my 4' ladder, my levels and carpenter
square, and some other miscellany.

I cleaned up a litle bit, but still have a lot more picking up to do. I did not get to the installation of the ClosetMaid Maximum Load shelving, mostly due to debating what I want to do with the remainder of the wall shared with the laundry room. There's a lot of empty wall space above the ProSlat. Originally I was going to install shelves there, but now I'm considering more ProSlat. It's not as if I'm short on shelving, especially if I put some in the southeast corner. Of course I could just install GearTrack, which gives me the option of using Gladiator shelves.
-
I installed two strips of GearTrack above the ProSlat on the south
wall. There is now more stuff hung from the wall; my long Irwin
clamps, my small corner clamps, my 4' ladder, my levels and carpenter
square, and some other miscellany.
- February 21, 2014
-
I stopped at Sears right before
closing (8:45PM) and picked up a second Gladiator Clean-Up Rack (paper
towel holder with shelf) and a Gladiator S-hook.
The set of three ProSlat baskets arrived from Amazon. I now have 5 of them, and they will be handy for holding various cans of cleaning chemicals. I still need some of the ProSlat hooks, but will buy those later. I would like some of the 4" locking double hooks for axe, sledges, drilling hammer, etc.
I finished installing a ProSlat kit on the south wall. I also installed a GearTrack and the Gladiator Clean-Up racks on this GearTrack. I now have 6 paper towel holders in the garage, and might install two more. It might seem like overkill, but I don't like to have to walk too far to get paper towels when I spill something.
Tomorrow I will try to install the remaining ClosetMaid Maximum Load shelving I have on hand, and do some shuffling and cleaning. I want to get going on the remaining work on the air lines and third air hose reel.
I need some more Sterilite Stackers from Walmart. I need a 7.5 gallon for cargo and tow straps, a 7.5 gallon for masking and duct tape, a 7.5 gallon for light bulbs, a 4 gallon for electrical outlets/switches/wallplates/etc., a 4 gallon for low voltage rework boxes and plates, and a 7.5 gallon for Romex wire.
-
I stopped at Sears right before
closing (8:45PM) and picked up a second Gladiator Clean-Up Rack (paper
towel holder with shelf) and a Gladiator S-hook.
- February 20, 2014
-
I stopped at Lowes to buy some
more ClosetMaid Maximum Load shelf brackets. I then stopped
at Home Depot and bought some
2" long #8 panhead sheet metal screws. Not ideal (thread pitch and
height), but they'll work for the ProSlat.
I started the installation of the ProSlat on the south wall. I got five of the ten slats installed, including the two trickiest ones that required cutting for the AC outlet on that wall. The remainder will be easy in comparison; the initial layout and measurements and the cutting of the two pieces for the outlet were far and away the most difficult parts.
I decided against running the ProSlat over the 240V outlet, since I will probably later want to add another 240V outlet on that wall. I also decided to not run past the 3-gang box for light switches, since it would make future door and trim replacement more difficult and leave the end of the ProSlat unsupported.
-
I stopped at Lowes to buy some
more ClosetMaid Maximum Load shelf brackets. I then stopped
at Home Depot and bought some
2" long #8 panhead sheet metal screws. Not ideal (thread pitch and
height), but they'll work for the ProSlat.
- February 19, 2014
-
I put the final coat of joint compound on the window corner protector,
and a coat of Kilz Original primer.
After much hemming and hawing, I decided on a layout for the ProSlat on the south wall. I marked the wall, including the stud locations. Unfortunately, ProSlat didn't include screws with my new kits.
-
I put the final coat of joint compound on the window corner protector,
and a coat of Kilz Original primer.
- February 18, 2014
- I ordered some parts to improve the Gladiator paper towel holder. 1/4" threaded rod, UHMW pipe and some threaded ball ends. As is, it's way too easy to pull a paper towel roll right out of the holder while using it. Having a fastened threaded rod through the roll will prevent this from occurring.
- February 16, 2014
-
I sanded the piece of oak I installed yesterday on the window corner
protector. I don't think it needs a second coat of joint compound; I
can prime it now.
I installed GearWall under my dock fan. 4' vertically, about 22" wide. This wasn't trivial due to several cuts to go around things, plus a cutout for an electrical outlet. I used an Arlington BE3 box extender to bring the outlet out to the surface of the GearWall, instead of having it recessed. This was necessary to accomodate 90-degree wall plugs, including the plug for the power strip that I installed in this area. I will likely be hanging my Bosch jobsite radio on this GearWall, though it's possible I will instead hang it on the south side of the garage. Speaking of which... I need a new battery for the remote control.
-
I sanded the piece of oak I installed yesterday on the window corner
protector. I don't think it needs a second coat of joint compound; I
can prime it now.
- February 15, 2014
-
I cut and routed a piece of oak to tidy up the transition from the window
corner protector to the dock fan mounting boards. I installed it with
Liquid nails and finish nails. I then filled the joints with the first
coat of spacking compound.
I caulked the corner protector in this area, but only on the wall part. I will do the cove part when I am ready to finish the cove. I did the wall part now because I'm preparing to install some GearWall here that will abut the corner protector. I don't want insects to be able to nest in the small gaps, especially mud wasps that are prevalent in this part of the country. I had some mud wasp nests in the flourescent lights that were originally installed on the ceiling.
Tomorrow I will install GearWall under the dock fan and work on the south wall ProSlat and/or the shelving I'm going to put in that area.
-
I cut and routed a piece of oak to tidy up the transition from the window
corner protector to the dock fan mounting boards. I installed it with
Liquid nails and finish nails. I then filled the joints with the first
coat of spacking compound.
- February 14, 2014
-
I stopped at Lowe's on the way home from work and picked up 5 more
ClosetMaid Maximum Load shelf standards, 5 more shelf brackets, a 6'
shelf and a 4' shelf. duh, I must be exhausted... I needed 9 brackets.
No big deal, I'll pick them up at a later date. I also picked up another
Lutron Maestro occupancy switch, this one will probably go in the first
floor half bath. I wanted to get companion dimmers, but Lowe's doesn't
carry them. I picked up another Rubbermaid FastTrack dual S-hook
since I will need one for mops once I get around to putting a FastTrack
in the stairwell from the garage to the basement. I also bought a 2'
long piece of 1x2 oak to modify the window corner protector setup near
my dock fan.
While I was at Lowe's, I checked out the Gladiator wire baskets. They're a little bit wider than the ProSlat ones, and could be handy in the areas where I have GearTrack and GearWall. I have found the ProSlat baskets to be incredibly handy for things like 1-gallon cans of mineral spirits, acetone, MEK, brush cleaner, denatured alcohol, etc. Due to the nice fit, they can't tip over in the baskets but they're still easy to get in and out of the baskets.
I ordered a 3-pack of the ProSlat baskets from Amazon. I also ordered some 12" pull chains for the shop lights, since I know the strings I have won't last. I also ordered a Gladiator Clean-Up Caddy, since the ProSlat one would take 2 to 4 weeks to arrive.
-
I stopped at Lowe's on the way home from work and picked up 5 more
ClosetMaid Maximum Load shelf standards, 5 more shelf brackets, a 6'
shelf and a 4' shelf. duh, I must be exhausted... I needed 9 brackets.
No big deal, I'll pick them up at a later date. I also picked up another
Lutron Maestro occupancy switch, this one will probably go in the first
floor half bath. I wanted to get companion dimmers, but Lowe's doesn't
carry them. I picked up another Rubbermaid FastTrack dual S-hook
since I will need one for mops once I get around to putting a FastTrack
in the stairwell from the garage to the basement. I also bought a 2'
long piece of 1x2 oak to modify the window corner protector setup near
my dock fan.
- February 13, 2014
-
I sanded the second coat of spackling compound on the window corner
protectors, and applied a coat of Kilz Original. I don't think I'll
be painting these for a while, since I'd like to paint the window
frames at the same time and I need to remove window hardware to do it.
Not something I can do in February.
I installed the second cord reel. I now have matching cord reels behind the garage door openers.
I'm still in the process of figuring out how I'm going to utilize the ProSlat kits. The issue is the lack of trim pieces to do anything other than a rectangle per kit. I ordered additional trim pieces: 3 L-trim pieces and 6 J-trim pieces. Shipping was pricey since no one offers these except ProSlat themselves, and they're in Quebec. But now I can use up the trim pieces from both of the kits I have without worrying abut running out of trim; more is on the way. I think I will use one whole kit beneath the shelves on the south wall, perhaps minus one slat so I can put GearTrack at the top (to hang heavier items).
I think I'm going to use my remaining GearWall on the north wall under my dock fan. It will give me a place to hang a few more items and will cover the remaining drywall in that area (for protection).
-
I sanded the second coat of spackling compound on the window corner
protectors, and applied a coat of Kilz Original. I don't think I'll
be painting these for a while, since I'd like to paint the window
frames at the same time and I need to remove window hardware to do it.
Not something I can do in February.
- February 12, 2014
-
I was at work until almost 9PM, since we're running behind on our
project and I was in late.
I went to Sears right before closing and picked up another 2-pack of 4' long GearWall panels. These will be installed above the ones I previously installed near the door to the basement.
Tonight's agenda was pretty short: I sanded the window corner protectors and applied another round of spackling to cover the countersunk screws. I installed the 2 new pieces of GearWall, which allowed me to hang both of my rolling tool holders near the door to the basement, along with my halogen work light.
I want to do something about the ugliness created by my dock fan mount. Back when I mounted it, I didn't have plans for the corner guards. So the mounting boards for the dock fan are flush with the edge of the window cove. Hence I had to cut out a section of the corner protector on that side of the window.
-
I was at work until almost 9PM, since we're running behind on our
project and I was in late.
- February 11, 2014
-
I installed the corner protectors on the drywall corners of the window
cove. One of these corners was pretty beat up, and both of them had
cracks around the original drywall corner supports. With the new solid
oak protectors, these corners are now very well protected from any
mishaps. I installed them with Loctite PL Premium and 2" finish
nails from my pneumatic finish nailer, and filled the countersunk screw
holes (that hold the pieces of oak together) with spackling compound.
They match the other corner protectors I've installed. There are now no
outside corners of drywall in the garage that are not protected up to at
least 6' from the floor. I'll sand and reapply spackling tomorrow,
and later put another coat of primer on them and paint them.
I need to move the wood slatwall pieces to the basement or install them somewhere useful. They're in my way and taking up a lot of space.
I'm going to install two more pieces of GearWall in the area by the door to the basement. This will let me hang some items up high.
-
I installed the corner protectors on the drywall corners of the window
cove. One of these corners was pretty beat up, and both of them had
cracks around the original drywall corner supports. With the new solid
oak protectors, these corners are now very well protected from any
mishaps. I installed them with Loctite PL Premium and 2" finish
nails from my pneumatic finish nailer, and filled the countersunk screw
holes (that hold the pieces of oak together) with spackling compound.
They match the other corner protectors I've installed. There are now no
outside corners of drywall in the garage that are not protected up to at
least 6' from the floor. I'll sand and reapply spackling tomorrow,
and later put another coat of primer on them and paint them.
- February 10, 2014
-
My cold took a turn for the worse, I feel awful. I'm staying home
from work today to not spread my germs around. And probably
spending much of the day in bed.
I did do one thing just so I wouldn't feel like a completely useless lump: I made a trip to Home Depot to pick up some things I need. Candelabra bulbs for the master bedroom ceiling fan, a Lutron Maestro companion dimmer (though I need more than one), some #6-32 screws to use with the Arlington box extenders, some 1/4" diameter 2&qout; long Spax lag screws, some 2.5" long cabinet screws, #10-24 locknuts to fix my cord reel, some 15" long by 1/2" wide Velcro One-Wrap straps, a pair of CE Tech USB to 40-in charging cables, a 3-pack of shop towel rolls and an 8-pack of Bounty select-a-size paper towels.
I repaired my first cord reel and installed it on the ceiling behind the north garage door opener using four Spax 1/4" diameter, 2" long lag screws. The matching reel I bought today will go behind the south garage door opener.
I finished assembling the corner protectors for the window. I had a little trouble with the first one, since I had forgotten that my impact driver will easily break wood screws when driving them into oak. I'll have to tweak that corner protector a bit once the glue sets up. Not a big deal since I fill all the countersunk screw holes during final installation.
I put a coat of Zinsser B-I-N on the window corner protectors. I can install them soon. The one on the west side of the window will need to be shimmed; the drywall corner there has some curvature to it. I'll probably pre-install the shims using my straightedge and level.
-
My cold took a turn for the worse, I feel awful. I'm staying home
from work today to not spread my germs around. And probably
spending much of the day in bed.
- February 9, 2014
-
I'm at about 70% capacity due to a nasty cold. Hope I feel better
tomorrow.
I put a coat of polyurethane on the bottom of the new fold-down benchtop.
I marked and drilled three 3/16" diameter holes in the 1x4 oak piece I'm using as a mounting pad for a power strip near my dock fan. These holes are countersunk with a flat profile (using a Forstner bit). I then drilled 5/8" diameter holes in the wall for the toggle bolts, using the oak pad as a template. I put the 3/16" x 3" toggle bolts through the oak board, then put the toggles on. I then put a ring of Loctite PL Premium around the holes in the wall and a bead of it up and down each side of the back of the oak board. I installed the board on the wall and snugged it down. When the PL Premium dries, it will be very firm. It's primed, but I still need to paint it before attaching the power strip. I decided to reuse my old power strip because its color scheme matches my dock fan (yellow and black). I need the power strip in this area because I've got my dock fan, my neon BMW clock and a 4-tube T8 shoplight here. There's only a single gang outlet in this area, and three items that will always be plugged in. Then I'll need outlets for plugging in tools when I'm using the fold-down workbench.
I ran a 1/4" roundoff bit around the edges of the boards I'll be using as wall support for the fold-down bench. I then sanded them. They're poplar, so I'm just going to prime and paint them instead of using stain and polyurethane. They won't be very visible, but I want primer and paint on them to protect them and I rounded the edges in order to help prevent them from being chipped when I shove things under the bench. White paint will blend the boards into the wall. I put a coat of Zinsser B-I-N on these boards, then applied the first coat of Olympic ICON Exterior paint (white semigloss).
I put a coat of paint on the mounting pad for the power strip. It will need a second coat.
I later mounted the fold-down bench. The Knape & Vogt folding L-brackets are finicky alignment-wise, and hence it's not that easy to fold down the bench top. I'm not terribly bothered by the fussing required, since I don't expect to fold the bench up and down very often. Right now it's folded down.
I put paint on the spots I patched for the outlet installation above my tool cabinet. I then reinstalled the wall plate and put the tool cabinet back in place.
I created a shopping list for Home Depot and Lowe's for tomorrow.
-
I'm at about 70% capacity due to a nasty cold. Hope I feel better
tomorrow.
- February 8, 2014
-
The Arlington BE3 and BE2 arrived today from
Platt. Unlike the 2-packs of BE1's
I got locally, they did not come with long screws. I will need to buy
some locally.
I did a little bit more work on my fold-down workbench. I cut all of the edges of the sandwiched plywood square, then cut and attached select pine 1x2's to the edges with Gorilla wood glue and finish nails (using my finish nailer). I then ran a 1/4" roundoff bit on all of the edges and corners, and sanded the top and sides.
I started some repair work on the cord reel I bought months ago that had a broken guide roller right out of the box. I drilled a pair of holes in the sides and ran a 4" long #10-24 machine screw through it and put some nylon spacers on it. It should work, we'll see. However, what I really want are 1/4"-20 stainless, which I can get from McMaster-Carr.
I sealed the top of the fold-down workbench with a coat of polyurethane. I expect to put coin-pattern PVC on it later, but I wanted a sealing coat on it for now.
-
The Arlington BE3 and BE2 arrived today from
Platt. Unlike the 2-packs of BE1's
I got locally, they did not come with long screws. I will need to buy
some locally.
- February 7, 2014
- The ProSlat slatwall kits finally arrived after several days of weather-induced delays. I found them outside my garage door when I got home from work. Yay!
- February 5, 2014
-
Snowed in again. Argghh, brutal winter. I met another one of my
neighbors while digging my car out: Laurel. I cleared part of her
driveway with my tractor after clearing a path down the road so I could
get out. She was out shoveling it. So I've now met 4 of my neighbors:
Chris, Linda, Paul and Laurel. Writing it here because I'm terrible at
remembering names.
I cleared a path down the road, but I don't know if I can drive Oak Hill. Sigh, I wish I had bought a 4WD truck this year.
Evening... I did eventually get out today. On the way home I picked up the fourth shelf bracket I needed for the new shelf above my Wright wrench displays. I also picked up the 84" Rubbermaid FastTrack that I need under the window. And some pegboard hooks that were on clearance.
I also bought another 5 gallons of kerosene for my heater and 5 gallons of gasoline for the tractor.
I installed the fourth shelf bracket above my Wright wrench displays, and installed the ClosetMaid Maximum Load shelf. I then installed a four tube T8 shop light that is hanging from the underside of the shelf. Since I'm installing a fold-down bench under this area, I needed some light here.
I started making a pad to mount a power strip between my dock fan and the Wright wrench displays. There is no stud here, so I need to use toggle bolts to mount the pad to the drywall. I will also be using polyurethane construction adhesive. The pad is a piece of 1" x 4" solid oak, whose edges I rounded with a 1/4" roundoff bit in the router. I was originally going to reuse an old power strip I have, but it's old enough that I'm not confident about the state of its contacts. I'm going to order another power strip like the one Julie bought for me for Christmas. It's robust, has 12 outlets, and as a bonus it's reasonably attractive. It also has a long cord.
-
Snowed in again. Argghh, brutal winter. I met another one of my
neighbors while digging my car out: Laurel. I cleared part of her
driveway with my tractor after clearing a path down the road so I could
get out. She was out shoveling it. So I've now met 4 of my neighbors:
Chris, Linda, Paul and Laurel. Writing it here because I'm terrible at
remembering names.
- February 4, 2014
-
I ordered a new lift cable for my snowthrower attachment. This will
replace the one I broke last weekend.
I stopped at Lowe's on my way home from work. I bought a ClosetMaid 4' long Maximum Load shelf, three Maximum Load brackets and three Maximum Load standards. This shelf will go above my Wright wrench displays on the north wall near the door to the basement. I bought another box of Gladiator J and L hooks. I bought two 2' x 4' pieces of 3/4" thick birch plywood to make my fold-down bench on the north wall near the door to the basement. I bought some short 1" x 4" pieces of poplar to space the bench out from the wall a bit and to provide some support to the drywall. I also bought a 6' long piece of 1" x 4" oak to create a pad on which to install a power strip in this area. There's only a single gang outlet here, and I need to plug in my dock fan and the shop light I'm going to hang from the new Maximum Load shelf.
As far as the fold-down bench goes, I intend to sandwich the two pieces of birch plywood together with wood screws and wood glue, then trim the edges with 1x2. I haven't decided on a finish, but I'm leaning toward just putting some raised-disc rubber on it, the same stuff I used on my carts I made years ago. It holds up well to abuse, and it's easy to clean.
The Arlington BE3 won't be here until at least Saturday, so I may or may not install the ProSlat on the south wall this week. Of course it's not like I don't have other things to do...
I glued and screwed together the two pieces of birch plywood for the fold-down bench. I marked it for the installation of the Knape & Vogt 206 ZC 15 206 folding L-bracket before installing the sandwiching screws, so I wouldn't put any screws in the way of the L-brackets.
I put the second coat of joint compound on the hole I'm patching from my electrical work for the new outlets above my tool cabinets. It will need a third coat, which means I need to buy more kerosene to keep the garage warm.
I installed four ClosetMaid Maximum Load shelf standards above my Wright wrench displays. One of the studs in this wall is 12" away from the adjacent stud, which is what allowed the four standards to be used for a 48" shelf. Unfortunately I need one more shelf bracket, which I'll pick up tomorrow. I can then put the shelf up and hang a shop light from it.
-
I ordered a new lift cable for my snowthrower attachment. This will
replace the one I broke last weekend.
- February 3, 2014
-
I sanded the spackling that I applied yesterday around the new outlets
above the tool cabinets.
I put the first coat of setting-type joint compound in the hole I created to run the wiring for the new outlets above the tool cabinets.
I put cable ties on the 12-2 wire in the basement near the breaker box, to tidy it up a tiny bit. It's now bundled with some other 12-2 wire and the wire to the load box.
I reinstalled the northmost shelf above the north garage door and wiped it clean.
I installed the remaining trim rings and baffles in the recessed lights. I also removed some more masking tape but still need to remove some in the north half of the garage.
I ordered an Arlington BE3 and BE2 from Platt. I need the BE3 to allow me to install the ProSlat over the 3-gang switch near the door on the south wall. I bought the BE2 just in case I need it elsewhere, since they're not available at the local big box stores.
It looks like the ProSlat kits will be here on Wednesday.
-
I sanded the spackling that I applied yesterday around the new outlets
above the tool cabinets.
- February 2, 2014
-
I put some Great Stuff fireblock expanding foam in the holes I created
to run the wiring for the 2-gang rework box for outlets above my tool
cabinets. I also put a bit of spackling compound around the area I had
damaged near the new rework box. When the Great Stuff dries, I'll fill
the hole on the garage side with joint compound and prime and paint it.
It's a small hole, about 3/4" wide and 2" tall.
I installed two very small shelves above the new outlets. Mainly so I can put an iPhone dock above the outlet with USB charging ports.
-
I put some Great Stuff fireblock expanding foam in the holes I created
to run the wiring for the 2-gang rework box for outlets above my tool
cabinets. I also put a bit of spackling compound around the area I had
damaged near the new rework box. When the Great Stuff dries, I'll fill
the hole on the garage side with joint compound and prime and paint it.
It's a small hole, about 3/4" wide and 2" tall.
- January 31, 2014
-
I ordered two more ProSlat slatwall panel kits. I like them, and this
was the last day of Home Depot's 10% off sale on ProSlat. One of these
panels is likely going on the south wall of the garage. The other is
likely going in the stairwell to the basement, but I may split it up.
I will need more trim pieces if I split things up.
The replacement impeller arrived for my snowthrower attachment. I removed the whole auger set, impeller and driveshaft as a single unit after removing the flex coupler. I drove out the roll pins with a roll pin punch, then removed the old impeller from the driveshaft. I then installed the new impeller and drove the roll pins in. I put everything back together, but I'm concerned about the soft part of the flex coupler. It has clearly flattened and elongated after minimal use. I should see if I can find replacement lovejoy coupler parts somewhere; MTD doesn't sell the parts individually. Given what I've seen with the couplers from MTD, I think I want to switch to a split type with retaining ring. But I don't see size D split spiders at McMaster-Carr. I could theoretically switch to a size E coupler at some point. If I do, I'll probably go with stainless steel.
-
I ordered two more ProSlat slatwall panel kits. I like them, and this
was the last day of Home Depot's 10% off sale on ProSlat. One of these
panels is likely going on the south wall of the garage. The other is
likely going in the stairwell to the basement, but I may split it up.
I will need more trim pieces if I split things up.
- January 28, 2014
-
I finished running the wire for the new outlets above my tool cabinet.
I installed the new breaker, and the circuit is now live. It will be
nice to have these outlets in the garage, since it's a 20A circuit
with nothing else on it and having the USB charging ports will be nice
for my cell phone when I'm in the garage.
I finished the electrical diagram for the garage, but I haven't mapped the devices to the breakers. I'll do that soon. I did start creating the cheat sheets for the breaker boxes.
-
I finished running the wire for the new outlets above my tool cabinet.
I installed the new breaker, and the circuit is now live. It will be
nice to have these outlets in the garage, since it's a 20A circuit
with nothing else on it and having the USB charging ports will be nice
for my cell phone when I'm in the garage.
- January 27, 2014
-
I drilled a hole to pass the new 12-2 wire through the floor joists
in the basement. I hit my head on the CFL bulb in that area and broke the
bulb and cut my scalp a bit. Doh.
I'm waiting for a phone call before returning to complete the breaker installation and the wiring.
I need to start documenting all of the breakers correctly. Right now, I can't trust the main breaker panel labelling, and in some cases I can't read it due to small handwritten labels and ink fading. I want diagrams of all rooms with easy-to-read labels on all breakers. Since I already have some overhead diagrams of the garage for other purposes, I will start there.
-
I drilled a hole to pass the new 12-2 wire through the floor joists
in the basement. I hit my head on the CFL bulb in that area and broke the
bulb and cut my scalp a bit. Doh.
- January 26, 2014
-
It turns out that my MTD 190-032 snowthrower attachment has a very bent
impeller from whatever I hit last week, and it was weakened to the point
where it fatigued further and started dinging the head of the bolt I used
to repair the broken stud. I ordered a new impeller from Weingartz for
in-store pickup. The impeller in this thrower is all stamped steel and
not very strong. I'm going to need to be very careful with it for the rest
of the season, and make some improvements to it during the summer. I'll
probably bend the old impeller back into shape and then weld a few small
gussets on it and keep it as a spare.
I put most of my yard tools back on the Rubbermaid FastTrack rails on the north wall: both of my leaf blowers and their bags, the gas hedge trimmer, the weed wacker, the post hole digger and the small gas can I use for gas/oil mixture.
I removed the tape from the shelf standards above the north garage door and reinstalled all of the shelf brackets. I installed one of the two shelves and put my chainsaw on it.
I put the baffles on all but two of the recessed ceiling lights.
I completed a layout for RibTrax tiles in the garage. I'm still hemming and hawing over how I want to finish the garage floor. On the one hand I'd like to have epoxy, but until warm weather arrives, I can't conduct a reliable vapor transmission test. And I know I'll want some tiles or mats to park on in the winter, it's just a matter of how many and how to keep the underlying concrete from not becoming a complete mess over time if I use flow-through tiles.
I need to start cleaning up in the garage; it's a complete mess and I'm tired of things being all over the floor.
-
It turns out that my MTD 190-032 snowthrower attachment has a very bent
impeller from whatever I hit last week, and it was weakened to the point
where it fatigued further and started dinging the head of the bolt I used
to repair the broken stud. I ordered a new impeller from Weingartz for
in-store pickup. The impeller in this thrower is all stamped steel and
not very strong. I'm going to need to be very careful with it for the rest
of the season, and make some improvements to it during the summer. I'll
probably bend the old impeller back into shape and then weld a few small
gussets on it and keep it as a spare.
- January 25, 2014
-
I ordered two True Lock Plus Premium Ribbed tile samples
from garageflooringllc.com:
one pearl silver and one pearl gray. I can't decide what to put on the
floor without some samples. One thing I don't like about these and the
RibTrax: they don't interlock with anything else, which means my whole
floor would need to be ribbed (flow-through), or I'd have to have separate
sections of flooring. This has me leaning toward RaceDeck XL, which
would allow me to mix ribbed and solid tiles.
I finished reassembling the tractor snowthrower attachment, and reattached it to the tractor. I then spent a couple of hours clearing snow, from my driveways and some of the road. I will have to do some of it again tomorrow since we're supposed to get more snow tomorrow. I will be happy when this winter is over, it's been rougher than recent winters in terms of snow and cold. We broke the record for snowfall in January, and we've had many days of below 0F temperatures and -20F wind chill temperatures.
-
I ordered two True Lock Plus Premium Ribbed tile samples
from garageflooringllc.com:
one pearl silver and one pearl gray. I can't decide what to put on the
floor without some samples. One thing I don't like about these and the
RibTrax: they don't interlock with anything else, which means my whole
floor would need to be ribbed (flow-through), or I'd have to have separate
sections of flooring. This has me leaning toward RaceDeck XL, which
would allow me to mix ribbed and solid tiles.
- January 22, 2014
-
I put 2 coats of Eastwood Rust Encapsulator and one coat of Eastwood
Chassis Black on the area of the snowthrower attachment where I had
to grind off a welded stud that broke.
I used the new ship auger bit to finish a hole the previous owner had started to get wire into the wall behind my tool cabinet. Due to available angles for drilling, and a horizontal wall plate that's almost 2' above the garage floor, I wound up needing to make a small access hole in the wall in the garage. I will patch it later. I pulled 12-2 wire through with my fiberglass fish tape, installed the wall box, and installed two outlets: a 20A GFCI outlet and a Hubbell 15A outlet with a pair of 3.0 amp USB charging ports. The Hubbell outlet is ganged from the GFCI outlet so I have GFCI protection on both outlets. Tomorrow I'll finish running the wire in the basement, and install the new QO circuit breaker.
-
I put 2 coats of Eastwood Rust Encapsulator and one coat of Eastwood
Chassis Black on the area of the snowthrower attachment where I had
to grind off a welded stud that broke.
- January 21, 2014
-
The flex coupler for my tractor's snowthrower attachment arrived.
In the process of reinstalling it, one of the welded studs for the
gearbox bracket broke. I was using my air ratchet, which isn't capable
of more than about 35 ft-lb. Sigh, this means those studs are probably
grade 2, or that this particular one was weakened during manufacturing
of the snowthrower attachment. It is 5/16"-18.
It was a real pain in the ass to get this stud out, since the welded part is in the deepest part of the impeller housing. I had to go at it from both sides, but eventually got a new 5/16" hole. I will replace it with an M8 size 316 stainless steel socket head cap screw with a button head and a 24mm diameter 316 stainless steel washer. Not the easiest thing to assemble, since I need to access both sides of the blower at the same time, but it shouldn't be a big problem using a long ratchet extension. I need to apply some rust encapsulator and paint first to the areas I beat up on one side with the drill bits and the other side with the Dremel's cutting wheel. After the screw is installed I will probably put a but of rubberized undercoating around it.
I ordered the stainless steel washers from McMaster-Carr. I also ordered some class 10.9 button-head M8 cap screws, but they won't be here for a couple of weeks. The 316 stainless that I have on hand should be fine until then.
This MTD 190-032 snowthrower attachment is a piece of crap compared to my old Craftsman 2-stage. I don't like the way it's assembled, and parts break too easily. It's only been used twice, and it's already had a pricey ($100) part break and now the welded stud that forced me to compromise the powdercoating to repair.
-
The flex coupler for my tractor's snowthrower attachment arrived.
In the process of reinstalling it, one of the welded studs for the
gearbox bracket broke. I was using my air ratchet, which isn't capable
of more than about 35 ft-lb. Sigh, this means those studs are probably
grade 2, or that this particular one was weakened during manufacturing
of the snowthrower attachment. It is 5/16"-18.
- January 20, 2014
-
I picked up the Milwaukee 3/4" x 18" ship auger bit,
two cans of Great Stuff expanding fireblock foam, another Hubbell
AC outlet with 3.0 amp USB charging ports and a few more of the 3M
adhesive-backed hooks at Home
Depot. I wanted to pick up some 2' x 4' pieces of 3/4" thick
oak plywood for my fold-down bench project, but they had none. They
also had no 1x4 oak boards in lengths shorter than 10'. Looks like
I'll need to go to Lowe's for those
items since they do a better job of keeping smaller pieces in stock.
I installed another 84" FastTrack rail on the north wall. This one is only a couple of feet off of the ground, and now has 5 utility hooks installed. I have a 5-gallon fuel can on each of these hooks. I'm trying to keep as much as I can off of the floor so that it will not be difficult to clean the floor, especially once I have new flooring.
-
I picked up the Milwaukee 3/4" x 18" ship auger bit,
two cans of Great Stuff expanding fireblock foam, another Hubbell
AC outlet with 3.0 amp USB charging ports and a few more of the 3M
adhesive-backed hooks at Home
Depot. I wanted to pick up some 2' x 4' pieces of 3/4" thick
oak plywood for my fold-down bench project, but they had none. They
also had no 1x4 oak boards in lengths shorter than 10'. Looks like
I'll need to go to Lowe's for those
items since they do a better job of keeping smaller pieces in stock.
- January 18, 2014
-
I bought some things from
Home Depot via in-store pickup. 5 single-gang Amerelle Madison
decorator wall plates to replace the remaining single-gang plastic
ones in the garage. A stainless steel wall plate for my 240V outlet.
A 2-gang old work outlet box so I can put outlets above my tool cabinet,
and a stainless steel 2-gang decorator wall plate for it. A SquareD 20A
QO breaker for this new circuit. A Hubbell 15A outlet with a pair of 3.0A
USB charging ports so I can charge my phone in the garage without a wall
wart. 5 Rubbermaid FastTrack multi-purpose hooks so I can suspend my
gas and kerosene cans off the floor.
I also picked up some replacement shear pins for my MTD 190-032 snowthrower attachment. I broke one this week and now only have one spare.
I installed the 240V wall plate.
-
I bought some things from
Home Depot via in-store pickup. 5 single-gang Amerelle Madison
decorator wall plates to replace the remaining single-gang plastic
ones in the garage. A stainless steel wall plate for my 240V outlet.
A 2-gang old work outlet box so I can put outlets above my tool cabinet,
and a stainless steel 2-gang decorator wall plate for it. A SquareD 20A
QO breaker for this new circuit. A Hubbell 15A outlet with a pair of 3.0A
USB charging ports so I can charge my phone in the garage without a wall
wart. 5 Rubbermaid FastTrack multi-purpose hooks so I can suspend my
gas and kerosene cans off the floor.
- January 12, 2014
- Well, no work done on the garage today. I spent the day helping mom pick up a 46" snowthrower attachment for her tractor. It was on craigslist, and is the same thrower I had on my Craftsman many years ago. It appears to be in excellent condition, but a few minor parts are missing. Hopefully I can finish putting it together for mom before we get more snow. To be honest, I'm somewhat envious; she paid less than I did for my thrower, and the 46" Craftsman unit is noticeably better than mine. The auger is much larger in diameter, the sheet metal is thicker, and the left/right chute adjustment works much more smoothly thanks to a single universal joint instead of two universal joints.
- January 11, 2014
-
Late last night I glued together some small pieces of 1/4" plywood
as an iPhone holder. The intent being a place to put my iPhone on the
wall for charging when I'm in the garage. I may or may not use it, but
it cost me nothing since it was created from scrap.
I put the first coat of paint on the remainder of the ceiling and the wall above the north garage door. It might not need a second coat, but I'll likely apply one anyway.
I ordered a factory-second Elevation Labs dock. This may or may not be related to the garage, depending on where I use it. But I needed a second dock since I have only one and it's in my office on the second floor. The second one will either live in the kitchen or move between the kitchen and the garage.
Tomorrow I intend to mount another Rubbermaid FastTrack on the north wall to hang fuel cans, continue painting and hopefully start fabricating the corner protectors for the drywall around the window well.
-
Late last night I glued together some small pieces of 1/4" plywood
as an iPhone holder. The intent being a place to put my iPhone on the
wall for charging when I'm in the garage. I may or may not use it, but
it cost me nothing since it was created from scrap.
- January 10, 2014
- The 2" and 4" slatwall hooks arrived from ULINE. They work fine in the ProSlat slatwall, which confirms that I can use generic slatwall hooks as long as they don't need a second slot. Most slatwall hooks and accessories use only one slot. I like the ULINE ones because they're priced lower than most other online options, and they're chrome plated so they should hold up well. And I need a lot of them for the slatwall I intend to put in the stairwell to the basement as well as some other spots, so inexpensive is good. The 2" hooks were $22.00 for 50, which works out to 44 cents each. The 4" hooks were $13.00 for 25, which works out to 52 cents each.
- January 7, 2014
-
Snow updates...
As of this morning, my road had not been plowed. And due to the wind, it was deeply drifted. Even my neighbor with a 4WD lifted truck could not get out.
I dried my winter clothes, bundled up and went out with the tractor and new snothrower attachment with corrected extension spring setup. Wow... now it throws snow 50' easily, even when I ram it into 18" of snow. I cleared the remainder of my circle driveway, then cleared the cul-de-sac. Since I was tired of being stranded, I also started to clear my road thoguh I knew I did not have enough gasoline to finish. I got about halfway down the road on my first pass when I spotted a land mover on Oak Hill. He was just sitting there. I waited a couple of minutes, then he started to move. He was trying to make the corner to clear my road! I retreated, and 20 minutes later he made the first pass. Ugh, he buried the driveways in 4' of snow. Fortunately when he got to my driveway, there wasn't enough snow to bury me since I had cleared the cul-de-sac. But it was now 2PM, so I did not attempt to get to work since I'm told by friends that Ortonville Road is a sheet of ice in spots. But tomorrow I should have no trouble getting to work.
For what it's worth, the new snowthrower attachment is fabulous. It throws the snow a LONG way, in fact I have to be careful when doing the circle drive since it can throw it so high that it will settle on the other part of the driveway if there is any wind. That's nearly 100 feet! So now I'm prepared for any kind of snow conditions, as long as I keep a good amount of gasoline on hand. I could even clear a path on my road if necessary.
Since I had to write off the day of work, I headed out again and unburied all of the driveways on my road from the plow snow. I also cleared all of Linda's driveway (she was out shoveling), and all of Chris and Brenda's upper driveway. I'm not sure if Chris and Brenda are not home or if their tractor is having trouble. He was out plowing with it over the weekend, but his upper driveway was not clear today. Maybe it just drifted over again. I tried to blow the snow far away from their driveway so it'll stay relatively clear tonight and tomorrow.
In any event, it was nice to meet some of my new neighbors and I am SO glad that my road is clear! I can finally go to work tomorrow!
-
Snow updates...
- January 6, 2014
-
Snow storm total was about 18" here. I am snowed in; Rama Ct has
not been plowed, and Oak Hill was not plowed as of this afternoon.
In the process of trying to clear the new 8+ inches of snow on my driveways, my plow blade broke. A weld on the lift mechanism that's not really reachable with a MIG torch. And of course it's not like I was going to have much luck moving this much snow; I had basically run out of space around the driveways. Craig brought me some gasoline, but he almost got stuck twice on my road. And that was this morning, and it was still snowing. Later it started blowing around and drifting.
I called the local Tractor Supply store in Ortonville and they had one MTD 190-032 snowthrower attachment in stock. I had just looked for this attachment online yesterday, and everyone wanted $1349 or more. I reserved the one at Tractor Supply and mom came and picked me up in her 4WD truck. I got the attachment for $999 plus tax.
Of course, typical of the big box stores... missing parts. Two retaining clips, a cotter pin, zip ties. I scavenged two retaining clips from the lift arms of my mower deck. I used a stainless steel M4 screw and bent it to replace the cotter pin. Got the snowthrower working, and cleared my main driveway, an area in the cul-de-sac around my mailbox, and part of my circle drive. At that point the windchill was -18F and it was dark outside, so I stopped.
There is an issue with the idler pulley on the upper drive belt; the tension spring is too long and doesn't provide much pressure. This causes the belt to slip fairly easily when throwing in deep snow. Unfortunately this spring sits close to the idler pulley, so I can't just use a slightly larger idler pulley. It is of course possible that I swapped the extension springs...
Indeed I had swapped the upper and lower extension springs. The reason: the diagram in the instructions shows a belt keeper pin that does not exist. There's only one other belt keeper pin that can be used to hold one end of the extension spring, and it's too close to the idler pulley bracket to provide tension when using the correct spring. So I had assumed I needed to use the shorter, smaller diameter keeper spring. What I really needed to do was to attach the correct, larger upper extension spring to the slotted fitting that's intended for the PTO cable on tractors with manual PTO. This appears to work, I'll test it tomorrow. Hopefully I will no longer experience slow blowing in deep snow. There is now some tension on the idler spring without the PTO engaged, and the auger appears to spin consistently when I engage the PTO. I'm betting that my work will go faster tomorrow.
-
Snow storm total was about 18" here. I am snowed in; Rama Ct has
not been plowed, and Oak Hill was not plowed as of this afternoon.
- January 5, 2014
-
As of 6PM, we had 12" of snow on the roads here and it was still
snowing. The National Weather Service said my area could get up to 18".
Yikes! I spent 4.5 hours and an awful lot of gas clearing the driveway
before 6PM, only to have it buried again. The road has not been plowed,
so I'm probably snowed in for a while. I though I could put off buying
the snowthrower attachment for the tractor for a year, but this is the
worst winter we've had in a long while. We're already well above double
our average snowfall for this time of year. I used my dozer blade on the
tractor to clear snow, but it takes forever to move this much snow off
of the driveways.
I installed the FRP panel to the south of the south garage door. This will protect the wall from abuse from the filter/regulator/etc. that will be on this wall. And I wanted to get rid of the piece of FRP; it was a 21" wide leftover from other work.
I installed the leftover ProSlat between the back door and the west wall. Depending on whether or not I can use regular slatwall hooks in the ProSlat, I may buy more of it. It looks nice and it doesn't weigh down the walls like MDF slatwall. It also won't be adversely affected by moisture, and it's significantly less expensive than GearWall.
-
As of 6PM, we had 12" of snow on the roads here and it was still
snowing. The National Weather Service said my area could get up to 18".
Yikes! I spent 4.5 hours and an awful lot of gas clearing the driveway
before 6PM, only to have it buried again. The road has not been plowed,
so I'm probably snowed in for a while. I though I could put off buying
the snowthrower attachment for the tractor for a year, but this is the
worst winter we've had in a long while. We're already well above double
our average snowfall for this time of year. I used my dozer blade on the
tractor to clear snow, but it takes forever to move this much snow off
of the driveways.
- January 4, 2014
-
I installed a 64"W x 48"H section of ProSlat slatwall on the
wall shared with the laundry room. I like it; it's easy to install and
isn't super heavy like MDF slatwall. It's also impervious to moisture
and rot.
I will be installing the leftovers elsewhere, posssibly on the space between the back door and the south garage door.
I ordered some slatwall hooks from ULINE. I ordered 50 2" hooks and 25 4" hooks. These are much less expensive than the ProSlat kits, but I don't know if they will work in the ProSlat slatwall. I think they will, but I still have regular slatwall to install in the stairwell to the basement and I can use them there. they should arrive sometime this week, but the weather we're getting will probably slow things a bit.
-
I installed a 64"W x 48"H section of ProSlat slatwall on the
wall shared with the laundry room. I like it; it's easy to install and
isn't super heavy like MDF slatwall. It's also impervious to moisture
and rot.
- January 3, 2014
-
The ProSlat slatwall kit arrived. I need to buy some panhead screws
to mount it. Home Depot SKU 726538 should work.
I can't really use the full 96" on the wall shared with the laundry room. The stud spacing in this wall will not allow it, the ends would be unsupported. I will probably trim it to 64" length, and use the remaining 32" elsewhere. Of course I don't have sufficient edge trim to split up the pieces in this manner, but there are some locations where this will not matter. For example, between the west wall and the back door.
I installed two stainless steel pegboards above my tool cabinets. I also attached one of my 4-tube T8 shop lights to the underside of the wire shelving above my 52" tool cabinet. This will provide extra light when I need to work on something on the top of the cabinet.
I rewired the new 20A GFCI outlet in the garage between the garage doors. I had miswired it the first time; it cares which wires are input versus downstream load (any ganged outlets). I don't have anything ganged from this outlet.
-
The ProSlat slatwall kit arrived. I need to buy some panhead screws
to mount it. Home Depot SKU 726538 should work.
- January 1, 2014
-
I primed the remainder of the ceiling and the wall above the north
garage door.
I then put the first coat of paint on the edges above the north garage door, around the northwest fluorescent light, and on the north and center air hose reel mounts.
-
I primed the remainder of the ceiling and the wall above the north
garage door.
- December 31, 2013
-
I ordered more screws and spacers from
McMaster-Carr to install
pegboard. I needed 5/8" spacers for the stainless steel
pegboard versus the 3/4" spacers I use for my framed hardboard
pegboards.
The 32 square feet of ProSlat slatwall should arrive on Friday.
I primed the remainder of the edges on the wall above the north garage door, and around the northwest fluorescent light, north garage door opener, and the recessed lights. I need to tape off the northmost garage door hardware to prime around it and along the remainder of the north wall before I can get out the roller to prime the remainder of the ceiling.
Once I finish this priming and painting, I will start completing my air plumbing.
-
I ordered more screws and spacers from
McMaster-Carr to install
pegboard. I needed 5/8" spacers for the stainless steel
pegboard versus the 3/4" spacers I use for my framed hardboard
pegboards.
- December 30, 2013
- I sanded remaining patched areas on the north half of the ceiling and the wall above the north garage door. I taped off all of the shelf standards on the wall above the north garage door. I primed the mounting base of the center air hose reel and the edges around half od the standards above the north garage door. Given that I'm still sick, that's about all I could do.
- December 28, 2013
-
I ordered an 8' x 4' ProSlat kit from
Home Depot. It should arrive in a week or so.
I received many nice Christmas gifts from my loved ones for the garage. Festool Sys Carts, Talon pegboard hooks, Wallpeg pegboard hooks, Proslat shelves and baskets, a power strip, a 32-gallon Rubbermaid BRUTE trash can with domed lid and casters, a Stanley Fatmax magnetic level, a Festool Maxi Systainer, a Festool Sys Toolbox, a Newborn Brothers 250 caulk gun, a Tajima CNV-100SP caulk gun, a Lehigh power drill holder, a Knape & Vogt 206 ZC 16 206 Series Adjustable Folding 16" L-Bracket, a pair of Amerelle polished nickel wall plates... I'm probably missing something. To all those I love, thank you SO much for the gifts for the garage! I can't wait to get over the flu and get back to finishing the garage work!
-
I ordered an 8' x 4' ProSlat kit from
Home Depot. It should arrive in a week or so.
- December 27, 2013
-
I have electricity again, after a 5 day power outage. I don't think of
my area as particularly rural, but this is the third multi-day power
outage I've had in the 6 months I've owned the house. Of course I need
a standby generator, but it hasn't been at the top of my list of
priorities. Perhaps that needs to change. This ice storm wasn't all
that bad compared to storms of the past. The real truth is that the
electrical grid in the U.S. is in a sad state of decades-long neglect
while demand continues to rise. The local utility company appears to
have very little monitoring other than smart meters. Each day of the
outage, they would call and send me a text message to tell me that my
service would be restored by midnight. And obviously for four of the
five days, that was untrue. The story becomes tiresome. And they
continued to send the same text messages after my power had been
restored.
My sister's power was out for the same amount of time. On the fourth night of the outage, there was a DTE truck parked outside her home for several hours. My sister's boyfriend went out to talk to them and see if they would like some hot coffee. He asked what they were doing. They answered, "We're waiting for our next call." Umm, OK. So the automated system that tells me that there are 1,500 employees working 16 hour shifts on repairs... are the guys parked for hours in areas where there is no cell phone reception included in the 1,500? I'm not calling out the linemen... I've no idea if they were avoiding work or not. But it seems to me that the whole system is terribly inefficient for the 21st century. It should not take a week to restore 1,800 downed lines (the number given to me by the utility company) when you've reportedly drafted crews from multiple surrounding states. When hundreds of thousands of customers are without electricity for 5 days in the winter in Michigan, crews shouldn't be sitting idle for hours on end. How does this happen? Is monitoring and dispatch so poor that the utility company doesn't even know where to send crews? In the age of the Internet of things, why would companies with electricity and tons of rights of way not have reasonable monitoring technology?
-
I have electricity again, after a 5 day power outage. I don't think of
my area as particularly rural, but this is the third multi-day power
outage I've had in the 6 months I've owned the house. Of course I need
a standby generator, but it hasn't been at the top of my list of
priorities. Perhaps that needs to change. This ice storm wasn't all
that bad compared to storms of the past. The real truth is that the
electrical grid in the U.S. is in a sad state of decades-long neglect
while demand continues to rise. The local utility company appears to
have very little monitoring other than smart meters. Each day of the
outage, they would call and send me a text message to tell me that my
service would be restored by midnight. And obviously for four of the
five days, that was untrue. The story becomes tiresome. And they
continued to send the same text messages after my power had been
restored.
- December 21, 2013
-
I taped off the garage door mounting on the ceiling in the north
half of the garage. I removed one of the shelves and the brackets
above the north garage door, and put some additional setting-type
joint compound on the areas that needed it. I want to get this area
primed and painted this weekend if possible.
We're under a winter storm warning, so I might lose power again. We could get up to 1/3" inch of ice. Sigh, we're only in December and it's already been a fairly brutal winter.
I primed the frames of two of the pegboard assemblies I had put together months ago. I used Zinsser B-I-N. I will paint them with Olympic ICON Exterior semigloss late tonight. One of them will be installed below my Wright wrench displays.
I'm leaving space below my Wright wrench displays for a fold-down bench. A fold-down bench is the best solution for bench space in this area, as opposed to a rolling bench. There will be times when I need the space to move something to/from the basement, and I don't want to have to roll a bench into the garage to make room. I'm leaning toward the bench from Bench Solution becuase it's reasonably attractive and it has the best lock and release mechanism I've seen. This isn't the only folding bench I'll be installing; I'm going to make my own for another location.
I put two thin coats of Olympic ICON Exterior semigloss on one of the pegboard frames, and one coat on a second frame.
The joint compound I applied earlier in the day wasn't drying fast enough, probably due to the weather (wet, cold). I used my heat gun to assist it. Hopefully I can sand it tomorrow so I can tape off the remaining areas and start priming and painting the remainder of the ceiling.
At 12:39AM, my power flickered quite a bit. Sigh, the ice storm is taking its toll...
I installed one of the framed pegboards below the Wright wrench displays. Obviously the tricky part is getting the nylon spacers I'm using to stick to the back of the pegboard while installing. I used 3M Super 90 contact adhesive, after trying SuperGlue without success. The Super 90 worked fine.
-
I taped off the garage door mounting on the ceiling in the north
half of the garage. I removed one of the shelves and the brackets
above the north garage door, and put some additional setting-type
joint compound on the areas that needed it. I want to get this area
primed and painted this weekend if possible.
- December 20, 2013
-
I stopped at Sears while Christmas shopping and picked up 4 more
Gladiator tool hook for my jackstands. I also picked up a 2-pack
of 4' long GearWall panels and another pack of 4 J-hooks and 4
L-hooks. I could probably use more GearWall, but I'm still
debating where everything should be located.
I rearranged things on the GearWall near the basement door, to keep my jackstands, wheel chocks, MityVac 7201 and creeper together. Nice to have this stuff off of the floor, even though it's all still covered with joint compound dust (I'll clean up when the garage is closer to completion).

I will be installing wire shelving above this location. The top of the GearWall it at the same height as the top of the basement door trim, so shelving above it will not conflict with the door.
I created a wide French cleat to hang my Wright combination wrench boards. I used the wood from the shelf I removed from the east wall. I primed it with Zinsser B-I-N, and mounted it with 2.5" long deck screws. I installed the Wright combination wrench boards, and cleaned them up a bit. They were very dusty, and one of them had paint spatter on it from painting the south half of the garage.

-
I stopped at Sears while Christmas shopping and picked up 4 more
Gladiator tool hook for my jackstands. I also picked up a 2-pack
of 4' long GearWall panels and another pack of 4 J-hooks and 4
L-hooks. I could probably use more GearWall, but I'm still
debating where everything should be located.
- December 19, 2013
-
I installed a single GearTrack below the GearWall
in the cove near the door to the basement. My Vika Two-Fold is now
hanging from it. I then hung my old creeper, my large rubber wheel
chocks, a shovel, a dustpan/brush, and one of my jackstands on the
GearWall. The GearWall works great for my jackstands, so I'm going
to pick up another 16 square feet of it and 5 more tool hooks. It's
great to get this stuff off of the floor and out of my way, and the
GearWall is very durable. I wish it was less expensive.
I put a coat of semigloss on the plywood mounting for my dock fan. This is because I expect it to get dirty and want it to be easy to wipe off.
I climbed into the attic and sealed the remaining recessed lights with Great Stuff Fireblock expanding foam. The lights don't get hot at all with the Cree LED bulbs in them, so it should hold up. Expanding foam doesn't hold up to heat, the point of Fireblock foam is to prevent fire from spreading quickly. I tried using some fireblock caulk from the finished side, but it is not very sticky and of course nothing sticks well to exposed gypsum. The Great Stuff Fireblock foam is sufficient, and certainly better than nothing.
I wish I was ready to blow in the attic insulation, but the reality is that there is electrical work that I should do beforehand.
-
I installed a single GearTrack below the GearWall
in the cove near the door to the basement. My Vika Two-Fold is now
hanging from it. I then hung my old creeper, my large rubber wheel
chocks, a shovel, a dustpan/brush, and one of my jackstands on the
GearWall. The GearWall works great for my jackstands, so I'm going
to pick up another 16 square feet of it and 5 more tool hooks. It's
great to get this stuff off of the floor and out of my way, and the
GearWall is very durable. I wish it was less expensive.
- December 18, 2013
- I installed a 4' by 4' section of Gladiator GearWall on the east wall in the cove by the door to the basement. This is probably where I'll hang some extension cords, work lights, mechanic's gloves, broom and dustpan. Tomorrow I'll install a GearTrack below it where I can hang my Vika Two-Fold.
- December 17, 2013
- I covered my tool cabinets with el-cheapo drop cloths, and put the second coat of paint on the cove area by the door to the basement. I put the second coat of paint on the ceiling in the northeast quadrant. Tomorrow I will install the GearWall in the cove area and start taping off the rest of the ceiling and above the north garage door. I was able to locate the studs in the cove area with my magnetic studfinders.
- December 16, 2013
-
I installed the remaining 9 shelf standards on the east wall, and
installed twenty shelf brackets and four 6' long shelves. I have not
installed the pegboard yet because I haven't decided on the layout.
It depends on the location of the studs versus my cabinets. At some
point I'll be replacing my tool cabinets to gain a bit of bench space
(get heavier-duty cabinets and ditch the top chests), but right now I
have a total of 93 inches of top chests and a tall locker that will
block wall space for pegboard.
I put my tool cabinets in place, but I might shuffle them around a bit. For now I just want them out of the way of continuing to prime and paint the north half of the garage.
At least it's starting to look like a garage instead of a hoarder's pigpen...

-
I installed the remaining 9 shelf standards on the east wall, and
installed twenty shelf brackets and four 6' long shelves. I have not
installed the pegboard yet because I haven't decided on the layout.
It depends on the location of the studs versus my cabinets. At some
point I'll be replacing my tool cabinets to gain a bit of bench space
(get heavier-duty cabinets and ditch the top chests), but right now I
have a total of 93 inches of top chests and a tall locker that will
block wall space for pegboard.
- December 15, 2013
-
Sidetracked by snow. It took me a long time to find the chains for my
tractor. I could not find the threaded rod and nuts to mount the wheel
weights. I wound up having to go
to Home Depot to buy four
1/2" thick threaded rods, nuts, washers, lockwashers, locknuts,
etc. I converted the tractor over for winter duties and cleared the
main driveway and the loop around the yard. A 2 hour project turned
into a 6 hour project. We were only supposed to get 3 to 5 inches, but
my yard appears to have more. The road was not plowed, so I cleared a
bit of the road too.
I need to buy some rubber tire chains. The driveway needs resurfacing anyway so I didn't worry about it today/tonight, but once resurfaced I don't want to be scarring it up with the steel tire chains.
I cut 10 ClosetMaid Maximum Load shelf standards to 39" for the east wall above my tool cabinets. The 39" length was determined by subtracting the height of a typical tool cabinet and 36" of pegboard from hy ceiling height, and also making sure I could mount a shelf on the lowermost holes and still open my Craftsman tool cabinet lids.
I mounted the first ClosetMaid Maximum Load standard, and checked that I'll be able to install all 10 of them. That's 5 for each 72" shelf. At the moment I intend to install four 72" shelves. I might wind up with another one or two later, depending on how I want to organize items on these shelves.
I hope to install the remaining standards tomorrow night, along with my stainless steel pegboards. I desperately need to get my tool cabinets back into place and I can't do that until the shelves and pegboard are mounted.
-
Sidetracked by snow. It took me a long time to find the chains for my
tractor. I could not find the threaded rod and nuts to mount the wheel
weights. I wound up having to go
to Home Depot to buy four
1/2" thick threaded rods, nuts, washers, lockwashers, locknuts,
etc. I converted the tractor over for winter duties and cleared the
main driveway and the loop around the yard. A 2 hour project turned
into a 6 hour project. We were only supposed to get 3 to 5 inches, but
my yard appears to have more. The road was not plowed, so I cleared a
bit of the road too.
- December 14, 2013
-
I put the first coat of paint on the main part of the northeast wall,
as well as about the first 20" of the ceiling near the wall.
I went out for more kerosene. The roads were very slippery.
I moved some more things out of the way, and primed the edges of the cove area near the door to the basement. I also primed the plywood that serves as the mounting pad for my dock fan. I taped off the northeast fluorescent ceiling light.
I primed the walls in the cove area and the northeast part of the ceiling. I then put the first coat of paint on these areas. I also put the second coat of paint on the northeast wall where my tool cabinets will be located. When it dries, I can install the ClosetMaid Maximum Load shelving and stainless steel pegboard, and put my tool cabinets back into place. Once I get a second coat of paint on the cove area, I can install the GearWall panels there.
Tonight I realized that that the paint I applied weeks ago in the south half of the garage has yellowed. This is probably from running the kerosene heater. Not much I can do about it but hope that eventually the paint I'm applying now will yellow a bit to match. In tne end, it's a garage; it's not that critical to me to have all the walls match. I am more interested in having the moisture protection of the primer and having the holes and joints patched. The reality is that most of the wall space will be hidden when I'm done (shelving, cabinets, GearWall, GearTrack, slatwall, etc.).
I'm starting to wish I wasn't using Kilz Original primer; it demands ventilation, which isn't convenient when the temperature outside is 17F.
-
I put the first coat of paint on the main part of the northeast wall,
as well as about the first 20" of the ceiling near the wall.
- December 13, 2013
-
I caulked the edges of the panel for
the garage door openers with DAP 3.0 White Window, Door, Trim and Siding
Sealant. I put a thin coat of caulk on the remainder of the gap between
the trim for the door to the basement and the east wall. I wish I had
used this caulk in the first place; the caulk I used originally shrunk
too much.
I put some touch-up caulk on a few narrow gaps in the door trim. Once it gets tacky, I'll be priming the door trim with Kilz Original. I'm also going to start priming the north half of the ceiling.
The trim around the door to the basement is beat up beyond patching. However, since it's not very visible to the outside world, I'm not going to bother replacing it. I'll just prime and paint it as is for now.
I taped off the weatherstripping around the frame of the door to the house, then primed it with Kilz Original. I later put the first coat of Olympic ICON semigloss paint on the trim. After that dried, I put the second coat on. It could probably use a third coat, but I'm moving on.
We're supposed to get 3 to 6 inches of snow tomorrow, which means I need to prepare the tractor to plow snow. Wheel weights, chains and plow blade. At the moment I don't know where I'll store my mowing deck; the intended location would put it in the way of the priming and painting I need to do.
-
I caulked the edges of the panel for
the garage door openers with DAP 3.0 White Window, Door, Trim and Siding
Sealant. I put a thin coat of caulk on the remainder of the gap between
the trim for the door to the basement and the east wall. I wish I had
used this caulk in the first place; the caulk I used originally shrunk
too much.
- December 12, 2013
-
I removed the baffles and trim rings
from the 4 northeast recessed lights so I can prime that part of the
ceiling.
I mounted my garage door openers to the panel I created for the long ago, then mounted the panel on the wall. Since I could only hit studs on one side of the panel, I used a bit of the Loctite PL Premium to adhere the panel to the wall. I leaned my heavy ladder against the panel for the night to keep it pressed to the wall while the Loctite cures. I'm also going to caulk the edges of this panel. It will not be fun to remove it if necessary some day, but I didn't want to impinge on another stud that I may want to use for shelf or pegboard mounting and I didn't want a huge panel just for garage door openers.
I spot primed the door trim with Zinsser B-I-N, just a thin coat on the areas where bare wood was exposed, on stains that might not be covered by a single coat of Kilz Original, and on the exposed nail heads.
-
I removed the baffles and trim rings
from the 4 northeast recessed lights so I can prime that part of the
ceiling.
- December 11, 2013
-
I cleaned up the door trim. I'm
going to keep it for now. I caulked the gaps that had developed over
the years, with the DAP 3.0 White Window, Door, Trim and Siding Sealant.
Tomorrow I'll spot prime it with Zinsser B-I-N and then prime it with
Kilz Original.
I put 2 coats of Olympic ICON Exterior semigloss paint on the corner guards. I had forgotten how much I dislike painting trim with cheap brushes. I have some good brushes, but I've been saving them for interior work. I did the second coat with foam brushes, since I wanted a thin coat. They might need a third coat (keep in mind I started with bare red oak), but I'm going to leave them with two coats for now.
Tomorrow I hope to move on to brush priming the rest of the east wall and to get started brush priming the ceiling in the north half of the garage. The weather hasn't been cooperative, it's been bitter cold and hence I've had to run the kerosene heater a lot.
-
I cleaned up the door trim. I'm
going to keep it for now. I caulked the gaps that had developed over
the years, with the DAP 3.0 White Window, Door, Trim and Siding Sealant.
Tomorrow I'll spot prime it with Zinsser B-I-N and then prime it with
Kilz Original.
- December 10, 2013
-
I stopped at Home Depot on
the way home and bought some DAP 3.0 White Window, Door, Trim and
Siding Sealant. I also bought a new caulk gun that's better than
the el-cheapo stamped steel ones I've been using. It's not as nice
as the ones on my Amazon wish list, but it will do for now.
I caulked the edges of the corner guards. This was mainly to compensate for uneven walls. I don't want bugs and dust going between the corner guards and the wall. The corner guards are now ready for paint.
I think I should replace the trim around the door to the house. It's very beat up, and semigloss paint is only going to highlight the damage. I'll see what I can do with sandpaper and filler, but I suspect it won't be enough. I did clean it up a bit, and with the exception of a large dent on one edge, it's probably usable. The downside is that it was installed with giant-headed nails, and they were not concealed in any way.
I need to get some kick and push plates for the doors. I need 4 kick plates and 4 push plates. I need them on both sides of the door to the basement, the inside of the door to the house and the inside of the door to the back yard. I'd like the stainless steel ones from diamondlifegear.com; they're less expensive than others I've looked at, and don't have screw holes (I intend to use adhesive to install them).
-
I stopped at Home Depot on
the way home and bought some DAP 3.0 White Window, Door, Trim and
Siding Sealant. I also bought a new caulk gun that's better than
the el-cheapo stamped steel ones I've been using. It's not as nice
as the ones on my Amazon wish list, but it will do for now.
- December 9, 2013
-
I sanded the joint compound on the corner guards. I then taped off
the two on the laundry room wall in preparation for caulk, and primed
them with Zinsser B-I-N. I also primed the one near the door to the
basement with Zinsser B-I-N.
I don't have the caulk I want to use on-hand: DAP 3.0 White Window, Door, Trim and Siding Sealant. I'll pick some up at Home Depot tomorrow.
-
I sanded the joint compound on the corner guards. I then taped off
the two on the laundry room wall in preparation for caulk, and primed
them with Zinsser B-I-N. I also primed the one near the door to the
basement with Zinsser B-I-N.
- December 8, 2013
-
Last night I sort of had a disaster with one of my stainless steel
pegboards. I tried to use 3M Super90 to adhere the backing board, but
the backing board is very difficult to install between the flanges
of the stainless steel pegboard. I wound up having to tear it out,
which broke a few small areas of it. I then had to remove the Super90
from the stainless steel, which is NOT fun (lots of 3M General Purpose
Adhesive Cleaner, and some acetone). I might be able to still use
the backing board, but I'm tempted to scrap it.
I wish diamondlifegear.com would adhere the backing board with a temporary adhesive so I wouldn't have to mess with this. The problem is that the backing board is so flexible that it doesn't stay against the stainless steel pegboard when inserting a hook. Their solution is to bolt the backing board to the pegboard at the corners, which is nowhere near sufficient given the flexibility of the backing board. The whole point of the backing board is hence defeated.
I'll find a solution, but in the meantime I'm moving on to other things.
I put the second coat of joint compound on the joint and corner near the door to the basement.
I created wall corner guards for the corner near the door to the basement and the laundry room wall corners. They're 6' long, made from 1x3 oak boards screwed and glued together at a 90 degree angle. I rounded the edges with a 3/8" roundoff bit in the router. These could have been done with pine since I'll be painting them, but the oak should hold up better to being bumped by hard objects. I'm going to attach them to the corners with polyurethane construction adhesive and finish nails. I need to do all 3 at the same time so I don't waste a bunch of adhesive (it's in caulk gun tubes). That means I need to wait until I'm done patching the corner by the garage door.
I sanded the joint and corner I repaired near the basement door.
I sanded the new corner protectors. It took a while (oak is hard, duh).
I mounted the corner protectors using the Loctite PL Premium polyurethane construction adhesive and my finish nailer with 2" nails. While the nails are a bit short since they were driven through 3/4" of wood and 5/8" of drywall, they should be sufficient to hold the pieces in place until the polyurethane cures. In the end I don't want a super-firm attachment since the wood will expand and contract at a different rate than the drywall, and I want the construction adhesive to handle the movement. The objective here is just to prevent bashing drywall corners which crack easily (joint compound is not flexible and crumbles if smacked). All of these corners were severely damaged when I bought the house because they're in areas with a high probability of being bumped.
Later this week I will caulk the edges of the corner guards. There's a decent gap in some spots on each one because the drywall corners are not straight. But I'm very happy I put these in place; they'll prevent drywall damage and are hard, strong and repairable when necessary.
I put a second layer of caulk on the gap by the door to the basement. The first coat cracked from shrinkage.
I put some spackling compound over the countersunk screw heads in the corner protectors. I'm not going to fuss too much over the heads, I just wanted to hide them a bit.
I made an adjustment on my kerosene heater. It was not burning the fuel cleanly, and was producing a nasty smell. It's much better now.
I spent another 30 minutes doing a second round of cleaning adhesive from the stainless steel pegboard I thrashed last night. I need to remove the4 plastic protective cover and hit the front with adhesive remover, it should then be good to go (though sans the backing board).
-
Last night I sort of had a disaster with one of my stainless steel
pegboards. I tried to use 3M Super90 to adhere the backing board, but
the backing board is very difficult to install between the flanges
of the stainless steel pegboard. I wound up having to tear it out,
which broke a few small areas of it. I then had to remove the Super90
from the stainless steel, which is NOT fun (lots of 3M General Purpose
Adhesive Cleaner, and some acetone). I might be able to still use
the backing board, but I'm tempted to scrap it.
- December 7, 2013
-
I bought 10 gallons of kerosene at Speedway. I bought 2 tubes of
Loctite PL Premium polyurethane construction adhesive and a 4-piece
roundover router bit set at Home Depot so I can create my corner
protectors for the wall corner by the door to the basement and the
corners on the wall shared with the laundry room. I bought six pieces
of 6' long 1x3 oak boards at Lowe's to create to corner protectors,
along with a gallon of Olympic ICON exterior semigloss paint to paint
the door trim, window trim and corner protectors. I also bought some
more painter's caulk.
Late tonight I intend to finish patching the joint and corner near the door to the basement, and start taping off things in the north end of the garage so I can finish priming and painting the ceiling and walls. Tomorrow I will hopefully seal the remaining recessed lights with fireblock foam and/or fireblock caulk, and get much of the priming of the ceiling done. I'd also like to get the east wall painted so I can install the shelves and pegboard and put my tool cabinets back into position.
-
I bought 10 gallons of kerosene at Speedway. I bought 2 tubes of
Loctite PL Premium polyurethane construction adhesive and a 4-piece
roundover router bit set at Home Depot so I can create my corner
protectors for the wall corner by the door to the basement and the
corners on the wall shared with the laundry room. I bought six pieces
of 6' long 1x3 oak boards at Lowe's to create to corner protectors,
along with a gallon of Olympic ICON exterior semigloss paint to paint
the door trim, window trim and corner protectors. I also bought some
more painter's caulk.
- December 6, 2013
-
I cleaned the old joint compound from a 12" drywall joint by
the door to the basement, along with the corner protector on that wall.
I then applied the first coat of joint compound.
I caulked the gap between the basement door trim and the east wall with painter's caulk (acrylic latex with silicone, paintable).
I put a second coat of paint on the panel I created for the garage door openers. I need some construction adhesive to install it; while there will be two screws into a stud, they will not be at the center of the panel.
-
I cleaned the old joint compound from a 12" drywall joint by
the door to the basement, along with the corner protector on that wall.
I then applied the first coat of joint compound.
- December 5, 2013
- I put a coat of Zinsser B-I-N on the joint on the east wall. I then put a coat of Kilz Original on the whole wall and part of the ceiling above the wall.
- December 4, 2013
-
I sanded the first coat of joint compound on the joint on the east wall.
This joint is somewhat of a mess due to uneven drywall, and not that easy
to repair since there are multiple cutouts from the narrow piece of
drywall (about 12") that runs horizontally.
I put the second coat of joint compound on the joint on the east wall, and patched the dents and holes on the rest of the wall. I don't expect to apply a third coat of joint compound, mostly because I don't have time to do it but also because this joint will mostly be covered by tool cabinets and pegboard.
I put a coat of Zinsser B-I-N on the panel I made for my garage door openers way back when. I later put a coat of gloss white enamel spraypaint on it ("Appliance Epoxy", which is just a hard enamel). I want a gloss paint here, this panel will be visited by dirty hands and I'll need to be able to clean it easily.
I sanded the second coat of joint compound on the east wall. I'm not going to put a third coat on it. I do need to put another coat on some of the deep dents I patched, tomorrow.
I removed the hideous, rickety handrail from the steps to the house from the garage. I don't know who put this on, but I suspect it was monkey boy (Howard Graves). The fastening to the wall was terrible and almost pointless since he split the wood with the screws. It would not have held anyone that put their weight on it. Plus I don't believe code calls for it; there are only 2 risers. Since I will have my tool cabinet with tall locker next to these steps, there's no need for a handrail since there won't be anywhere to step off the side of the stairs.
-
I sanded the first coat of joint compound on the joint on the east wall.
This joint is somewhat of a mess due to uneven drywall, and not that easy
to repair since there are multiple cutouts from the narrow piece of
drywall (about 12") that runs horizontally.
- December 3, 2013
- I took a closer look at the failing drywall joint on the east wall behind my tool cabinets. Leaving the original tape in place was not an option, it had lost its bond in a few places. I moved my tool cabinets out of the way, pulled the tape and cleaned the joint of old joint compound. I retaped the joint with new tape and the first coat of setting-type joint compound. This is the main hurdle to completing the work on this wall, including installing the new shelving. I need to get it done quickly.
- December 2, 2013
- I continue to be sidetracked with the MINI. I replaced the passenger side rear wheel bearing tonight. Nice to be rid of the grinding noises from the rear, though I know they'll return eventually. I also tweaked the exhaust a bit since it was rattling my bumper cover a bit.
- December 1, 2013
-
Today was a clean-up day of sorts. I moved slatwall reinfoircements,
wood, my pushmower, my powerwasher, my mop bucket, some PVC pipe and
other miscellany to the basement in order to make room to paint the
ceiling in the north half of the garage. I moved the copper pipe for my
future air lines to the shelves above the south garage door. I moved
some spare T8 light bulbs to the new shelves, but they'll be moved to
the basement soon. I need to keep reminding myself that my garage is a
workspace, not a storage space. Anything that's a supply I don't use
regularly in the garage or yard should be stored in the basement.
I found the location of one of the studs in the wall above my tool cabinets. It wasn't easy since there is OSB behind the drywall and I don't know how the drywall was attached to it (there are no screws or nails to be found); I suspect it was all just glued, which is probably part of the reason one of the joints is failing. But I can now prime the ceiling over the tool cabinets.
I primed the edge of the ceiling over my tool cabinets, in the cove near the door to the basement, and part of the north wall. I'll probably get the priming done in the next couple of days, and hopefully be ready to paint sometime late in the week.
I am sidetracked tonight... I'm replacing rear wheel bearings in the MINI. I replaced the original driver side rear bearing first, since it was the one with play in it. It was a rusted mess. Normally I'd call this an easy job, but MINI didn't make the bolts easy to access. Not terrible, but not trivial. I didn't have time to do the passenger side, which is also making noise. I'll replace that one tomorrow night.
Funny, I just realized this was the first time I had one of my cars in the garage. I moved in during the first week of July. It has taken me 5 months to redo a laundry room and do the work in the garage that I've done so far. Not exactly speedy, but it's progress. And it was very nice to have a car in the garage. I can't wait to finish the garage so I can park cars in it.
-
Today was a clean-up day of sorts. I moved slatwall reinfoircements,
wood, my pushmower, my powerwasher, my mop bucket, some PVC pipe and
other miscellany to the basement in order to make room to paint the
ceiling in the north half of the garage. I moved the copper pipe for my
future air lines to the shelves above the south garage door. I moved
some spare T8 light bulbs to the new shelves, but they'll be moved to
the basement soon. I need to keep reminding myself that my garage is a
workspace, not a storage space. Anything that's a supply I don't use
regularly in the garage or yard should be stored in the basement.
- November 30, 2013
-
Since it was a little warmer today, I decided it was time to do some of
the work in the attic. Namely install the support pieces for the last
fluorescent light so I could stop tripping over it in the garage. After
some measurements, I installed the first of three 22.5" long 2x4
pieces in the attic using Simpson Strong-Tie connectors. I then
installed the new electronic 0F-rated HO ballast in the old fluorescent
light housing, then hung the light with a screw going into the new
support. I then drilled two holes in the light housing and through the
ceiling drywall, to let me position the remaining two support 2x4's
exactly. I then installed the remaining 2x4 supports and then screwed
the fluorescent light housing to them through the drywall. I cleaned
the old light housing covers, but they need to be primed and painted
(they're rusting). I replaced the bulbs and plugged the light into
the outlet on the ceiling. I flipped the light switch on, it works.
Now all of the fluorescent lights are properly installed into framing
instead of being hung with toggle bolts. They're also MUCH lighter
than they were with the old magnetic ballasts, and they're audibly silent.
Yes, they emit a lot more RFI, but that's the tradeoff. I honestly
don't care; they won't be used often.
I then used Great Stuff Fireblock expanding foam in the attic to help seal the recessed lights to the ceiling. I didn't get all of them, but I managed to get 18 of them done before running out of the first can of foam. I also sprayed some around the gaps around the ceiling outlet boxes. I'll try to do the remainder tomorrow.
I removed the long, warped wood shelf from the north part of the east wall. It was hideous and mostly unusable. I will be putting 24 feet of ClosetMaid Maximum load shelving on this wall, up high so I can install pegboard below them and also still open the tops of my tool cabinets. Of course my long-term plan is to buy two new 56" tool cabinets for this wall, without anything on the top of them. That will give me bench space I don't have right now.
I'm still debating where all of my pegboard and GearTrack will be installed. I also need a French cleat somewhere to hang my Wright combination wrench displays, or I need to build a hinged cabinet for them as I had planned at my previous residence. The advantage of a hinged cabinet would be keeping dust out and using up less wall space. The disadvantage would be depth. However, if I offset the displays inside the cabinet, the cabinet doesn't need to be much deeper than one of the displays.
Given how much of the east wall on the north half of the garage will be covered with shelving and pegboard and hidden by tool cabinets, I might not completely redo the drywall joints that are having trouble. I might leave the old tape in place and simply replace the outer layer of joint compound. I won't know for sure until I dig into it.
Late at night, I confirmed that the 21.5" wide piece of FRP left over from the piece I put below the north window will work fine to protect the piece of wall between the south garage door and the south wall. I also confirmed that the shelving that I intend to install above my tool cabinets will not cross the joint that needs repair. Tomorrow I will prepare to prime the ceiling in the north half of the garage, but I need to take a break to try to install the rear wheel bearings on the MINI.
-
Since it was a little warmer today, I decided it was time to do some of
the work in the attic. Namely install the support pieces for the last
fluorescent light so I could stop tripping over it in the garage. After
some measurements, I installed the first of three 22.5" long 2x4
pieces in the attic using Simpson Strong-Tie connectors. I then
installed the new electronic 0F-rated HO ballast in the old fluorescent
light housing, then hung the light with a screw going into the new
support. I then drilled two holes in the light housing and through the
ceiling drywall, to let me position the remaining two support 2x4's
exactly. I then installed the remaining 2x4 supports and then screwed
the fluorescent light housing to them through the drywall. I cleaned
the old light housing covers, but they need to be primed and painted
(they're rusting). I replaced the bulbs and plugged the light into
the outlet on the ceiling. I flipped the light switch on, it works.
Now all of the fluorescent lights are properly installed into framing
instead of being hung with toggle bolts. They're also MUCH lighter
than they were with the old magnetic ballasts, and they're audibly silent.
Yes, they emit a lot more RFI, but that's the tradeoff. I honestly
don't care; they won't be used often.
- November 29, 2013
-
I went to Lowe's today. I bought
8 more pieces of 4' long Gladiator GearTrack and end caps for them, two
more packs of the L and J hooks, three of the wide hooks (for hoses and
the like), two utility hooks, and three big hooks. I bought three more
4' long ClosetMaid Maximum Load shelving standards, and six more of the
16" shelf brackets. I also bought a 5 lb. container of #9 x
2.5" Torx-drive polymer-coated deck screws, a 1 lb. container of
#10 x 3.5" Torx-drive polymer-coated deck screws, two DAP 3.0
exterior caulk tubes (clear) and a Stanley FatMax 24" level since
the windows on my el-cheapo 24" beam-style level have become near
impossible to read (cloudy) and I don't trust it (the vial retainers
are loose). The windows are so cloudy that I sometimes can't tell
if I'm getting the same reading when flipping the level over.
I finished patching the spots of drywall that broke while installing shelf standards on the south wall. I primed them with Zinsser B-I-N. I'm still working on a plan for the remainder of storage on this wall.
-
I went to Lowe's today. I bought
8 more pieces of 4' long Gladiator GearTrack and end caps for them, two
more packs of the L and J hooks, three of the wide hooks (for hoses and
the like), two utility hooks, and three big hooks. I bought three more
4' long ClosetMaid Maximum Load shelving standards, and six more of the
16" shelf brackets. I also bought a 5 lb. container of #9 x
2.5" Torx-drive polymer-coated deck screws, a 1 lb. container of
#10 x 3.5" Torx-drive polymer-coated deck screws, two DAP 3.0
exterior caulk tubes (clear) and a Stanley FatMax 24" level since
the windows on my el-cheapo 24" beam-style level have become near
impossible to read (cloudy) and I don't trust it (the vial retainers
are loose). The windows are so cloudy that I sometimes can't tell
if I'm getting the same reading when flipping the level over.
- November 27, 2013
-
I went to Lowe's after work to get
another 5 gallons of Olympic ICON Exterior Flat paint, tinted to Snow
Storm. They did not have the Ultra White base (base #1), so I had it
mixed from the #3 base. Hopefully it matches... I'll do my best to
use the remainder of the first bucket on the ceiling to increase the
odds of not having a mid-panel mismatch. Of course it's possible I'll
run out, but it's also possible that I won't need the second bucket for
the remainder of the garage. I got the second bucket to be sure, and
because I need to paint the walls in the stairwell from the garage to
the basement.
I also picked up two more ClosetMaid Maximum Load shelves and 8 brackets to mount them. I already have the standards, this is to allow me to have two tiers of shelves above my tool cabinets and on the south wall.
I also bought 4 pieces of 4' long Gladiator GearTrack, end caps for them, and a small number of hooks for them. I also bought 2 more ladder hangers for my Rubbermaid FastTracks. I intend to hang my 2', 4' and a future 6' ladder on the wall in the stairwell from the garage to the basement. This keeps them easily accessible without consuming garage space. The west wall in the stairwell is set back about 4" so the ladders won't intrude much into the stairwell.
The CH Hanson 03040 magnetic stud finders arrived from Amazon. I need these to deal with walls where my studfinder doesn't work due to sheathing underneath the drywall. The walls between the garage and the laundry room, for example. I tested one, it works well. Gotta love the inexpensive, truly simple tools that don't require batteries.
I put a second coat of paint on the south wall. Unfortunately I can tell where I primed and where I didn't prime. I'm not going to sweat it, it's a garage after all and slatwall is going to hide most of this wall.
I put the first coat of paint on the wall between the garage doors. I used the new paint that has base #3 instead of base #1. It looks like it matches, but I won't really know until I use the two paints right next to each other. I'm still hoping that I won't need to do that on the ceiling. The smart thing to do would be to use the new paint for the first coat on the north half of the ceiling, then use the first bucket of paint for the second coat.
While painting the south wall, I noted a lot of cold air drafting between the sill plate and the foundation. I need to foam and/or caulk there.
I installed two of the ClosetMaid Maximum Load 6' long shelves on the south wall. I need them so I can migrate some things to the shelves from the north half of the garage before starting to prime and paint the ceiling in the north half. The shelves over the north garage door need to come down while I prime and paint.
Unfortunately, due to the drywall being bowed and poorly installed, it broke out in 3 spots when installing the shelf standards. I cut the paper around these areas (2" holes) and removed the crumbled parts of the drywall. I then filled with setting-type joint compound. I wish I had some Durabond compound on hand, but the easy-sand type should be sufficient. It's not like this wall space will ever be moving around again; it now has 5 ClosetMaid Maximum Load standards on it and 2 shelves. I may add a third shelf later. These shelves will mostly be used to hold tools that I have in Festool Systainers. Nail guns, pneumatic staplers, etc. Eventually most of my woodworking type tools will be in Systainers. I don't use them every day, so having them up high on shelves is perfect for me. As is being able to latch them together to take them outside to work in the driveway when desired.
I had forgotten the superiority of the ClosetMaid Maximum Load shelving since I haven't installed any in several years. It is MUCH stronger than the Rubbermaid shelves I put over the garage doors. The wire is much thicker, and there are three thick lengthwise wires on a 16" deep shelf versus the two longitudinal wires on a 20" deep shelf on the Rubbermaid. Further, I've always liked the way the ClosetMaid shelves latch into the brackets; it makes them very rigid. And finally, nothing protrudes through the wires of the ClosetMaid shelves, unlike the Rubbermaid whose brackets stick up through the wire shelf and make it harder to move things around. In summary, there's no comparison... the ClosetMaid is hands-down MUCH nicer than the Rubbermaid. Unless you desperately need the 20" depth of the Rubbermaid, don't think twice... buy the ClosetMaid Maximum Load shelving.
I cut the four pieces of Gladiator GearTrack to fit on the east end of the south wall. I installed 3 of them, and I'm not sure I'll use the fourth one here. I intend to hang my spare air hoses and extension cords here, and possibly my saw horses. I will likely do something similar on the north wall to hang my creeper and Systainer Carts.
-
I went to Lowe's after work to get
another 5 gallons of Olympic ICON Exterior Flat paint, tinted to Snow
Storm. They did not have the Ultra White base (base #1), so I had it
mixed from the #3 base. Hopefully it matches... I'll do my best to
use the remainder of the first bucket on the ceiling to increase the
odds of not having a mid-panel mismatch. Of course it's possible I'll
run out, but it's also possible that I won't need the second bucket for
the remainder of the garage. I got the second bucket to be sure, and
because I need to paint the walls in the stairwell from the garage to
the basement.
- November 26, 2013
- I primed the south wall with Kilz Original. I then put the first coat of paint on it. Tomorrow I'll put the second coat on it, and Friday I hope to install shelves on that wall and put the FRP panel in the corner.
- November 25, 2013
- I removed the old unfinished pegboard from the south wall. I cleaned the wall, then spackled it twice to fill the holes. I then removed the electrical wall plates and sanded. It can be primed tomorrow. I intend to cover this wall with slatwall or the like, and it will have shelves up high.
- November 24, 2013
-
I started to prime the area near the back door, but wound up doing a
lot of fiddling around with miscellany. I moved my rolling wash buckets
to the basement. I am moving some more items to the basement shortly.
I moved my Lista cabinet next to the laundry room wall. I taped off
one of the fluorescent lights on the north half of the garage so I can
prime the ceiling in that half. I have a lot more to tape off in that
half of the garage.
I need to reinstall the fluorescent lights in the south half of the garage. The new ballasts need to be installed, and I need to install some supports in the attic for the southeast light. Unfortunately I misplaced the nut holding the ballast in one of the lights. Hence I had to go to Lowe's to get one, since it's a #10-24 and I don't have many non-metric fasteners on hand.
I reinstalled the fluorescent light nearest the south garage door. I have not yet put supports in the attic for the installation of the remaining fluorescent light.
I primed the wall area between the garage doors and the wall area between the south garage door and the back door.
-
I started to prime the area near the back door, but wound up doing a
lot of fiddling around with miscellany. I moved my rolling wash buckets
to the basement. I am moving some more items to the basement shortly.
I moved my Lista cabinet next to the laundry room wall. I taped off
one of the fluorescent lights on the north half of the garage so I can
prime the ceiling in that half. I have a lot more to tape off in that
half of the garage.
- November 23, 2013
- I put the second coat of paint on the south half of the ceiling, the wall above the south garage door, the southeast wall, and two of the walls shared with the laundry room. I put the first coat of paint on the bit of wall to the south of the door to the house. I installed baffles and trim rings on ten of the twelves recessed lights in the south half of the garage. I removed the masking tape from the shelf stays above the south garage door and reinstalled the shelf brackets and the two shelves.
- November 22, 2013
-
I put the first coat of paint on the rest of the south half of the
ceiling, the wall above the south garage door, and the southeast wall.
I also put the second coat of paint on all of the edges. I can use
the roller tomorrow to get the second coat on the bulk of the south
half of the ceiling and install the baffles and trim rings in the
recessed lights and reinstall the shelves above the garage doors.
The south half of the ceiling now looks a lot better than it did when I bought the house. No more failed ceiling drywall joints, no more drywall falling off of the ceiling, no more dead garage door opener with risky mounting, and all new recessed lights.
-
I put the first coat of paint on the rest of the south half of the
ceiling, the wall above the south garage door, and the southeast wall.
I also put the second coat of paint on all of the edges. I can use
the roller tomorrow to get the second coat on the bulk of the south
half of the ceiling and install the baffles and trim rings in the
recessed lights and reinstall the shelves above the garage doors.
- November 21, 2013
-
I finished the edge priming of the south half of the garage ceiling,
as well as edges of the 8' section of the southeast wall and the wall
area above the south garage door. I primed the remainder of
these areas with rollers. I also primed the door to the attic, which
will likely get a semi-gloss paint since it gets marked up with
dirty fingerprints when used.
I got the first coat of paint on the edges of the south half of the ceiling. I also started putting the first coat on the rest of the south half of the ceiling, but will need to finish the first coat tomorrow.
-
I finished the edge priming of the south half of the garage ceiling,
as well as edges of the 8' section of the southeast wall and the wall
area above the south garage door. I primed the remainder of
these areas with rollers. I also primed the door to the attic, which
will likely get a semi-gloss paint since it gets marked up with
dirty fingerprints when used.
- November 20, 2013
-
Well, we did get the severe weather on Sunday. My power was out for 3
days, and I exhausted my supply of kerosense (twice) just keeping the
house warm so my pipes wouldn't freeze and so I could sleep at night
without freezing. I lost two trees in the high winds, across my driveway.
One of them took out a large bough from one of the very old oak trees
adjacent the driveway. Part of that bough spiked into the ground and
may have damaged my underground power line. DTE was out today to look
at it but they have to come back after I finish clearing the tree
debris. The ash tree crushed my temporary broadband cable line that
Comcast has not yet buried, but it appears to be working despite
being somewhat flattened.
Here's a picture after I had cut some of the mess up and hauled some of it away. That's not an optical illusion; the trunk of the oak tree is almost as wide as my MINI Cooper. The fully felled oak tree on the other side of the driveway (not pictured) is larger; its trunk is wider than my height. I'm leaving that one be since it'd be a significant undertaking to remove it and it fell away from the driveway. Sad to see the old oak trees go, hopefully the one in the picture will survive despite losing a large bough. I need to make a clean cut of the remaining bough and treat it.

-
Well, we did get the severe weather on Sunday. My power was out for 3
days, and I exhausted my supply of kerosense (twice) just keeping the
house warm so my pipes wouldn't freeze and so I could sleep at night
without freezing. I lost two trees in the high winds, across my driveway.
One of them took out a large bough from one of the very old oak trees
adjacent the driveway. Part of that bough spiked into the ground and
may have damaged my underground power line. DTE was out today to look
at it but they have to come back after I finish clearing the tree
debris. The ash tree crushed my temporary broadband cable line that
Comcast has not yet buried, but it appears to be working despite
being somewhat flattened.
- November 17, 2013
-
I disassembled my old large workbench and moved the parts to the
basement. I may or may not reassemble it; I don't really need it in
the basement and I want a rolling bench in the garage.
I went to Home Depot and bought some more masking tape, painter's caulk, fire block caulk, replacement springs for the Halo recessed light baffles, paint roller covers, paint brushes, paint cup liners, some more pegboard to cut for small areas, six 6' long 1x2 select pine boards, and four more Simpson RTC42 corner ties. I now have a sufficient number of RTC42 to make the rolling bench I need. I will later buy the lumber and Colson Total Lock 5" x 2" casters to build the bench.
I moved all of my detailing Systainers to the basement to get them out of my way. I also moved my small detailing cart to the basement.
I removed the second shelf above the south garage door and started taping off more things on the ceiling so I can finish priming that half of the garage.
We had severe weather this evening, and we're due for more later tonight. We're anticipating 55 mph winds and we're under a tornado watch. Very odd for this time of year.
-
I disassembled my old large workbench and moved the parts to the
basement. I may or may not reassemble it; I don't really need it in
the basement and I want a rolling bench in the garage.
- November 16, 2013
-
I primed most of the south half of the ceiling with Kilz Original. I
need to tape off some more areas in order to prime the remainder. I
also primed the remainder of the wall shared with the laundry room.
I put one coat of the Olympic Icon paint on the wall shared with the laundry room and a bit of the ceiling, just to see what it will look like when dry. I'm mainly looking for flash-through from the Zinsser B-I-N.
I need to make a trip to Home Depot for some supplies like masking tape and more economy paintbrushes and 3/8" nap roller covers.
Late at night, I took a look at the coat of Olympic Icon paint I put on the wall and a bit of the ceiling. Flash-through of the Zinsser B-I-N is essentially nil, probably thanks to the Kilz Original. I'm confident that I won't have any problems once there are two coats of paint applied.
-
I primed most of the south half of the ceiling with Kilz Original. I
need to tape off some more areas in order to prime the remainder. I
also primed the remainder of the wall shared with the laundry room.
- November 15, 2013
-
I removed the utility sink from the wall. Piece of cake since I had
long ago removed the plumbing. The only thing holding it to the wall
was a galvanized steel french cleat. I then cleaned that small piece
of wall and applied spackling compound to the holes from the french
cleat's lag screws and other dings in that section of wall.
I started wiping the edges of the ceiling in the south half of the garage so I can apply primer around all of the edges and obstacles with a brush. In the process I found a few more areas where the ceiling drywall needed to be shored up with drywall screws and the nails re-driven. I spackled over those areas, I'll need to sand them tomorrow before I apply primer. Tonight I should get some of the edge priming done. Part of the reason I'm using an oil-based primer is to help prevent bleed-through of rust from the original drywall nails, which were uncoated nails.
I also taped off some things... half of the shelf standards above the south garage door and the galvanized angle of the garage door opener mounting.
My focus remains on the ceiling. I still have plenty of wall work to do, but there's little sense in starting it until the ceiling is done. Tomorrow I hope to get the south half of the ceiling primed, and possibly get the first coat of paint on it.
-
I removed the utility sink from the wall. Piece of cake since I had
long ago removed the plumbing. The only thing holding it to the wall
was a galvanized steel french cleat. I then cleaned that small piece
of wall and applied spackling compound to the holes from the french
cleat's lag screws and other dings in that section of wall.
- November 14, 2013
-
I'm exhausted, but since I don't like to let a night go by without
doing some work, I started some spot priming with Kilz Original. I
primed around all of the recessed lights in the south half of the garage,
the ceiling at two edges of the wall shared with the laundry room,
and around the door to the attic.
Tomorrow I need to bear down on preparation to prime the ceiling in the south half of the garage. I should remove the non-functional utility sink since it's in my way, and take apart my old workbench and move it to the basement. Then wipe the ceiling with a sponge and water with a bit of TSP in it.
I am starting to think I want some fold-down benchtops using the Knape & Vogt 206 ZC 16 206 folding L-brackets. They are strong, and having benchtops that aren't always intruding into parking space would be a good thing. And for the one beefy rolling bench I intend to build, I can have a fold-down extension that lets me use it as an outfeed table or just larger worktop when dealing with large sheet goods.
.
-
I'm exhausted, but since I don't like to let a night go by without
doing some work, I started some spot priming with Kilz Original. I
primed around all of the recessed lights in the south half of the garage,
the ceiling at two edges of the wall shared with the laundry room,
and around the door to the attic.
- November 13, 2013
-
I sanded the second coat of joint compound on the 12" ceiling
joint by the air hose reel, the second coat of joint compound on the
wall joint above the north garage door, the third coat of joint compound
on the wall joint above the back door and the second coat of joint
compound on the south corner of the laundry room wall. I then sealed
these joints with Zinsser B-I-N, and put the first coat of Kilz Original
on the wall shared with the laundry room. The Kilz was to seal the
wall joints, since I didn't want to use B-I-N on such a large patch.
At this point, all major drywall joint failures are repaired. There is a horizontal joint on the east wall in the north half of the garage that needs repair, but I can't address it right now because my tool cabinets are in the way and I have nowhere else to put them. I will probably prime and paint the south side of the garage, then move my tool cabinets there for a bit to let me get at the east wall in the north half of the garage.
My large workbench will become a real hindrance to priming and painting. I need to take it apart and move it to the basement in pieces.
-
I sanded the second coat of joint compound on the 12" ceiling
joint by the air hose reel, the second coat of joint compound on the
wall joint above the north garage door, the third coat of joint compound
on the wall joint above the back door and the second coat of joint
compound on the south corner of the laundry room wall. I then sealed
these joints with Zinsser B-I-N, and put the first coat of Kilz Original
on the wall shared with the laundry room. The Kilz was to seal the
wall joints, since I didn't want to use B-I-N on such a large patch.
- November 12, 2013
-
I sanded the first coat of joint compound on the 12" ceiling
joint by my center air hose reel. I sanded the first coat of joint
compound above the north garage door. I sanded the second coat of
joint compound above the back door. I also finished sanding the third
coat of joint compound on the joints on the wall shared with the laundry
room. I sanded the first coat of joint compound on the south corner
of the laundry room wall.
I applied the second coat of joint compound to the 12" ceiling joint by my center air hose reel and the wall joint above the north garage door. I applied the third coat of joint compound to the wall joint above the back door. I applied a second coat of joint compound on the south corner of the laundry room wall. I don't expect to put more compound here since I'll be installing corner protection.
-
I sanded the first coat of joint compound on the 12" ceiling
joint by my center air hose reel. I sanded the first coat of joint
compound above the north garage door. I sanded the second coat of
joint compound above the back door. I also finished sanding the third
coat of joint compound on the joints on the wall shared with the laundry
room. I sanded the first coat of joint compound on the south corner
of the laundry room wall.
- November 11, 2013
-
I stopped at Lowe's in Madison Heights on my way home from work. I
picked up two more 16" x 72" ClosetMaid Maximum Load shelves,
eight more brackets, and eight more standards. But the main reason
for my visit was to see if the Holland Panel slatwall inserts slide
into their slatwall easily. They do; I easily slid one into one of
the panels in the store with no tools. Lowe's only carries the painted
panels (not laminated), but I'm OK with that. The Madison Heights store
only had two panels in the store, both of them damaged badly enough
that they would not be worth buying or even taking for free. They also
only had a handful of the inserts. If I order 4 panels and 64 inserts
at the White Lake store, I suspect I'll have to wait a while. I wish
Lowe's would get its act together on its website with respect to these
types of products; they don't show store inventory. Home Depot's web
site is an order of magnitude better in this respect.
I taped the wall joint above the back door, the 12" ceiling joint by my air hose reel, and the wall joint above the north garage door using setting-type joint compound. I used a little more water in the mix than I normally use, in order to give me a little bit more work time. I also put some joint compound on the south corner of the wall shared with the laundry room.
-
I stopped at Lowe's in Madison Heights on my way home from work. I
picked up two more 16" x 72" ClosetMaid Maximum Load shelves,
eight more brackets, and eight more standards. But the main reason
for my visit was to see if the Holland Panel slatwall inserts slide
into their slatwall easily. They do; I easily slid one into one of
the panels in the store with no tools. Lowe's only carries the painted
panels (not laminated), but I'm OK with that. The Madison Heights store
only had two panels in the store, both of them damaged badly enough
that they would not be worth buying or even taking for free. They also
only had a handful of the inserts. If I order 4 panels and 64 inserts
at the White Lake store, I suspect I'll have to wait a while. I wish
Lowe's would get its act together on its website with respect to these
types of products; they don't show store inventory. Home Depot's web
site is an order of magnitude better in this respect.
- November 10, 2013
-
I sanded the third coat of joint compound on ceiling joints 6, 7, 15
and 16. That's the last of the ceiling joint sanding, whew.
I sanded the second coat of joint compound on the joints on the wall shared with the laundry room. I then applied a third coat of joint compound.
I sealed ceiling joints 6, 7, 15 and 16 with Zinsser B-I-N. In the process, I realized that I missed the repair of one small joint: 12" of joint 5 between my air hose reel mount and the west wall. I will start repairing this joint when I start repairing a nearby joint above the north garage door.
I started sanding the third coat of joint compound on the wall shared with the laundry room. I'm not done since the compound is not completely dry yet.
I straightend the beat-up drywall corner guard on the wall shared with the laundry room, and cleaned the joint compound out of it. It had very few nails in it; I put some more in it. I'm going to install beefier corner guards on this and the other corner, but I needed to get this corner guard straightened up a bit so I can mud it again and hence have a decent base unerneath corner guards. I was going to buy metal corner guards, but I've changed my mind... it will be easier for me to just use wood, which will be easier to repair in the future and a lot less expensive.
I cleaned the joint above the back door, the 12" joint on the ceiling near my air hose reel mount, and the failed joint above the north garage door. Damn lazy drywallers... every wall joint I've repaired has failed because the joint isn't at a wall stud. Which means they'll likely fail again at some point. Not much I can do about it without rpelacing drywall, and I don't have time to do that right now. I might later put FRP panels over those areas.
I spent the entire day in the garage, and feel like I didn't get all that much done. Ceiling work is very time-consuming.
.
-
I sanded the third coat of joint compound on ceiling joints 6, 7, 15
and 16. That's the last of the ceiling joint sanding, whew.
- November 9, 2013
-
I primed the patch on the wall shared with the laundry room with
Zinsser B-I-N.
I primed ceiling joints 8, 9, 17 and 18 with Zinsser B-I-N. The repair of these joints is now complete, and I'm getting closer to having the ceiling joint repair done.

I also primed the joint on the wall above the south garage door.
I sanded joints 6, 7, the rest of joint 16 and the two joints I created with the patch from my ceiling fall. These are now ready for the third coat of joint compound.
Late at night... I applied the third coat of joint compound on the remaining ceiling joints. I put a second coat of joint compound on the joints of the wall shared with the laundry room. I should be able to sand and prime the ceiling joints in the morning, at which point all ceiling joint repair will be completed. I need to finish repairing wall joints that touch the ceiling (two above the north garage door, one above the back door), and I can then prime the ceiling.
-
I primed the patch on the wall shared with the laundry room with
Zinsser B-I-N.
- November 8, 2013
-
I taped the joints on the wall shared with the laundry room, using
setting-type joint compound.
I sanded the third coat of joint compound on ceiling joints 8, 9, 17 and 18. They are ready for primer. I'm aiming to get all ceiling joint compound done this weekend. I'd really like to get all the wall work done too, except for the south wall since messing with that wall means turning off my air compressor; I can't do that right now since I'm using the blow guns to get rid of joint compound dust. Hopefully I can get the east and west walls done, though tonight I realized I need to redo the joint above the back door of the garage; like other joints, its tape has failed.
I'm rambling... I will continue to focus on the ceiling until it's fully primed and painted. It's the hardest work and the job I started first. Tomorrow I'll sand the second coat of compound on joints 6, 7 and 16 and apply the third coat of joint compound. On Sunday I can hopefully seal up all joints in the south half of the garage with Zinsser B-I-N, and start priming the ceiling with Kilz Original. Given that there's already paint on all of the ceiling except my patch, I should only need one coat. Especially since I'm using Olympic ONE Exterior paint/primer as the top coat. The main reason for the Kilz Original is to add a layer that's not vapor permeable.
-
I taped the joints on the wall shared with the laundry room, using
setting-type joint compound.
- November 7, 2013
-
I stopped at Home Depot and picked up new 12" and 4"
joint knives. My old ones have just about had it at this point, the
4" has rusted heavily and I'm tired of cleaning the rust off.
The new 12" is stainless steel, hopefully it'll last a bit longer.
I also bought another 18 lb. bag of setting-type joint compound, two cheap 9' x 12' drop cloths, three Cree LED 2700K bulbs for the master bedroom closet, and a pair of 6' long select pine 2x2's that I might use to mount things between the garage doors. Using them should allow me to utilize wall space obscured by air plumbing.
I put the third (final) coat of joint compound on ceiling joints 8, 9, 17 and 18. I used pre-mixed joint compound here.
I removed the tape from the two bad joints on the wall shared with the laundry room. I cleaned the joints, and will soon retape and mud them.
-
I stopped at Home Depot and picked up new 12" and 4"
joint knives. My old ones have just about had it at this point, the
4" has rusted heavily and I'm tired of cleaning the rust off.
The new 12" is stainless steel, hopefully it'll last a bit longer.
- November 6, 2013
-
I started to sand the second coat of joint compound on ceiling joint 8.
But I'm tired, so I didn't get very far. Too many days/weeks/months
burning the candle at both ends, I may need a break.
Bah, I don't have time to be a wimp. I got out the palm sander and sanded the second coat of joint compound on joints 8, 9, 17 and 18. VERY dusty job. I need to do something about my lack of sealed eye protection. I ordered various safety glasses and a pair of goggles from Amazon, and a Festool Systainer SYS 1 to keep them in. I keep trashing my various safety glasses by keeping them with other items in a tool drawer. It was time to buy dustproof storage for them where I can also stash a few microfiber towels to clean them.
-
I started to sand the second coat of joint compound on ceiling joint 8.
But I'm tired, so I didn't get very far. Too many days/weeks/months
burning the candle at both ends, I may need a break.
- November 5, 2013
-
I sanded joints 9, 17 and 18, then put the second coat of joint compound
on them. I did the same for the joint on the wall above the south garage
door.
I then sanded joint 8 and put a second coat of joint compound on it. I also put a little bit of a third coat on joint 7 in part of the problem area.
At this point, the ceiling joints in the south half of the garage all have a second coat of joint compound. They'll all need a third coat. Most of the third coats will be light since they're pretty good after the second coat, except for joint 7 which will need a 4th coat. Since I'm running low on setting-type compound, I will likely use pre-mixed compound for the third coat on all joints except joint 7.
I really want to get joints 7 and 8 done so I can put the flourescent lights back on the ceiling. I don't need them for light right now, but the fixtures are in my way.
-
I sanded joints 9, 17 and 18, then put the second coat of joint compound
on them. I did the same for the joint on the wall above the south garage
door.
- November 4, 2013
-
I stopped at Lowe's and bought a 5-gallon bucket of Olympic ONE Exterior
Flat White paint, tinted to Snow Storm white. I will be using this on
the ceiling after I prime with Kilz Original. It should be about double
what I need, or in other words, it should provide two coats.
I also bought some paint brushes, tray liners, foam brushes, and a roller set with plastic pan.
I sanded ceiling joints 6, 7 and 15 and applied the second coat of joint compound. Joint 7 is going to need 4 coats, since the two pieces of drywall are very uneven in one spot (the spot where I patched in a new, straight piece of drywall after I fell through the ceiling). Nice to have a diagram that no longer includes ceiling joints whose repair has not been started.

I sanded the final coat of joint compound on the patch on the wall shared with the laundry room. It's not perfect, but it's damn close. It's ready for Zinsser B-I-N primer.
Tomorrow I will continue working on the ceiling drywall joints.
-
I stopped at Lowe's and bought a 5-gallon bucket of Olympic ONE Exterior
Flat White paint, tinted to Snow Storm white. I will be using this on
the ceiling after I prime with Kilz Original. It should be about double
what I need, or in other words, it should provide two coats.
- November 3, 2013
-
I went to the Marathon station in Ortonville and bought 10 gallons of
kerosene for my torpedo heater. While I don't want to run it a lot in
the garage without insulation, I need it to help keep the temperature up
while I finish doing joint compound, priming and painting.
I moved a bunch of stuff to the north half of the garage to make room to work on the south half. I then shored up the remaining ceiling drywall on the south half, and taped and mudded a 16' joint, two 4' joints and a short joint above the garage door. I later taped and mudded the final joint, which was 19' long. At this point, all of the ceiling joints have been retaped. However, the whole south half of the garage still needs second and third coats of joint compound. Hopefully I can get much of that done this week and get them sealed up with Zinsser B-I-N. I will then be ready to prime the ceiling with Kilz Original and paint it.
-
I went to the Marathon station in Ortonville and bought 10 gallons of
kerosene for my torpedo heater. While I don't want to run it a lot in
the garage without insulation, I need it to help keep the temperature up
while I finish doing joint compound, priming and painting.
- November 2, 2013
-
I ordered some things for local pickup at the Lake Orion
Home Depot:
- 3 gallons of Kilz Original Primer
- 8 48" ClosetMaid Maximum Load standards
- 2 72" x 16" ClosetMaid Maximum Load shelves
- 8 16" ClosetMaid Maximum Load shelf brackets
- 12 Cree BR30 5000K LED bulbs
The shelving is going above my tool cabinets, up high. Of course I first need to patch, prime and paint that wall. I don't like my paint options at Home Depot, so I'm going to make a trip to Lowe's for some Olympic ONE soon. I want eggshell finish, in the Snow Storm color. Even though I'm priming with Kilz Original, I like the Olympic ONE paint and primer in one product. I used it in the laundry room.
I picked up the Home Depot order, and installed the 12 Cree BR30 LED bulbs. I then wired the feeder for this half of the garage. I now have reasonable automated lighting throughout the garage. I will not need the fluorescent lights very often, and the power consumption for the 24 LED lights is only 228 watts total. Since they are automatically turned on and off by the occupancy sensor, I also don't need to go to a light switch to turn them on or off. There is no light switch for these lights because I don't need one. The occupancy sensor works great, I've essentially completely forgotten about it because it just works.
-
I ordered some things for local pickup at the Lake Orion
Home Depot:
- October 31, 2013
- I put the tape and the first coat of setting-type joint compound on two of the long joints in the south half of the garage. I also taped one of the 4' joints.
- October 30, 2013
-
Slight change of plans due to a weather change... it was warm today and
will be warm tomorrow. So I'm trying to knock out the taping and first
coat of joint compound on the remaining ceiling joints.
I removed the tape from the remaining ceilign joints and cleaned the old failed joint compound out of all of them except the half of the last joint that isn't easy to get to at the moment (lots of stuff in that corner of the garage). Hopefully tomorrow night I can get some of the taping done.
I tried installing the reinforcements in the slatwall. It's not possible, which means they were a complete waste of money :-(. They just don't fit. If you try to force them in with a lot of hammering, they end up breaking the slatwall. The only way I could envision installing them would be to cut them in half lengthwise and install each half from the front. I'm not going to try, I've already wasted too much time on them.
What this means is that I'm back to square one on slatwall. I need the weight capacity of slatwall with slot reinforcements. Which means the sheets I have aren't useful to me on the walls of the garage. And one of them now needs to be cut down to less than 4' width to be useful at all.
I think I'm going to buy some Proslat slatwall instead. It's PVC which means it won't suffer from humidity, and it's strong. It's also lightweight and looks nice since the fasteners are all concealed. It also doesn't weigh a ton like wood slatwall, so it's easy to install and doesn't add a lot of load to the wall. $149 per 32 sq. ft. kit, and free shipping from Home Depot. And given that each section is installed individually, I don't need to do any horizontal cutting and I can easily install it alone.
As for the slatwall I already bought... I will find a use for it. I would not mind having some in the master bathroom closet, and a sheet on the wall in the stairwell to the basement would be very handy. I could also use some to make a rolling tool board and storage, though pegboard would work just as well.
-
Slight change of plans due to a weather change... it was warm today and
will be warm tomorrow. So I'm trying to knock out the taping and first
coat of joint compound on the remaining ceiling joints.
- October 29, 2013
-
I put a third coat of setting-type joint compound on the patch on the
wall shared with the laundry room. Due to the warped sheathing
underneath the drywall, it needed it. If I were not covering this part
of the wall with slatwall, I'd be doing a third coat with a 14"
knife. But it's even enough with the third coat to support the
slatwall, so tomorrow I'll sand it and and probably seal it with Zinsser
B-I-N.
I put tape and the first coat of setting-type joint compound on one of the short joints of the patch piece I had to put in the ceiling over the weekend (the spot I fell through). I need to clean the remaining joints in that area so I can tape and mud those as well.
I need to get some of the slatwall out of my way, so tomorrow I'll experiment with greasing the metal slot supports to install them. I was unable to install them dry, they get wedged tight about 12" into the slot.
-
I put a third coat of setting-type joint compound on the patch on the
wall shared with the laundry room. Due to the warped sheathing
underneath the drywall, it needed it. If I were not covering this part
of the wall with slatwall, I'd be doing a third coat with a 14"
knife. But it's even enough with the third coat to support the
slatwall, so tomorrow I'll sand it and and probably seal it with Zinsser
B-I-N.
- October 28, 2013
-
I stopped at Home Depot for
some more setting-type joint compound, a bucket, and some Simpson RTC-42
braces. I want the RTC-42 braces to build the only permanent workbench
that will reside in the garage. Unfortunately I need 8 and they only
had 6. I bought 4, since I will use them in multiples of 4.
Other Home Depot stores nearby
have more of them. This bench will be on lockable casters, but I
haven't chosen the casters yet. I do know that I want all swivel
casters, since I don't want to have to fuss with direction when moving
it. I'd like casters whose direction can be locked though, which limits
my choices. This bench will hold one of my large vises, and ideally
would be the same height as a Bosch 4100-09 table saw so I can use it as
an outfeed table when I buy the table saw. It's possible that I'll
build 2 benches, 48" x 24" each. One of them will go in the
nook in the southeast corner of the garage. I may not need a second
one, since my sister is buying a Vika Two-Fold for my birthday. If
it weren't for needing a place for a vise, I wouldn't need a heavy
permanent bench at all.
I put another coat of joint compound on the patch on the wall shared with the laundry room. The joint compound doesn't particularly like to dry in the cold. I used the heat gun to get it started, and put a 500W halogen light near it to keep it going.
The Owens-Corning insulation calculator says I'll need about 30 bags of blown-in insulation to complete the attic. That comes to around $750. But before I do that, I need to create the storage area by using batts and laying down plywood, and creating a thin wall to keep the blown-in insulation off of the storage area. I'll likely just use 1/4" plywood ripped to 16" width.
-
I stopped at Home Depot for
some more setting-type joint compound, a bucket, and some Simpson RTC-42
braces. I want the RTC-42 braces to build the only permanent workbench
that will reside in the garage. Unfortunately I need 8 and they only
had 6. I bought 4, since I will use them in multiples of 4.
Other Home Depot stores nearby
have more of them. This bench will be on lockable casters, but I
haven't chosen the casters yet. I do know that I want all swivel
casters, since I don't want to have to fuss with direction when moving
it. I'd like casters whose direction can be locked though, which limits
my choices. This bench will hold one of my large vises, and ideally
would be the same height as a Bosch 4100-09 table saw so I can use it as
an outfeed table when I buy the table saw. It's possible that I'll
build 2 benches, 48" x 24" each. One of them will go in the
nook in the southeast corner of the garage. I may not need a second
one, since my sister is buying a Vika Two-Fold for my birthday. If
it weren't for needing a place for a vise, I wouldn't need a heavy
permanent bench at all.
- October 27, 2013
-
I stumbled in the attic and fell through the ceiling (by stepping on
the drywall). I think I'm OK, other than some bruises, a sore wrist
and a tweaked back. Of course I need to keep working; thank goodness
for vicodin. I'm thoroughly annoyed that I created more work for myself
(replace some drywall on the ceiling), but I'll get it done. No time
for wiring today, I need to fix the 4' x 4' hole in the ceiling first.
Not yet sure if I can get the piece up there by myself, but I
think I can.
Update: I managed to get the drywall replacement piece in place by myself. I wish I could have replaced the whole sheet, but I can't manage a full sheet of drywall over my head without a drywall jack and I'm not going to buy or rent a drywall jack for a single repair.
I'm sore from falling through the ceiling, but since I was cutting up a piece of drywall, I finally cut and attached a piece of drywall to the spot the previous owner had removed on the wall shared with the laundry room. I also taped and mudded it (first coat). I'm installing slatwall on this wall, so this patch doesn't need to be perfect; it just needs to be sealed up.
I almost finished wiring the recessed lights in the south half of the garage. The only thing remaining is to connect the feeder wire to the output of the occupancy sensor.
-
I stumbled in the attic and fell through the ceiling (by stepping on
the drywall). I think I'm OK, other than some bruises, a sore wrist
and a tweaked back. Of course I need to keep working; thank goodness
for vicodin. I'm thoroughly annoyed that I created more work for myself
(replace some drywall on the ceiling), but I'll get it done. No time
for wiring today, I need to fix the 4' x 4' hole in the ceiling first.
Not yet sure if I can get the piece up there by myself, but I
think I can.
- October 26, 2013
-
I removed the plywood in the garage attic that was in the way of
installing the recessed lights in the south half of the garage.
I removed the 8' long T12 HO fluorescent fixture near the attic stairs.
I cut all 12 holes for the recessed lights in the south half of the garage, and nailed 11 of the fixtures into place. I then removed the final 8' long T12 HO fixture. Finally I nailed the last recessed light fixture into place.
Given my back issues, this was very hard work. But I couldn't wait any longer, it's too cold in the attic at night to do this kind of work. So I had to do it during the day in order to not freeze. I'm taking a break to type this blog entry and rest my back.
The hardest part was the lights nearest the south wall, since there is no headroom there. It's not easy operating a large hole saw while carefully laying on your stomach on a 2' x 3' board on top of 2 x 4 truss bottoms. It's also not easy to swing a hammer in this position. But those fixtures are all in place now, I just need to wire them.
I will order 12 more of the Cree BR30 LED bulbs in 5000K temperature soon. It will be nice to have the lighting done and be close to ready for insulation. It has been very cold in the garage at night and it's only going to get colder for the next four to five months. I can't run a heater in there until the attic is insulated, since it would cause condensation problems if there is no insulation. It would also be nearly futile since there's no insulation over the garage.
I pulled the failing tape on some of the ceiling joints in the south half of the garage and scraped off some of the old joint compound. Tomorrow I hope to get started retaping these joints with setting-type joint compound.
I finished about 2/3 of the wiring of the recessed lights in the south half of the garage, including much of the difficult part (the cans with no room to work). I need to finish this work so I can seal the cans to the drywall. It will then be possible to insulate the garage attic, though I really should address the electrical issue with the circuit that's shared between the fluorescent lights and the outlets before I blow in insulation.
Of course, it's probably worth noting that I have not used the fluorescent lights since I put bulbs in the 12 recessed cans in the north half of the garage. It will likely turn out that I almost never use the fluorescent lights. The Cree BR30 LED lights are providing enough light to do most things in the garage. Given some task lighting, I suspect my use of the fluorescent lights will be rare.
I've had two people suggest that I put boxes over the recessed lights in the garage before insulating. I don't need them with the 9.5W LED bulbs. Their argument is that the next owner might replace the LED with hot incandescents. I don't see that happening. 100W incandescent bulbs were banned in 2012. 75W incandescents were banned in January 2013. 60W and 40W will be banned in 2014. It's federal law (Energy Independence and Security Act of 2007). And would anyone replace very good, long-lasting LED bulbs with incandescents or CFL? The bulbs I have installed should last more than 20 years. By then, the replacements will likely be brighter and use even less power. They will definitely be more efficient (lumens per watt), and probably have an improved CRI. LEDs have been improving rapidly, with both Philips and Cree leading the way. And unlike CFL, they like cold temperatures and start instantly. They're ideal for a garage in Michigan.
-
I removed the plywood in the garage attic that was in the way of
installing the recessed lights in the south half of the garage.
- October 25, 2013
-
I stopped at Home Depot
to get the things I forgot to buy last night:
- 3/4" copper elbows
- Denatured alcohol to clean Zinsser B-I-N off of the FRP panels
- Klean-Strip brush cleaner
- Another gallon of Liquid Nails FRP adhesive since one of the 3.5 gallon buckets I bought appears to be bad.
- 3M Super 90 Spray Adhesive to attach backing board to stainless steel pegboard from diamondlifegear.com. The backing board comes attached with 4 bolts and acorn nuts, which isn't very effective at keeping the backing board snugly against the stainless steel pegboard over the entire area.
- More white pegboard, so I can put some on the west wall behind the air drops.
- 1x2 select pine boards to frame the pegboard.
- Two 4-piece sets of 1/4" male couplers since I needed some for the new blowguns and was out of spares.
- bleach
-
I stopped at Home Depot
to get the things I forgot to buy last night:
- October 24, 2013
- I stopped at Home Depot and picked up some copper pipe fittings to continue the plumbing for air in the garage. I forgot to buy some other things I need, I'll have to get them tomorrow.
- October 23, 2013
- I duplicated a second set of regulator output plumbing for an air drop. 1/2" tee, three 1/2" sweap to NPT fittings, a ball valve and pipe connecting it all. I attached one of the air manifolds.
- October 22, 2013
-
The silicone-cushioned band clamps arrived
from McMaster-Carr, along with
the 45-degree 3/6" NPT elbows for the hose reels and some UV-resistant
cable ties.
To take some measurements for my air drops, I suspended the overhead copper with a pair of the band clamps. I then cut a piece of 3/4" copper pipe for one of the drops: the piece from the overhead tee to the first ball valve. I then soldered a 3/4" sweat to 3/4" NPT fitting on this piece. I also cut a piece of 3/4" copper pipe for the piece after the second ball valve that leads to the automatic drain, and soldered a 3/4" sweat to 1/2" NPT piece on it (to connect to the automatic drain). I haven't decided how far off of the floor I want the drain, so this piece might get shortened later. Hence I haven't soldered the fitting on the other end yet.
I duplicated the input side plumbing I did the other night: the 3/4" sweat to 3/4" NPT fittings, the 3/4" NPT ball valves, a 3/4" x 3/4" x 1/2" tee and a 1/2" sweat to NPT fitting to go into a filter/regulator. I need to duplicate this drop piping for one more hose reel, and duplicate the output side 2 more times.
I need to decide how to connect the compressor to the plumbing. If I use my existing connection, I'll have some restriction right out of the compressor since I have 3/8" fittings. I should probably change to a 1/2" coupling on the compressor (to 1/2" NPT), and put a 1/2" coupling on the end of the leader hose. I can then use a 1/2" male to 3/4" female NPT plug on the end of the copper piping (McMaster-Carr 6534K44). On the other hand, 3/4" NPT isn't very convenient if I ever need to replace the plug. 1/2" male coupling to 1/2" NPT is fine here, and I can put a 1/2" NPT male to 3/4" sweat adapter on the end of the copper.
-
The silicone-cushioned band clamps arrived
from McMaster-Carr, along with
the 45-degree 3/6" NPT elbows for the hose reels and some UV-resistant
cable ties.
- October 20, 2013
-
I sanded the second coat of setting-type joint compound where the next
piece of FRP will be installed. I then put two coats of Zinsser B-I-N
on it. I also put one coat of Zinsser B-I-N on the air hose reel mount
on the north end of the garage.
Once the Zinsser B-I-N dried, I installed the FRP panel. It wasn't easy, since a full sheet of FRP isn't easy to handle on a ladder and it's difficult to put pressure on the roller when you're off the ground. It's not perfectly aligned with the panel below it, but it's close enough for my purposes. Of course I wish I had planned to install this piece when I installed the first panel so I could have used a panel-to-panel trim piece. But I'm OK with the final result, and the objective has been met (provide a robust, easy to clean surface underneath hanging lawn tools).


I later remounted the 84" long FastTrack, and also mounted a 32" one up high.
I did some more work on the air line plumbing. I soldered two 3/4" diameter 10' long pipes into a 3/4" tee and suspended it by setting it on my shelves above the garage doors. This was just to figure out where the drop between the garage doors can be located to avoid the electrical outlet in that wall. I'm going to put that drop to the left of the electrical outlet.
I soldered together a bit more of the piping for the second air drop. I put together the 1/2" side that has a valve for drainage or future expansion, a tee, a 1/2" pipe to NPT adapter from the regulator output, and a 5" section of pipe to another pipe to NPT adapter for the 2-port manifold. I also put together part of the 3/4" side: a pair of ball valves (one for the whole drop and one for the automatic drain), a 3/4" to 1/2" tee between them, and a 1/2" sweat to NPT adapter to connect the filter and regulator. I used sweat the thread adapter on the pipe leading to the valves as well, so I didn't have to heat up the valves with the torch.
I ordered some silicone-cushioned band clamps from a< href="http://www.mcmaster.com">McMaster-Carr to support the air pipe. I also ordered 45-degree 3/8" NPT male to female elbows to use on the air hose reels, and a pack of UV-resistant cable ties. I to use a somewhat temporary mounting of the pipe for now, since I expect to need to move it in the spring to finish ceiling drywall joint repair in the south half of the garage. I don't expect to get that work done this year, but we'll see.
Tomorrow I'm going to clean up a bunch of things in the garage and shuffle things around a bit so I can do the drywall patch work on the wall shared with the laundry room and start shoring up the drywall and installing the recessed lights on that side of the garage.
-
I sanded the second coat of setting-type joint compound where the next
piece of FRP will be installed. I then put two coats of Zinsser B-I-N
on it. I also put one coat of Zinsser B-I-N on the air hose reel mount
on the north end of the garage.
- October 19, 2013
-
I cut the piece of FRP to go above the first piece I installed below
the FastTrack for yard implements. I then removed the FastTrack and
marked the location of the studs on the top of the lowr FRP panel. In the
process I realized that the drywall joint near where the FastTrack was
installed was failing. I hence removed the tape and old joint compound,
and set new tape with setting-type compound. This joint doesn't need to
be perfect, since it'll be covered with FRP. But it needs to be flush
and sealed up, which means it'll need more coats, sanding and Zinsser
B-I-N primer.
Later I sanded this joint and applied the second coat of joint compound. This coat will be sufficient under the FRP once it dries and is sanded. However, there's a bit of it that will not be covered by FRP, near the window. I may need a third coat there, even though that drywall corner will eventually get corner protection.
-
I cut the piece of FRP to go above the first piece I installed below
the FastTrack for yard implements. I then removed the FastTrack and
marked the location of the studs on the top of the lowr FRP panel. In the
process I realized that the drywall joint near where the FastTrack was
installed was failing. I hence removed the tape and old joint compound,
and set new tape with setting-type compound. This joint doesn't need to
be perfect, since it'll be covered with FRP. But it needs to be flush
and sealed up, which means it'll need more coats, sanding and Zinsser
B-I-N primer.
- October 18, 2013
-
I finally got around to creating a thin mounting panel for the garage
door opener control pads. The idea here is to conceal the old wiring,
which I can't shove in the wall (it won't move for some reason) and
don't want to cut short since the wire passes through fire barrier and
hence would not be fun to rerun. Using some leftover 1/4" thick
plywood underlayment from the laundry room remodel, I created a panel
with a hollow back to conceal the wires. It's glued and clamped at the
moment, and once it's dry I will sand it and install it. It will get
primed with Zinsser B-I-N and painted when I paint the wall. I can
fasten one side of it with drywall screws since there's a stud nearby.
I need to get some drywall anchors to fasten the other side, or I could
just use a dab of adhesive.
I need to remove the rickety shelf on the east wall in the north half of the garage and spackle the holes. Eventually, ClosetMaid Maximum Load shelves will be installed here, up high. But the shelf that's installed right now is mounted too low, very warped, too shallow, and looks awful.
-
I finally got around to creating a thin mounting panel for the garage
door opener control pads. The idea here is to conceal the old wiring,
which I can't shove in the wall (it won't move for some reason) and
don't want to cut short since the wire passes through fire barrier and
hence would not be fun to rerun. Using some leftover 1/4" thick
plywood underlayment from the laundry room remodel, I created a panel
with a hollow back to conceal the wires. It's glued and clamped at the
moment, and once it's dry I will sand it and install it. It will get
primed with Zinsser B-I-N and painted when I paint the wall. I can
fasten one side of it with drywall screws since there's a stud nearby.
I need to get some drywall anchors to fasten the other side, or I could
just use a dab of adhesive.
- October 17, 2013
-
I stopped at Home Depot on my
way home from work to buy some DAP 3.0 window caulk, three cap trim
pieces for FRP, a chuck key for my drill guide and a 90-degree 3/8"
male-to-female NPT brass elbow. The elbow is to experiment with the
mounting of the coupler on my air hose reel. I wanted a 45-degree
elbow, but
Home Depot doesn't have them
in the store. The 90-degree may or may not provide enough clearance
to prevent the lead hose from being rubbed by the reel.
I got home very late, but I managed to install the FRP panel below the window. I also assembled the two new leader hoses for the air hose reels. Each leader hose is 1/2" in diameter and 5' long, with a 3/8" male coupler on one end and a 3/8" female push-on coupler on the other end. Some would say I've gone overboard with couplers, but I've always done my leader hoses in this manner because it allows for easy disconnection at either end of the hose (with the rest of the air system remaining pressurized), and allows for easy hose replacement should one ever spring a leak or be damaged. Planning up front reduces my future downtime and frustration.
In addition to the leader hoses, I received the M10 carriage bolts to assemble the third hose reel mount.
I've concluded that I don't really need an elbow at the inlet to the hose reel between the garage doors, but it would be nice. I definitely need one for the hose reel at the north end of the garage, and I will need one for the reel at the south end of the garage.
I need to remember to add some tools I need to my tools wish list. I will soon desperately need the Bosch 4100-09 table saw that's been on my wish list for years. I also need an air chisel and a pneumatic needle scaler for some car and tractor work.
-
I stopped at Home Depot on my
way home from work to buy some DAP 3.0 window caulk, three cap trim
pieces for FRP, a chuck key for my drill guide and a 90-degree 3/8"
male-to-female NPT brass elbow. The elbow is to experiment with the
mounting of the coupler on my air hose reel. I wanted a 45-degree
elbow, but
Home Depot doesn't have them
in the store. The 90-degree may or may not provide enough clearance
to prevent the lead hose from being rubbed by the reel.
- October 16, 2013
-
Tonight was trash night, and I had a lot of coardboard to cut up and
pack into a large trash bag. Mostly from the pegboard delivery, but also
an air hose reel box and other items.
Couplers and related parts arrived from McMaster-Carr. I also received M10 locknuts and M10 stainless steel washers, but the M10 carriage bolts were shipped separately and have not yet arrived. I need them to assemble the third air hose reel mount. The lead hoses for the hose reels were also shipped separately and have not arrived yet. I suspect those were the holdup on the second part of my order; I think they're made-to-order.
I moved the remaining recessed light fixtures into the garage attic.
I swept enough of the floor to make room to cut FRP. I cut the piece of FRP for the spot below the window. I shored up the drywall under the window (it had nowhere near the required number of drywall nails at the base plate), sanded the compound I had used to patch a big dent in it weeks ago, and washed the wall and the back of the FRP. I cut two of the three cap trim pieces for the panel. Tomorrow I'll cut the third piece of cap trim, slightly trim the length of the FRP panel (it's about 1/4" longer than I'd like), mark the location of the studs, and adhere the FRP and cap trim to the wall. I need to buy some more DAP 3.0 clear caulk to seal the cap trim to the wall and the FRP to the cap trim.
-
Tonight was trash night, and I had a lot of coardboard to cut up and
pack into a large trash bag. Mostly from the pegboard delivery, but also
an air hose reel box and other items.
- October 15, 2013
-
I decided that the piece of plywood for the second hose reel was
unnecessarily long, so I cut it shorter. Not a perfect cut since I did
with the piece still partly mounted on the ceiling (but propped away
a bit to avoid cutting the drywall). But good enough and I am filling
the plywood edges before priming anyway. I then mounted the hose reel
with its sandwiched mounting block. It's a bit in the way of mounting
the next FRP panel, but it's manageable. It's also a bit in the way of
my yard tool rack, but only for those tools that require me to lift them
way above the rack to get them in their hooks. Namely my leaf blowers.
I'm probably going to tweak the hooks for those tools, and in the meantime
I'll move them to the other end of the rack. The odds are good that I'm
going to lower the rack anyway after I install the next FRP panel, since
it's currently higher than necessary.
Tomorrow I want to move a bunch of things to the basement that are in my way:
- All of my Systainers for detailing, motor oil and filters.
- Jackstands.
- Tire chocks.
- Stools.
- Detailing carts.
- Anything else that's not needed for the next 2 weeks and can be moved without assistance.
I then want to cut and install an FRP panel below the window. 26.25" x 96". I also want to cut one for above the first yard tool piece, and one for above the second yard tool piece. And finally cut one for the location between the garage doors.
-
I decided that the piece of plywood for the second hose reel was
unnecessarily long, so I cut it shorter. Not a perfect cut since I did
with the piece still partly mounted on the ceiling (but propped away
a bit to avoid cutting the drywall). But good enough and I am filling
the plywood edges before priming anyway. I then mounted the hose reel
with its sandwiched mounting block. It's a bit in the way of mounting
the next FRP panel, but it's manageable. It's also a bit in the way of
my yard tool rack, but only for those tools that require me to lift them
way above the rack to get them in their hooks. Namely my leaf blowers.
I'm probably going to tweak the hooks for those tools, and in the meantime
I'll move them to the other end of the rack. The odds are good that I'm
going to lower the rack anyway after I install the next FRP panel, since
it's currently higher than necessary.
- October 14, 2013
-
Due to the odd framing layout at the north end of the garage, I had
to play around a bit with how to mount the second air hose reel. The
two supports above the drywall ceiling there are only 13.75" apart
center-to-center, and the next one is above the top plate of the west
wall. I worked up a plan, but it's possible I'll execute something
different.
I drilled the holes in the two sandwiched pieces of plywood that hold carriage bolts for the reel. I then applied wood glue between the pieces and then bolted the reel to them while the glue sets up. I should not have used 1/2" carriage bolts; they were a VERY tight fit in the reel mounting plate, I'm not sure I'll ever get the reel off of them without a pry bar. I had to hammer it on, and that was after reaming the holes in the hose reel mounting plate a bit. Of course, I wanted 7/16" carriage bolts, but Home Depot did not have them. I'm going to use M10 carriage bolts on the next one, which I ordered from McMaster-Carr. I also ordered locknuts and washers, some of the couplers I need to connect the hose reels, two 5' long rubber leader hoses for the hose reels, and some brass compression tube fittings to connect tubing to the automatic drains (which will eventually be run to the outdoors). I thought I had added tubing to my cart, but I missed it. Not a big deal, I'll order some later. I should probably order NPT to barbed fittings while I'm at it, in case I don't want to use compression fittings and hard tubing. Say McMaster-Carr 5346K17.
I drilled 5/16" holes in the top piece of 3/4" plywood for the second hose reel and mounted it to the ceiling.
-
Due to the odd framing layout at the north end of the garage, I had
to play around a bit with how to mount the second air hose reel. The
two supports above the drywall ceiling there are only 13.75" apart
center-to-center, and the next one is above the top plate of the west
wall. I worked up a plan, but it's possible I'll execute something
different.
- October 13, 2013
-
I went to Home Depot to get some small items: hardware to mount
my remaining cord reels, and more economy paint brushes. I bought more of
the Spax 5/16" x 3.5" lag screws, some 1/2&qout;-13 x
2" carriage bolts, 1/2" washers, and 1/2-13 locknuts. I
also bought more Great Stuff expannding foam: the pest blocker version
(one can) and the fire block version (2 cans).
I started building the ceiling mounts for the remaining cord reels. I considered just using Unistrut since it would be much faster, but I prefer the look I've acheived with the plywood mounts. I cut the 6 pieces I need to mount the remaining two overhead self-retracting reels. I marked the hole pattern for one of them. The other reel is still on my reel cart that I plan to decommission or retask and I'm not sure the hole pattern is the same.
-
I went to Home Depot to get some small items: hardware to mount
my remaining cord reels, and more economy paint brushes. I bought more of
the Spax 5/16" x 3.5" lag screws, some 1/2&qout;-13 x
2" carriage bolts, 1/2" washers, and 1/2-13 locknuts. I
also bought more Great Stuff expannding foam: the pest blocker version
(one can) and the fire block version (2 cans).
- October 12, 2013
-
My back is still a significant hindrance, but I managed to get the
remaining ceiling joints on the north half of the garage sanded and
sealed, except joint #15 which needs another coat of joint compound.
Some of the joints don't look great, but my time is very limited and my
back problem makes sanding very strenuous. I can't spend the
time to make perfect joint repairs. What matters is that they're sealed
up and the drywall has more fasteners to keep it on the ceiling.

I mounted the junction boxes in the attic for the Leviton OSC20-M0W and OSP20-D0. They're mounted flush with the ceiling drywall, and I drilled the hole through the ceiling drywall for the OSC20-M0W wiring.
Sigh, the garage has poor electrical distribution for a garage. The previous owner tapped the circuit for electrical outlets to feed the HO fluorescent lighting. This is bad because that lighting totals 880 watts, which means you can't really run a significant power tool and the lighting at the same time. I will need to address this problem later (moving the unused, incorrectly wired subpanel from the basement to the garage would be a good idea). In the meantime, I am feeding the new recessed lighting (which is a small load) from the garage door opener circuit. The feed is wired from the south opener's outlet, and I wired the 3 rows of lights on the north side of the garage together and ran the wire to the new junction box.
Late at night I wired the remainder of the recessed lighting to see how much light I get from the Cree BR30 9.5W 5000K LED bulbs in the recessed fixtures and to test the Leviton OSC20-M0W. I like the lighting, and if I had installed a handful more, I could probably have ditched the fluorescent lights. But what I have will work great for the intended purpose: enough light to easily find things in the garage at night and well-lit conditions when getting in and out of the cars. And the OSC20-M0W is fantastic. The range covers the whole garage, and it's sentitive enough to stay on regardless of where I am in the garage. Tomorrow I'll button up the junction boxes until I install the lights in the south half of the garage, and remove the bulbs and trim rings so I can prime and paint the ceiling in the north half of the garage. I might get started on removing the plywood in the garage attic and start putting in the lights for the south half of the garage.

My back actually appreciated the hard work crawling around in the warm/hot attic. I suspect it was all about the stretching, not the heat, since heat has generally aggravated it in the past and the hot shower yesterday morning gave me trouble.
-
My back is still a significant hindrance, but I managed to get the
remaining ceiling joints on the north half of the garage sanded and
sealed, except joint #15 which needs another coat of joint compound.
Some of the joints don't look great, but my time is very limited and my
back problem makes sanding very strenuous. I can't spend the
time to make perfect joint repairs. What matters is that they're sealed
up and the drywall has more fasteners to keep it on the ceiling.
- October 11, 2013
-
Darn, had a bad back episode late last night and this morning. It took
me over an hour just to get from my bed to the kitchen for some vicodin
and a muscle relaxer. Mad at myself for putting the meds in my backpack
last night instead of putting them on the nightstand. Very poor planning
on my part.
I can't drive at the moment since the spasms escalate when I sit in the driver seat of my car and I can't depress my clutch or brake pedal without uncontrollable spasms. Sent email to work once I could get to my computer (second floor and stairs are a b**ch). Hopefully I can loosen it up enough to get to work this afternoon since I need to fetch a requirements document and get going on an interface specification. I _think_ I'll be able to drive in an hour or two.
-
Darn, had a bad back episode late last night and this morning. It took
me over an hour just to get from my bed to the kitchen for some vicodin
and a muscle relaxer. Mad at myself for putting the meds in my backpack
last night instead of putting them on the nightstand. Very poor planning
on my part.
- October 10, 2013
-
I stopped at Home Depot
and picked up 3 junction boxes with covers, more wire staples, and
100 more feet of 14/2 wire to continue wiring the recessed lights.
The first 12 Cree BR30 5000K LED bulbs arrived for the recessed lighting.
My back problem flared up last night, and I'm sort of out of commission. It had been at least a year since I had an issue, but today was a lot of pain and hence I'm tired. I sanded ceiling joint #4, which will need some touch up tomorrow. It took all I had to just sand this one joint, my back is killing me. Ceiling joints #4, #5, #14 and #15 are hence still in progress.
On Friday I hope to nearly finish the ceiling joints in the north half of the garage. If my back feels better, I also hope to install the Leviton OSC20-M0W and OSP20-D0 and wire the feeds for the three rows of recessed lights in the north half of the garage. Each row of four lights are already wired to each other.
-
I stopped at Home Depot
and picked up 3 junction boxes with covers, more wire staples, and
100 more feet of 14/2 wire to continue wiring the recessed lights.
- October 9, 2013
-
I applied the third coat of joint compound to ceiling joint #4, #5 and
#14. I applied the second coat of joint compound to ceiling joint #15.
I used pre-mixed joint compound, mostly because I aggravated my old
back problem and hence didn't feel like mixing the setting-type compound.
Since this is a top coat, it'll be fine. It'll all get sealed up with
Zinsser B-I-N shortly anyway.
I reinstalled the second 8' long T12 HO fluorescent light with the new electronic ballast on the north half of the garage. I consider these ballasts a tradeoff. They produce a lot more RFI than the old magnetic ballasts, making radio reception near impossible when they're on. But they're audibly silent. Given that a lot of my live radio listening these days is streamed over the Internet, it's a tradeoff I'm willing to make. And I will not have them on all of the time once I complete the installation of the recessed lighting.
I know a lot of people consider recessed lights evil. And they are from an HVAC perspective. That's why I bought IC-rated air-tight fixtures. Yes, they'll still leak some air between the fixture and the drywall, and they're not absolutely air-tight. But the holes I cut for them are very snug, and I can caulk the gap if desired. More importantly... in a garage, I like to have lights that are flush with the ceiling. It greatly reduces the chances of breaking a bulb when handling long pieces of dimensional lumber, pipe or whatever. It also gives me several more inches of clearance for a car lift.
The Leviton OSC20-M0W and OSP20-D0 arrived from Amazon. I need to buy a few junction boxes and more wire to get started on the installation. The first set of twelve Cree BR30 5000K LED bulbs should arrive tomorrow and I'm somewhat anxious to see what the lighting looks like in the north half of the garage. It's one thing to know the lumens/sq.ft., it's another to actually experience it. This isn't going to be work lighting, it's just everyday lighting (operated solely by the OSC20-M0W, no light switch).
-
I applied the third coat of joint compound to ceiling joint #4, #5 and
#14. I applied the second coat of joint compound to ceiling joint #15.
I used pre-mixed joint compound, mostly because I aggravated my old
back problem and hence didn't feel like mixing the setting-type compound.
Since this is a top coat, it'll be fine. It'll all get sealed up with
Zinsser B-I-N shortly anyway.
- October 8, 2013
-
The four pieces of stainless steel pegboard arrived from
diamondlifegear.com. It's
very nice, I suspect I'll order more once I have a completed storage plan.
The 3/4" threaded ball valves and fittings I need for my air drops arrived from McMaster-Carr, along with some military grade premium pipe thread tape in light green.
I took a slight break from garage work to listen to the last 2 innings of the Detroit Tigers game (ALDS game 4); the Tigers are down 2-1 in the series and hence this was an elimination game.
I then sanded the second coat of joint compound on ceiling joints #4, #5 and #14. I sanded the first coat of joint compound on joint #15. Tomorrow night I'll put another coat of joint compound on these joints, along with the wall joint above the north garage. Once these joints have their final coat of joint comopound and are sanded, I can prime all remaining joints in the north half of the garage and call that half done in terms of ceiling joint repair. I can then prime and paint the ceiling in that half of the garage. The other half is probably going to have to wait for the springtime.
Tonight I realized that the wall between the garage doors is severely bowed. At the moment I'm not sure why, since the drywall is in place. It might just be from settling. But it throws a wrench in my plan to mount stainless steel pegboard on that wall. I can of course shim it, but we're talking about 3/4" or more of bowing. It has me thinking that I should remove a section of the drywall to see what's going on, or at least be prepared to do so. I can of course just put thick furring strips (probably 2x2 poplar) on the drywall, which might not be such a bad idea; it would let me conceal some of the air piping. behind it and hence allow me to use more of the pegboard.
-
The four pieces of stainless steel pegboard arrived from
diamondlifegear.com. It's
very nice, I suspect I'll order more once I have a completed storage plan.
- October 7, 2013
-
I sanded the first coat of joint compound on ceiling drywall joints #4, #5 and #14. I removed the failed tape and compound from joint #15. I taped and mudded joint #15 and put a second coat of compound on joints #4, #14 and most of #5. I'm calling joints #1, #10 and #11 done as far as joint compound is concerned. They just need some Zinsser B-I-N.

I received a shipping confirmation from diamondlifegear.com for the 4 small pieces of stainless steel pegboard that I ordered. It will arrive tomorrow.
I downloaded the installation instructions for the Leviton OSC20-M0W occupancy sensor and put it in my Manuals collection.
Amazon says the OSC20-M0W and OSP20-D0 should arrive on Wednesday.
-
- October 6, 2013
-
I cleaned the old joint compound out of ceiling joints #5 and #14. I
taped and mudded the east half of joint #4. I then shored up the drywall
around ceiling joints #5 and #14 with drywall screws.
I sanded the second coat of joint compound on ceiling joint #10. I may or may not put a third coat of joint compound on this joint. I need to see it during daylight hours since it's above the window.
I taped and mudded ceiling joints #5 and #14 with setting-type joint compound.
I sanded and sealed ceiling joint #3; it is now done. I sealed joint #1 except near joint #10 since I'm not sure I'm done with joint compound there.

As an aside, the Zinsser B-I-N continues to impress me. It dries fast and hard, and seals very well. If it were not so expensive, I'd prime the whole garage with it instead of just using it to seal my joint compound and wood. On the other hand, until I have the garage heated regularly, shellac based primer like B-I-N would be a bad idea for large surfaces since it's brittle compared to latex and oil based primers. I'm only using it to spot-prime the joint compound.
I ordered the Leviton OSC20-M0W occupancy sensing switch and OSP20-D0 power pack from Amazon. This is for the recessed lighting.
I also ordered twelve of the Cree BR30 5000K LED bulbs for the recessed lighting. I will need twelve more once I install the remaining recessed lights, but I want to get one half of the garage lit soon so I can stop using the power-hungry fluorescent lights all of the time.
-
I cleaned the old joint compound out of ceiling joints #5 and #14. I
taped and mudded the east half of joint #4. I then shored up the drywall
around ceiling joints #5 and #14 with drywall screws.
- October 5, 2013
-
I installed the metal-reinforced edge trim on the exposed steel angle of the garage door tracks. This will protect my ceiling-mounted air hoses from being scraped by the steel angle if the hose whips around when retracting and when I pull hard on the hose at a severe angle.
I ordered some more valves and fittings for my air supply from McMaster-Carr. This time I ordered threaded valves. After last night's soldering, I've decided I just don't enjoy the care required to solder valves with 95/5 solder. You have to be very careful with the torch to not cook the PTFE ball seal. I don't think I cooked the ones I soldered last night, but I don't have the time to be doing a bunch of these.
I shored up the drywall around another 18' long ceiling joint, and taped and mudded a little more than half of it. Unfortunately I can't do the whole joint at once due to space constraints. I'll do the remainder tomorrow.
I taped and mudded a very bad joint above the northmost garage door. This joint had a 1/2" gap between the sheets of drywall. My new shelving is in the way of doing the finish coats, I'll need to take that shelf down to complete the job.
I sanded the second coat of joint compound on another 10' ceiling joint. This joint will need a third coat of joint compound.
I put the second coat of joint compound on the ceiling joint above the window. This joint was tricky due to a very uneven intersection with the very first joint I had done. It won't be perfect no matter what I do, I have to keep reminding myself that it's a garage and that my main objective is to seal the joints to prevent air and moisture from entering the attic. I was hoping to finish the joint compound work in this half of the garage this weekend, but it's not going to happen.
I created a diagram showing all of the ceiling drywall joints, mostly so I can keep track of my progress. Right now, joint #2 is done. Joints #1 and #3 are mostly done. Joint #11 is done except near joint #10. I'm working on joints #10, #3 and #4. I'd like to get the initial mud and tape in the rest of joint #4, joint #14 and joint #5 tomorrow. However, joints 14 and 5 have not been cleaned of the original compound yet. I'd also like to get the rest of joint #1 and joint #3 sealed with Zinsser B-I-N tomorrow.

I need to decide what I'm going to do with the output of my automatic drains on the air drops. I'm not excited about having buckets under them. I think I'd like to put compression adapter fittings on them and run the tubes through the wall to the outdoors. No space consumed in the garage, and no buckets to tip over.
-
- October 4, 2013
-
I made a late night trip to Home
Depot for 3/4" copper pipe, 1/2" copper pipe, three more
FRP panels, FRP adhesive, some 3/4" copper elbows, and 3 more pieces
of 3/4" thick 2' x 4' plywood. I forgot to buy Quikrete for mom. :-(
I'll make a trip in the morning for mom's Quikrete.
The hose reels and filter/regulator combos arrives from Northern Tool. Automatic drains, 3/4" ball valves, 1/2" ball valves, solder, flux, edge trim (to protect my air hoses from garage door angle iron) and a slew of plumbing fittings arrived from McMaster-Carr.
I started a bit of the copper pipe soldering for the air drops, just so I could get a feel for the flux and solder I'm using and figure out how narrow I can make the drops to conserve wall space. In doin this, I realized I should probably buy more 3/4" ball valves so I can individually disable each drop and also shut off the automatic drains individually for servicing. Of course, as it stands today, I've never had water reach my tools since I have an automatic drain on my tank, another automatic drain on the drip leg near my tank, and the Milton filter that drains when pressure drops below 5 PSI.
-
I made a late night trip to Home
Depot for 3/4" copper pipe, 1/2" copper pipe, three more
FRP panels, FRP adhesive, some 3/4" copper elbows, and 3 more pieces
of 3/4" thick 2' x 4' plywood. I forgot to buy Quikrete for mom. :-(
I'll make a trip in the morning for mom's Quikrete.
- October 3, 2013
-
I sanded the final coat of joint compound on two ceiling joints, and
primed one of them with Zinsser B-I-N. I'm not thrilled with parts of
the second joint, but my time is limited and the drywall is crooked
enough that it would take a lot of work and joint compound to make it
look great. And it's a garage, after all. My main goal is to get the
joints sealed so I don't have major moisture penetration once the attic
is insulated.
I sanded the first coat of joint compound on a third joint. I then put the second coat of joint compound on it.
I taped and mudded the 4' long joint near the window.
I added some of the remaining parts to the air plumbing wish list. Lead hoses, couplers, and the 3/4" and 1/2" copper pipe that I need. I need to add some elbows and figure out how I'm going to connect the compressor. I think I have most of what I need on hand to connect the compressor, it's just a matter of the plumbing configuration.
-
I sanded the final coat of joint compound on two ceiling joints, and
primed one of them with Zinsser B-I-N. I'm not thrilled with parts of
the second joint, but my time is limited and the drywall is crooked
enough that it would take a lot of work and joint compound to make it
look great. And it's a garage, after all. My main goal is to get the
joints sealed so I don't have major moisture penetration once the attic
is insulated.
- October 2, 2013
-
New Milton 1108 Air filters/regulators should arrive on Friday, along
with another self-retracting hose reel, a manual hose reel, a pair of
telescoping blow guns and a pair of Milton pushbutton safety couplers.
I need to complete my air plan (couplers and whip hoses) so I can start
working on it soon. It's become a pain to drag hoses around in the
garage. I ordered a slew of parts from
McMaster-Carr tonight that I know I need. I will later order the
lead hoses and the like. The most important things in this order were
the automatic drains, 95/5 (tin/antimony) solder, Nokorode solder flux
and the ball valves with T-handles. I also ordered the edge trim to protect
my air hoses from the angle iron of my garage door tracks, and most of the
copper fittings I need except 3/4" couplers and elbows since I can
get those locally at Home Depot.
Tonight I sanded the second coat of joint compound on another ceiling joint. This particular joint will need a third coat, which I'll do with pre-mixed joint compound.
I do not have any shipping status from diamondlifegear.com on my stainless steel pegboard order. Kind of disappointing that an online store doesn't provide order status. Hence I can't complete my plan for the bit of wall space between the garage doors. I need to have parts in hand to decide how that wall will be laid out. I may not put much FRP on it if I decide I'm going to have some of the stainless steel pegboard mounted there.
-
New Milton 1108 Air filters/regulators should arrive on Friday, along
with another self-retracting hose reel, a manual hose reel, a pair of
telescoping blow guns and a pair of Milton pushbutton safety couplers.
I need to complete my air plan (couplers and whip hoses) so I can start
working on it soon. It's become a pain to drag hoses around in the
garage. I ordered a slew of parts from
McMaster-Carr tonight that I know I need. I will later order the
lead hoses and the like. The most important things in this order were
the automatic drains, 95/5 (tin/antimony) solder, Nokorode solder flux
and the ball valves with T-handles. I also ordered the edge trim to protect
my air hoses from the angle iron of my garage door tracks, and most of the
copper fittings I need except 3/4" couplers and elbows since I can
get those locally at Home Depot.
- October 1, 2013
-
I installed the second piece of FRP near the Rubbermaid FastTrack that
holds my yard tools. This FastTrack is normally completely full, I
had to empty it to install the FRP. I put one of my leaf blowers (the
electric one) and my post hole digger back in place for the picture
below just so you can see the purpose of the FRP. It protects the drywall,
and it's very durable and easy to clean.
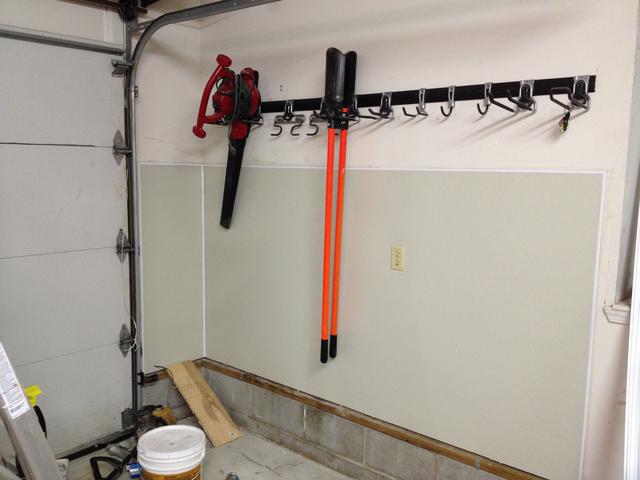
- September 30, 2013
-
I installed an FRP panel under the Rubbermaid FastTrack that will hold
my yard tools. I had forgotten how much work it was to roll this stuff
flat after applying the adhesive; I'm tired. :-) I'll cut and install
the second piece soon.
The ATR19S-SO air tool holders, ten extra ATRA-12 swivel adapters to place on my tools for the holders, and a DAHLDR2-RED air sander holder arrived from VIM Tools. I'm not ready to install them yet.
I ordered four 3' x 2' stainless steel pegboards with backing board from diamondlifegear.com. Two of these will likely go between the garage doors. The other two will likely go on the garage door wall, south of the south garage door. They were not cheap, but I will definitely use them.
I also ordered two Milton 1108 air/filter regulators, another 50' ReelWorks air hose reel with 50' of 3/8" rubber hose, two Milton M-style safety couplers, two more telescopic air blow guns, and a manual air hose reel from Northern Tool. The manual reel will hold 100' of 3/8" hose, though I don't expect to put 3/8" hose on it. I'm expecting to put 1/2" hose on it for the times I need to extend a lot of hose outdoors.
-
I installed an FRP panel under the Rubbermaid FastTrack that will hold
my yard tools. I had forgotten how much work it was to roll this stuff
flat after applying the adhesive; I'm tired. :-) I'll cut and install
the second piece soon.
- September 29, 2013
-
I sanded the two joints I taped and mudded yesterday, and applied the
second coat of setting-type joint compound. I taped and mudded another
10' joint using setting-type joint compound.
Given that some of my air tool hangers arrive tomorrow, I'm going to take a short break from drywall tomorrow to install two or three pieces of FRP panel. Today I cut one of the pieces: the one that will protect the wall beneath the Rubbermaid FastTrack rail that holds my yard tools. I need to cut a second piece for that area, to go between the edge of the garage door and the north wall. Another piece will be used to protect the wall between the garage doors where I intend to install some air tool hangers.
-
I sanded the two joints I taped and mudded yesterday, and applied the
second coat of setting-type joint compound. I taped and mudded another
10' joint using setting-type joint compound.
- September 28, 2013
-
I moved a few more items to the basement to make it easy to move one
of my benchtops around in the garage for taping joints on the ceiling.
USA Insulation was here for an estimate to insulate the garage ceiling. I'm happy with the estimate, but I won't be executing it for at least a few weeks.
I taped and mudded two more 10' long ceiling joints. They'll need sanding and a second coat, of course. I also pulled the loose tape from an 18' joint, and cleaned about 1/3 of it. There's another one of these to be done, and then I can tape and mud the remainder of the north side of the garage ceiling.
Tonight I intend to start ordering parts to plumb for air. Tomorrow I'll probably borrow mom's truck and pick up the copper pipe and maybe some more FRP panels. I need 5 10' long pieces of 1/2" pipe and 9 10' long pieces of 3/4" pipe.
-
I moved a few more items to the basement to make it easy to move one
of my benchtops around in the garage for taping joints on the ceiling.
- September 27, 2013
- I've completed a basic air line plan.
- September 25, 2013
-
I now have three more 10' long joints cleaned up and ready for taping and
jointing. I shored up all of the drywall with drywall screws, and tapped
in the nails that had backed out a bit. Hopefully the nails will stay
put since there are now screws holding up the drywall.
I finally cut up and threw out the three big boxes that were laying on the floor: the boxes for the washer and dryer and the box for the laundry room cabinet.
I didn't get much done for the last two days due to dealing with Comcast problems (my service was down for 5 days and there was the usual trail of fiascos: different story every time I called, which was different from what the automated system was telling me, and as usual the technicians didn't show up for scheduled appointments (first on Saturday September 21 at 2PM, then on Tuesday September 24 at 4PM). They wound up sending an escalation technician after I kept complaining, but he couldn't get here until 9PM. He was here until 2AM last night running new RG-11 cable all the way from the road to the back of the house (over 300 feet), then new cable in the basement since it previously entered the front of the house and I did not want to move my server rack and my modular wiring box that feeds the rooms in the house. While my Internet connection is now working, there are still some issues they need to address at the road. Tests look OK at low and high frequencies with a new amplifier installed in the basement, but middle frequencies (for video services) are still down a lot (like 30dB). Thankfully I'm not using television services at all at this point, but I will be in the future. Once the line technicians fix the issue at the road, I'll probably call the tech back to check my signal strength in the basement. It might wind up way too hot at the low and high frequencies with the amplifier installed. Unlike the zany previous owner, I won't have cable going to every room in the house. I don't need cable in my kitchen, for example.
-
I now have three more 10' long joints cleaned up and ready for taping and
jointing. I shored up all of the drywall with drywall screws, and tapped
in the nails that had backed out a bit. Hopefully the nails will stay
put since there are now screws holding up the drywall.
- September 23, 2013
-
I cleaned the loose joint compound from another 10' joint in the northwest
corner of the garage, in preparation for new tape and compound. This one
had a wide swath of joint compound that wasn't adhered to the drywall.
I then did the same for the next 10' long joint. I have more of them to
do before I start taping and mudding again.
I removed the second fluorescent light in the north half of the garage, and removed its ballast. Like the first light, this one will get a new electronic 0F-rated ballast. It saves a lot of weight, and I'm growing very tired of the buzzing noise of the remaining magnetic ballasts.
I shored up some of the sagging drywall with new drywall screws, then tapped in the popped nails with a nail set. Hopefully they won't pop up again. They hadn't come out far enough to pull them without damaging the drywall, and they're rusty so they probably won't come out easily. I still can't believe how few nails are in the garage ceiling drywall; nowhere near enough to meet code requirements.
I was hoping to do some taping and mudding tonight, but it took too long to remove the loose mud in the damaged joints.
I ordered a few things from the Red Hot Deals at VIM Tools: four more ATR19S-SO air tool holders, ten extra ATRA-12 swivel adapters to place on my tools for the holders, and a DAHLDR2-RED air sander holder. I've had one of the ATR19S-SO holders for ages and I really like it. At $11.50 with 5 swivel adapters, they're a steal. I'll likely mount two of them on the wall near my existing air hose reel, and the other two on my air tool cart if I don't ditch it in the name of saving space.
I've decided I'm going to mount two more air hose reels, one at each end of the garage. I don't frequently need more than one air tool at a time, but sometimes I do. More importantly, this is a convenience thing; when there are cars in the garage, it's not always easy to pull an air hose from a single location. By having all 3 reels near the same wall, the plumbing is straightforward.
-
I cleaned the loose joint compound from another 10' joint in the northwest
corner of the garage, in preparation for new tape and compound. This one
had a wide swath of joint compound that wasn't adhered to the drywall.
I then did the same for the next 10' long joint. I have more of them to
do before I start taping and mudding again.
- September 22, 2013
-
I cut two pieces of 3/4" thick plywood to 2' x 2'. I drilled holes
for my dock fan, and countersunk some 3/8"-16 1.75" long
armor-coated bolts from the back in a pattern matching my dock fan's mounting
brackets. I then mounted the fan to these pieces. With some assistance
from Julie, I mounted the whole assembly on the north wall, right next to
the window.

With the dock fan on high and my portable dual fan stand at the garage door threshold, I sanded the 10' drywall joint that I had mudded on the 18th. I then put a coat of Zinsser B-I-N over the sanded joint compound to seal it from moisture until I get around to priming the whole ceiling with KILZ Original oil-based primer.
Sanding the ceiling by hand is exhausting. To sand two of the other joints, I used my palm sander. It's a bit heavy to be holding over my head for long periods of time, but it saves a lot of time. I sealed these joints with Zinsser B-I-N.
I cut a piece of 3/4" plywood to 2' x 3' and mounted it to the ceiling between the garage doors with six 3" long Spax lag screws and four 2.5" long deck screws. I then mounted my 1.5" thick plywood block for my air hose reel to the aforementioned plywood, then mounted the hose reel to the 1.5" thick block. It seems very solid, but only time will tell. I liker this location because it's the center of the garage north-to-south, and with 50' of hose, I can easily get air to any location in the garage from here. I can also easily get air outside from here. The only downside is that if I pull hard to the north or south, there is the possibility of the hose scraping the edge of the angle iron for the garage door tracks. The easy solution to this problem is edge trim on the angle iron. I'll order some from McMaster-Carr.
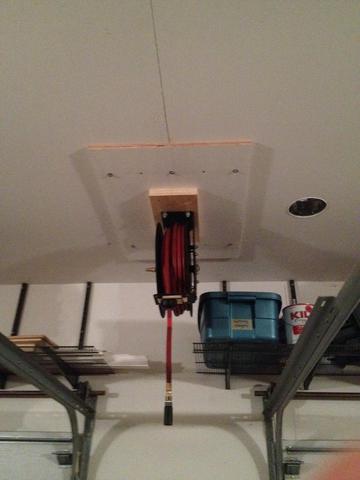
I have not plumbed for air yet, having not decided if I want copper or black iron or RapidAir.
Given that the cord reel I bought the other day from Home Depot is broken, I'm not going to mount it to the ceiling. It looks like I'll invest in a beefier one, probably with 12/3 wire.
-
I cut two pieces of 3/4" thick plywood to 2' x 2'. I drilled holes
for my dock fan, and countersunk some 3/8"-16 1.75" long
armor-coated bolts from the back in a pattern matching my dock fan's mounting
brackets. I then mounted the fan to these pieces. With some assistance
from Julie, I mounted the whole assembly on the north wall, right next to
the window.
- September 21, 2013
-
I moved my second computer rack to the basement to get it out of the
way.
I sanded the joints on the ceiling near the area where the fluorescent light was installed. I then primed these spots with two coats of Zinsser B-I-N. I reinstalled the 8' long T12 HO fluorescent light, with the new electronic ballast installed. Unlike the previous homeowner, I put the screws into the joists above the ceiling so it will not pull the drywall off of the ceiling. I like the new electronic ballast; it will work in very cold temperatures, it's silent, and it weighs a lot less than the old ballast.
The drywall joints on the ceiling that I've redone look quite good. I have a lot more to do, and it's slow going, but at least it's turning out nicely. Of course, to keep them that way, I need to get oil-based primer on the ceiling and insulation in the attic.
I installed one of the pegboard panels in the stairwell to the basement. I then installed four of my spraycan racks on it.
I gathered the parts to install my dock fan. Given the location of electrical outlets in the garage, there's really only one place to put it: east of the window, near the stairwell to the garage. This is a good thing, it will allow me to draw air from the basement when I want to exhaust dust from the garage. I will probably install the fan late tonight, since it's been in my way on the garage floor for a long time.
-
I moved my second computer rack to the basement to get it out of the
way.
- September 20, 2013
-
I put together three more pegboard panels. I put a coat of Zinsser
B-I-N on the back of them to help prevent deterioration from moisture
and prevent tanins from seeping through paint. I'll prime the sides
with Zinsser B-I-N later.
I started sanding more of the ceiling joint compound, in preparation for another round of taping and mudding. I'm trying to finish the northeast part of the ceiling so I can put the fluorescent light back in place. I'm not aiming for perfection here, I just want the attic to be sealed off from the garage better than it was with all of the failed joints. So far the setting-type compound is working well for that purpose. It'll be better once I have some decent primer on and get the recessed lights fully installed.
I put a second coat of mud on more of the ceiling joints. I used pre-mixed joint compound on one, mostly due to not feeling like mixing more of the setting-type compound. I'm not worried about moisture causing a problem here, since the first coat was setting-type compound and I intend to use KILZ Original primer on the ceiling, which is oil-based and works very well at sealing out moisture.
I installed the final shelf above the south garage door.
-
I put together three more pegboard panels. I put a coat of Zinsser
B-I-N on the back of them to help prevent deterioration from moisture
and prevent tanins from seeping through paint. I'll prime the sides
with Zinsser B-I-N later.
- September 19, 2013
-
I stopped at Home Depot and
bought some inside corner trim for FRP panels. I also bought some panel
joining pieces, since I expect to protect more of the drywall with FRP
panels than just lone panels. I bought some more setting-type joint
compound, as well as a bucket of pre-mixed joint compound which I might
use as my top coat since it's a little easier to sand. If I were not
working on a 10' ceiling with existing paint and compound, I would be
using Durabond. But it's a waste of effort on old dirty imperfect
joints. I don't have the time to remove a whole lot of old joint
compound.
I forgot to buy some replacement springs for my recessed light housings; one was missing in the shipment from platt.com due to poor packing. I also forgot to buy a drywall sanding tool with vacuum attachment. I'll get these tomorrow so I can start sanding the first pass of joint compound and start the second pass.
I taped and mudded a few more of the joints in the garage using the setting-type joint compound. I sanded the joint above the south garage door and applied the first coat of primer to it (Zinsser B-I-N). Tomorrow I'll put the second coat of primer on it so I can install the second shelf above that door.
I cut the wood for two of my pegboard frames. I assembled one of the pegboards on its frame. I'll assemble the second one tomorrow. One of these will hold some of my spraypaint can racks, and probably be mounted in the stairwell to the basement from the garage. It will not be heavily loaded, and I don't need spraypaint, Rust Encapsulator, undercoating, etc. very often. And I'd rather have it in a climate controlled environment.
My Internet connection is down, so I can't check the stock levels at Menard's for the Rubbermaid Tough Stuff shelving. However, I've concluded that it's not as strong as the ClosetMaid Maximum Load. In fact it's not even as strong as the regular ClosetMaid stuff. The brackets are OK, but the shelves themselves are fairly flimsy in comparison (much thinner wire lengthwise). Hence for the shelves above my workbenches, I'm probably going to use ClosetMaid. I'm OK with the Rubbermaid Tough Stuff over the garage doors, since they're 20" deep and I need the depth for some things.
-
I stopped at Home Depot and
bought some inside corner trim for FRP panels. I also bought some panel
joining pieces, since I expect to protect more of the drywall with FRP
panels than just lone panels. I bought some more setting-type joint
compound, as well as a bucket of pre-mixed joint compound which I might
use as my top coat since it's a little easier to sand. If I were not
working on a 10' ceiling with existing paint and compound, I would be
using Durabond. But it's a waste of effort on old dirty imperfect
joints. I don't have the time to remove a whole lot of old joint
compound.
- September 18, 2013
-
The Halo ERT707WHT trim rings arrived for the recessed lights. They will
work fine, I fitted one to check. They're simple and plain, but that's
just what I wanted for the garage and the price was right. Especially
considering that the LED light bulbs are going to cost a small fortune.
Screws and spacers arrived for building and mounting framed pegboard panels.
I scraped more of the old joint compound off of the ceiling, and put the first coat of mud and tape on another joint (a 10' section). I think I now have a pretty good idea of how much of the setting-type mud I can mix at a time and use before it becomes unworkable: about 4 cups. I could do a lot more if I was working on scaffolding or drywall stilts, but I'm using a ladder and spending a lot of time moving the ladder. The joint I filled tonight was a disaster due to poor drywall installation; there was a 1/2" gap along most of the 10' span.
I'm a little bit sidetracked tonight by iOS 7. I'm patiently waiting for the download and installation to finish on my iPhone.
-
The Halo ERT707WHT trim rings arrived for the recessed lights. They will
work fine, I fitted one to check. They're simple and plain, but that's
just what I wanted for the garage and the price was right. Especially
considering that the LED light bulbs are going to cost a small fortune.
- September 17, 2013
-
I put the second coat of mud on the drywall joint above the garage door.
I used my 10" knife and don't expect to use my 12" knife. It's
not worth the effort in a garage. And until I have the ceiling insulated
and a heater in place, cracks are likely going to reappear.
I also put the second coat of mud on the small section of the ceiling I worked on yesterday, and the first coat on a nearby section. I don't expect these areas to remain uncracked either, but the original tape had no mud under the tape in several areas.
I moved one of my computer racks to the basement. It's been in my way sine I bought the house. I will move the other one to the basement tomorrow. Not so easy doin it alone, but it's manageable.
I put some drywall screws in the ceiling drywall in the northeast quadrant of the garage, wherever it was obvious that the drywall was loose. This is in preparation to tape and mud the drywall joints that have failed (which is all of them in this quadrant). I expect to do a decent amoun of taping and mudding in this part of the garage over the next 2 days.
I removed the hooks that were screwed into the ceiling between the garage doors. I'll be putting a cord reel and air hose reel here. It's a good spot for them since it's the center of the garage from north to south and overhead space is already constrained here by the garage door tracks. I need to add an outlet in the ceiling for the cord reel. In all likelihood I'll just branch from one of the garage door opener outlets, sine those are the only things on that circuit and I won't be opening and closing garage doors while operating anything connected to the cord reel.
On Saturday the 28th, USA Insulation is coming out to help me figure out what to do with garage attic insulation. I want closed-cell foam to be sprayed in, but I know it's not cheap. However, it's the best route to a reasonable R-value at low thickness. The main issue here is the fact that I'm not done planning electrical work in the attic.
-
I put the second coat of mud on the drywall joint above the garage door.
I used my 10" knife and don't expect to use my 12" knife. It's
not worth the effort in a garage. And until I have the ceiling insulated
and a heater in place, cracks are likely going to reappear.
- September 16, 2013
-
I taped and mudded the failed drywall joint above the south garage door.
I used setting-type joint compound. I'll need to sand and put a second
coat on tomorrow. With what I had left in my mud tub, I taped and mudded
a short section of a failed ceiling joint. This was a section under
the fluorescent light I removed a while ago and intend to put back. I'd
like to fix more of the ceiling joints, but at the moment I don't have
enough room to move around easily in the garage. I need to move some
more things to the basement, especially the big space hogs like my old
computer racks.
I am trying to do some planning. I think I want to get rid of
almost all of my benchtops. They take up tremendous amounts of space,
and I don't use them often. All I probably need is a Vika TwoFold or
two. And I don't really need my Lista fastener storage in the garage;
it would be fine in the basement. I definitely don't need my 8'
workbench in the garage, thought it might be nice to cut it shorter and
keep it tucked in the awkward corner that once held the utility sink.
Especially if I keep it high enough that I can roll some things under
it. I do need a place for a vise, of course.
I ordered 24 steel slot reinforcements for my slatwall panels. This is enough to do every other slot. I don't need reinforcements in every slot. These will be delivered to my local Do-it-Best hardware store and I'll pick them up there. Avoids the shipping cost.
I also ordered screws to build my pegboard frames and screws and spacers to mount them to the walls. I need to do this soon, I have a lot of tools that I previously had hung on pegboard, which currently have no home.
-
I taped and mudded the failed drywall joint above the south garage door.
I used setting-type joint compound. I'll need to sand and put a second
coat on tomorrow. With what I had left in my mud tub, I taped and mudded
a short section of a failed ceiling joint. This was a section under
the fluorescent light I removed a while ago and intend to put back. I'd
like to fix more of the ceiling joints, but at the moment I don't have
enough room to move around easily in the garage. I need to move some
more things to the basement, especially the big space hogs like my old
computer racks.
I am trying to do some planning. I think I want to get rid of
almost all of my benchtops. They take up tremendous amounts of space,
and I don't use them often. All I probably need is a Vika TwoFold or
two. And I don't really need my Lista fastener storage in the garage;
it would be fine in the basement. I definitely don't need my 8'
workbench in the garage, thought it might be nice to cut it shorter and
keep it tucked in the awkward corner that once held the utility sink.
Especially if I keep it high enough that I can roll some things under
it. I do need a place for a vise, of course.
- September 15, 2013
-
While marking the wall above the south garage door for shelf uprights,
I pulled the joint tape for one of the many drywall joints that have
failed. None of the joints in the garage that I've looked at so far
were done correctly, including this one. There is no joint compound
under the tape. It's no wonder that most of the joints have tape that's
falling off; there's nothing holding the tape to the drywall underneath
the tape, and the joints themselves have no mud in them. Sigh, shoddy
drywall work. I'm going to need to fix it soon, probably starting
today. On some of the walls, I'm not so concerned, since I'm probably
going to cover the drywall with FRP panels (much more durable than a
painted drywall surface, and easy to clean). For this particular joint,
I'm going to use setting-type joint compound. Note that like many
other joints in the garage, this joint is unsupported at the edge.
Very sub-par drywall job by someone. :-(
I went to Home Depot and bought a bunch of supplies for various projects. A sheet of 5/8" drywall to replace the sheet destroyed by the previous owner's dryer duct hackery, four sheets of textured FRP for drywall protection in various places, a large bucket of FRP adhesive, 16 Spax 5/16" diameter 3.5" long corrosion-resistant lag screws, two more 2' x 4' pieces of 3/4" thick B/C plywood, four pieces of 2' x 4' pegboard, six 8' long 1x2 pieces of select pine to mount pegboard, twelve cap mouldings for FRP panels, a Husky 50' cord reel, two gallons of Kilz Original oil-based primer, a small bucket to mix setting-type joint compound, and a couple more economy-grade paint brushes.
I put two coats of Zinsser B-I-N on the four pieces of 2' x 4' x 3/4" sanded plywood. I know I'm going to cut these pieces, but I figured I might as well get a head start on priming them and I used the B-I-N because it's better than anything else for priming wood.
-
While marking the wall above the south garage door for shelf uprights,
I pulled the joint tape for one of the many drywall joints that have
failed. None of the joints in the garage that I've looked at so far
were done correctly, including this one. There is no joint compound
under the tape. It's no wonder that most of the joints have tape that's
falling off; there's nothing holding the tape to the drywall underneath
the tape, and the joints themselves have no mud in them. Sigh, shoddy
drywall work. I'm going to need to fix it soon, probably starting
today. On some of the walls, I'm not so concerned, since I'm probably
going to cover the drywall with FRP panels (much more durable than a
painted drywall surface, and easy to clean). For this particular joint,
I'm going to use setting-type joint compound. Note that like many
other joints in the garage, this joint is unsupported at the edge.
Very sub-par drywall job by someone. :-(
- September 14, 2013
-
I finished installing the south garage door opener, except for the
obstruction detectors. For now I'm using the old ones, which work but
are so loosely mounted that they have no chance of staying aligned.
I'll need to remount them, or install the new ones that came with the
garage door opener.
I adjusted the torsion springs on the south door and replaced the old door rollers with new 13-ball nylon rollers. The door is now quiet and smooth.
I cut twelve more pieces of Rubbermaid Tough Stuff upright to mount the shelves above the south garage door. I mounted six of them to the wall and installed one of the shelves.
-
I finished installing the south garage door opener, except for the
obstruction detectors. For now I'm using the old ones, which work but
are so loosely mounted that they have no chance of staying aligned.
I'll need to remount them, or install the new ones that came with the
garage door opener.
- September 13, 2013
-
I almost finished installing the south garage door opener. It's
mounted to the header and the ceiling, in the same manner as the north
door. It is rock solid. I still need to adjust the springs on the
south door, attach the garage door opener to the door and adjust it, and
install all of the obstruction sensors. I need to install the new
rollers in the south door, and install the new garage door seals.
I also need to officially mount the control pads on the wall by the door to the house; I have the one for the north door just temporarily mounted at the moment. And I need to install the keypads outside.
I am preparing to order G-Floor for the garage floor. I wanted to wait to do this, but Home Depot has a really good price right now on what I want (hundreds of dollars cheaper than anywhere else): 9' x 44' industrial grade coin pattern in slate gray. I also need to be realistic: if I wait, winter is going to make a complete mess of the concrete floor from parking a wet, snowy, muddy car. Two of these will cover the entire garage floor. I will buy edge trim this time, instead of using tape to mate pieces together. The industrial grade is 13% thicker than what I've used before, which will help prevent stretching from jacking cars. I may later put RibTrax on top of it, but having something that makes spills easy to clean is a very good thing.
-
I almost finished installing the south garage door opener. It's
mounted to the header and the ceiling, in the same manner as the north
door. It is rock solid. I still need to adjust the springs on the
south door, attach the garage door opener to the door and adjust it, and
install all of the obstruction sensors. I need to install the new
rollers in the south door, and install the new garage door seals.
- September 12, 2013
-
I stopped at Home Depot on the
way home from work. I bought five Arlington BE1 electrical box extenders
for areas where I might install slatwall around an existing electrical
outlet.
I removed the old garage door opener's header bracket from the wall above the south garage door. It was installed directly on the drywall, not recommended. The lag screws holding it were loose, probably due to compression of the drywall. I cut two pieces of 3/4" thick oak plywood as a pad and used 3" long lag screws to hold the first one to the stud behind the drywall. The second piece of oak plywood is screwed to the first with deck screws. I then used lag screws to mount the bracket for the new garage door opener to the second piece of oak plywood. It should be plenty solid. Note that unlike the north door, this bracket is centered on a wall stud. Since I didn't want a 33.5" log support piece up there, I opted for about 8" of width for the plywood pieces. Given that I'll be mounting the opener motor to the ceiling in a much firmer manner than the previous owner, and installing all new 13-ball rollers, I think it will be good for a very long time.
The trim rings for the recessed lighting shipped today and should arrive next Wednesday. I picked out the motion detection unit and power pack that I want to use to operate the recessed lights, but have not ordered it yet. I need to look at the installation instructions to figure out where I should place it, keeping in mind that I intend to insulate the garage ceiling and that I need to hang hose reels and a garage heater from the ceiling. A garage heater will pose two problems: it will block the infrared vision of the unit and when on it will likely trip the ultrasonic sensing of the unit.
-
I stopped at Home Depot on the
way home from work. I bought five Arlington BE1 electrical box extenders
for areas where I might install slatwall around an existing electrical
outlet.
- September 11, 2013
-
I ordered 24 Halo ERT707WHT trim rings
with metal baffles from
platt.com. These are for the
new recessed lights in the garage. Slightly cheaper
product price than Home Depot,
but more importantly, they had plenty of them in stock.
Home Depot has none in stock.
I hope they fit OK. These were far and away the least expensive trim
rings I could find, so at least it won't be a big loss if there's an
issue with them. And unlike most of the baffled ones I've seen locally,
the baffles are metal instead of plastic. The rings are high gloss,
which I'm not excited about but it does make them easier to clean.
And for $3.16 each, I can't complain.
I installed one of the 84" Rubbermaid FastTrack rails and got most of my yard tools off of the floor.
I removed the south garage door opener. It has not been functional since I purchased the home, and Iv'e had the replacement (new, still boxed) for months. It's time to start installing it.
I disassembled both of the old garage door openers and put them in the trash. I have no idea if my trash collection service will take them, but it was worth a try.
-
I ordered 24 Halo ERT707WHT trim rings
with metal baffles from
platt.com. These are for the
new recessed lights in the garage. Slightly cheaper
product price than Home Depot,
but more importantly, they had plenty of them in stock.
Home Depot has none in stock.
I hope they fit OK. These were far and away the least expensive trim
rings I could find, so at least it won't be a big loss if there's an
issue with them. And unlike most of the baffled ones I've seen locally,
the baffles are metal instead of plastic. The rings are high gloss,
which I'm not excited about but it does make them easier to clean.
And for $3.16 each, I can't complain.
- September 10, 2013
-
I stopped at Home Depot on the
way home. I bought two pieces of 3/4" thick plywood, 2' x 4'. One
of these will be cut up to support the incorrectly sized 32"
Rubbermaid FastTrack rails. The other will be used to mount air hose
reels. I bought a gallon of Zinsser B-I-N to seal and prime the plywood,
as well as other things. I've found nothing that works as well as
Zinsser B-I-N when it comes to sealing wood for painting. It's expensive,
but my time is worth more than the price difference versus products that
don't work. I bought some economy paintbrushes to apply it.
I also bought two 84" long Rubbermaid FastTrack rails, another FastTrack power tool holder, a pair of FastTrack ladder hooks, a pair of FastTrack multi-purpose hooks, a pair of FastTrack hose hooks and a pair of FastTrack dual handle hooks. I'm sure I'll buy more, but Combined with the FastTrack kits I bought from Menard's, I think this is a good start. It will let me get many items off of the floor without impinging on garage space as much as shelves.
Speaking of shelves, I installed the second shelf above the north garage door tonight. I'm liking this storage since it's out of the way but I can easily see what's up there. I will be buying more of these shelves in the future, to go above my tool cabinets.
Tomorrow I hope to start working on the installation of the second garage door opener. I need to finish that before I install the shelves above that door. I also need to start doing some of the drywall joint repairs, but it was too hot tonight and will be too hot tomorrow to work with setting-type joint compound.
-
I stopped at Home Depot on the
way home. I bought two pieces of 3/4" thick plywood, 2' x 4'. One
of these will be cut up to support the incorrectly sized 32"
Rubbermaid FastTrack rails. The other will be used to mount air hose
reels. I bought a gallon of Zinsser B-I-N to seal and prime the plywood,
as well as other things. I've found nothing that works as well as
Zinsser B-I-N when it comes to sealing wood for painting. It's expensive,
but my time is worth more than the price difference versus products that
don't work. I bought some economy paintbrushes to apply it.
- September 8, 2013
-
I went to Menard's in Davison
and bought some Rubbermaid Tough Stuff 20" wire shelving to go over
the garage doors. I also bought three sheets of slatwall and two
Rubbermaid FastTrack 8-piece kits to hang some of the yard tools.
I cut some 25" pieces from the Tough Stuff 70" uprights with my chop saw. These 25" pieces are to mount a single shelf above one of the garage doors. For now I've only cut enough to install one of the 96" shelves, so I can get an idea of what the 20" shelves will look like in this location. I have ceiling and wall finish work to do, so I can't leave the shelves loaded up for long. But once I have more of them up, I can use them to move things around to make working in the garage easier.
After mounting the uprights, I put 20" shelf brackets in and placed a shelf on them. At the moment, I like the 20" deep shelves here. This is space that is typically not utilized. I have of course seen many examples, this idea isn't original. Many examples show a much larger loft, hung from the rafters. Given that I intend to have a car lift, I don't want the ceiling lowered for more than a small amount. This is why I might eventually wind up with 16" shelves instead of 20" shelves here. I will eventually have a separate 20' x 20' garage built to house a lift and my automotive tools (and the lawn tractor), but I intend to always have a MaxJax in the main garage.
The slatwall from Menard's is the Anchor Core slatwall from Wind Mill, redistributed by garageescape.com. I can buy reinforcing inserts for it at Do-It-Best, though they don't seem to have it in stock (I need to order it for pickup in the store). I will probably cover many of the walls with slatwall, since it gives me a lot of options for hanging things as well as rearranging as needed. That included cabinets.
-
I went to Menard's in Davison
and bought some Rubbermaid Tough Stuff 20" wire shelving to go over
the garage doors. I also bought three sheets of slatwall and two
Rubbermaid FastTrack 8-piece kits to hang some of the yard tools.
- September 7, 2013
-
I partially wired twelve of the recessed lights. I wired three rows
of four together. These rows will later get feed wiring. The wiring
done today is neatly stapled to the sides of the bottom of the roof
trusses. This was a lot of work, mostly because it was warm/hot in
the garage attic today.
I put drywall screws in a bit more of the drywall that had sagged. I still have a lot of work to do on this front.
-
I partially wired twelve of the recessed lights. I wired three rows
of four together. These rows will later get feed wiring. The wiring
done today is neatly stapled to the sides of the bottom of the roof
trusses. This was a lot of work, mostly because it was warm/hot in
the garage attic today.
- September 5, 2013
-
I installed six more of the Halo IC-rated recessed light fixtures in
the garage ceiling. These went faster than the first six due to not
working in cramped quarters. So there are now twelve of them on the
north half of the garage. I have twelve more to install in the south
half of the garage, then I need to wire all of them. I also have not
purchased trim rings yet. I need to do that soon so the garage isn't
leaking heavy amounts of air into the attic.
This lighting may seem like overkill, but I consider it a necessity. This will be the everyday lighting, and I want Julie to be able to see well when she pulls into the garage. Her vehicle is tall, and will block most of the light from the garage door openers. That's one of the reasons I crawled around on my hands and knees with no head room to get the cans in near the north edge of the garage. Those will light a path for walking even if she is parked in the northmost parking spot in the garage. The two rows of lights near the center of the garage are a little closer together than others to give more light on the typical path from the door to the house to the outdoors.
I have decided that I'm going to use heavy-duty wall-mounted wire shelving at about 8' height around much of the perimeter of the garage, including above the garage doors. This will give me a lot of storage space for things I don't use frequently, without infringing on space for tool cabinets, vehicles and walking.
I need to do something about my old workbench. It's too long to use anywhere in the garage, but I like its design. I'm not sure whether or not it can be transported to the basement, it's tall. If not, I will likely cut it in half and make two 4' long workbenches.
-
I installed six more of the Halo IC-rated recessed light fixtures in
the garage ceiling. These went faster than the first six due to not
working in cramped quarters. So there are now twelve of them on the
north half of the garage. I have twelve more to install in the south
half of the garage, then I need to wire all of them. I also have not
purchased trim rings yet. I need to do that soon so the garage isn't
leaking heavy amounts of air into the attic.
- September 4, 2013
- I stopped at Home Depot in Auburn Hills on the way home from work. I bought twelve more Halo IC-rated recessed lighting fixtures for the garage ceiling. Since I couldn't find my old drywall screw setters, I bought a 4-pack of the DeWalt ones. These make it easy to sink drywall screws to the right depth without breaking the drywall backing paper. For $4.97, a worthwhile thing to have to make drywall screw driving a fast operation.
- September 3, 2013
-
I cut the holes for four more of the recessed light fixtures and mounted
them. Due to the roof framing, the lights closets to the north wall of
the garage had to be placed a little oddly. Not a big deal, functionality
is the objective.
I spent an hour removing one of the pieces of plywood from the roof trusses so I can install more of the recessed light fixtures. I carefully pried it up one nail at a time. For the other pieces, I think I'll use my oscillating tool to cut the nail heads off. It will save a lot of time, and time is worth more than the plywood I was trying to save.
I submitted a request for information on closed-cell foam insulation to USA Insulation. It's what I would prefer to use in the garage attic. Though I know it's expensive, it yields a much higher R-value per inch than my other options, and it's much less affected by moisture. Since I intend to install a natural gas garage heater at some point, I need insulation; it's not optional. I also want to retain some of the garage attice storage space, and since the trusses are 2x4 construction on 24" centers, I don't have the space for a lot of depth. However, I could feasibly use the closed cell foam only in the areas where I want to keep storage floor, and blow in cellulose everywhere else. The main issue there is the 24" centers; the drywall won't hold a lot of mass. Especially since it wasn't installed correctly in the first place. There are about half the number of nails that there should be, maybe less. With nails, there should be a nail about every 7 inches. In most of the drywall, there's a nail every 16 to 20 inches. Yikes, this wouldn't even be OK with drywall screws. With all of the other issues, it's no wonder that the drywall joints are failing.
-
I cut the holes for four more of the recessed light fixtures and mounted
them. Due to the roof framing, the lights closets to the north wall of
the garage had to be placed a little oddly. Not a big deal, functionality
is the objective.
- September 2, 2013
-
I bought four new GE 72109 high-output ballasts
at Home Depot. These are
electronic ballasts, and should be silent. They will replace the old
magnetic ballasts in the 8' long HO fixtures on the ceiling. They
were not cheap, so I hope they work well.
I also bought some new work electrical outlet boxes, some electrical outlets (GFCI and non-GFCI), some wall plates for the outlets, some 1x2 poplar, some Strong-Tie #10x2.5" screws and some 3M Extreme mounting tape. The mounting tape is unrelated to the garage; it's for mounting my Kresto dispensers in the laundry room and/or kitchen.
The new ballasts fit fine in the old fixtures. They are much lighter in weight, which will make it easier to remoun the fixtures.
I broke one of the bulb connectors when installing a new ballast in one of the old fixtures. I could not find any of my super glue, so I used Loctite 325. I don't know if it'll work, but I suspect it will. The part that broke is part of the wire guide, and not part of the bulb retention. It is not exposed to much force.
I spackled the holes in the ceiling the previous owner made for his toggle bolts. They'll take a while to dry, since they were almost 1" in diameter.
I moved a few more items to the basement to make more room to work in the garage.
I think I've completed the layout for the recessed lighting. I cut the holes for two of them, and installed the cans in the ceiling. Very easy with the hole saw for recessed lighting.
-
I bought four new GE 72109 high-output ballasts
at Home Depot. These are
electronic ballasts, and should be silent. They will replace the old
magnetic ballasts in the 8' long HO fixtures on the ceiling. They
were not cheap, so I hope they work well.
- September 1, 2013
-
I removed one of the 8' long fluorescent lights from the ceiling. It
was mounted ot the drywall with toggle bolts like the others, and had
pulled the drywall off of the trusses. So this is what it looked like.
Fairly obvious why I need to install some braces in the attic to bring
the drywall flush again before I redo the joints.
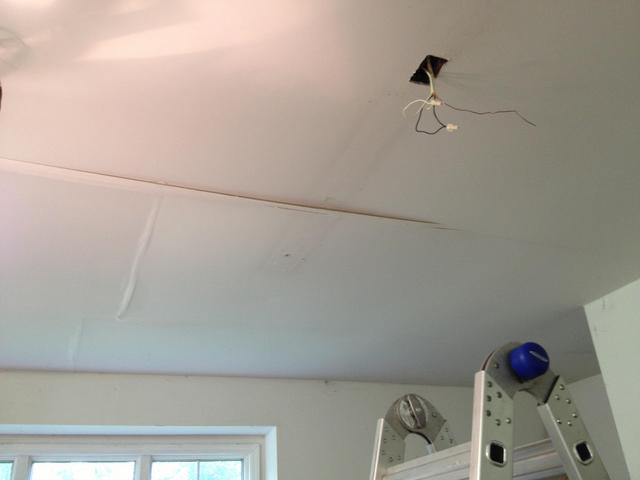
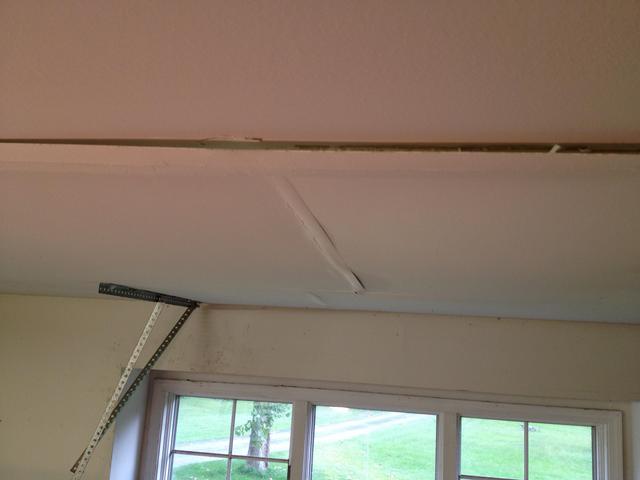
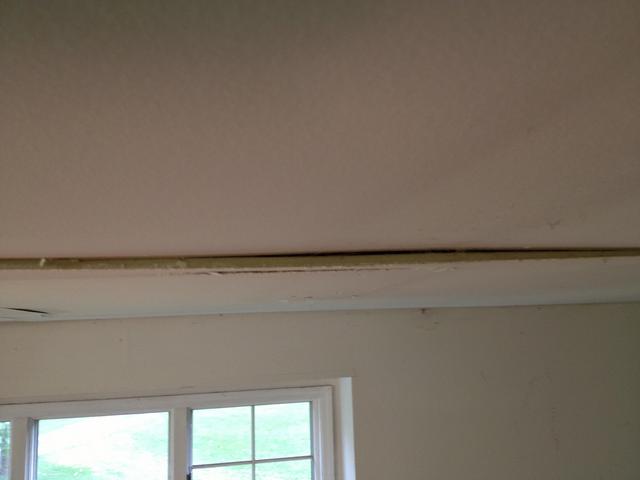
I removed the tape and some of the mud from this joint and another, then drove some drywall screws in a few places just to get an idea whether or not I can get the drywall back into a position I can accept. I think it's OK, but it's going to take a decent amount of work to retape and mud the joints. I'm not going to do that work until I have the recessed lights positioned and some insulation installed. Otherwise I'll just be risking cracking the joints when I'm working in the attic.
I'm going to firmly attach the new fluorescent lights to the ceiling instead of using the included hanging chains, but I'll space them from the ceiling with some oak pieces just so they aren't flush mounted. The instructions don't say whether or not it's acceptable to flush mount them, but I think it's wise to allow a small amount of air to pass over the top of the ballast housing.
I disassembled one of the new Lithonia Lighting 1284GRD RE lights I bought at Home depot. I could hardwire them if desired, but I think I'll use the cords. The 8' lights that were poorly hung in the garage were concealing outlet boxes. So all I need is the outlets (preferably GFCI), and I can simply plug in the new lights. That will make it easier to replace them in the future if necessary or desired.
I spent a few hours creating a rough drawing of a top view of the garage ceiling so I can plan my lighting layout. It's unfortunate that the pull-down stairs for the garage attic conflict with a good plan for the number of fluorescent lights I want to install; it's right where I'd like one of the lights. I could move it, but that would mean more ceiling drywall and trim work that I'm loathe to do right now. Given that I'm increasing the lumens of fluorescent light in the garage from 70,400 to 94,400, I think I'll be OK with one light being a couple feet away from its ideal position.
However, it's worth noting that the original lighting in the garage has T12HO bulbs. They're 110W each, and theoretically should emit over 8000 lumens each. They do illuminate the garage nicely, my main complaint with them (other than the horrible mounting) is the noise from the ballasts. I could easily remedy that problem by replacing the ballasts with GE 72109 ballasts (Home Depot SKU 714264). This also potentially eliminates some of my layout issues.
-
I removed one of the 8' long fluorescent lights from the ceiling. It
was mounted ot the drywall with toggle bolts like the others, and had
pulled the drywall off of the trusses. So this is what it looked like.
Fairly obvious why I need to install some braces in the attic to bring
the drywall flush again before I redo the joints.
- August 31, 2013
-
I went to Home Depot in Auburn
Hills and bought a 6.375" diameter Milwakuee hole saw for recessed
lighting. This will be much faster than using a drywall saw to make the
holes for the recessed fixtures, and will create a near-perfect fit. I
also bought some screws to fasten the Strong-Tie brackets to the 2x4
braces I'm making to repair the sagging drywall issues created by the
previous owner's cluelessness in hanging fluorescent lights. I bought
some setting-type joint compound and joint tape to repair the joints on
the ceiling. I bought ten more 5000K T8 bulbs to fill the new 4'
lights. I also bought some white Rust-Oleum Appliance Epoxy to paint
the underside of the hoods of the new lights to get more reflected
light.
I painted the underside of the hoods of the new fluorescent lights with the Rust-Oleum white appliance epoxy. They were originally painted with a gray reflective paint, but when I tested one of the lights earlier this week, it didn't seem very effective. At a minimum, I think they look better with white-bottomed hoods. I wish I had left one of them with the gray paint so I could do an A/B comparison, but to my eyes, they look like they're giving off more light with the white paint versus what I saw last night with the original gray paint.
When it cools off a bit tonight, I hope to start working on fixing the ceiling drywall issues. I also need to take one of the new fluorescent lights apart to see how hard it would be to wire them directly instead of using the included cords. Of course there are upsides to using the cords; it makes it easier to replace an entire fixture should it ever be necessary.
I created four support braces for the garage attic, to shore up the areas with sagging drywall. These are 22.5" long with Simpson Strong-Tie brackets on the ends. I have a fifth one cut, but I ran out of battery in my impact driver before I could mount the Strong-Tie brackets to it.
I need to start considering tool cabinet positioning and air line setup. Right now I have my air compressor roughly where it needs to be, dictated by the location of the 240V outlet. Of course I could run another 240V circuit, and in fact I'll need to do that at some point for welding. But aside from that, I need to run air throughout the garage, with more drip legs than I have now. I really like the Norgren automatic drain I have now; in combination with the filter I have and the automatic drain I have on the compressor, I've never had water enter my hoses. But with more iron pipe through the garage, I'll need more drip legs and I'll also need a more effective filtering setup in one location for paint guns.
-
I went to Home Depot in Auburn
Hills and bought a 6.375" diameter Milwakuee hole saw for recessed
lighting. This will be much faster than using a drywall saw to make the
holes for the recessed fixtures, and will create a near-perfect fit. I
also bought some screws to fasten the Strong-Tie brackets to the 2x4
braces I'm making to repair the sagging drywall issues created by the
previous owner's cluelessness in hanging fluorescent lights. I bought
some setting-type joint compound and joint tape to repair the joints on
the ceiling. I bought ten more 5000K T8 bulbs to fill the new 4'
lights. I also bought some white Rust-Oleum Appliance Epoxy to paint
the underside of the hoods of the new lights to get more reflected
light.
- August 30, 2013
- I stopped at Home Depot in Auburn Hills on the way home from work. I bought twelve Halo IC-rated recessed lighting fixtures and two more Lithonia Lighting 1284GRD RE 4-light T8 heavy duty shop lights with 0F-rated electronic ballasts. I did not buy trim rings for the recessed fixtures since the reflective/specular ones in the store are expensive. These will be installed in the garage, though I have yet to decide on a layout for lighting. Given that I will be loading these with LED bulbs (probably the new Cree BR30 9.5W bulbs), power consumption will be very low. I could easily run a lot more of them on a single circuit, but at the moment I don't anticipate needing more than twelve of these for what will just be ambient lighting. Fluorescents will be my work lighting.
- August 29, 2013
-
New garage door rollers arrived. I installed them on the door with the
new opener. I used the method that the professional installers use: I
bent the lower part of the track (the U-shaped retaining part of the
track) out a bit a few inches above the topmost roller when the door is
closed. That allowed me to pop out each roller by positioning the door
with the roller at the bent part. That includes the lowermost roller,
whose bracket holds the cable that's attached to the torsion spring.
This is far and away the easiest way to replace garage door rollers;
I was done in 10 minutes (both sides), including the lowermost roller
that you can't do by just removing the bracket (it's under tension from
the torsion springs). And if you have a fiberglass or wood door, it's
not all that advisable to take out the lag screws for the brackets anyway;
I've seen people strip the wood or fiberglass when replacing them..
Once all the rollers are installed, you just bend the track back. I
used an adjustable wrench to do the bending, but vice grips or a Knipex
plier wrench will work too. A little tapping with a hammer might be
needed to get it perfectly straight again. Seek forward about 6 minutes
into this video
by a nice gentleman at ddmgaragedoors.com to see how it's done.
While I was at it, I put a little more tension on the torsion springs. The door is now almost effortless to open without the assistance of the garage door opener, and is VERY quiet when operated with the opener. It's mechanically near perfect. Now I just need to install the new door seals and start working on the other door.
I've decided to brace some of the areas in the garage ceiling where the drywall joints have failed. This is largely because the drywall has bowed from the previous owner's terrible decision to hang heavy 8' long fluorescent lights from the drywall alone using toggle bolts (and only one on each end). While I'd like to replace the drywall, I just don't have the time to prepare the garage for it right now. I already have some 2x4 hangers I can use.
When I get around to repainting the garage, I think I'm going to use Olympic ONE paint in a satin finish, white.
-
New garage door rollers arrived. I installed them on the door with the
new opener. I used the method that the professional installers use: I
bent the lower part of the track (the U-shaped retaining part of the
track) out a bit a few inches above the topmost roller when the door is
closed. That allowed me to pop out each roller by positioning the door
with the roller at the bent part. That includes the lowermost roller,
whose bracket holds the cable that's attached to the torsion spring.
This is far and away the easiest way to replace garage door rollers;
I was done in 10 minutes (both sides), including the lowermost roller
that you can't do by just removing the bracket (it's under tension from
the torsion springs). And if you have a fiberglass or wood door, it's
not all that advisable to take out the lag screws for the brackets anyway;
I've seen people strip the wood or fiberglass when replacing them..
Once all the rollers are installed, you just bend the track back. I
used an adjustable wrench to do the bending, but vice grips or a Knipex
plier wrench will work too. A little tapping with a hammer might be
needed to get it perfectly straight again. Seek forward about 6 minutes
into this video
by a nice gentleman at ddmgaragedoors.com to see how it's done.
- August 28, 2013
-
I verified that the previous owner mounted the fluorescent lights in
the garage using toggle bolts. Which is why they're pulling the drywall
off of the ceiling. Sigh, stupidity reigns. He could've moved them
just a few inches and caught the bottom of the joists, but instead chose
to mount them to just the drywall. They'll all have to be remounted
properly. I'm also going to buy more of the Lithonia Lighting 1284GRD
RE 4-light T8 heavy duty shop lights with 0F-rated electronic ballasts.
Eventually I'd like to replace all of the garage lighting with these
since they're somewhat protected (wire cage), will work in the winter,
don't buzz, bulb replacement is easier (4' bulbs instead of 8' bulbs),
and they look nicer than bare fixtures. Plus they're easier to fit
wherever I need them.
Since I've bought several new tools recently, I finally got around to printing and sealing some label cards for new Systainers for my old Bostitch pneumatic narrow-crown stapler and my new Hitachi N5008AC2 7/16" crown pneumatic construction stapler. These are both in SYS 1 T-Loc Systainers. I need to print labels for the Systainer Maxi that is holding my old Senco FramePro 701XP pneumatic framing nailer. And I need to buy more Systainers for many other tools. The idea here is to get most of my power and air tools into Systainers so they'll stack nicely on shelves, many of them above the garage doors. Having a bunch of differently-sized blowmolded cases with rounded corners that don't latch together makes for terrible storage. The Systainers are expensive, but they work so wonderfully as a system and I like being able to make my onw label cards that can be inserted on 3 sides of the T-Loc Systainers (and easily swapped when I rearrange).
I also need to buy some foam to protect some of them inside the Sysytainers. The cheapest option that's easy to cut to shape is Kaizen foam.
The next tools to be placed in Systainers will be the Bosch MX30E oscillating tool, Bosch PS21 and PS41 set with charger, and my Bosch jigsaw. I use the PS21 and PS41 fairly regularly, so those will likely wind up on a 495020 Systainer cart. The MX30E and jigsaw will wind up on a shelf.
-
I verified that the previous owner mounted the fluorescent lights in
the garage using toggle bolts. Which is why they're pulling the drywall
off of the ceiling. Sigh, stupidity reigns. He could've moved them
just a few inches and caught the bottom of the joists, but instead chose
to mount them to just the drywall. They'll all have to be remounted
properly. I'm also going to buy more of the Lithonia Lighting 1284GRD
RE 4-light T8 heavy duty shop lights with 0F-rated electronic ballasts.
Eventually I'd like to replace all of the garage lighting with these
since they're somewhat protected (wire cage), will work in the winter,
don't buzz, bulb replacement is easier (4' bulbs instead of 8' bulbs),
and they look nicer than bare fixtures. Plus they're easier to fit
wherever I need them.
- August 27, 2013
- I stopped at Home Depot in Auburn Hills to get more garage door seals. Unfortunately, despite looking similar to the ones I bought at the White Lake Home Depot, these are different. They're better (sturdier, and the sealing flaps are wider). Hence I will likely buy more of them and use them on both doors. They also have 16' long ones, which the White Lake store did not have. Of course I can't transport the 16' long ones in the MINI Cooper. :-)
- August 25, 2013
-
I removed the switch cover plate by the back door to look at the
switches. Two of them are 3-way, one of them is single-pole. That
means I need another 1223-0LC switch. I still don't know what's
connected to some of the switches in the garage; nothing visible occurs
when I toggle one near the door to the house.
I sprayed some EEZOX Cycle Tune-Up on the torsion springs of one of the garage doors. This was just to prevent rust. As near as I can tell, the Cycle Tune-Up is extremely similar to their Gun Care product. Goes on wet, but dries.
I went to Home Depot and bought another 1223-0LC switch and four strips of 7' long garage door seal to replace the damaged ones on one of the garage doors. Unfortunately they didn't have more, so I'll have to wait to replace the seals on the second garage door.
I installed the new light switches at the back door. Two 1223-0LC and one 1221-0LC. And now I know why one of the old decorator switches I replaced did nothing: it had failed. Though it wasn't cheap, I'm glad I replaced all of the garage switches with Leviton industrial grade switches. They're rated for a minimum of 50,000 cycles. I expect them to still be working 20 years from now. And I really like the amber illumination when the switches are off.
-
I removed the switch cover plate by the back door to look at the
switches. Two of them are 3-way, one of them is single-pole. That
means I need another 1223-0LC switch. I still don't know what's
connected to some of the switches in the garage; nothing visible occurs
when I toggle one near the door to the house.
- August 24, 2013
-
I ordered some 13-ball nylon rollers for the garage doors
from Amazon.
I want to build some shelves over the top of the garage doors. This is typically space that's difficult to utilize, but shelves will make it usable. To get to them, I'll probably buy an Xtend & Climb ladder; they take up very little space when not in use.
-
I ordered some 13-ball nylon rollers for the garage doors
from Amazon.
- August 23, 2013
-
I stopped at Home Depot and
bought another triple-gang stainless steel switch cover plate for the
garage. This one will go by the door to the back yard. I also bought
more of the GE Reveal 100W-equivalent light bulbs, mainly because I know
they will not last long. Hopefully by the time I burn them all out, LED
replacements will be a little cheaper. Right now, a Philips 422220 (75W
equivalent) is $38.50 and a Philips 423535 (100W equivalent) is $70.
Not worth it to me in the garage door openers.
I lubricated the hinges on the left garage door and looked at the rolloers. Both of my garage doors need new rollers. I'll order some tomorrow.
-
I stopped at Home Depot and
bought another triple-gang stainless steel switch cover plate for the
garage. This one will go by the door to the back yard. I also bought
more of the GE Reveal 100W-equivalent light bulbs, mainly because I know
they will not last long. Hopefully by the time I burn them all out, LED
replacements will be a little cheaper. Right now, a Philips 422220 (75W
equivalent) is $38.50 and a Philips 423535 (100W equivalent) is $70.
Not worth it to me in the garage door openers.
- August 22, 2013
-
I stopped at Home Depot and
bought two more 1223-0LC light switches. I also bought some GE Reveal
100W equivalent bulbs for the garage door openers, even though they're
halogen inside and will not last all that long. I'll probably eventually
replace them with Philips LED bulbs, but these will do for now. They
consume 72W of power each.
I installed the three new light switches by the door to the house. Two were 3-way and were replaced by 1223-0LC switches. The other was a single pole switch and was replaced by a 1221-0LC. I then installed the new stainless steel triple-gang cover plate. Yay, no more decora switches on the garage side of the door to the house. The new switches were expensive, but they're industrial grade and should outlive me. Several of the decora-style switches in the house have failed because they're cheapies. I tend to use my garage a LOT and hence need switches that will last.
Tomorrow I'll work on installing the obstacle sensors and install the keypad. I might even start installing the second opener, but I need to move quite a bit of stuff out of the way to do it. Of course, it's high time to get stuff out of the way in the garage so I can put my cars in it.
-
I stopped at Home Depot and
bought two more 1223-0LC light switches. I also bought some GE Reveal
100W equivalent bulbs for the garage door openers, even though they're
halogen inside and will not last all that long. I'll probably eventually
replace them with Philips LED bulbs, but these will do for now. They
consume 72W of power each.
- August 21, 2013
-
I stopped at Home Depot and
bought the 1223-0LC light switch I need for the garage. I also bought
more hardware so I can install the second garage door opener (lag screws,
galvanized angle, galvanized flat pieces).
I now have a functioning garage door opener, but I have yet to correctly position the obstacle sensors. They can't be effectively track-mounted due to the track being right against the cinder blocks on one side of the door. If I mounted them on the tracks, they'd be too high. The previous owner taped his together on one side of the door so they're effectively disabled. I've disabled mine for now, but I will be mounting them soon.
I'm not happy with the wiring to the control pad. It is jammed in the wall somewhere so I can't easily replace it, but it's longer and thicker than I'd like (or need) at the wall while being shorter than I'd like at the motor. And I will need to reroute it in the garage when I insulate the garage.
It turns out I need some more of the 1223-0LC or similar switches. I didn't realize that the fluorescent lights in the garage are on 3-way switches (one of the switches by the back door to the garage is for the fluorescent lights). If I had been smart, I'd have bought all 3-way switches, even though they're $4 more each.
-
I stopped at Home Depot and
bought the 1223-0LC light switch I need for the garage. I also bought
more hardware so I can install the second garage door opener (lag screws,
galvanized angle, galvanized flat pieces).
- August 20, 2013
-
I stopped at Home Depot and
bought two Lithonia Lighting 1284GRD RE 4-light T8 heavy duty shop
lights with 0F-rated electronic ballasts. I also bought a 10-pack of
5000K bulbs to populate them. If I like them, I'll probably buy six
more. Not that I normally need it, but it would be nice to be able to
get to 100 lumens per square foot in the garage when necessary. Of
course, that's a pretty penny in electricity... at 1024 watts or so for
eight of these, and assuming 10 cents per kilowatt hour, we're talking
about 10 cents an hour to run them. And that's not including any of the
recessed cans I intend to install. But I won't be working in the garage
every day, nor for 8 hours a day. If it costs me an extra $6 to $10 a
month (worst case) to have this lighting, I'm not going to fret. Good
work lighting is an important part of avoiding mistakes and injuries.
Anyway, I also bought five Leviton 1221-0LC 15/20 amp industrial toggle switches. These are illuminated when off, so they're easy to find in the dark. Two are to disable the garage door openers, the other three are to replace light switches. Of course it turns out that one of the ones I need to replace in the garage is a 3-way switch, so I'll need to go back to Home Depot and get one of the 1223-0LC switches.
I also bought two stainless steel wall cover plates for the new switches; a double-gang for the garage door opener switches and a triple-gang for the light switches. Nothing exciting about these, I just wanted stainless steel for cleanability and durability.
While I was there, I also picked up a set of Ridgid cobalt drill bits and some spares of the small size DeWalt split-point Ti-coated bits that I seem to break once in a while.
My original plan for tonight was to put the second coat of sealant on the outside of the foundation. However, the weather forecase for tomorrow night nixed that plan. The stuff takes 48 to 72 hours to cure, and there's a 60% chance of thunderstorms tomorrow night. Looks like I might have to wait until Thursday night.
I cut, drilled and installed the header support over the garage door, and installed the door opener mounting bracket. The center of the door is almost exactly between two studs in the wall, so the support header is a necessity. I used two pieces of 3/4" thick treated plywood here, stacked to get 1.5" thickness. Four 3" long 5/16" diameter lag screws hold the first piece to the studs in the wall, with their heads counersunk to be flush. The second piece is held to the first with two 1.675" long 5/16" diameter lag screws and four deck screws. Two more 1.675" long 5/16" diameter lag screws go through the opener mounting bracket and into both pieces of the plywood. It's rock solid. I dind't worry about some of the lag screws penetratin the drywall behin the header support, because the previous owner riddled the drywall with holes behind it (apparently searching for studs). I'll be caulking the edge of the header support at the wall anyway.
I then played around with positioning the opener motor. Normally I'd put it as close to the top of the door (when the door is open) as possible, but given how high I had to place the mounting bracket above the door, it looks awful that way. So I'm going with having it positioned such that the track is nearly level. I don't think this is going to be a problem, given that the openers are stronger than I need (3/4 HP versus 1/2 HP) and that I'm using strong galvanized angle to keep the motor from moving around. It's relatively easy to lower the motor if necessary.
I cut the angle iron pieces and mounted the opener motor securely. I also added two flat pieces of galvanized steel in an X pattern in the trapezoid formed by the garage ceiling, angle iron and top of the garage door opener. The mounting is VERY solid. I'll be repeating the same process for the other door, except I think it will need a longer header support due to it being nearly centered on a wall stud. I think I have enough treated plywood for the job.
I tightened all of the screws that hold the door hinges to the door panels. A few of them were loose.
Tomorrow I'll mount and wire the trip eyes and indoor control pad and adjust the opener. I'll also mount the outdoor keypad if I have time and it's not raining. Hopefully I'll have one fully functioning garage door tomorrow night.
I used up some of the hardware I had bought to reinforce the bottom edge of the garage door (it sags a bit). I'll need to replace it. I need to buy some for the other garage door opener too.
I ordered 2 cans of EEZOX Cycle Tune-Up to coat the torsion springs above the door.
-
I stopped at Home Depot and
bought two Lithonia Lighting 1284GRD RE 4-light T8 heavy duty shop
lights with 0F-rated electronic ballasts. I also bought a 10-pack of
5000K bulbs to populate them. If I like them, I'll probably buy six
more. Not that I normally need it, but it would be nice to be able to
get to 100 lumens per square foot in the garage when necessary. Of
course, that's a pretty penny in electricity... at 1024 watts or so for
eight of these, and assuming 10 cents per kilowatt hour, we're talking
about 10 cents an hour to run them. And that's not including any of the
recessed cans I intend to install. But I won't be working in the garage
every day, nor for 8 hours a day. If it costs me an extra $6 to $10 a
month (worst case) to have this lighting, I'm not going to fret. Good
work lighting is an important part of avoiding mistakes and injuries.
- August 19, 2013
-
Old garage door opener #1 is now removed. Given that the holes for the
new header bracket do not align with the holes of the old header support
board, I need to replace the old header support board. Instead of 2x6
lumber, I'm using stacked 3/4" thick treated plywood. Same thickness,
but more dimensionally stable and will not split from the lag screws.
I may not get to cutting those pieces tonight.
I'm very lucky that the garage door opener motor did not fall on my head. As if it wasn't bad enough that the metal angle holding it was not done properly (vertical pieces were parallel and did not form a trapezoid), the moron that installed it attached the outlet box in the way of the angle iron attached to the ceiling (on the same truss). So when he went to install the angle on the ceiling, THE LAG SCREWS DIDN'T PENETRATE WOOD AT ALL BECAUSE THE OUTLET COVER IS IN THE WAY OF PLACING THE ANGLE DIRECTLY UNDER THE TRUSS! THE LAG SCREWS WERE ONLY IN THE DRYWALL! They flew right out when I put my tiny 12V cordless Bosch impact driver on them, without the impact mechanism activating. Sigh, how can people be so dumb as to buy a perfectly good house and then proceed to destroy it and create very dangerous hazards? A garage door opener falling from 8 feet could kill someone at worst and severely injure them at best. And all he really had to do was use two pieces of iron angle instead of one, or take a notch out of the iron angle to accomodate the outlet cover plate. I chose to do the latter (using my chop saw), and I now have a 36" long piece of galvanized angle with 4 lag screws holding it to the truss. The same problem exists with the other opener, so I'll have to do it there too. And I need to remove the other opener ASAP so it doesn't fall on its own.
A similar problem existed at the header support over the garage door. The lag screws he used did not penetrate the drywall, they were too short. And his header was a piece of decking which had cracked. The lag screws holding the garage door opener bracket to the piece of decking were both loose. The only thing holding the piece of decking to the wall were four deck screws. Amazing that people can let these kinds of disasters-in-the-waiting hang over their head (literally). The garage door opener of Damocles.
Worth noting from my laundry room work: the previous owner's decision to pump all the moist air into the garage from his hokey dryer vent hack (vented directly into the garage) caused all of the taped drywall joints on the garage ceiling to fail. When the house was built, I don't know if today's setting-type joint compound was available. Regardless, that's not what was used and I can't blame the contractors; it's more difficult to apply due to the dramatically shorter work time and greater sanding difficulty. It didn't help that the previous owner hung 8' T12 fluorescent lighting on the drywall and not the trusses; one of them has pulled part of a sheet of drywall away from the truss. It's dangerous, the light will have to come down. Not a huge deal, I plan to redo the lighting in the garage anyway. But it stinks that I'm going to have to retape and mud all of the drywall joints (with setting-type joint compound). Or hire someone to put new 5/8" drywall in. Not a hot idea at the moment since I need to be able to use the garage; I vote for retaping the joints when I have time.
-
Old garage door opener #1 is now removed. Given that the holes for the
new header bracket do not align with the holes of the old header support
board, I need to replace the old header support board. Instead of 2x6
lumber, I'm using stacked 3/4" thick treated plywood. Same thickness,
but more dimensionally stable and will not split from the lag screws.
I may not get to cutting those pieces tonight.
- August 18, 2013
- I started installing one of the new garage door openers. I may not have enough lag bolts to finish. At the moment I have the opener all assembled, laying on the floor. The original openers were very poorly installed, which killed one of them. The other one is on the blink for the same reason. They're not supported properly at the motor end. Obviously I'm going to fix that problem with the new openers. The old openers also had no keypads, which is inconvenient for some activities. They're also connected to switches to disable them, but those switches are ancient 600W decora switches. That's not sufficient for the new openers. I'll replace them with Leviton R54-01221-20G switches (Home Depot SKU 739732 or 162677). While I'm at it, I'd like to replace the light switch for the fluorescent lights. Decora switches are not very nice in the garage.