

Diary
- May 29, 2025
-
Bedroom 2
I installed the new 2-gang electrical switch box for the ceiling fan and ceiling fan lights.I installed the new ceiling fan rated electrical box in the ceiling.
I routed the new 14/3 wire in the attic to the new ceiling fan electrical box. I was able to loosen the staples for the old wiring enough in most spots to just reuse them. Near the ceiling box, I installed a new non-conductive wire holder.
I redistributed the blown-in insulation I had disturbed in the attic. Worth noting that as part of this process, I reinsulated the attic access door with 4 layers of 1.5" Foamular 150. I had the foam on hand since I used it as temporary window covering when I had the sashes out of the window of bedroom 1 for painting.
With some help from mom, I installed the new 44" ceiling fan.
I installed the Lutron Caseta dimmer for the ceiling fan light and the Leviton D24SF ceiling fan control in the new 2-gang wall box. I then turned the breaker on and tested; all good. I added the dimmer and fan control to Apple Home so I can use Siri to control the ceiling fan and ceiling fan light (independently).
I installed the new Hampton Bay Ansley 2-gang wall plate. I also installed a Hampton Bay Ansleyy single-gang wall plate for the closet light just so the switch plates match.
-
Bedroom 2
- May 28, 2025
-
Bedroom 2
I started the process of replacing the light fixture with a flush mounted ceiling fan. Step 1 was to remove the existing wall switch and cap the branch wiring. Step 2 was to find the ceiling box in the attic (not fun since I have blown-in cellulose insulation). I found it, and of course it's in a difficult spot (against the rafter) and not ceiling fan rated (which is why I bought a ceiling fan rated box a while ago). Step 3 was to backtrack the wiring to where it goes down into the wall to get to the wall switch. I found where it penetrates the top plate, and tugged on it hard to see if it's stapled to the wall stud. It is, so I won't be removing it, but just snipping it off just above the top plate in the attic and shoving that end into the wall, while cutting as much off as I can at the wall box end. It'll just be unused wire in the wall. Step 4 was to run a fish rod from the attic to make sure I could pull new 14/3 wire before committing to replacing the single-gang wall box with a double-gang wall box (cutting a larger hole in the wall). The fish rod hit the wall box, so I proceeded to enlarge the wall box hole and remove the old single-gang wall box.I snipped the old 14/2 wire at the top of the top plate in the attic, then pushed that end into the wall. I then fed the new 14/3 wire from the attic to the wall box using the fish rod.
I installed the new 2-gang wall box.
I went back in the attic and removed the old ceiling box, then taped over the hole in the ceiling. I'll install the new ceiling box tomorrow.
-
Bedroom 2
- May 27, 2025
-
Bedroom 1
I removed the masking from the upper window sash and brought both sashes to the bedrooom. I removed the temporary foam insulation from the window, then installed the upper sash, then the lower sash, then the last white jamb liner (lower left).I cleaned up a bit, removing most of the things from the room that I no longer need nearby. I also moved the wool rug from the master bedroom to this room, mostly just to get it out of my way; it's been rolled up in the master bedroom for years. It is too big for this room, and not the right colors, but it will live here for now. One good thing: it eliminated most of the echo in the room.
I patched and spot-primed 2 gouges in the window stool.
I put a coat of paint on the window stool and the window bay seat. I later put a second coat on the window bay seat. Both will need another coat.
-
Bedroom 1
- May 26, 2025
-
Bedroom 1
I reinstalled the second bifold door of the east closet. The closets are now officially done.I completed the finishing process on the door jamb and door stop moulding, and removed the flashing from under the jamb and plinth blocks.
I went to Home Depot to get a wall protector to put on one of the east closet bifold doors. The entrance door knob hits one of the bifold doors, and I've always disliked the alternative here (a hinge pin stop, which eventually trashes the trim). I also bought a sheet of foam insulation to put in the window frame while I work on the window sashes.
I installed the wall protector on the east closet bifold door.
I removed the lower left window jamb liner, then removed the upper and lower sashes. I then removed the upper left window jamb liner, the top left window jamb liner and the right window jamb liner. I then installed the new white jamb liners, except for the lower left since it needs to wait until I'm ready to reinstall the sashes.
I cut a piece of the foam insulation I bought earlier to size, then fitted it in the window opening and taped it in place with masking tape. This is just while I work on the window sashes.
I cleaned the upper sash, lightly sanded the parts I am painting, cleaned again, then masked everything on it that isn't getting paint. I then sprayed 2 coats of Rust-Oleum Painter's Touch 'blossom white' on the sash frame. I then removed the masking tape.
I later did the same for the lower sash, minus removing the masking tape.
I should be able to reinstall the sashes tomorrow, and install the last new jamb liner piece (lower left).
-
Bedroom 1
- May 25, 2025
-
Bedroom 1
I reinstalled all 9 of the wall plates.I changed my mind about the entrance door stop moulding. I was able to remove it with no damage, and reinstall it. I left the moulding on the latch side alone since it's perfectly positioned for a nice snug door when latched. But I slightly moved the top moulding and the hinge side moulding. No more rubbing or squeaks. I started the refinishing process on the door jamb.
I moved one of the east closet's bifold doors to the basement and resprayed it to color match the west closet doors. I later reinstalled it, and moved the other bifold door to the basement and resprayed it.
-
Bedroom 1
- May 24, 2025
-
Bedroom 1
I cleaned the other side of the entrance door, lightly sanded it, cleaned it again and then sprayed a coat of Rust-Oleum Painter's Touch 'blossom white' on it.I cut in the second coat of paint on the walls, then rolled the second coat.
I removed the masking tape from all of the trim, including the crown moulding.
I removed the flashing from under the baseboard and shoe moulding, except under the entrance door jamb since I'm still doing some work there.
I installed the new cold air return grill.
I installed the new dual-gang wall plate for the ceiling fan and light.
I reinstalled the entrance door, and I've decided I'm going to live with how snug it is for now, mostly because I rarely close that door and because I don't feel like replacing the door stop moulding at the moment.
The new extended lip strike plate for the entrance door arrived. I installed it, and it's the perfect size and good quality. I'll order more for the other bedrooms.
-
Bedroom 1
- May 23, 2025
-
Bedroom 1
I removed the masking tape and flashing from both closets.I reinstalled the doors on the west closet. I can call this closet done.
I removed the entrance door and moved it to the basement for finish work. I sanded the edges of the side I planed, lightly sanded and then cleaned one side of the door, then sprayed two thin coats of Rust-Oleum Painter's Touch 'blossom white' on one side.
I finished masking the trim in preparation for the second coat of paint on the walls. This took a long time due to my perfectionist tendencies.
I cut in the baseboard paint on the west, north and east walls.
-
Bedroom 1
- May 22, 2025
-
Bedroom 1
I primed the baseboard and shoe in the east closet.
I put the first coat of paint on the baseboard and shoe in both closets.
I put the second coat of paint on the baseboard and shoe in both closets.
I removed the masking tape from the wall in the east closet. I then removed most of the flashing from under the baseboard and shoe that I used to mask the floor. Honestly, that might be the most brilliant idea I've had in a while. I cut the paint with a single pass of my utility knife and the flashing came out easily, leaving a perfect paint job on the shoe with zero paint on the hardwood floor.
I did a little bit more trim masking in the room in preparation for the second coat of paint on the walls.
I reinstalled the bottom shelf in the east closet (4 screws).
-
Bedroom 1
- May 21, 2025
-
Bedroom 1
I got sidetracked today dealing with the entrance door. I rehung it quite a while ago because it was so crooked that it didn't engage the stop moulding at the bottom at all. Unfortunately, due to adjacent walls on both sides, there wasn't a lot of room to work. I got it hung evenly, but it was a snug fit. At the time the door jamb still had its original finish. Well, now with primer and paint, the door was rubbing the jamb. The other issue was the strike plate not being long enough to protect the new trim, which is considerably thicker than the original. And finally, the stop moulding, now with primer and 2 coats of paint, is too tight against the door.I knew I had to plane the door to a narrower width. And not wanting to risk compromising the fit of the knob and latch, I knew I needed to plane the hinge side. But I didn't have a hinge mortise jig for my router, so I went to Home Depot and bought the inexpensive Ryobi hinge mortise jig. I also bought more Rust-Oluem Painter's Touch 'blossom white' satin spray paint to repaint the closet doors that wound up mismatched from the Behr spraypaint, and to repaint the entrance door when I'm done fixing it. I made sure that all 8 cans were from the same lot number.
I planed about 1/16" from the hinge side of the door with my Bosch power planer, then recut the hinge mortises. This went just fine. The door now fits width-wise. I've yet to decide what to do about the stop moulding. I sanded it a bit which improved things considerably, but the issue will likely return if I reprime and repaint it. The right thing to do is to remove it and either install new moulding or just move the old moulding if I can remove it intact.
I ordered an extended lip strike plate from Amazon, but it will not arrive until June 2nd.
I sanded the joint compound on the baseboard and shoe in the east closet. I also caulked it.
I started masking the trim for the second coat of paint on the walls. I only did about 6 feet on the north wall, just to see if the yellow Frog Tape (for delicate surfaces) is going to hold.
-
Bedroom 1
- May 20, 2025
-
Bedroom 1
To-do for today:- DONE - Put the first coat of paint on the baseboard and shoe moulding of the south wall.
- DONE - Put the first coat of paint on the remaining closet door casings.
- DONE - Put the second coat of paint on the entrance door jamb and door casings.
- DONE - Put the second coat of paint on the baseboard and shoe moulding of the east, north and west walls.
- DONE - Put the second coat of paint on the baseboard and shoe moulding of the south wall.
- DONE - Put the second coat of paint on the remaining closet door casings.
- DONE - Replace the entrance door hinges with new satin nickel hinges.
- DONE - Remove the masking tape from the north and west walls.
- Sand the nail holes in the baseboard and shoe moulding of the east closet.
- Prime the baseboard and shoe in the closets.
- Caulk the baseboard and shoe in the closets.
-
Bedroom 1
- May 19, 2025
-
Bedroom 1
I caulked the baseboard and door casings in the room.I put the first coat of paint on the entrance door jamb and casings.
I put the first coat of paint on the baseboard and shoe moulding of the east wall, north wall and west wall. I also put the first coat of paint on one of the door casings of the west closet.
I put a second coat of paint on the door jamb. I'm using such thin coats here that it will probably need a third coat.
I have put off closet work for a bit because I have the entrance door and the closet doors stored in the closets while I work on finishing all of the door casings.
-
Bedroom 1
- May 18, 2025
-
Bedroom 1
To-do for today, but I suspect I won't get it all done:- DONE - Home Depot trip for more DAP Alex Ultra caulk, Zinsser B-I-N, brushed nickel door hinges and a replacement bifold door knob for the one that was broken inside the package.
- DONE - Sand the nail holes in the baseboard and shoe moulding of the north wall.
- DONE - Sand the nail holes in the door casings.
- DONE - Prime the baseboard, shoe and door casings in the room.
- DONE - Remove the entrance door and hinges.
- DONE - Patch the minor dings in the entrance door jamb.
- DONE - Prime the entrance door jamb with one coat of Zinsser B-I-N.
- Sand the nail holes in the baseboard and shoe moulding of the east closet.
- Prime the baseboard and shoe in the closets.
- Caulk the baseboard and door casings in the room.
-
Bedroom 1
- May 17, 2025
-
Bedroom 1
I put joint compound in the nail holes in the baseboard and shoe moulding in the east closet and on the north wall of the room.I masked the walls of the room from all of the door casings and baseboard so I can caulk, prime and paint the baseboard and shoe moulding. Really this is just for the caulk, since it helps prevent me from getting caulk on the wall where I don't want it. I'm pretty good about wiping caulk as I go, but I'm using DAP Alex Ultra and it sets up quite fast. The masking tape just makes for a good guide to make sure my smoothing doesn't spread caulk up the wall. In all likelihood I'll remove the tape after caulking (before primer and paint). This took a long time due to me being picky and the profiles of my trim work.
I sanded the joint compound used to fill nail holes in the baseboard and shoe moulding on the east wall.
I caulked the baseboard in the west closet, mostly to use up the last of a caulk tube that was going to go bad if I let it sit for a few more days. I have one more 10.1 ounce tube left, which probably means I should buy another one just to be sure I don't run out caulking the rest of the room.
-
Bedroom 1
- May 16, 2025
-
Bedroom 1
I taped flashing to the floor of the closets at the walls to act as masking while I work on baseboard and shoe moulding. This took a while because I ran low on flashing and had to cut my 6" wide roll into 2" strips.I installed all of the shoe moulding in the closets. Same time-consuming miter cuts as the baseboard.
I filled the nail holes in the baseboard and shoe moulding of the west closet, all of the door casings ad the east wall with joint compound. I still need to do the north wall.
I sanded the joint compound in the baseboard and shoe moulding of the west closet.
I removed the entrance door strike plate and cleaned it. I had gotten primer on it when priming the wall. I also addressed two 18 gauge nail misfires in the door trim.
-
Bedroom 1
- May 15, 2025
-
Bedroom 1
I spot-primed the baseboard and shoe moulding on the west wall, just to seal up the joint compound I used to fill nail holes.I installed the corner blocks and baseboard in the east closet. It wasn't terribly easy, mostly because the closet walls are not very close to perpendicular. The two outside miters, for example, pushed my miter saw near it's limit. They required 47.5 degree cuts.
I installed the corner blocks and baseboard in the west closet, with the same complications.
-
Bedroom 1
- May 14, 2025
-
Bedroom 1
I finished cutting and nailing all of the plinth blocks, door casings, baseboard and shoe moulding in the room. I haven't started the closets yet.The north wall required another scarf joint in the baseboard. I sanded that joint and put one coat of Zinsser B-I-N primer on it. It needs another coat and some more sanding.
I started filling the nail holes in the trim with joint compound. I didn't get very far, but made good progress on the west wall.
I fabricated a small tool from an oak dowel to help me fill the nail holes in the fluted door casings. I decided to coat it with polyurethane to help prevent it from swelling when wet, so I can't use it until tomorrow (dry time).
-
Bedroom 1
- May 13, 2025
-
Bedroom 1
I installed one of the entrance door casings and plinth blocks.I cut some aluminum flashing to length and taped it to the floor under where the baseboard and shoe moulding will be installed. Just easier to remove than masking tape after painting.
I installed the baseboard on the east and west walls, and most of the south wall.
I made the tricky coping cut for the southeast corner of the room, and also trimmed down the second entrance door plinth block which will dissolve into the adjacent wall. I wound up doing the final cutting on the router table since it allowed me to very carefully shave off what I needed without the MDF falling apart.
I primed most of the shoe moulding, since it's easier to do before installation.
-
Bedroom 1
- May 12, 2025
-
Bedroom 1
I sunk all of the face nails in the hardwood floor. That's the last full row and 1/2 row in the closets and the first row in the room (though the ones in the room will all be covered once the baseboard and shoe moulding are installed). I then filled them all with colored putty.I primed all of the closet door plinth blocks with Zinsser B-I-N, and one of the entrance door plinth blocks. The final entrance door plinth will need to be cut for clearance, so I haven't primed it yet.
I temporarily reinstalled all of the closet doors in order to be able to make sure they don't run into the door casings. I then cut and aligned the closet door casings with my level, marked the positions with a pencil, then marked and installed the closet door plinth blocks. I then measured the closet door casing final lengths and cut them again. I then installed them.
I am putting aluminum flashing under the plinth and baseboard as I go. This is just to mask the floor from joint compound, primer and paint when I get to that step for the trim. It's much easier to deal with than masking tape or various types of paper, because I can pull it out later without it tearing. And I can cut the paint line and not penetrate the flashing, so no accidental cuts in the floor and no bits left behind. The flashing is less than 1/100" thick.
Tomorrow I hope to install one of the entrance door plinth blocks and one of the casings, then get started on the baseboard. The final plinth and door casing will wait a bit because I need to put another coat of paint on the wall in that corner since it won't be accessible once the casing is installed (there's less than 1/4" from the edge of the casing and the wall). A short piece of baseboard in the same corner will need to be coped to the plinth block, which won't be very easy, mostly because coping sharp turns in MDF is not much fun. I might try doing some of it on the router table with a 1/4" straight bit.
-
Bedroom 1
- May 11, 2025
-
Bedroom 1
I finished installing the hardwood flooring. I'll probably set the face nails in the last row a bit deeper tomorrow before I fill the nail holes.Next up is trim installation: plinth blocks, door casings, baseboard and shoe moulding. I am debating which parts to pre-finish beyond the shoe moulding, just to avoid some of the masking work.
-
Bedroom 1
- May 10, 2025
-
Bedroom 1
I removed the bifold door mounts on the floor of the west closet. I then cut and installed the row of hardwood flooring that goes under the bifold doors of the west closet. I then reinstalled the bifold door mounts of the west closet.I installed the next row of hardwood in the west closet. Hence I'm done with pieces that require the jigsaw.
I finished installing the hardwood in the east closet. This took most of the day, mostly because I couldn't use the flooring nailer. Lots of pre-drilled holes at an angle through the tongues, then hardwood trim nails driven by hand and then sunk with a nail set. The last full row and the final row (about half a board) were face nailed. I need to get some putty to fill the nail holes that will be visible after the baseboard and shoe moulding are installed.
All that remains of hardwood flooring installation: the rest of the west closet. It will likely take most of a day since it's the same gruling process as the east closet, though it is about half done and I found my nail set that's easier to use.
-
Bedroom 1
- May 9, 2025
-
Bedroom 1
I reached the closets with the hardwood flooring.I installed the underlayment in the west closet.
I installed the underlayment in the east closet.
I removed the bifold door mounts on the floor of the east closet. I then cut and installed the row of hardwood flooring that goes under the bifold doors of the east closet. I then reinstalled the bifold door mounts of the east closet.
I installed the next 2 rows of hardwood in the east closet, and started the next row. Unfrotunately for this row and the remaining rows, I can't use the floor nailer (clearance). So it'll be slow going with the drill and hardwood finish nails.
-
Bedroom 1
- May 8, 2025
-
Bedroom 1
I finished installing the 33rd row of hardwood flooring and started the 34th row. I'm not at the closets yet, but I will be tomorrow. I am traversing the doorway to the hallway, and thankfully the transition piece I installed way back when is working out perfectly.For some of the 34th row and beyond, I will not be able to use the flooring cleat nailer due to clearance. To the extent possible I'll hand nail into the tongues, but I suspect I'm going to need to glue the last row to the second to last row and count on the face nailing of the last row to hold them both in place.
-
Bedroom 1
- May 7, 2025
-
Bedroom 1
I finished installing the 23rd row of hardwood flooring. Not nearly as much as I had hoped for today, but it's progress. That's about 64 percent of the room, not counting the closets. Hopefully tomorrow I'll reach the closets.
-
Bedroom 1
- May 6, 2025
-
Bedroom 1
I finished installing the 12th row of hardwood flooring. That's about 30 percent of the floor, not including the closets. I didn't have any trouble working around the floor ducts, and in fact I put the new floor registers in place.Most of my time is being spent sorting through the boards in a different room and going up/down stairs and across the house every time I need to make a cut (at least once per row). I'm near the point where I can bring a bunch of wood into the room and sort it into piles by length, which will let me work faster. I expect to reach the closets tomorrow.
-
Bedroom 1
- May 5, 2025
-
Bedroom 1
I sprayed a coat of Kilz Original on the front of the 8th panel of the closet bifold doors.With some help from mom, I got the Floor Muffler underlayment installed in the room (but not the closets yet). I wanted to get to where I could start working on the first few rows of hardwood.
I sprayed a coat of Rust-Oleum Painter's Touch 2X Blossom White satin on the front of the 8th panel of the closet bifold doors.
I face nailed the first row of hardwood on the floor, and tongue nailed the longest board. I'm doing the tongue nailing by hand with hardwood trim nails, pre-drilling first. Not only does this eliminate any splitting, but the flooring is hickory and the nails won't go through it without pre-drilling (I tried). Hand nailing these is slow, but it's the right way to do it. I don't trust my 18-gauge nailer to reliably penetrate the hickory, and the big bump guide on my 15-gauge nailer doesn't let me aim precisely enough.
The first few rows are tricky due to the two HVAC floor ducts not being equidistant from the wall. One is 4.125" from the wall while the other is 4.875" from the wall. And since the ducts are 4"x10", it doesn't jive very well with the 4" wide hickory I'm installing. I notched for one of the ducts in the first row of hardwood using the table saw and jigsaw, and will need to do similar for the next 2 rows before both ducts are covered.
-
Bedroom 1
- May 4, 2025
-
Bedroom 1
I put another coat of paint on the trim around the window bay ledge.I disassembled the 4th bifold closet door (panels 7 and 8). I cleaned both sides of panel 7 with denatured alcohol, then sprayed the back side with Kilz Original.
I did the first round of cutting in on the walls around the detailed spots (door entablatures and window bay trim). I did this with a 1/2" wide straight artist brush. It was difficult but it's done.
I flipped the 7th bifold closet door panel and sprayed the front side with a coat of Kilz Original.
I finished cutting in the first coat of wall paint.
I rolled the first coat of paint on the walls, very thin. The second coat will be thicker, but won't happen until after the new trim is installed, which will be after the hardwood floor.
I sprayed a coat of Rust-Oleum Painter's Touch 2X Blossom White satin on the 7th panel of the closet bi-fold doors.
I cleaned both sides of the 8th panel of the closet bi-fold doors with denatured alcohol.
I sprayed a coat of Kilz Original on the back of the 8th panel of the closet bi-fold doors.
-
Bedroom 1
- May 3, 2025
-
Bedroom 1
I continued to work on the fix to the paint on the 5th door closet panel.I put the second coat of paint on the door entablatures.
I put a coat of paint on the window casings and apron just to seal the joint compound I used to cover the nail heads. I also put a coat of paint on the acanthus applique on the window entablature, and a bit of paint on the joint compound covering the nail heads there.
I cut in a first coat of wall paint on most of the walls, except the areas around the door entablatures and the window bay shelf. I am waiting a bit longer for the paint to cure on the entablatures before I do the tricky cutting in there, and I still need to caulk and paint the edge of the bay window shelf. And of course it'll all get done again on a second coat since the door casings, plinth blocks and baseboard won't go in until after the hardwood floor.
I caulked the trim around the bay window ledge, and later applied the first coat of paint on the trim.
I reassembled the closet bifold door that was spraypainted with Rust-Oleum Painter's Touch 2X Blossom White satin (panels 5 and 6), and reinstalled it. I need it installed when I get around to positioning the new door casings, but I also just wanted to see that it looks consistent in daylight.
-
Bedroom 1
- May 2, 2025
-
Bedroom 1
I sprayed a coat of Rust Oleum 2X Blossom White on the front of the 5th closet door panel. The coverage is definitely better than the Behr, and nowhere near as much is lost to overspray.It looks like there was one area of contamination that wasn't removed with denatured alcohol. It's the top edge of the panel. I'll need to sand, clean and repaint there.
I cleaned both sides of the 6th closet door panel, then sprayed a coat of Kilz Original on the back side.
I caulked the door entablatures. I even did the tops, despite them not being visible unless on a ladder.
I finished nailing the window trim in place, feeling pretty confident that I can replace the jamb liners without mucking with the trim.
I put joint compound in all of the nail holes in the window trim.
I sanded and cleaned the spot on the top edge of the 5th closet door panel where the paint had crackled (presumably surface contamination I missed when cleaning). I sprayed a light coat of paint on this area. It looks like it's going to need more work, for which I will wait more than 24 hours and then probably apply a bit of Zinsser B-I-N before painting again.
I sprayed a coat of Kilz Original on the front side of the 6th closet door panel.
I sanded the joint compound I put on the window trim earlier.
I put the first coat of paint on the door entablatures.
I sprayed a coat of Rust Oleum 2X Blossom White on the front of the 6th closet door panel.
I glued and pin-nailed the acanthus appliques on the closet door entablatures.
I sprayed a coat of primer on the acanthus appliques for the door to the hallway and the window.
I glued and pin-nailed the acanthus appliques on the hallway door and window entablatures.
-
Bedroom 1
- May 1, 2025
-
Bedroom 1
I ran into some trouble spraypainting the closet doors. The Behr paint I bought isn't the same color from can to can, even within the same lot number. :-( Some cans were pure white, others an off white. This means I need to respray the 4 doors I've already done. :-( I don't really want to break out the HVLP gun in May just for these doors, so I'm going to try Rust Oleum 2X on the next set of doors. The Rust Oleum product I formerly used for doors isn't available anymore, or the packaging has changed enough that I just don't recognize which current product is the same as what I formerly used. But I've never had such a drastic color difference for a satin white as what I got with the Behr. In fact in the past, even across different lot numbers, Rust Oleum products have been consistent in color (at least for satin white). And I can't even complete a single door front with one 12 or 13 ounce can, so inconsistent color is a showstopper.I cleaned both sides of the 5th of the 8 closet door panels, and sprayed a coat of Kilz Original on the back side. I lter flipped the door panel and sprayed a coat of Kilz Original on the front side.
-
Bedroom 1
- April 30, 2025
-
Bedroom 1
I reassembled the first bifold closet door, and reinstalled it.I disassembled the second bifold closet door. I cleaned both sides of one of the pieces with denatured alcohol, then sprayed a coat of Kilz Original primer on the back side.
I cleaned both sides of the second piece of the second bifold closet door with denatured alcohol, then sprayed a coat of Kilz Original primer on the back side.
I masked the crown moulding from the walls so I can paint the walls and not be worried about dinging the crown with the paint roller.
I brushed 2 thin coats of ceiling paint on the spots on the ceiling that I patched with primer yesterday.
I put a coat of Kilz Original primer on the front side of the first piece of the second bifold closet door.
I sprayed a coat of paint on the front side of the first piece of the second bifold closet door.
I sprayed a coat of paint on the back side of the second piece of the second bifold closet door. This is just an experiment to see if it makes sense to do this for long-term wear.
I sanded dust and roller lint nibs from the primer on the walls, and wiped them down with water and a microfiber towel.
I sprayed a coat of Kilz Original on the front side of the second piece of the second bifold closet door.
-
Bedroom 1
- April 29, 2025
-
Bedroom 1
I primed the front side of the 1st closet door panel.I cleaned both sides of the 2nd closet door panel with denatureed alcohol.
I primed both sides of the 2nd closet door panel.
I painted the front side of the 1st closet door panel.
I made a trip to Home Depot trip to get more Kilz Original aerosol primer, Behr satin white aerosol paint and a center spring for bi-fold closet doors.
I painted the front side of the 2nd closet door panel.
I put the second coat of paint on the crown moulding, then removed the masking tape from the ceiling. The tape pulled a little bit of paint in a couple of spots, down to the drywall paper (indicating poor bond of the original ceiling paint). I started patching those spots with Zinsser B-I-N.
-
Bedroom 1
- April 28, 2025
-
Bedroom 1
I put a coat of Zinsser Cover Stain primer on the walls of bedroom 1. It's difficult to brush, I'll probably need to sand a few spots a little bit. And it might need a second coat.I did try a different 1/4" nap roller cover than I normally use. I tried a roller cover meant for epoxy and adhesives. It was definitely easier to use, if mostly because it doesn't stick to the paint tray as much as a normal woven roller cover. Zinsser Cover Stain is very thick and super sticky, especially the new low VOC formulation, so this type of roller cover is probably the right thing to use.
I was hoping to get a second coat of paint on the crown moulding, but given that I might need a secoad coat of primer on the walls, I decided against it. And realistically, I want the fumes from the Cover Stain to dissipate more before I spend a bunch of time with my head near the ceiling.
Hindsight being 20/20, I probably should have just used Zinsser B-I-N like I did on the ceiling and in the closets, despite the higher price. It takes 2 coats to get full coverage, but it's much easier to work with and dries much faster.
I started the process of painting the closet doors. There are 4 bi-fold doors, which means 8 total pieces. I should've started this process sooner since I only have room to do one piece at a time, and I need to prime and paint. One side at a time, so it's likely going to take more than 2 weeks to get them done and that's assuming I can get both sides of one piece primed in one day. The doors were originally unfinished on the back side, and I might not paint the backs but they will get primer (Kilz Original aerosol). I cleaned both sides of the first piece (denatured alcohol), and sprayed Kilz Original on the back side.
-
Bedroom 1
- April 27, 2025
-
Bedroom 1
I reassembled both closet organizer assemblies. I needed help from mom for the east closet due to the way it is assembled. I also thoroughly cleaned them, then drove all the screws and replaced the screw caps. I lost one cap, but it was for the back corner screw of the top shelf of the east closet. This isn't visible without getting on a ladder and squeezing between the assembly and the wall, so no big deal. But the awkward access to those shelf screws is why it took hours for me to finish this work.Tomorrow I should be able to start priming the walls of the room.
-
Bedroom 1
-
Roof
I fixed a roof leak around another PVC vent. Mom helped by handing me stuff while I was on the ladder and roof, and acting as spotter.
- April 26, 2025
-
Bedroom 1
I put the second coat of paint on the ceiling of both closets. For this coat, I cut in with a brush and then rolled the bulk.I went to Home Depot for a gallon of Behr ULTRA Ultra Pure White in eggshell sheen for the closet walls. Closet walls get scuffs, so I didn't want flat sheen. But the walls aren't perfect, so I didn't want satin. Eggshell is a good compromise, and this particular paint used to be called 'Scuff Defense' so it should be decent at handling scuffs.
I cut in the first coat of paint on the walls of the west closet.
I cut in the first coat of paint on the walls of the east closet.
I rolled the first coat of paint on the walls of the east closet.
I rolled the first coat of paint on the walls of the west closet.
3 hours later, I cut in the second coat of paint on the walls of both closets. I was reminded that Behr's eggshell actually has more gloss to it than Sherwin-Williams' satin. Go figure. It's fine, and for a closet it's probably a good thing (boots, shoes, boxes, etc. tend to scuff the closet walls).
I rolled the second coat of paint on the walls of both closets. I put this coat on fairly thin, mostly to avoid having to buy another gallon of paint of which I'd use less than a quart. I have a little bit of paint left, which should be enough for touch ups on the closet doorways if needed.
Tomorrow I should be able to reinstall the closet organizer assemblies, though I have some minor roof work to do.
-
Bedroom 1
- April 25, 2025
-
Bedroom 1
I rolled Zinsser B-I-N primer on the ceiling, walls and subfloor of both closets. Normally Zinsser B-I-N fumes don't bother me, but working in such confined spaces, it was a bit problematic even with a respirator. But it's done.I painted the ceiling of both closets with Behr Ultra ceiling paint (Ultra Pure White). The area is small and is mostly hidden when the built-in organizer assemblies are put back, so I decided to brush this first coat. It didn't make sense to consume a roller cover here. I might brush the second coat too; brush marks aren't really an issue here since it's a very flat sheen and I'm using a good quality brush, applying thin and being careful about brush marks.
.
-
Bedroom 1
-
Roof
I fixed a roof leak around a PVC vent. It had caused a minor water stain in the west closet of bedroom 1, as well as the kitchen. It only leaked when it rained hard. The issue was that the aluminum boot's rubber seal had deteriorated, and since the boot is short height-wise, a hard rain would cause ran to flow over the lip of the boot at the PCV pipe and run down the outside of the PVC pipe.After my repair today, it rained cats and dogs for about an hour and then continued to rain. I went into the attic to check, and the PVC pipe was completely dry. So it's fixed, for now. I used Loctite PL Roof and Flashing Sealant for the repair, with a bit of Loctite expanding foam from the underside (in the attic) for some support (there wasn't a good way to use foam backer rod).
I'll check things from the attic periodically over the next few months to make sure the repair holds up.
- April 24, 2025
-
Bedroom 1
With some help from mom, I disassembled the west closet organizer assembly and removed it from the closet.I removed the baseboard and nails from the west closet.
I cleaned the ceiling and walls of the west closet with diluted ammonia.
I primed the edges of the walls and ceiling of the west closet with Zinsser B-I-N.
I scrubbed the subfloor of the west closet with diluted ammonia, a green scotchbrite and a microfiber towel. This was mostly to get rid of lumps of joint compound from the original drywallers, but also prep for a coat of Zinsser B-I-N.
-
Bedroom 1
- April 23, 2025
-
Bedroom 1
Change of plans...I managed to disassemble the east closet in bedroom 1. It was very difficult to do solo, but I got it done. My thoughts from yesterday were incorrect because it wasn't possible to remove the top shelf without disassembling the entire shelving/wardrobe assembly.
I also removed the carpet, tack strips, carpet padding, carpet padding staples, baseboard and baseboard nails that didn't come out with the baseboard. I cleaned the ceiling, walls and subfloor of the closet.
I masked off the metal French cleat that the full-closet shelving and clothing bars were hanging on, then did the edge priming of this closet.
I removed the carpet, carpet padding, tack strips and carpet padding staples from the west closet. Tomorrow I'll remove the baseboard and nails, and disassemble and remove the organizer assembly.
I burned the tack strips and some baseboard in the fire pit. The nails don't burn, but my experience is that they rust away in the fire pit fairly quickly.
-
Bedroom 1
- April 22, 2025
-
Bedroom 1
I replaced the 4 remaining duplex outlets in bedroom 1 with decora style outlets: 2 with built-in settable nightlights and 2 plain outlets. The room now has decora style outlets throughout.I started patching the minor dings on the walls with joint compound.
I made a shopping list for supplies I need going forward. Baseboard moulding, Zinsser Cover Stain, Zinsser B-I-N, paint tray liners, Frogtape and inside corner moulding from Lowe's, shoe moulding from Home Depot and Linzer round trim paint brushes from ACE Hardware.
I picked up all items from my list. It took a couple of hours, mostly due to Highland Road being a construction nightmare right now.
I did a little sanding/scraping of nail hole bumps left over from pulling the baseboard and door casings.
I sanded the spots I patched with joint compound earlier today, and spot-primed the patches with Zinsser B-I-N. In the process I found a couple more dings I need to patch.
I'm hoping to be able to start priming the walls tomorrow.
I did some cleaning of the inside of the east closet. I'm still debating whether or not I put new paint in the closets. It's quite a bit of work to remove the built-in organization to be able to get to the walls and ceiling, and I wouldn't be changing the color (I'd keep them white). I might just remove the top of the organizer and the shelves, and paint around the rest. I'd mainly do this just to get a better finish on the closet walls. While they're not dinged up, they have a flat low-quality paint on them (probably ceiling paint).
-
Bedroom 1
- April 21, 2025
-
Bedroom 1
I installed the Caseta dimmer switch (for the ceiling fan light) and the Leviton D24SF fan speed controller in the wall box in bedroom 1. I set them up in HomeKit, and tested them. They're both working fine.I masked the ceiling in preparation for painting the crown moulding. I later put the first coat of paint on the crown moulding.
-
Bedroom 1
- April 20, 2025
-
Bedroom 1
More ceiling fan saga. The instructions for the ceiling fan rated electrical box were wrong about the screw size. So I wasted a trip to Home Depot for #10-24 screws when I needed #10-32 screws. I wound up having to go to the Home Depot in Pontiac (further away) to get 2" long #10-32 stainless steel screws.I also went to Menards to get a second ceiling fan matching the one for bedroom 1. It's smaller (44" versus 52") and will be installed in bedroom 2 when I get around to it. I bought a double-gang old work wall box for the controls and 25 more feet of 14/3 wire.
On my first trip to Home Depot, I bought another ceiling fan rated box/brace kit and returned the 'old work' one I didn't use (I didn't like the single spike on each end to engage the truss), another Lutron Caseta dimmer switch and another 3-pack of A15 100w-equivalent vintage look LED bulbs (clear lens, filament type).
I put the second coat of paint on the ceiling in bedroom 1.
I mounted the ceiling fan in bedroom 1, and installed the new LED bulbs. Tomorrow I'll wire in the controls in the wall box. I need the light when I start painting the walls, and when installing the hardwood, baseboard, plinth blocks and door casings.
-
Bedroom 1
- April 19, 2025
-
Bedroom 1
With some help from mom, I managed to remove the old ceiling light electrical box and install a ceilng fan rated box. This was far from easy, since I was working in the attic wearing a respirator and holding myself up on angled truss lumber. It took about an hour to get the old box out, and an hour to get the new one in place. The latter should have gone faster, but the included mounting screws for the ceiling box cross brace were garbage; the hex head stripped immediately on the first screw having driven it about 1/3 of the way, and the Philips part stripped immediately when trying to remove it. This is despite using a very good PH2 bit (the Wera diamond-coated type). Sigh, I hate when companies include complete garbage hardware. If you're going cheap out a few pennies on 4 wood screws, just don't include them at all. I used some GRK Torx head screws instead once I got the garbage fastener out, which worked beautifully.Worth noting that the #10-24 screws included in the ceiling box/brace kit for mounting the ceiling fan are too short. I saw this in some of the reviews, and it's true. I'll pick up some longer ones tomorrow and probably return the second ceiling fan box/brace kit that I didn't use.
-
Bedroom 1
- April 18, 2025
-
Bedroom 1
I went to Home Depot for more ceiling paint, a Lutron Caseta dimmer switch, a Hampton Bay Ansley 2-gang wall plate and some EcoSmart A15 100W equivalent 3000K clear lens vintage-look LED light bulbs.I went to Menards for a Hunter Postman 52" 3-light ceiling fan, a 2-gang 32 cubic inch old work switch/outlet box, and 25' of 14/3 NM-B cable with ground.
I went to ACE Hardware to get a Caseta Smart Fan Control, but they didn't have it (web site lied). Instead I wound up with a Leviton D24SF, at 50% off of list price. It should work, and is listed to work with HomeKit, so I'm OK with it. The advantage of the Lutron Caseta over the Leviton S23SF is the ability to easily add a Pico remote, but over time I've found myself almost never using the wall controls for the ceiling fan in the master bedroom; I just ask Siri to set the ceiling fan speed (25%, 50%, 75%, 100%) or to turn it off.
The idea here is to install a ceiling fan with light kit where previously there was just a light fixture. I've always wanted a ceiling fan in this room, and now is the time to do it since I'm about to repaint. I want separate HomeKit-compatible fan and light controls on the wall, which means replacing the single gang wall box with a 2-gang and running more conductors from the wall box to the ceiling box.
I got a lot of the work done today, but... I forgot to check if the ceiling box was suitable for a ceiling fan, and it's not. So I need to go back to Home Depot tomorrow to get a ceiling fan/light fixture box with brace that can handle the weight and vibrations of a ceiling fan. Which means I'll be up in the attic again to remove the old ceiling box.
In any event, I managed to replace the single-gang wall box and to run 14/3 NM-B from the wall switch to the old ceiling box.
-
Bedroom 1
- April 17, 2025
-
Bedroom 1
I finished cleaning the remainder of the subfloor with diluted ammonia and a microfiber towel. A lot of this activity was just to make sure I've removed any lumps of joint compound that would later potentially lead to a squeaky hardwood floor. But it also allows me to reasonably prime the subfloor with Zinsser B-I-N to seal in any old odors.I cut in the second coat of Zinsser B-I-N on the ceiling, then rolled the second coat.
I used the remaining B-I-N to prime the remainder of the subfloor.
I cut in the first coat of ceiling paint, then rolled the first coat. I don't have a full gallon of ceiling paint, I'm going to need to buy another gallon for the second coat.
-
Bedroom 1
- April 16, 2025
-
Bedroom 1
I put the 'unifying' coat of primer on the crown moulding, about 12" of the ceiling and a few inches of the walls. I'm using Zinsser B-I-N here.I removed the ceiling light fixture, cleaned the area of the ceiling that was covered by the fixture, then spot primed the area with Zinsser B-I-N.
I rolled the first coat of Zinsser B-I-N on the ceiling. With what was left of the gallon, I primed the part of the subfloor I had previously cleaned, which was less than half of the floor.
-
Bedroom 1
- April 15, 2025
-
Bedroom 1
I caulked the crown moulding on the north wall.I caulked the crown moulding on the east wall.
I wiped the east wall again with diluted ammonia and a microfiber towel.
I migrated the cold air return hole to its final location. As noted previously, the cold air return was too close to the ceiling to allow for crown moulding. I had the same issue in Bedroom 2. I moved the hole down about 1 5/8" and fabricated a filler support piece out of 1/2" thick plywood. The filler piece won't be visible since it's behind the crown moulding and the cold air return grill which butts against the crown moulding.
It's a bit odd that the cold air returns for some rooms in the house were so close to the ceiling while others are not (in fact the one in bedroom 3 is on the floor). I guess the gist is that HVAC guys don't really aim for consistency or consider trim accomodations, they're just aiming for correct flow.
I drilled the new mounting holes for the cold air return grill, and tested the grill fitment. It's perfect.
Like the other cold air returns in the house, I put a coat of flat black latex paint on the wall cavities behind the grill. This particular return is a 30", which means it spans a stud. With the Victorian style replacement grills I've been using, the wall cavities and things within them (in this case, an AC power wire and some phone lines) are more visible and there's no center strip on the grill to hide the center stud. I prefer the look of the grills with just blackness behind them, and the painting only takes a few minutes.
I caulked the crown moulding on the south wall. This completes the caulking of the crown, so I can put the 'unifying' coat of primer on the crown, edges of the ceiling and edges of the walls tomorrow.
The crown looks good. My scarf joints aren't perfect, but they're not visible without bouncing light directly off of them at an angle. There was no way around two of the scarf joints since the room is a tad over 16' long. And of course the other two scarf joints turned out great. If I had to do it all over again, I would retry gluing the scarf joints to make longer boards before cutting to length. I've not had great luck with this in the past with MDF, but it's been a while since I've tried it.
-
Bedroom 1
- April 14, 2025
-
Bedroom 1
I cleaned about half of the floor with diluted ammonia, a cheap wood chisel, a green scotchbrite pad and a microfiber towel. Painstaking work on my hands and knees, but needed.I went to Home Depot for two gallons of Zinsser B-I-N, microfiber towels and some satin white spray paint.
I caulked the crown moulding on the west wall.
-
Bedroom 1
- April 13, 2025
-
Bedroom 1
I finished removing the carpet and padding from bedroom 1, except for the closets.I finally started poking at some of the residue left behind by the carpet padding. The padding was the typical mized-media foam, and it appears that one of the colors of the foam broke down over time into a sticky, gummy substance. It left a pattern of gummy lumps throughout the room, though it didn't stick to the subfloor everywhere due to parts of the subfloor having enough joint compound dust to prevent it. But I want to clean the subfloor of the carpet pad residue, and it appears that diluted ammonia from a spray bottle and a little elbow grease is sufficient.
Given that I don't know the history of this room, and there are some stains on the subfloor that predate my ownership, I'm going to prime it with Zinsser B-I-N.
I need to start making a wish list for bedroom 1. Things I haven't bought yet includes HVAC registers, baseboard moulding, shoe moulding and lighting for the closets.
-
Bedroom 1
- April 12, 2025
-
Bedroom 1
I removed more of the carpet, tack strips and carpet padding. I also pulled all of the staples for the carpet padding that I removed. Lots of tedious work, in part due to the carpet installers running a small filler strip of padding near the middle of the room. That strip had two staples every 1.5", and the adjacent pieces had the same spacing.I finished disassembling my old Middle Atlantic ELUR Edit Center desk, which is a big monster (84" wide, about 44" deep). I decided to thoroughly clean the base components since they're difficult to clean when the desk is fully assembled. This took a while (spray bottle of diluted ammonia, toothbrush, microfiber), but the parts are now drying on what remains of the carpet.
I burned the old trim in the fire pit. It was just pine, so it was fairly easy to break into pieces. There was a decent amount of it piled up on the porch, so it was time. Three sets of door casings, window casings, window apron and most of the original baseboard. I haven't yet removed the baseboard from the closets, but that will happen soon.
.
-
Bedroom 1
- April 11, 2025
-
Bedroom 1
I removed the remaining baseboard moulding.I started removing the carpet and carpet padding.
-
Bedroom 1
- April 10, 2025
-
Bedroom 1
I primed the remaining 2 door entablatures and the remaining crown moulding. This is just a thin coat to seal the joint compound that I used to fill the nail holes. I used Sherwin-Williams Premium Wall & Wood Primer here, which is sandable. I may need to touch up one of the crown scarf joints. Of course the crown will need to be caulked before I start final priming and painting.I removed the two longest pieces of baseboard moulding. This is a delicate operation, and unfortunately the trim carpenter must've been using his finish nailer in bump-nailing mode. There were multiple spots with two to three 15-gauge nails right next to each other (touching), and they of course didn't come out with the baseboard. I wound up damaging the drywall in one of these spots to get a triple set of nails out, since they had all gone into the base plate near a corner where I didn't have a good means of protecting the drywall from my prying. Not a big deal since the walls need some patching anyway, but I've never understood why a finish carpenter would use bump nailing mode for interior trim. It's not that many nails, and they're normally 12 to 16 inches apart. What you want is a well-placed, well-sunk nail, which is near impossible to perform reliably in bump mode. I've been using nail guns for decades (I own 5 of them, from framing to a pin nailer), and really the only place I've found bump nailing useful is in the roofing nailer. Which is kind of a different beast than other nailers.
I did some more wall cleaning, but there are some black scuff marks that aren't going to come off without some serious abrasion. I don't know what they're from since they pre-date my purchase of the house. I had intended to just use the Sherwin-Williams Premium Wall & Wood Primer to prime the walls, but since I don't know the composition of these scuffs, I'm likely going to use Zinsser Cover Stain primer. It's not fun to work with (it's thick and has powerful fumes), but it works for covering just about anything. I formerly used Kilz Original for these types of situations, but it's no longer available in Michigan. I could use Zinsser B-I-N, but it's considerably more expensive. I might spot-prime these scuffs with Zinsser B-I-N and then use Kilz Restoration over the top.
-
Bedroom 1
- April 9, 2025
-
Bedroom 1
The white window jamb liners arrived from Andersen. There isn't any warm weather in the foreseeable forecast, so it'll be a while beofre I install them. They don't take long to install, but I will be priming and painting the windows while they're out, and I have to allow for curing time before putting them back.I finished sanding the remainder of the crown moulding and door entablatures.
-
Bedroom 1
- April 8, 2025
-
Bedroom 1
I finished filling the nail hole son the door entablatures and crown moulding, and started sading and priming it.
-
Bedroom 1
- April 7, 2025
-
Bedroom 1
I started filling the nail holes on the door entablatures and crown moulding with joint compound.
-
Bedroom 1
- April 6, 2025
-
Bedroom 1
I finished cleaning the ceiling with a diluted ammonia solution. I'll probably make a second pass when I'm ready to prime and paint the ceiling. This takes a long time but is worth it. The ceiling had not been cleaned since move-in, and as expected, the paint used on the ceiling was low quality.
-
Bedroom 1
- April 5, 2025
-
Bedroom 1
I tacked the window entablature, apron and casings in place. In the process I discovered that the window isn't centered in the window bay. It's off center to the right. This means that the entablature is touching the wall on the right but has a gap (almost 3/8") on the left. Not a big deal, I just wish I had noticed it much earlier in the process. I haven't fully nailed any of the pieces into place yet because I might need to wiggle them a bit when installing the new jamb liners. The jamb liners should ship today (finally), but they will not arrive for another week or so. Not a huge issue since I need warm weather to install them (the window will be out during this time for painting).
-
Bedroom 1
- April 3, 2025
-
Bedroom 1
I bailed on using the shoe moulding from the hallway for the bay window shelf in bedroom 1. Mainly because it just didn't look right but also because it was a bit too dainty and fragile when constructing the short runs with returns to cover the bit of the shelf trim that extends beyond the bay opening. I can't effectively nail to the wall there since I'd run into the metal drywall corner support, so the glue for the outside miter cut will be most of the support (though I'll probably also put a single pin nail into the shelf).I wound up making my own moulding out of a 1/2" wide strip of 3/4" deep red oak I had in my scrap pile. I routed it with the same classical ogee bit I used for the window apron and top of the window entablature as well as the door entablatures, so it's a good match. I pre-glued the outside miters with Titebond III, and they're very strong joints. Since I routed my own profile, I just routed the end of the short runs instead of having to make mitered returns. One less joint to worry about.
I sanded and primed the joint compound under the window. It's not perfect, but it's not possible to make it perfect without replacing the drywall. Fortunately the location is barely visible once the new trim is installed, and honestly I think it'll look near perfect once complete.
I put the first coat of paint on the window bay drywall, mainly because there isn't room to paint some of it nicely once the trim is installed. Due to space constraints, the window entablature will nearly touch the ceiling of the window bay, as well as the sides. The window sill ends are less than half an inch from their adjacent bay wall. These space constraints are dictating the order of operations.
-
Bedroom 1
- April 2, 2025
-
Bedroom 1
I fabricated a replacement for the front trim of the bottom of the window bay in bedroom 1. Just a simple piece of 1x2 oak. I ran a roundover bit around the top edge, and a classical ogee on the bottom edge. I primed it and installed it.I did some sanding and priming of the bottom wood of the window bay.
I applied some joint compound to the wall under the window, above the bottom of the window bay. Not sure what the original drywallers were doing here, it looks as if they never properly taped/mudded/sanded here. Not much of this is exposed once I install the new apron and shoe, but the bad spots were visible before and would still be visible. I'm fixing them.
Speaking of shoe, I've decided I'm going to use the same shoe moulding I used in the hallway, for both the bottom of the window bay and the baseboard. I will need to buy it, since I only have a small amount remaining (enough to do the window bay).
-
Bedroom 1
- April 1, 2025
-
Bedroom 1
I removed the quarter-round and the front trim piece from the bay window bottom in bedroom 1. Had to be very careful since I didn't want to create more patching work. I sanded the oak plywood window bay seat, and put 2 quick coats of Zinsser B-I-N on it.The only reason I removed the front trim piece is that it was beat up and was only profiled on one edge. It's just 1x2, I'll fabricate a replacement from oak.
I primed the inside of the window bay with Sherwin Williams Premium Wall & Wood Primer. I haven't used this product in a long time, but I had a gallon I needed to start using before its shelf life expires. I've always liked how it goes on, despite it needing two coats for full coverage when brushing.
-
Bedroom 1
- March 31, 2025
-
Bedroom 1
I finished priming the window entablature for bedroom 1.I finalized the design for the window apron. The issue here was simply the space available. The shelf in the window recess is not far below the sill. Originally, the trim carpenters had just mitered a 2.25" builder-grade door casing, which looked, well, like a builder-grade door casing. I decided that 2.25" was as tall as possible without looking like it was running into the shelf below, so I am stacking a classical ogee routed board, a 3/4" tall plain board and a cove from top to bottom. Instead of routing the cove board, I just used some leftover cove moulding from another project and cut and glued returns. I glued and pin-nailed the cove piece to the plain board. I hadn't decided if I was going to attach the top piece to the plain board or nail it to the bottom of the sill. However, the proximity of the sill to the shelf below made the decision for me; there isn't room to nail from under the sill with a nail gun or hammer. The main issue here is that the window itself extends below the sill, so I have to be careful nailing through the plain board to the wall. Thankfully the plain board is select pine so I am not very worried about 18-gauge nails changing direction as I install, but I will have to place the nails toward the lower edge of the plain board.
This decision made, I glued and nailed the top piece to the plain board.
-
Bedroom 1
- March 30, 2025
-
Bedroom 1
I assembled most of the window entablature. I haven't attached the architrave bead yet since it's possible I'll need to shave a little more off the bottom of the frieze. I also primed the exposed raw edges of the MDF.I removed the old builder-grade window casings.
I later shaved a bit from the frieze of the window entablature and attached the architrave bead.
-
Bedroom 1
- March 29, 2025
-
Bedroom 1
I cut and routed the pieces for the window entablature. Due to height constraints, it's slightly different than the door entablatures. The cove piece is 1/2" instead of 3/4" and I didn't route the bead in the frieze; I'm just using a 1/4" architrave bead make of red oak. And since I ran out of 3/4" MDF, the top piece is poplar.I finished a sealing coat of Zinsser B-I-N on the front and sides of the new window casings.
-
Bedroom 1
- March 28, 2025
-
Bedroom 1
I have most of a plan for trimming the deeply recessed window in bedroom 1. I don't want to replace the sill like I did for the windows in bedroom 2; it's more work and it'd be tricky since the sill ends are not far from the drywall of the recess. I also can't get much more width for the same reason. The same issue prevents me from using the same casings I used for the doors.So I wanted 2 1/4" wide casings, but fluted like the door casings. Unfortunately the only suitable ones I could find are only 3/8" deep. I bought them, and also bought 5/16" thick x 2 1/2" wide S4S pine which I glued to the back of the new casings after ripping it to the same width as the back of the new casings. It of course makes them very rigid (even more so than a solid board of equal thickness), but that's OK.
I forgot that I want to replace the window jamb liners, just like I did for bedroom 2. The current ones are gray, and I want white since I'm going to paint the window white. I ordered the jamb liners from parts.andersenwindows.com, they'll probably take 2 weeks to arrive. They're kind of a PITA to replace, and I need warm weather to do it since the window will be out for a bit while I do the work and paint the window. That means the window trim won't be done for a few weeks.
-
Bedroom 1
- March 27, 2025
-
Bedroom 1
I finished priming and sanding the entablature for the door to the hallway from bedroom 1. I later cut it for the dissolve into the south wall, and installed it.I removed the trim for the second closet and scraped off the paint ridge with a sharp wood chisel.
I completed the entablature for the second closet: assembly, priming and sanding. I later installed it.
Tomorrow I hope to figure out how I'm going to trim the window, since it is deeply recessed and has no room for the entablatures I used for the doors. It currently has just basic builder window casings, including an ugly apron made from window casing.
-
Bedroom 1
- March 26, 2025
-
Bedroom 1
I assembled one of the closet door entablatures for bedroom 1 with Titebond III and 18-gauge brad nails. I also primed the frieze for the door to the hallway.I needed 3 more door casings. They're House of Fara 8583 from Home Depot. I'm not sure how I wound up with an odd number, but I needed 6 and I had 3. I bought 3 more at Home Depot tonight.
I also needed 4 more plinth blocks from Lowe's. They're Ornamental Mouldings EV742PBWHW. I bought them at Lowe's tonight.
I removed the trim from the first closet, then carefully shaved off the paint ridge with a sharp wood chisel. I then installed the entablature for this closet.
I primed two of the appliques for the closet entablatures.
I assembled the entablature for the door to the hallway. It's going to need a dissolve on the right side, but I'll cut that once I'm ready to install it. The door casings I'm using are just barely going to fit on that side, but that's OK. It just means I won't be installing that one until after the walls are painted. Worth noting that the baseboard will need to be coped to the plinth for the same reason (space).
Tomorrow I'll probably install the entablature for the door to the hallway and then start assembling the entablature for the second closet. I haven't removed the builder trim from that closet yet.
-
Bedroom 1
- March 25, 2025
-
Bedroom 1
I finished routing all of the pieces for the three door entablatures for bedroom 1. Given the length of the ones for the closets, it wasn't easy.I started priming and sanding the routed edges of the MDF. First a coat of SealCoat, then an initial sand, then Zinsser B-I-N. Since the MDF was prefinished (not just primed) from the factory, I had an issue with the finish on the face of the bead on the frieze lifting. I had to remove it (it peeled off in one piece), which meant multiple rounds of primer and sanding to make it smooth. I would not normally use prefinished MDF for this work (it tends to be problematic to route), but I had some leftovers on hand from a shelving project that I wanted to utilize.
I ran into a second issue with this MDF, namely internal tension. I noticed it when cutting a 1 9/16" wide strip on the table saw, where the leftover curved quite sharply away from the blade. I don't typically see this from MDF from Menards since I'm always buying the stuff that's stored indoors, but these pieces sat in my garage for a couple of years. It's not a big deal since the process of gluing and nailing my stackup will correct it, but it means a little more work clamping during the glue-up. For the moment the one piece that's a bit warped is clamped to an straight LVL beam in hopes of it being a little straighter tomorrow. If it winds up being a a real issue, I'll cut and route a new one. The bummer here is that I didn't address it sooner; it's already been routed with a deep cove bit and primed and sanded.
I've seen MDF do something like this before. It's just not common for me to see it warp while making full cuts (versus say a dado). Thank goodness I was using a featherboard and the riving knife on the table saw, else I might have had a kickback incident.
-
Bedroom 1
- March 24, 2025
-
Bedroom 1
I started working on the entablatures for bedroom 1. They're the same design as the ones I used for bedroom 2 and the hallway. While they don't strictly follow classical dimensions, they're not far off. One of the reasons here is that I prefer to just route my bead in the bottom of the frieze instead of creating a separate architrave bead piece. Yes, it's sort of cheating and doesn't create the same look, but I like it and it's a little less work for me since I have a router table and the bits to do it. And of course having a descent entablature at all is a big upgrade over builder-grade door casing.Two of the doors in this room are big closet doors, and the frieze for each of those is 77" wide. I cut the frieze pieces for these from MDF, and routed the lower bead. I also cut the 2 pieces for the cornice for each of these doors. I then cut the same pieces for the door to the hallway and routed the lower bead. This last frieze was made from poplar because I ran out of MDF that was wide enough.
I routed the cove in one of the cornice pieces for the door to the hallway.
-
Bedroom 1
- March 23, 2025
-
Bedroom 1
I finished nailing all of the crown moulding in bedroom 1 in place. I did a bit of work on touching up the joints, but will wait for the room to be cleared out to do the bulk of it.
-
Bedroom 1
- March 22, 2025
-
Bedroom 1
More work on the 3-piece crown moulding in bedroom 1. All 8 ceiling pieces are nailed in place, as well as all 8 wall pieces. 5 of the 8 crown pieces are installed. The remaining 3 crown pieces will be installed tomorrow. They're 3 of the 4 trickier pieces since they're scarfed on one end (to join to make one long run) and mitered on the other (corner). I decided I want to be fresh to do those since they'll take time and patience.If I finish nailing up the crown moulding and get the joints touched up, I'll start on the entablatures for the door and the two closets in bedroom 1.
-
Bedroom 1
- March 21, 2025
-
Bedroom 1
I have been working on the 3-piece crown moulding in bedroom 1. I'm using the same moulding as I used for bedroom 2.I haven't cleared out the room yet, so I'm not ready to paint or start installing the hardwood floor. But I can install the 3-piece crown moulding as well as the custom made door entablatures (which I've yet to make, but they'll be the same as the hallway and bedroom 2).
I've installed 6 of the 8 ceiling and wall pieces of the crown moulding. It's 8 pieces each because the walls are longer than 12 feet and I don't have any way to easily transport boards longer than 12 feet. I'm using 45 degree scarf joints to get more than 12 feet, glued and pin-nailed at the joint (probably overkill). I've also installed 2 of the 8 pieces of crown.
-
Bedroom 1
- March 16, 2025
-
Garage
I finished assembling a simple stand for my bench grinder so I can move/remove the old long bench it's been sitting on forever. The new stand was made from scrap plywood and pieces of scrap 2x10 from when I sistered the floor joists under the den to meet deflection requirements for the tile floor. It's on casters co I can roll it around as needed, and all 4 casters have total lock brakes. They're not nice casters (Shepherd 3546M), in the sense that the brakes are difficult to operate. But the bench grinder won't get moved very often, so it shouldn't be a big deal. And it's unlikely I'll ever really need the brakes, since grinding doesn't involve any real force.
-
Garage
- March 10, 2025
-
Basement
I made another tray to hold paint cans. This one is my new preferred design because it's stackable. The interior dimensions are 14" x 14", which can hold 4 1-gallon cans or 9 1-quart cans or 25 rattle spray cans. It's all plywood, 3/4" sides and 1/2" bottom. It's roughly 3" deep. I didn't fuss over the depth since it was made from scrap. The bottom fits into the sides via dado, like drawer construction. The dado is 1/2" from the bottom, so there's enough of a bottom lip to stack on top of another full tray, assuming that tray has same-height cans.Eventually I'll probably buy some drawer slides and make more of these so I can have a paint storage cabinet.
-
Basement
- March 9, 2025
-
Kitchen
I've been sorting through boxes of miscellaneous fasteners and other hardware I had in the kitchen, most of it from McMaster-Carr. I'm not done but I've made good progress. Much of it went into a Sortainer I bought a long time ago, including threaded inserts, guide pins, 5/16" fasteners, small hinges and inexpensive draw hasps.I installed 4 draw hasps on the underside of the kitchen table to keep the table snugly fitted with the first insert installed. I don't typically need the second insert, so for the moment I'm not going to add draw hasps there. It's kind of odd that the table has strong draw latches pre-installed from the factory that only work when no inserts are installed. I'm assuming this is cost cutting by Ethan Allen. The fact is that draws are needed MOST when one or both of the inserts are installed, but there are none on the inserts from the factory.
-
Kitchen
- March 5, 2025
-
Garage
The final light in my garage door openers stopped working. I mostly unly use the light from one of them, and one of the two bulbs in that opener stopped working about a year ago. I never got around to troubleshooting because I didn't really need it; when I need more light in the garage, I turn on the 24 recessed lights. I only needed one bulb to work, to light my way when entering the garage at night.I had assumed that the bulbs had all died, so I bought 4 new LED bulbs at Home Depot. Well, that didn't fix anything. It turns out that the contact in the base of each of the bulb sockets was no longer making contact with the bulb. I'm assuming this is long-term thermal exapansion/contraction. The contacts all looked super clean (like new), as did the sockets themselves. No signs of arcing or overheating. Which makes sense since I've always had low-current LED bulbs in them. I bent the contacts into position on all 4 of the sockets, and now all of them are working again. So I went from no lights to four lights with a trivial fix.
-
Garage
-
Kitchen
I think I'm done with the new bench for the kitchen. I finished applying 2 coats of flat polyurethane late in the evening. Worth nothing that it already had 2 light coats of gloss polyurethane.
- March 4, 2025
-
Kitchen
More work on the bench for the kitchen...I installed the top on the base (Loctite PL MAX and 16 pocket hole screws). I installed the top piece of porcelain, then the bottom piece of porcelain, using beads of Loctite PL MAX every 1.5 inches. I misted the mating surfaces with water before joining, since it's really dry in the house and SMP adhesives need moisture to cure (misting is recommended in the instructions if humidity is well below 50%). After a few hours with weights on the porcelain, I masked the top frame and grouted the porcelain with TEC ready-to-use grout (same as I used for the foyer console table). I then did the same for the bottom porcelain, which was much more difficult to mask and grout.
Tomorrow I can start the final finishing, which will be ultra-flat polyurethane (matching the sheen of the coat rack the bench will live beneath).
-
Kitchen
- March 3, 2025
-
Kitchen
More work on the bench for the kitchen...I finished assembling the base frame. I then cut and installed the strips to support the bottom shelf (#6 x 1.25"e; screws and Titebond III). I then cut the bottom shelf plywood and installed it (again using #6 x 1.25" screws and Titebond III).
I sprayed two light coats of gloss polyurethane on the assembled base, and a second coat on the top frame.
-
Kitchen
- March 2, 2025
-
Kitchen
More work on the bench for the kitchen. The top now has 1 coat of gloss polyurethane, which isn't the intended final sheen. This is just a sealing coat, which I'll be sanding.I completed the two leg assemblies. Each has two of the legs, a rail, a stretcher and the three maple stiles.
Next up is the front and rear rails and stretchers. I need to sand them, dye them and seal them with shellac. I've been doing this initial part of finishing before assembly simply because the dye doesn't penetrate PVA wood glue and it's difficult to touch up the dye (versus say gel stain). As for why I'm using TransTint dye: I can mix it with denatured alcohol to penetrate red oak grain, and it's relatively easy to control color saturation. More coats will yield more color, and to some extent it can be lightened again by wiping with denatured alcohol (which also means you can control blotching if you have a lot of time). It can also be mixed with SealCoat (dewaxed shellac).
I have not yet cut the plywood piece that will support the bottom piece of porcelain, nor the strips of oak that will support that plywood from underneath.
-
Kitchen
- March 1, 2025
-
Kitchen
More work on the bench for the kitchen. I dyed the top frame, which took multiple coats to reach the desired darkness. I also dyed one set of side stretcher and rail and later sealed them with dewaxed shellac. I sanded one set of side stiles and sealed them with dewaxed shellac. I then finished drilling the dowel holes for one side panel and assembled it (3 maple stiles, oak rail, oak stretcher). I'm getting better at dowel joinery, but it's very time-cosuming with the tools I have. I can only jig one dowel hole at a time, so 48 holes took many hours. But the first side panel appears to be good and is curing. The stiles aren't really a structural element, but building the side panels as the first part of the base is the easiest route.
-
Kitchen
- February 28, 2025
-
Kitchen
More work on the bench for the kitchen. I glued and nailed the piece of spacer plywood in place for the top porcelain. I cut and installed the cove moulding that covers the edges of the 3/4" plywood that is the structural part of the top.I cut all of the dimensional wood for the base. Four 2x2 oak legs, four 1x3 oak top stretchers, four 1x3 oak bottom stretchers and six maple stiles. I then drilled all of the pocket holes (48 of them... ugh). I then started drilling the dowel holes for the stiles. There are 48 holes to drill, I've done 36 of them and checked the fitment of one of the two sets of stretchers/stiles.
I can't glue the stretchers/stiles assemblies together until after I dye the stretchers. The maple stiles will not be stained, since I want them to contrast with the rest of the bench and make it obvious that they're a different wood species.
-
Kitchen
- February 27, 2025
-
Kitchen
I've been working on a bench for the kitchen, to go beneath the new coat rack. I have no mud room, and in fact basically have no entranceway space at all. The entrance from the garage leads directly into the kitchen, and it's narrow (barely more than the width of the door). Worse, the laundry room door is on one side and the pantry door on the other. So three sides of the short entryway are doorways, leaving no room for anything to be on the floor and pretty much no room to even remove your coat, boots or shoes. So I'm intruding on the kitchen a bit in order to have somewhere to remove boots/shoes/coat. The objective is a bench I can sit on and store shoes/boots underneath to keep them off of the hardwood floor, especially when they're wet. It will have a wood-framed porcelain top and shelf, which will be very durable and not have trouble with a bit of moisture. But it's sized to also have a 15" x 30" boot tray on the bottom shelf in the winter. The height is about the height of my dining chairs, which lets me use it as temporary dining seating when my dining table extension inserts are installed. I don't want extra chairs since it's rare for me to need to seat more than 4 people.I glued together the top frame tonight (biscuits for the miters), then glued and screwed it to the support plywood. I also cut the 3/8" thick spacer plywood piece that brings the top porcelain almost flush with the top of the frame. All good so far.
-
Kitchen
- February 16, 2025
-
Foyer
The foyer table is done and turned out well. It is very strong and stable, and while a simple design, I like it. Given that it's oak and porcelain, it will outlive me.
-
Foyer
- February 10, 2025
-
Foyer
I cut the piece of tile for the bottom shelf of the new foyer table. I also installed the top on the base and the spacer plywood in the top. I finished dyeing the base, and later put the first coat of Polycrylic MAX on the base.
-
Foyer
- February 9, 2025
-
Foyer
I did some more work on the foyer table.I went to Home Depot for Loctite PL Premium MAX adhesive that I will be using to adhere the tile to the plywood. For single large tiles in furniture, I've had great success using it. It's a moisture cure urethane, and very strong but will accomodate bits of movement from wood expansion/contraction. I also bought butcher paper to protect the benchtop during glue-ups, and some 1.5" diameter thick felt pads to stick to the bottom of the table legs.
I glued and nailed the top frame to the 3/4" plywood that will support the tile. Sadly I had some trouble here. I can't seem to remind myself that pin nailing oak or hickory is a risky endeavor; the nails might do a 180 inside the wood. The same is true for 18 gauge brads. So I had to patch up a couple of nail errors and will need to do some more finishing work tomorrow.
I cut and installed the 3/4" oak pieces that support the bottom shelf from underneath. I used wood glue and #6 screws here to avoid nailing issues. I then cut and installed the bottom shelf plywood with wood glue and 18 gauge nails. I have yet to cut the tile for the bottom shelf, mostly because I prefer to use my tile saw outdoors and it was well below freezing outside. Given that I'm only cutting a single 12" x 24" tile, I may brave it this week using a 5-gallon bucket of warm water to fill the tile saw water resorvoir.
The good news is that the new table is REALLY strong and rigid, unlike the table it will replace. Even sitting on it and trying to make it twist/rack/flex, it doesn't budge. Which is good since it's about the right height to sit on when removing boots or shoes.
-
Foyer
- February 8, 2025
-
Foyer
I am working on a new table for the foyer. It's similar in design to the one I'm using now, but will be a bit better quality. The one I'm using now is an old table I made before I had a miter saw and table saw, pocket hole jigs, dowel jigs, etc. And it's made of poplar. It was used just as a plant stand, not a table. But the dimensions are good, so I've basically reproduced them. I'm using red oak for top frame, legs and stretchers. I'm using porcelain tile insets for the top and the shelf, but this time each inset is just one tile. I own a tile saw now, so I can cut the piece for the shelf.I finished building the top frame, and cut the support plywood for the top. I also finished assembling the base. Pocket holes (that will not be visible) and wood glue. Tomorrow I'll glue and pin-nail the top frame to the support plywood, and install the support plywood for the bottom shelf. I might get around to sanding and the TransTint dye. I'm using the same color I used for the coat rack since this table sits beneath the coat rack.
-
Foyer
- February 2, 2025
-
Foyer
I completed the coat rack for the foyer. I used Minwax Polycrylic Max ultra-flat as the top coat finish. It's the first time I've used a water-based topcoat in a long time. I like the flat finish a lot for this piece. I had initially sprayed a coat of shellac on it, but mounted on the wall, I quickly realized I didn't want any shine at all. Hence even a satin finish wasn't going to work. A lot of daylight hits that wall, and reflection from the coat rack is just out of place. It's a utility piece. So I stripped the shellac with denatured alcohol and finished with two coats of the Minwax Polycrylic Max ultra-flat.
-
Foyer
- February 1, 2025
-
Foyer
I assembled the wood parts of the new coat rack, including its half of the French cleat. I then measured and marked the wall for the other half of the French cleat. I drilled the holes for two Toggler toggle bolts and installed the cleat on the wall, making sure it was level. I then drilled a pilot hole for a long wood screw near the center of the cleat, which was the one spot where I could hit a wall stud.I hung the coat rack temporarily just to check the fitment. It's all good.
-
Foyer
- January 31, 2025
-
Foyer
I have wanted a wall-mounted coat rack for years. I finally started shopping for one, but didn't find what I want. Mainly because I don't want exposed mounting hardware (screw heads), and I want some wall protection so I can hang my bicycling helmets during cycling season without dinging up the wall. I also want 2 tiers of triple hooks, with the top tier a bit further out from the wall. So I decided to make my own, which will be mounted with a French cleat. I cut, routed, sanded and dyed (TransTiny mahogany brown) the pieces tonight (all solid oak). It's 28.5" wide and 23.75" tall. There's a 1" thick shelf at the top. There's a 1" thick spacer for the top row of 4 hooks. The second row will be 3 hooks.I bought hooks at Menard's. Originally I had planned to use hooks with an oil-rubbed bronze finish, but they didn't have enough of them in stock (the web site was wrong). So I bought hooks with a satin nickel finish.
-
Foyer
- January 26, 2025
-
Family room
I started painting the final piece of trim that borders the bottom of the banister fascia. It spans the entire north side of the room. The masking didn't work well, so I'll need to go back over it with a small brush.I finished making some primitive but functional pads for the legs of the larger travertine table. The base is steel, and the legs only have about 1 square inch of surface area that touches the floor. The tabletop and base weigh over 200 pounds, so without the pads, the table legs dig deep into the carpet. The pads don't prevent flattening of the carpet, but they greatly reduce it and allow me to move the table. They're solid 3/4" thick oak with 1/8" polycarbonate glued to the bottom with 3M 90 spray adhesive. They're octagons about 3.75" flat-to-flat. I ran a roundover bit over the bottom and top edges after the 3M 90 dried, and cut a 1/8" deep recess in the center of the top with a 1.5" diameter Forstner bit. The feet of the table legs fit into the recess, which allows me to move the table around a bit on the carpet. I sanded the sides and top and dyed (TransTint), then sprayed two light coats of satin polyurethane on them.
I did some more carpet cleaning with the steam cleaner, since I have moved furniture around and exposed areas I hadn't cleaned yet.
-
Family room
- January 24, 2025
-
Family room
I started putting the furniture back in place. I've moved things to new locations, in part because much of what's in the family room was/is intended for a home theater I've yet to build in the basement. The big old TV, the floorstanding speakers, the subwoofer, the audio/video shelving units, the big TV stand. For the family room, I really just want a frame-style TV and a soundbar and possibly in-wall speakers. Basically don't consume floor space for the TV and speakers.
-
Family room
- January 23, 2025
-
Family room
I cut-in the second coat of paint on the south and east walls. I then rolled the second coat on the south and east walls.I checked the remaining 3 electrical outlets. They're split-wired. Strange to have 7 split-wired outlets in one room. This room isn't very large, and who would want so many outlets controlled from a wall switch?
-
Family room
- January 22, 2025
-
Family room
I finished masking the ceiling on the south and east walls, then finished the first coat of cut-in painting. I then rolled the first coat on the south and east walls.I really like the color (Sherwin-Williams 'Vanillin', SW 6371). It's the same color I used in the foyer. It's MUCH better than the original light pink! And it coordinates well with the Sherwin-Williams 'Torchlight' (SW 6374) that I used for the stairwell and second floor hallway. Of course that's expected since it's listed as a coordinating color on the Sherwin-Williams web site. In any event, it gives a little bit of warmth to the room, but is subtle. In some light, it almost looks off-white. The warm yellow undertone is most apparent in cloudy daylight, which is perfect for Michigan winters. An antidote for seasonal affective disorder?
-
Family room
- January 21, 2025
-
Family room
I continued some electrical work. 4 of the 7 receptacles in the family room are now Legrand NTL885TR-WCC6, which have built-in nightlights with four selectable light levels (or off). I ran out of these receptacles, so I need to order more. But I found that more of the family room receptacles were split-wired, with the top outlets controlled by the wall switch I replaced yesterday. I don't need so many split-wired receptacles, and for now I've only left 2 of them split-wired: the one in the southwest corner and the one under the stairs. If the one in the southeast corner is split-wired, I might leave that one split-wired too. Basically one in each corner, except the one near the main switch plate. There's really no need for control of an oultet there, since it's basically under the switch plate and the wall sconce. The wall sconce already provides controlled lighting for that location.My APC G5 power conditioner/sequencer is dead. I opened it up just to see if there was anything obvious wrong. All of the MOVs and thermal fuses appear to be intact (though I didn't probe all of them). The breaker is intact (120V makes it through to the PCB). I do see one suspect electrolytic capacitor, but without a schematic and/or time to put it on the bench for diagnosis, I'm not sure what that capacitor's purpose is. But I do see reports of people needing to replace it. I'm going to order a replacement capacitor just so I can try fixing it instead of adding to the landfill.
-
Family room
- January 20, 2025
-
Family room
I picked up a new ceiling fan for the family room. The one I installed way back when was getting louder, emitting an electrical buzzing sound (not mechanical). The new fan was on clearance at Menards, and was the display unit in the store. It's now installed and working nicely, but since it was the display unit, it didn't have the balancing kit. It has some wobble, so I'll order a balancing kit from Amazon.I also picked up a Lutron Caseta smart switch with Pico remote. I'm using it to replace the older Maestro switch that was in the main switch plate and controlled one of the outlets in each of several receptacles in the family room that were split-wired. The Pico remote is now wall-mounted near the other Pico remotes for the family room. All family room lighting is now controllable via HomeKit except the ceiling fan light.
-
Family room
- January 19, 2025
-
Family room
Last week I finished painting the ceiling of the family room. It was a tremendous amount of work, since it's a vaulted ceiling that needed patching of settling cracks beforehand, and it extends above the second floor hallway. A lot of way-above-my-head work, on tall ladders. Two thin coats of Zinsser Cover Stain primer, then two coats of ceiling paint.This weekend I finished painting the west wall, after rounds of patching and priming. Next up are the south and east walls. The north wall was painted as part of the foyer work.
I got sidetracked a bit solving an electrical puzzle I had not previously investigated. There were two mystery switches in the family room, wired as a 3-way pair. I had replaced them with Lutron Maestro switches a long time ago, but never bothered to figure out what they controlled. It turns out they controlled the bottom outlet of at least two of the wall receptacles; the one on the east wall under the stairs and the one closest to the light switches on the west wall. I had never used those outlets, so had no idea they were split-wired with the bottom outlet controlled by wall switches. In this day and age with smart devices, there's really no need for them. So I replaced one of outlets with a non-split-wired receptacle and removed one of the switches (capped the red wire, tied the black and white together). I replaced this switch with a Pico remote for the wall sconce, which is more useful to me.
Speaking of that... the wall sconce LEDs didn't work correctly with my older Maestro dimmer, so I replaced it with a Caseta dimmer. I also replaced the recessed lighting dimmer with a Caseta dimmer, and put a Pico remote for it in place of an old undocumented audio volume controller. So now I have Pico remotes in place of old stuff I never used. This is good since I use HomeKit.
-
Family room
- April 24, 2024
-
Second floor hallway
I cut in the second coat of paint on the wall.I rolled the first coat of the tight spots with a 4" roller, then rolled the rest of the wall with a 9" roller. It will definitely need a second coat, but I like it. I got the contrast I wanted versus the trim, and it's not as wild a color as it can seem in pictures. Especially under 2700K light, which is what is in the recessed hallway fixtures.
I later rolled the second coat. The finish isn't as glossy as it seemed from brushing. The color is bolder in pictures than in person. I like it.
Later I pulled most of the tape and reinstalled the wall plates, the newly painted central vacuum port covers and the cold air return grill. I have some touch-up painting to do and I've yet to paint the custom made pieces of trim on the second riser to the third bedroom, but I'm in the home stretch.
-
Second floor hallway
- April 23, 2024
-
Second floor hallway
I will need to touch up some of the trim due to some paint runs. I had put extra Floetrol into the paint, and I overdid it. But I usually need to touch up trim a bit after painting walls, so I'm moving ahead.It took several hours, but I finally got th bathroom pocket door reinstalled. I wish I had taken a closer look at it before I started all of the hallyway work. The top trim isn't right, it reveals way too much of the mechanism. Of course it doesn't get closed often (pretty much never), just due to the layout of the bathroom (you can't see the toilet nor the shower from the hallway even when the door is open). But just the same, I wish I had addressed it, and having the trim removed would have made the door work easier.
I went to ACE Hardware for a roll of .94" FrogTape masking tape. I had some 1.88" from a previous project, but I needed the .94" to make my life easier taping the contours of the new door entablatures.
I taped off all of the trim, and finished the first coat of cut-in. The paint color is much darker than the primer, so I know it needs two coats (I tested it). It might only need one coat rolled with a 3/8" nap roller, but there's a lot of cutting in on this wall and I can't lay down a thick enough coat with a brush without leaving dramatic brush marks. And unfortunately Sherwin-Williams' idea of 'matte' is more like what I think of as 'satin'. They no longer offer Duration in egg shell sheen, which is actually flatter than what they now call 'matte'. I'm OK with this since the wall is in a hallway and is now in good shape (I did a lot of patching), but it makes me with I had bought 'flat' simply because it might actually have more gloss than the trim (which is Behr Premium Plus Ultra in 'satin').
-
Second floor hallway
- April 22, 2024
-
Second floor hallway
I painted one side of the pocket door to the bathroom. I also painted one of the central vacuum covers after applying adhesion promoter.I put the first coat of paint on most of the trim. It will need a secont coat.
I cut in the ceiling, electrical outlet, central vac vents and cold air return. They'll need a second round, so I wanted to get one round done.
I nailed the final custom-made piece of trim into place on the left side of the upper riser for the steps into the third bedroom. I waited until now because having it in place was going to make caulking the end of the baseboard impossible.
I put a second coat of paint on the trim, thinned a bit. I'm not thrilled with my paint job, mostly because the paint was a few years old. I may touch up a few spots later, but it's good enough.
I pulled some of the tape, just to check my caulk lines. They look good, no heavy damming anywhere. I'll pull the rest tomorrow.
-
Second floor hallway
- April 21, 2024
-
Second floor hallway
I picked up the paint from Sherwin Williams. I went with Duration in 'Torchlight' (SW 6474), which is a very close match to Benjamin Moore 'Gamboge'. Sherwin Williams was having a 40% off sale, and paint is expensive these days. Plus their store is much closer than the nearest Benjamin Moore store.It took many hours, but I caulked all of the trim I intend to paint soon. I used Sascho Big Stretch, which I sort of regret only because I have ot wait 25 to 48 hours before painting.
I sanded one side of the pocket door to the bathroom and primed it with KILZ Original.
-
Second floor hallway
- April 20, 2024
-
Second floor hallway
I carefully removed the pocket door to the bathroom and took it to the basement for paint prep. I filled the gouges with Durham's Rock Hard Water Putty.I primed the hallway half of the trim for the pocket door with Zinsser B-I-N. I'm not ready to remodel the bathroom, so I'm leaving the stained trim on the bathroom side as-is for the moment.
-
Second floor hallway
- April 18, 2024
-
Second floor hallway
I am still doign some spackling, sanding and priming on the new trim. I'd like to get to the point where I can caulk soon. I need to make another door entablature for the inside of the first bedroom doorway, I'll likely work on that tonight. I can't install the casings and plinth blocks there until after I've cleared the room and installed hardwood, but the entablature can be installed.I need to decide on a paint color for the hallway. The second bedroom was painted with Sherwin-Williams 'Concord Buff', but I'd like something that has more contrast with the white trim since I've put so much effort into the trim. I like a lot of the Benjamin Moore 'Williamsburg' colors, and I have a fan deck from them. I'm leaning toward CW-285 ('Gamboge') or CW-280 ('Moir Gold'). The family room wall is a pale pink right now (ick), but I intend to repaint it in CW-275 ('Ludwell White').
-
Second floor hallway
- April 17, 2024
-
Second floor hallway
All of the hallway baseboard and shoe moulding is nailed in place, and the nail holes are spackled. The door casings for the 1st bedroom doorway are sanded and primed with Zinsser B-I-N. The door frame is aslo filled, sanded and primed up to and including the door stop.I tried a few different solutions to terminate the baseboard at the railing. The original baseboard was just cut off after passing over the railing base, which looked unfinished. I tried the same with a return, with a miter cut and with a plinth. None looked right to me. So I wound up making my own small plinth out of solid oak, and placing it on top of the moulding I used to cover the expansion gap between the hardwood flooring and the railing base. I'm still not thrilled with it, but it's better than anything else I tried.
I did some tricky work on the riser into the third bedroom, just to make the awkward step look a little better. I fabricated some pieces from solid oak to make it look like there's a column from the hallway floor all the way to the top of the plinth blocks at the bottom of the door casings. This whole area is kind of a PITA, but it looks better.
-
Second floor hallway
- April 10, 2024
-
Second floor hallway
I managed to get baseboard installed on the tricky part of the hallway, namely on the wall that has the step into the third bedroom butted against it at an odd angle. Tricky angled cuts plus an angled 1" hole drilled on the drill press.I went to Lowe's for another plinth block to do what I want to do at the top of the stairs. I removed some of the half-ass stair trim from the wall, then cut the big piece on the wall vertically with my oscillating tool. It previously had a half-baked return piece to the floor, presumably done by a trim carpenter. I can now butt a plinth block against the big piece, and then continue on the wall with baseboard. I also bought some caulk.
I bought some smaller shoe moulding at Home Depot than I originally intended to use. This is because I dodn't like the look of the original shoe moulding where it meets the plinth blocks. I tried cutting returns as well as chamfer cuts (the tradidion ways of joining shoe to plinth or door casing when the shoe protrudes more than what it meets), but it just don't look right to me for plinths at the bottom of the door casings for the two doors that are very close to each other. The plinth should look like a substantial base to a column, but the shoe sticking out further than the plinth kills this look when the plinths are close together. Maybe it's just me. But I prefer the look of the new shoe moulding I bought, which sits just a hair inside the face of the plinth when butted.
I'm doing something a little tricky with the shoe moulding at the awkward step to the third bedroom. The baseboard and trim on the walls is all going to be white, but the piece of hickory riser for the step is stained to match the flooring. But it needs shoe moulding, and white would look terrible. So the wall shoe will be white but the shoe for the step riser will be stained to match the riser. Where the wall shoe meets the riser shoe, I have a miter joint. To pull this off cleanly, I need to prefinish the shoe pieces, then touch them up after installation. We'll see how it goes. I can use my pain nailer for the wall piece, but I'm lery of trying to use it for the piece on the stair riser. My experience with pain nails in hickory is that they frequently do a 180 and come back out the face of what I'm nailing. They're just not strong enough for hickory, which is very hard. So I'll probably use 18 gauge nails there.
I started the process by priming the piece for the wall with Zinsser B-I-N.
I finally have a rough plan to install the last two pieces of flooring and the stair nose. I need to cut off the end of the subfloor, since it's rounded and sticks out too far. For the bulk of the cut, I think my savre saw with a guide is the best option, and I'll finish it off with the oscillating tool. Its edge is also ugly since it's a piece of particle board. Makes me wish I had replaced it with plywood like the rest of the subfloor before I installed the hardwood. The plan is to face the edge with a 3/8" thick piece of 3/4" hickory I have left from the step riser after I cut a straight edge. I'll run a roundover bit over the one exposed edge of this face piece, and stain it to match the stair nose.
I cut the stair nose to length. I crept up on the length because the stair nose is very expensive, presumably largely due to the tooling to bullnose and shape hickory. It's our hardest domestic hardwood.
I'm going to need to shape one custom piece of flooring, since I can't fit a full-width board as the last piece before the stair nose, and there are some odd transitions at each end due to the railing base on one side and the stair trim on the other. Not a big deal, I already have the router table set up with the new Yonico bit for the groove. I think the tricky part is going to be installing the stair nose. I don't want to face nail it. I _think_ I can drill pilot holes from underneath the edge of the subfloor and put a few screws in from underneath, and of course some Loctite PL construction adhesive. We'll see when I get to it.
-
Second floor hallway
- April 7, 2024
-
Second floor hallway
I finished installing the bulk of the hand-sculpted hickory flooring in the second floor hallway. The long curve at the railing base made it difficult but not impossible. There's still quite a bit of work to do to cover the expansion gap there, but I'm working on it. I am using solid oak outside corner moulding here, but it's possible I will change my mind. I also haven't done the stair nose or the last couple of pieces leading to it. Mainly because there is some moulding I haven't decided how to handle yet.I finished priming four of the plinth blocks for the hallway. Two for the second bedroom door and two for the bathroom door. I used Zinsser B-I-N here, only to prevent any tanins from leaking through the paint later on. I have two more to do for the first bedroom, but I've yet to decide how to deal with that door's proximity to the hallway wall. It's awkward for the plinth and the baseboard and shoe, even if I trim the plinth to match the width of the door casings I intend to use. I'd like to avoid any tricky coping of the baseboard since it's MDF which is generally not very nice to have to cut with a coping saw.
-
Second floor hallway
- March 28, 2024
-
Second floor hallway
I cut and nailed the door stop moulding to the first bedroom door jambs, after putting some Zinsser B-I-N on the back just to avoid oak tanins from later affecting the paint. I bought oak just for the durability, it was the same price as poplar.Like other doors in the house, the first bedroom door had deep gouges from the previous owner, presumably a large dog. Deep enough that just sanding wouldn't suffice. The doors were originally stained wood, but I'm painting them since all the trim on the second floor is going to be painted. I removed the door, then removed the hardware. I cleaned one side with denatured alcohol, then filled the gouges with Rock Hard Water Putty. Once it dried, I sanded and then sprayed the sanded areas with automotive primer. I then sanded again and sprayed with Zinsser B-I-N. I'll sand again, then flip the door over on my sawhorses and fill the gouges on the other side. The door will eventually get a full coat of primer (probably just Kilz Original since shellac-based products are pricey these days), then a sparay coat of enamel. I like enamel on doors because it's more durale than most latex paints, and I already have the satin white rattle canls I used for the other bedroom doors on the second floor.
I nailed the door entablatures above the first and second bedroom doors, as well as the one above the bathroom pocket door. I had trouble with the dissolve on the one above the first bedroom, so I wound up cutting it a little short and I'll fill the gap with caulk later. It's only the corning that is dissolved, not the frize. It's going to be difficult to paint this area, I probably should have prepainted before installing but I haven't chosen the wall paint yet. I'll be able to do it with craft brushes and careful application of masking tape, it's just not going to be easy.
I haven't installed the appliques yet. That's mainly because I'm not thrilled with their resolution. They're fine inside the bedrooms, but I think I want something higher resolution for the hallway.
I need to make a shopping list for the big box stores. I know I need some Kilz Original spray, I only have one can. I think I also need more plinth blocks.
At any rate, I can get back to installing the hardwood in the hallway now.
-
Second floor hallway
- March 24, 2024
-
Second floor hallway
I am almost done adjusting the door jambs for the first bedroom. I had the door to this room open since buying the house, and hence hadn't noticed how poorly the door was hung. The gap between the door and the latch side jamb was so big at the bottom that the door stop moulding didn't even cover the gap. It was more than 1/2". I bought new jamb legs in case I need them, but I think I've managed to get things where I need them to be by carefully prying the jambs away from the framing, removing much of the existing shims and reshimming both sides. I also carefully removed the jamb head and shortened it about 3/16", then reinstalled it. The jamb legs are now as plumb as I can get them without completely removing them and replacing them. They're at about 89.90 degrees according to my 4' level. I'm not inclined to completely rehang the door right now, since I'd have to cut the hinge recesses in the new jambs and make quite a mess during installation. If I had noticed this issue before I had laid all of the FloorMuffler, I would be more inclined to rehang the door. But repeatedly walking all over the FloorMuffler isn't a good thing; it's not durable enough to sustain a lot of foot traffic.At any rate, this wasn't easy work, in part because the jamb leg on the hinge side had no shims originally. This makes me think the carpenter didn't even try to make it plumb, and that the sims on the latch side were just to fill the gap. Especially asince it was pretty obvious that the jamb head was too wide for the door. I can't really be sure what happened here, of course.
In the process of renailing the jamb legs, the no-mar pad on my very old Senco SFN40 nailer crumbled into pieces. I ordered a replacement from Amazon. I need it for the first and last rows of the hardwood flooring. In the interim, I'll probably just put some masking tape around the nailer's foot.
I need some new door stop moulding. I'll pick some up at Menard's.
-
Second floor hallway
- March 20, 2024
-
Second floor hallway
I cleared the hallway and thoroughly vacuumed the subfloor. I'm preparing to install the thin foam padding (FloorMuffler) that goes under the hardwood.
-
Second floor hallway
- March 19, 2024
-
Second floor hallway
I completed the assembly of the three hallway door entablatures.I cut and routed the piece of flooring for the transition piece for the second bedroom. It needed to be slightly tapered from end to end, about 1/8" over 32". And the amount removed was only about 1/2". It was a bit tricky, so I first cut off the bulk on the table saw, then went back with a straightedge guide and flush cutting bit on my trim router to get the taper. I then used the new tounge and groove router bit to cut the groove to fit it to the hardwood in the second bedroom. I then slightly rounded the edge with a random orbital sander, then dyed the edge to match the stain. I put one coat of wipe-on satin polyurethane on it after the dye was dry. Looks good.
-
Second floor hallway
- March 15, 2024
-
Second floor hallway
After doing a bit of cleaning in the garage and burning some scrap wood and cardboard, I routed the cornice pieces for the second floor hallway doorways.
-
Second floor hallway
- March 14, 2024
-
Garage
The RIDGID telescoping wand for my shop vac arrived. I like it.
-
Garage
-
Second floor hallway
The threshold for the second bedroom needs to be tapered. This is a consequence of the exterior wall (which I used as the reference for the hardwood installed in that room since it's the most visible) not being parallel with the wall that's shared with the hallway. I haven't measured yet, this is just a note to myself.I am taking measurements for the door headers in the hallway. There's a stackup I create here from MDF stock. The frieze is 3.5" tall with a bead routed around the bottom. The cornice is two stacked pieces, the top with a classical edge and the bottom with a cove.
The second bedroom:
frieze length 37 1/4" cornice top length 40 1/4" cornice top width 2 3/8" cornice bottom length 38 3/4" cornice bottom width 1 9/16" The bathroom, which is a narrower pocket door:
frieze length 30 7/8" cornice top length 33 7/8" cornice top width 2 3/8" cornice bottom length 32 3/8" cornice bottom width 1 9/16" The first bedroom door width is the same as the second bedroom, but doesn't have room for the same length cornice. However, I want the same pilasters, so I might just trim off the end of the cornice (known as a 'dissolve'). My other option is to neck the frieze. For now:
frieze length 37 1/4" cornice top length 40 1/4" cornice top width 2 3/8" cornice bottom length 38 3/4" cornice bottom width 1 9/16" I cut these pieces on the miter saw and sable saw.
I checked the Yonico 15230 router bit set profiles against the edges of the hickory flooring. They match perfectly.
- March 12, 2024
-
Garage
I picked up accessories for the RIDGID shop vac at Home Depot: a floor brush, a dusting brush and an exhaust diffuser. I have needed the brushes for decades, espcecially the floor brush. The exhaust diffuser is just to help prevent the shop vac exhaust from blowing stuff all over the place when I'm using the vacuum. I also picked up a 25' extension cord that is coiled on the back of the shop vac cart on the cord wraps I created. This facilitates leaving the shop vac's cord coiled on the vacuum when it's in the cart, so it's much easier to remove the vacuum and use it outside of the cart when desired.I also ordered the RIDGID telescoping wand for delivery. It should be much more useful to me than the fixed wands. And by chaining the telescoping wand with a fixed wand, I can easily reach the ceiling of the garage.
I created the holders for the brushes inside the cart. Same as those I've already created: a piece of plywood with a 1.5" PVC pipe topped with a 1.5" coupling. The PVC pipe passes through the plywood. It just turns out that a 1.5" Schedule 40 Hub x Hub coupling fits snugly inside a 2.5" shop vac accessory, so it's ideal for creating storage solutions for shop vac acccessories. The ones I'm using are Nibco CP4801. A 10-pack is $6 at Home Depot. I didn't have to buy any since I had just enough left from a previous project.
I also picked up an inexpensive power strip from Menard's to install on my workbench. I've been meaning to do this for years since I'm tired of pluggin and unplugging tools when I'm working at the bench. The most common tools I have out at the same time are my trim router, one to three sanders and an old corded drill. So I bought a 5-outlet power strip with a metal housing. I looked at the RIDGID one at Home Depot that has USB charging and outlet dust covers, but it's all plastic and double the price, and I don't see the need for built-in USB charging. I can always plug in an Apple, Anker, UGREEN or other USB charger if I need it. And the reality is that I don't want my iPhone or iPad on or in my bench when I'm working; they're expensive devices best keptaway from things that can destroy them in a hurry. The only things I might want to charge at my bench would be small lights or my AirPod Pro earbuds.
-
Garage
- March 10, 2024
-
Garage
I am almost done putting together a cart for my new shop vac. Background story...I've been using an old Craftsman 16 gallon shop vac that's about 30 years old (that's a guess). I don't have any of the attachments, or even a wand. Just a 7' hose. The casters are pretty much shot, and it's a pain in the butt to move around. But the big issue is that I am tired of cleaning and replacing filters just due to what I'm often doing with it: cleaning up piles of wood chips and sawdust. I want reasonable dust collection without all the hassle of regularly lifting an integrated motor/lid, emptying a big-ass tub and cleaning or replacing a filter, And I want a more flexible hose with a bit more length.
At the same time I don't have the space for a big 4" input dust collection system in my garage, especially since it's basically only useful for wood chips and sawdust. I also don't want to spend the money for a Festool dust collector, which doesn't really solve my need for general purpose vacuum anyway.
What I wanted was just a cyclone collector upstream of a shop vacuum, to make it much easier to dispose of the bulk stuff and greatly reduce the number of times I need to remove the motor/lid of a shop vac. There are a number of solutions here, but they're all unwieldy since they're separate from the vac and connected via a hose. And some of the ones that use a 5-gallon bucket are tall and prone to tipping over.
For some of the RIDGID vacuums, you can put together a low-profile cyclone on a 5-gallon bucket with PVC pipe that utilizes the accessory storage that's designed into the feet of the vac. This is OK but it's flimsy and you lose the accessory storage. And in the end I have more accessories than can be stored on the vacuum or on any of the PVC pipe solutions I've seen. And I don't want something that's tipsy.
I built a cart from 3/4" plywood. It has storage for all of my accessories inside, 3" casters and a hole in the top that holds a 5-gallon bucket topped with a Dustopper cyclone. So far it works great, but I'm still in the process of adding accessory storage.
-
Garage
- March 7, 2024
-
Bedroom 1
I am trying to clear out the first bedroom on the second floor so I can install new hardwood flooring.
-
Bedroom 1
- March 6, 2024
-
Second floor hallway
I am finally starting to figure out how I'm going to install the hardwood flooring in the second floor hallway. It's been somewhat intimidaitng for years because one of the long edges is at the railing and has a very long gradual curve. Which happens to be parallel to the direction I need to run the hardwood. The fear has always been how to prevent slivered pieces and also how to scribe and cut the pieces that butt against the 1" thick stock that is the base for the railing stiles.I need to just get over this fear. I've never encountered a problem I can't solve; it's part of the reason I'm a good engineer. Yes, the edge presents a challenge. But it's one I can solve.
Note that part of the issue here is that I need to leave space ffor wood expansion/contraction. Hickory, while harder than oak, is more susceptible to movement from humidity than oak. Meanwhile due to the bottom of the railing posts being flush with the edge of the 1" curved oak stock base, I can't just use flexible transition strip. I might be able to use corner moulding, or make my own. Fortunately the hallway isn't terribly wide, so at least I don't need to accomodate a ton of movement. If I could guarantee that I could precisely cut the curved edges here, I could get away with a high quality silicone caulk.
The other issue is the transition to the second bedroom; I want no threshold, so I need to fit against the tongue of the second bedroom flooring. That's not a big deal, and I checked that the layout will work as I'd like. The only issue is that I need to rip about 1/2" from the first boards on that wall, and hence I need to cut a new matching groove for the board that meets the wood of the second bedroom. I don't have the router bits I need, so I ordered them from Amazon. While I'd love to have the Amana set, it's $150. I went for the cheaper option, Yonico.
-
Second floor hallway
- February 29, 2024
-
Basement
I sealed the top front parts of the new clamp rack with wipe-on polyurethane. That's the backing plywood and both slotted assemblies. I sealed the back of the rack with SealCoat (shellac), as well as the bottom of the front (just the backing plywood).I cut french cleats for the clamp rack. I cut two sets, and drilled countersinks and through-holes in the pieces that will go on the wall to accomodate Red Head hammer-set anchors. 4 holes in each cleat.
I mounted the first cleat. I then attached its mating cleat to the top of the back of the clamp rack with 14 Spax construction screws and Titebond II. I temporarily hung the clamp rack, and I think I've concluded that I don't need the second set of cleats. I just need a spacer, which I'll make tomorrow. A bonus here is that I now have a second set of cleats that I can use for something else.
-
Basement
- February 28, 2024
-
Basement
I lightly sanded the parts of the parallel clamp rack that I had assembled yesterday, and put a coat of 1-lb cut shellac on them. I've decided I'm not going to paint these parts, since they will get banged on by the clamps. The shellac is just to seal them up a bit. The plywood edges were very thirsty, so I think this was a smart thing to do. My garage has no climate control other than a torpedo kerosene heater, which generates humidity.I glued 4 triangular supports to the bottom slotted piece of the rack, then put a coat of 1-lb cut shellac on it.
I drilled all of the pocket holes in the top piece. They're on the underside. While visible, this is the right place for them given the direction of stress that will be on the joints.
I routed the edges of the shelf and then glued and nailed on small triangular supports. This shelf is small and not intended to hold much weight, and I don't want to interfere with the hanging clamps, so I only put them on the ends.
I need to lay out where things will go on the plywood backing sheet. I want about 9" of clearance from the top of the weight-supporting slotted piece and the bottom of the top shelf. This accomodates the Bessey clamps even if I have both of the clip-on supports between the jaws.I decided I don't want this rack in the garage. I'm going to install it near the bottom of the stairwell that goes from the garage to the basement. I just don't need them in the garage since I don't use them on a regular basis. I'm an occasional wookdworker. I can easily go 6 months without doing any woodworking.
This plan means I need to install on a cinder block wall. I have the anchors to do it, but I need to dig out the hammer drill and a 1/4" bit.
I drilled the pocket hole screws in the top shelf and installed it on the plywood back with pocket hole screws and Titebond III. I then installed the weight-supporting structure with pocket hole screws and Titebond III. It's 9" below the top shelf.
Finally, I installed the lower slotted piece with pocket hole screws and Titebond III.
-
Basement
- February 27, 2024
-
Garage
I started building a simple rack to hold my parallel clamps. I've never had a good spot for them, and given that I use them in spurts, they don't need to be on the slatwall. And to be honest they're a PITA to store on the slatwall.It's pretty simple to make a decent rack. 3/8" wide 2" deep slots in a 3" wide piece of 3/4" plywood (cut with dado stack on the table saw), every 2", accomodates the brands I own (Jet and Bessey) and probably most others. I cut and slotted the 3/4" plywood that holds the weight and the bottom piece that keeps them straight at the same time so I know the slots line up. I cut and glued on some triangle supports underneath the weight-supporting piece, and pinned them in place with 18 gauge nails. I also cut a 6" wide piece that will just be a shelf above the rack for the accessories (the Jet framing blocks, Bessey KR-AS jaw adapters, etc.). I only own 8 parallel clamps but the rack will hold 16. That's dictated by the space I have available on the wall. I should be able to clamp most of my quick clamps to the bottom piece, but those are also OK on the slatwall.
I'm going to let the glue cure overnight before I attach things to the plywood backing. I don't intend to do anything special finish-wise; I'll probably just paint the whole thing white, or just leave it unfinished.
-
Garage
- February 26, 2024
-
Den
I finally received the medium size D-Line oak colored cable covers. They took a week to get here despite being a Prime Two-Day item that was 'In Stock'.I installed one of the newly received cable covers to hold the cord for the power strip under the second end table. This completes the tidying up of the window seat and end tables.
I received the Micomlan LED desk lamp. I installed the base behind my monitor. The stand is a bit flimsy, and I wish it had one more degree of articulation, but light-wise I really like it. I have the extensions completely folded, so they're pointing upward. I can already tell that this light is going to give me some relief from eye strain. And it's really nice that I can turn the main part and the extensions on separately.
-
Den
- February 25, 2024
-
Den
I installed the second power strip on the wall behind the second end table. It's more difficult to access compared to the first, but that's OK. At the moment it's only used to power the bench fans, and in a bit I'll also be using its USB charging ports.I installed a D-Line cable cover on the cord for this power strip. It traverses a 45 degree wall joint, so I mitered that part (22.5 on each piece). I also added a handful of pieces of 45mil 3M VHB tape since I didn't fully trust the tape that's pre-installed on the cable cover.
I ordered some more Bluelounge CableDrops. They've apparently discontinued the 'Muted' color pack, so I wanted to get these ordered before everyone runs out of stock. I bought some of this color scheme years ago and I'm out of the brown ones included. I just need 4, so I can have lightning and USB-C cables readily accessible from the bench. I'm placing the CableDrops just above where I expect the top of the bench cusnhion to be. I'm out of 6' USB to lightning and USB-C to USB-C cables so I ordered some.
I also ordered a Micomlan LED desk lamp. I've hemmed and hawed over this for a year, but I want something that can illuminate my keyboard and desk. While I like the idea of the BenQ monitor-mounted light, it's more than I want to spend. I was able to buy the Micomlan with an Amazon gift card I received for Christmas.
-
Den
- February 23, 2024
-
Den
I caulked the joint between the porcelain and frame of the second end table. It's now latched to the bench.The delivery of cable covers from Amazon has been delayed, they won't be here until tomorrow. In the meantime I applied some gel stain to one of the large ones I had on hand just to see if it makes for a better match to the walls. I think it's debatable at the moment.
I mounted one of the new power strips to the wall behind the first end table. It's easily accessible but out of the way.
-
Den
- February 22, 2024
-
Den
I got a little bit sidetracked today replacing a wheel speed sensor on mom's truck. I put the final coats of polyurethane on the second end table this morning, then this evening I installed the draw latches for it. Now I just need to install the porcelain.While I was waiting for the polyurethane to cure, I finally repaired my old paper towel holder. It's made of wood and stainless steel. The body is a cylindrically bent piece of stainless steel, and at the base of the cylinder is has tabs bent inward that were sandwiched between two circular pieces of wood (one inside the cylinder, one below it). The wood pieces were held together with three too-short screws and some glue (which failed). The bottom piece (which serves as the base) was pine, unsealed. At some point years ago it got wet and the bottom piece warped severely, pulling away from the top piece of wood. This made it unusable, since it'd wobble and tip over when trying to dispense a towel. I kept it but haven't used it in 10 years! I bought a nice cabinet-mounted replacement for the kitchen, but kept this old one for the den. I drink a lot of coffee, and hence I like having paper towels handy in my workspace in the event of a spill. But it was annoying the heck out of me. So today I cracked the old base off with a chisel after removing the screws, sanded the glue off the top piece of wood and tapped the center dowel out. I cut a piece of 3/4" oak from scrap in a rough circle to match the top piece of wood, screwed it to the top piece of wood, then trimmed it flush to the top piece of wood with my trim router and a flush cutting bit. I then drilled the partial depth hole for the dowel on the drill press (easy since there's a through hole for the dowel in the top piece of wood). I then sanded and put the whole thing back together, using Gorilla Glue and longer #8 countersunk screws. I wiped on some polyurethane to protect it from moisture. Yay, it no longer wobbles and is fully functional again! Nice to fix something with some scrap.
I installed the porcelain in the second end table with Loctite PL Premium and will let it cure for 24 hours. My 50 lb. kettlebell is on top of it to keep it in place. Tomorrow night I'll caulk the edges with Mapesil T.
-
Den
- February 21, 2024
-
Den
More work on the second end table...- DONE - lightly sand the top.
- DONE - lightly sand the base.
- DONE - spray a coat of gloss polyurethane on the top.
- DONE - spray a coat of gloss polyurethane on the base.
- DONE - wipe a coat of satin polyurethane on the base.
- DONE - wipe a coat of satin polyurethane on the top.
More electrical...
I ordered some inexpensive power strips from Amazon with relatively flat profiles. One has a 5' cord and one has a 10' cord, both with flat plugs. I am still waiting for some oak colored D-Line half-round cable covers and connectors to arrive. The idea here is to put one of the power strips behind the end table on the right, and cover the cord with the D-Line cable cover (on the wall). I hate cords on the floor, since they get in the way of cleaning and collect dust bunnies. The other power strip will go on the wall behind the rack in the window seat, also with cord covers.
-
Den
- February 20, 2024
-
Den
More work on the second end table...- DONE - Spray shellac on the top of the top.
- DONE - Put the base on the top (upside down) and position for marking the location of the threaded inserts.
- DONE - Mark the position of the rear threaded insert of the short stretcher on the bottom of the top. Remove the base from the top.
- DONE - Drill the 7/16" hole for the aforementioned threaded insert.
- DONE - Install the aforementioned threaded insert.
- DONE - Put the base back on the top and install the 3" stainless bolt with a 316 stainless washer, hand tight with nut driver and then back off enough to allow movement.
- DONE - Mark the location of the second threaded insert of the short stretcher on the bottom of the top.
- DONE - Drill the 7/16" hole for the aforementioned threaded insert.
- DONE - Install the aforementioned threaded insert.
- DONE - Position the base and install the second 3" stainless bolt with a 316 stainless washer.
- DONE - Use parallel clamp as needed to squeeze or spread the front legs, then mark the position of the 3 threaded inserts for the long stretcher.
- DONE - Remove the base from the top and drill the holes for the 3 threaded inserts for the long stretcher.
- DONE - Install the 3 threaded inserts for the long stretcher.
- DONE - Test fitment of top on base with all 5 bolts installed.
- DONE - Strip the top since it's too dark.
- DONE - Reseal the top with shellac.
- DONE - Restain the top, VERY lightly (the wood is darker than other wood I used).
- DONE - Spray shellac on restained top.
- DONE - Lightly sand the base and wipe on a coat of gloss polyurethane.
I realized that the 1x3 I used for the top of the second end table is a MUCH redder piece of oak than the oak I have elsewhere. This caused it to be much darker than other items after staining. I know I can't make it match, but I stripped the top and resealed with 1 lb. cut shellac again. I then restained and sprayed a coat of shellac. When the shellac dries I'll see if it's a bettter match. It's not a big deal if not, but it was worth a try. I know it won't be perfect simply because I can't get rid of the red color of the wood without making a new top, which I am not going to do.
One other thing to note... the second end table doesn't mate up to the wall nearly as nicely as the first. I didn't measure, and it turns out that the left angled wall isn't at 45 degrees like the wall on the right. Not a big deal, I'd rather have symmetrical end tables than not. This isn't a built-in, it's freestanding furniture.
More work on the first end table...
- DONE - Mask the frame with masking tape.
- DONE - Mist the top plywood with water.
- DONE - Apply Loctite PL Premium fairly liberally to back of porcelain.
- DONE - Mist the back of porcelain with water.
- DONE - Place the porcelain in the top, press into place.
- DONE - Place 50 lb. kettlebell on top for 24 hours.
Loctite PL Premium, like any polyurethane adhesive, will expand as it cures. The kettlebell just helps force the expansion to be mostly horizontal and keeps the porcelain from lifting. Polyurethane adhesive draws moisture from the environment to cure, hence the water mist since the center of this large tile is far from access to moisture in the air. I expect some of the adhesive to expand out from underneath the porcelain, hence the masking tape. It just makes it easier to remove the adhesive seepage later.
Interesting observation while the polyurethane was curing... it makes crackling noises. I don't think I've ever noticed this before, but I'm not normally working in a really quiet space. I suppose the nice thing about it is that I'll be able to tell when it's set just by listening.
This is what the first end table looks like when latched to the window seat. I haven't caulked the porcelain yet.

Electrical...
There aren't enough outlets in this room. Though honestly I can probably say that about most rooms versus what we often need in a modern work space. I've addressed the desks with power strips and PDUs, but there's really only one readily accessible outlet now since there were only outlets on 2 walls. There is one hidden inside one of the built-in cabinets, but it's only useful for the cabinets.
All I really need at the moment is to change the accessible single-gang outlet to a double-gang. Unfortunately it's wedged against the trim on the left of the wood wall panel inset, and the stud the electrical box is mounted on is to the right of the box. So a double-gang isn't possible here. The outlet is already all the way to the right in the box, so I don't think I can just mount an ugly outlet expander.
What I really need is outlets on the exterior wall. That's a lot more work than I want to do at the moment; there is no wiring in that area in the basement.
-
Den
- February 19, 2024
-
Den
- DONE - Apply 1-lb cut shellac to the second end table base.
- DONE - Reattach the top of the first end table to its base.
- DONE - Figure out where I'm going to put the draw latches to hold the first end table against the window seat.
- DONE - Mark the location of the draw latches on the right side of the window seat (for the first end table).
- DONE - Drill pilot holes for the draw latches in the underside of the window seat. I'm using #6 x 1" screws; #8 flat head screws don't sit flush in the countersink of the draw latches.
- DONE - Install the draw latches on the window seat.
- DONE - Mark the location of the draw latches on the first end table.
- DONE - Install the draw latches on the first end table.
- DONE - Apply gel stain to the base of the second end table.
- DONE - Spray shellac on the base of the second end table.
- DONE - Apply gel stain to the top of the second end table.
- DONE - Spray shellac on the bottom of the top of the second end table.
I broke a screw off in the underside of the window seat top when installing the first draw latch. I was unable to remove it, so I cut it off with a cutting wheel on one of my Dremels and moved the draw latch. I used a slightly larger drill bit for the pilot hole the second time.
With the end table latched to the window seat, the whole top surface (window seat plus end table) feels VERY solid. It can of course be easily unlatched as desired.
-
Den
- February 18, 2024
-
Den
- DONE - Wipe fourth coat of polyurethane on base of first end table. This is the first coat of satin (the first three were gloss).
- DONE - Wipe first coat of gloss polyurethane on top frame of first end table.
- DONE - Wipe 5th coat of polyurethane on base of first end table.
- DONE - Wipe second coat of gloss polyurethane on top frame of first end table.
- DONE- Cut the edge banding for the 3/4" plywood of the second end table. I want a thick piece on the right side to accomodate draw latches to hold the table to the window seat.
- DONE - Install the edge banding on the second end table. Glue and 18 gauge nails for the front and diagonal, glue and screws for the right piece.
- DONE - Route the edges of the edge banding of the second end table (1/8" roundover bit).
- DONE - Sand the edge banding of the second end table.
- DONE - Route the remaining edges of the base of the second end table.
- DONE - Sand the bulk of the base of the second end table.
- DONE - Wipe 6th coat of polyurethane on base of first end table.
- DONE - Wipe third coat of polyurethane on top frame of first end table.
- DONE - Lightly sand top frame of first end table with 400 grit, wipe on fourth coat of polyurethane.
- DONE - Plug the pocket holes on the base of the second end table.
- DONE - Sand the pocket hole plugs on the base of the second end table.
The draw latches to hold the end tables to the window seat arrived today. Since I hadn't planned for these during design, it's going to be a very tight fit. But I think I can make them work.
-
Den
- February 17, 2024
-
Den
- DONE - Spray the base of the first end table base with shellac to seal the stain.
- DONE - Wipe the first coat of polyurethane on the first end table base.
- DONE - Cut the edge banding for the 3/4" plywood of the first end table. I want a thick piece on the left side to accomodate draw latches to hold the table to the window seat.
- DONE - Install the edge banding on the first end table. Glue and pin 18 gauge nails for the front and diagonal, glue and screws for the left piece.
- DONE - Route the edges of the edge banding of the first end table (1/8" roundover bit).
- DONE - ACE Hardware trip: Titebond III, Loctite PL, adhesive spreader, Bostitch 18-gauge 1.25" nails.
- DONE - Wipe the second coat of polyurethane on the first end table base.
- DONE - Stain the edge banding of the top of the first end table.
- DONE - Wipe the third coat of polyurethane on the first end table base.
- DONE - Order more shellac from Amazon.
-
Den
- February 16, 2024
-
Den
- DONE - Attach the frame of the second end table to the 3/4" plywood.
- DONE - Glue and screw the 1/4" plywood to the 3/4" plywood.
- DONE - Remove the top from the first end table.
- DONE - Plug the pocket holes of the first end table.
- DONE - Sand the base of the first end table.
- DONE - Apply shellac sanding sealer to the base of the first end table.
- DONE - Apply a coat of gel stain to the base of the first end table.
- DONE - Label the joints of the front leg of the second end table.
- DONE - Mark the location of the dowel holes in the front leg of the second end table.
- DONE - Drill the dowel holes in the front leg of the second end table.
- DONE - Attach the front leg of the second end table to the long stretchers.
- DONE - Assemble the base of the second end table. Clamp overnight.
Note that the draw latches will not arrive until Monday.
I didn't get as far as I would have liked tonight. I made a mistake when marking and drilling the dowel holes in the front leg of the second end table: I had labelled the wrong side of the stretcher, which meant I marked the holes with the stretcher flipped over. It's just three holes and equidistant in theory, but anyone who has done a lot of dowel joints knows that it's rare that you can flip a part over and have the dowels still line up. And unfortunately I didn't notice until I had already glued that joint. I went to glue up the upper stretcher and realized my mistake. I had to quickly disassemble the first joint and flip the stretcher. And it didn't fit perfectly so it took a good amount of effort to force it together in the correct orientation. It worked and thanks to precisely marking the center dowel, it was in the correct position. And thanks to the fact that I'm using Titebond III, the glue hadn't completely set. That doesn't meant it was easy to take it apart without breaking a dowel, since I had nothing to brace a spreader against. I used a block of wood to protect the leg and hammered on it with a deadblow hammer. And of course the lower dowel remained in the leg while the other two remained in the stretcher, so I had to pull out one dowel and replace it.
In any event, it all worked out. That joint is never coming apart, and I didn't crack a dowel (they are 1/2" oak dowels). But it caused about an hour of panic. Building another leg and foot would've cost me a lot of time and I would have had to order more acetal.
A replacement 1/2" brad point drill bit arrived from Amazon. I put the old one in the metal recycling bin and the new one in my case that holds the brad point bits I normally use for dowel holes.
-
Den
- February 15, 2024
-
Den
On the agenda for today:- DONE - Mark the dowel holes of the right leg of the first end table.
- DONE - Drill the dowel holes of the right leg of the first end table.
- DONE - Glue and clamp the right leg of the first end table to the long stretchers.
- DONE - Glue and screw the 45 degree connections of the first end table stretchers.
- DONE - Clamp the right side assembly for a couple of hours to allow the glue to cure.
- DONE - Route all the edges of the first end table base parts that can be touched (using a roundover bit).
- DONE - Put the base on the top (upside down) and mark the location of the threaded inserts in the bottom of the top.
- DONE - Drill the holes for the threaded inserts.
- DONE - Install the threaded inserts.
- DONE - Attach the top and make sure it fits in the room as desired.
- DONE - Glue and screw the 1/4" thick plywood to the 3/4" plywood that sits beneath the porcelain.
- DONE - Route the stretchers of the second end table with roundover bit.
- DONE - Label the dowel joints of the right leg assembly of the second end table.
- DONE - Mark the dowel hole positions of the right leg assembly of the second end table.
- DONE - Drill the dowel holes in the right side legs of the second end table.
- DONE - Assemble the right side leg assembly of the second end table (dowels and glue), clamp overnight.
Just a note to myself that my plan from last night worked. I avoided damaging the pointed parts of the stretchers when gluing the right front leg to the stretchers by using a wedge clamped to my bench, and avoided 45 degree joint movement when driving the pocket hole screws by using my parallel clamps as stops.
With the base now assembled, My fears of needing a front stretcher for rigidity have been allayed. It's plenty strong and rigid as is.
The table fits as desired. I can proceed with finishing, and assembly of the second table.

I ordered some draw latches so I can lock the tables to the bench most of the time, but easily release them. Same ones I used to latch the desks together. They'll require a slight change to the underside of the table top, but it's just widening of the edge banding for the plywood; easy to accomodate.
-
Den
- February 14, 2024
-
Den
On the agenda for today:- DONE - Cut 5/16" from the end table legs.
- DONE - Drill the dowel holes in the stretchers of both end tables.
- DONE - Mark and drill pocket holes for the 45 degree connections of the end table stretchers.
- DONE - round over the edges of the countersinks in the top stretchers of the first end table.
- DONE - round over the inside edges of the long lower stretcher of the first end table.
- DONE - round over the lower edges of the short upper stretcher of the first end table.
- DONE - round over 4 edges of the short lower stretcher of the first end table.
- DONE - label the joints for the first end table with masking tape.
- Mark the dowel holes in the left legs of the first end table.
- DONE - Drill the dowel holes in the left legs of the first end table.
- DONE - Glue and clamp the left leg assembly of the first end table.
I ran into a slight issue drilling the dowel holes: my 1/2" brad point doweling bit is about as sharp as a butter knife. The other problem is that my 1/2" drill stop collar wouldn't fit on a 1/2" bit despite the screw being loose. Apparently it's got some shape memory.
I had to experiment to arrive at the pocket holes for the 45 degree connection of the long stretchers to the rear leg. I wound up using the jig and bit set for 1 1/4" material, and I'm using 1 1/2" pocket hole screws. These joints will be glued as well, and while I could have used 2" screws with the jig and bit set for 1 1/2" material but I don't have any 2" pocket hole screws on hand.
I didn't get to everything I had planned tonight. That's mostly due to vascillating about how I'm going to clamp the 45 degree connections of the stretchers to the rear leg while I drive the pocket hole screws, since the glue will make them want to move. I also don't want to crush the point of the 45 on the stretchers, so I need a means of preventing that when I need to clamp the front right leg to the stretchers (dowels and glue joint). I think my best bet it to do it all at once, which will take more energy than I have tonight. I can clamp a wedge to my bench to let me use a parallel clamp to bring the doweled joints together, then unclamp those and bring the assembly to the other assembly and use parallel clamps to prevent the 45 degree joints from sliding when I drive the pocket hole screws. Once the pocket hole screws are installed, I can clamp from the rear leg to the front right leg to hold the doweled joints while the glue cures. Or at least that's the idea for now.
-
Den
- February 13, 2024
-
Den
On the agenda for today:- DONE - Sand the pocket hole plugs flush on the top frame of the second end table
- DONE - Put a coat of sanding sealer on the top frame of the second end table
- DONE - Cut the acetal pieces for the end table feet (six).
- DONE - Mark the acetal pieces for the end table feet.
- DONE - Drill the countersinks in the acetal pieces for the end table feet. 3/4" diameter by 1/2" deep with forstner bit.
- DONE - Drill the through holes in the acetal pieces for the end table feet. 3/8" diameter with forstner bit.
- DONE - Mark the dowel holes in the stretchers of both end tables.
- DONE - Mark and drill the holes in the end table legs for the threaded inserts. 7/16" diameter by 1.125" deep.
- DONE - Install the threaded inserts in the end table legs.
- DONE - Mount the feet on the end table legs.
- DONE - Shape the feet flush to the legs with flush cutting bit on router. Be careful of the Colt's tendency to not lock due to plastic threaded parts.
- DONE - Attach the top frame of the first end table to the 3/4" plywood, making sure I avoid putting screws too close to where the threaded inserts will be installed in the plywood.
- DONE - Prop the top on the legs to decide the final length of the legs. I've decided I want the top at the same height as the window seat, so I need to take about 5/16" off the length of the legs.
Note that the threaded inserts for the feet arrived late, so I sort of got held up for a bit. Plus it takes a long time to drill the acetal. Thankfully I remembered that using a twist drill for the through holes in the acetal is scary and hence I used a Forstner bit. With a typical twist drill, there's a significant grabbing force as the twist drill breaks through the exit side. I nicked myself with a spinning part on the drill press before, and even when clamped there's a risk of an ugly exit. The Forstner bits don't have this problem and produce a clean exit.
I decided to do all of the feet shaping instead of just the flush cutting. Mainly because routing acetal makes a huge mess and I don't want to clean it up twice. So I did the roundover work on all six of the feet. I'll have to go back and do the roundover work on the oak once I have the leg assemblies doweled together, but at least there won't be any acetal flying and clinging to things.
-
Den
- February 12, 2024
-
Den
I cut the legs for the first end table. I intentionally cut them about 3/8" too long so I can decide later if I want them flush with the window seat wood top or just a bit taller.I cut the stretchers for the first end table. The short ones are 12 5/16" long and the long diagonal ones are 22 1/4" on the long side despite me marking them at 56.7 cm (longer than 22 1/4"). A consequence of drift of the laser on my miter saw from top to bottom when it's at 45 degrees. The important thing: it fits.

I cut the plywood for the top of the second end table, mirroring the first end table pieces.
I cut the short 2x4 stretchers for the second end table.
I cut the long 2x4 stretchers for the second end table.
I cut the 2x4 legs for the second end table.
I cut the 1x3 pieces for the top frame of the second end table and tested their fitment around the porcelain.
I drilled the dowel holes and pocket holes for the second end table top frame and assembled the frame. I'm waiting a bit for the glue to set on the doweled joint.
I drilled the countersinks in the stretchers of both end tables. These are 7/8" diameter for the long bolts that will go into threaded inserts in the bottom of the table top. I then drilled the through-holes, which are 3/8" diameter to allow some wiggle room for the 5/16" bolts.
I routed and sanded the top frame of the second end table. I then plugged the pocket holes. I'll need to sand these flush tomorrow.
I am out of kerosene so I'm stopping for the night. Tomorrow I should receive the threaded inserts I plan to use in the legs of the end tables so I can bolt the feet on. I haven't cut the acetal for the feet yet.
-
Den
- February 11, 2024
-
Den
I have enough 1" thick acetal left to make a mirror copy of the end table for the other side of the window seat. I know I don't have enough 1x3 and 2x4 oak pieces, but I can buy those locally. The acetal is expensive, so I'm glad I have enough remaining.I plugged the pocket holes in the end table frame. I later sanded the plugs flush, routed the edges of the frame with a roundover bit and sanded the frame to remove the burn marks on the end grain and remove the planer marks. I then sanded it with 220 and applied a coat of thin-cut shellac.
I sanded the bottom side of the 3/4" plywood for the end table top, sealed it with thin cut shellac and then stained it. This part will not normally be visible.
I stained the end table frame.
I lightly sanded the bottom of the 3/4" plywood for the end table top, then wiped on a coat of gloss polyurethane.
I sprayed a light coat of shellac on the bottom side of the end table frame.
I was hoping to create the end table legs today, but realized I am out of the threaded inserts I want to use for the feet. I ordered some from McMaster-Carr. This time I ordered 63/64" long 5/16"-18 inserts intended for soft woods (92105A415). These are flanged, and I prefer them in end grain even if it's hardwood. I'll be putting some Gorilla Glue in the holes for the inserts before I install them.
I went to Menard's and bought oak 2x4 and 1x3 so I can make a second mirror-copy end table. I also bought more 3" long stainless steel 5/16"-18 bolts. I have the rest of the materials already. I'll start making the top tomorrow.
I sprayed a coat of shellac on top of the end table frame.
I wiped a second coat of polyurethane on the underside of the 3/4" plywood for the end table top.
I made a mirrored copy of the end table in my SketchUp drawing.

-
Den
- February 10, 2024
-
Den
I went to Menard's for an oak 2x4, an oak 1x3 and some 18-8 stainless steel 5/16"-18 hex head bolts.I cut some of the pieces for the end table: the 3/4" plywood, the 3/8" plywood (just raises the porcelain) and the oak frame pieces. I later drilled the dowel holes to connect two of the 1x3s that frame the porcelain, and then glued them together.
I drilled the pocket holes to hold the diagonal piece of the top frame, then installed the pocket hole screws. I didn't use any glue here, and don't feel inclined to disassemble and add glue. This frame is going to be attached to the 3/4" plywood, and glue isn't going to add any strength here. Plus it's the edge that will be against the wall and isn't going to see heavy loads.
I'm still hemming and having about the leg length for the table. I can't decide if I want it flush with the window seat top or slightly higher. The main advantage of slightly higher is that it would help keep a cushion in place on the window seat. That's important for me to remember: the end height of the window seat will include the cushion, which means no matter what, the window seat will be taller than the table. I don't want the table to be above the window sash handle, so at most the table height will be 3/8" taller than the top of the wood on the window seat.
-
Den
- February 9, 2024
-
Den
I fabricated a cable raceway from an oak 1x4 to hide the cord for the power strip that goes to the bench. Two 3/8&quopt; slots cut with dado cutters on the table saw, and a decorative routed edge top and bottom. I sanded it and applied sanding sealer, then applied gel stain. I later sprayed the first coat of satin polyurethane.It's not very often that I can use the tile saw outdoors in February. But it was 60F today, so I took advantage and cut an 18" porcelain tile into two, diagonally. This is so I can make the end table that will butt against the window seat. I have enough wood on hand to make my plan, except for an 8' oak 2x4. This is the idea:

-
Den
- February 8, 2024
-
Den
The wastebasket collar is in final finishing stages. I sprayed the first coat of satin polyurethane on it tonight. The lid is about ready for the same.Before I started applying polyurethane, these parts looked like this.

-
Den
- February 7, 2024
-
Den
I applied a second coat of stain to the collar I made for the wastebasket. I later got to the point where it has the first coat of wipe-on polyurethane on all sides but one.I fabricated a lid that drops into the collar. I wanted it to be flat so things can be set on top of it, so I went with finger holes. The top itself is just a slab of red oak. It looked like this after I had cut, drilled and routed it.

-
Den
- February 6, 2024
-
Den
I started making a top frame for the wastebasket, to hold the bag in place and hide the top of the bag. I thought this would be quick, but all off the 1/2" oak stock I have is cupped (from relatively minor to almost unusable). This includes the pieces I bought this weekend, which was the best one Menard's had in stock.So, instead of just needing squaring clamps, I needed to use multiple parallel clamps to hold things together during glue-up. I used 3/4" pin nails to position things before clamping. I'll wait 8 or more hours for the glue to cure before I unclamp it. Note that since the joints are butt joints (I decided against mitre joints due to the cupping of the wood), I first applied glue on the end grain, then waited 5 minutes before applying the usual bead. I could have used Gorilla Glue here, but since there will be some corner bracing added (part of the design that sits on top of the wastbasket), I deemed the cleanup not worth it. This isn't a structural piece, it just rests on top of the wastebasket.
I fabricated the pieces that rest on the top of the wastebasket. I ripped some 1/2" thick oak to 3/4" width for this purpose. I cut them to length, then glued them in place and clamped them for drying.
Later I sanded, wiped on sanding sealer (shellac), and applied the first coat of stain. The oak stock I used was close grained, it'll need a second coat.
Before I started the finishing, it looked like this on the wastebasket with a bag in the wastebasket.

-
Den
- February 5, 2024
-
Den
I bought a wastebasket at The Container Store over the weekend. I like the design (bamboo slats), but wasn't thrilled with the look once I put a bag in it. A bag is pretty much necessary since the wastbasket is about 50% open. So I cut some 1/4" thick oak plywood to line the inside, sanded and stained them, shellac'ed and put one coat of wipe-on polyurethane on them. I then glued them in place with Gorilla Glue. For most office trash, this makes the bag optional. However, there's always the oddball thing like a leaky ink pen that would warrant a bag. So I intend to create a top frame that will secure the bag at the top and make it look a bit tidier. It will likely accomodate a lid.The bummer: I hadn't used Gorilla Glue in 10 years. I knew it would foam, so I used it VERY sparingly. However, it still made a mess that I realistically can't clean up due to the slats in the wastebasket. Hidnisght being 20/20, I should have just used TiteBond. The only reason I used Gorilla Glue was to avoid having to sand off the finish on the inside of the wastebasket to get a good bond. But realistally, this isn't structural at all; TiteBond would've worked fine without sanding.
Fortunately I still have my template for the liner pieces, so I could get a second wastebasket and repeat the process. I have enough 1/4" oak plywood to do it again.
-
Den
- February 3, 2024
-
Den
More work on the window bench...I wiped two coats of satin polyurethane on the drawer front.
I later installed the drawer pull and the dividers. The drawer is done except for some stacking bamboo organizers I want for the front areas of the drawer (mainly for loose pencils, pens and markers). I was going to make my own, but the bamboo ones are way cheaper than my time from The Container Store. I'll pick them up tomorrow.
I mounted a small power strip on the rear stretcher behind the rackmount drawers. This is where the Kasa smart plug lives for the bench fans, aince there is no outlet nearby. In the summer I might put a new outlet in the wall behind the bench, but for now the power strip with an 8' cord works. I checked the basement and I did not find the wiring for the AC outlet that's on the porch in that wall. Odd, it must be from a drop from the second floor or holes through a lot of wall studs. I don't want to pull that box and peek inside in the winter, so it'll have to wait. If I keep the power strip, I'll fabricate an oak piece to hide the power strip cord above the shoe moulding. I hate having power cords on the floor, even if they're along the wall.
-
Den
- February 2, 2024
-
Den
More work on the window bench...On the docket for today...
- DONE - Scuff the drawer dividers and wipe on the second coat of gloss polyurethane.
- DONE - Mark and drill the holes in the drawer box for the screws that will hold the drawer front to the drawer box.
- DONE - Mount the drawer front to the drawer box.
- DONE - Drill the holes in the drawer box for the drawer pull.
- DONE - Test fit the drawer pull.
- DONE - Mount the drawer slides to the drawer box as intended (per my drawing), but use the vertical slots to allow up/down adjustment.
- DONE - Mount the drawer in the bench, adjust as needed.
- DONE - Screw the slides to the drawer box via the round holes, using my hinge drill bits to mark the centers.
- DONE - Remove the drawer, mask the slides.
- Continue finishing process on the drawer.
After drawer fitment:

19:00: I wiped a third coat of gloss polyurethane on the drawer front, as well as the interior of the drawer. The inner plies of the drawer box plywood soak up the wipe-on polyurethane rapidly, so I will continue to use gloss there so it's obvious when they're sealed up.
22:00: I wiped another coat of polyurethane on the drawer. This was the 4th coat on the drawer front. I think I'm done with the interior, it won't be touched often and it's not a visible area. I might apply more to the edges of the plywood if needed.
The next coats on the drawer front will be satin.
-
Den
- February 1, 2024
-
Den
More work on the window bench...I drilled the holes in the drawer front for the drawer pull. I tested the fitment, it's good.
I quickly checked the fitment of the drawer box between the drawer slides on the bench, and I think it's going to be good without shims. I'll know later, but it's no big deal to make some solid oak shims on the table saw if necessary.
All of the dividers have a sealing coat of shellac over the stain. I went to Menard's and picked up another can of shellac, more cheese cloth, a power strip with an 8' cord for the bench fans, a pair of power strips with 30" cords for unrelated use, some 1.75" long #8-32 screws for the drawer pull and some washers for the screws for the drawer pull. I also bought a box of 100 Kreg 1 1/4" screws for softwoods since I'm almost out.
I stained the inside of the drawer. It doesn't look great but that's OK; it's a drawer interior.
I added screw locations to my drawing to hold the drawer front to the drawer box.
I put a sealing coat of shellac over the stain on the outside of the drawer box. Power went out in my neighborhood seconds afterward. :-(
When power returned 4 hours later, I put a coat of shellac over the stain on the interior of the drawer box. I also wiped on the first coat of polyurethane on the drawer front and one side of the dividers.
I later sprayed a coat of satin polyurethane on the drawer box, all but the bottom. I only have half a can of spray gloss left, and since I don't need clarity inside the drawer, I'm saving it. Tomorrow I'll be working on the holes for the screws that hold the drawer front to the drawer box, and installing the drawer slides on the drawer box. I want to get all the holes and fitting done before I apply final finish coats.
I set up the Kasa smart plug for the bench fans. I don't really care about their app, but had to use it for setup. It is of course broken; it claimed that it failed to add the plug to Home (the Apple HomeKit app), when in fact it succeeded.
I wiped a second coat of gloss polyurethane on the drawer front, and finished the first coat of wipe-on gloss polyurethane on the drawer dividers. Before further coats on the dividers, I need to mask then ends so I don't need to sand them to fit the slots in the drawer box.
-
Den
- January 31, 2024
-
Den
More work on the window bench...I sealed and sanded the drawer box. It had been many years since I had last worked with oak plywood, and I forgot how soft the core veneers are underneath the thin oak veneer. Hence some of the corners I was intentionally rounding had a lot more paterial removed than intended. Mainly the top of the slots for the dividers. No big deal since these aren't visible when the drawer is closed.
I started staining the drawer box.
I started filling the pocket holes inside the drawer box with Durham's Rock Hard Water Putty. This is mostly to make it easier to wipe the inside of the drawer clean once it's done and prevent things like mechanical pencil tips from getting snagged in one of the pocket holes. It won't accept stain and it'll stick out like a sdore thumb visually, but it's in the drawer interior.
I sealed and sanded the drawer box dividers.
I cut, routed, sanded and sealed the drawer front. I stained the parts that will be visible, then sprayed a sealing coat of shellac.
I stained the drawer box dividers.
I flipped the drawer box and filled the second set of pocket holes with rock hard water putty. Once it sets up I'll make it flush. The first set will need a second round; I scraped too soon.
I sprayed a second coat of shellac on the drawer front. I'm expecting a decent amount of sanding on this part due to the coarse grain, so a bit more shellac here is a good idea. Plus I need to drill holes for the drawer pull on the drill press, which I'll do before I start final finishing.
I installed the coolerguys 3U rackmount fan panel. Despite my beefs with the power supply connection and the fact that I don't want ball bearing fans (they'll get louder over time), I am really happy with the function. At the moment they're very quiet and I can feel the air moving from across the room. I think Julie is going to like having a breeze at roughly butt height, especially with the Aeron chair since it's mesh. I will replace the fans with Noctua NF-S12A PWM fans with an NA-FC1 controller, and plug the power supply into a Kasa smart plug so the fans can be turned on/off via HomeKit. But for now I think I've addressed any issues with the bench straddling the HVAC register.
I ordered a pair of Kasa HomeKit-compatible smart plugs from Amazon. One will be used to control the bench fans. I need to pick up a small power strip at Menard's.
-
Den
- January 30, 2024
-
Den
More work on the window bench...I installed the drawer slides on the bench. I then measured, and the rear span is about 1/16" wider than the front. I will loosen the right leg assembly from the top and see if I can make it parallel. I intentionally drilled 3/8" holes in the stretchers while using 5/16" bolts, just for some wiggle room when installing the leg assembly to the top. There may be enough wiggle room to bring things parallel. I don't actually expect a problem with 1/16" but there's no harm in trying to improve it. I have some PVC I can use to shim if necessary.
Well, that worked! It looks like the drawer slides are now parallel.
I cut the 2 drawer side pieces to length, and ripped the front and back pieces and cut them to length. I then set up the table saw for the dados for the bottom and cut them.
I set up the table saw to cut the dados for the dividers and cut them.
I drilled the 8 pocket holes in the drawer box sides. I fit the sides, front and back together to get a final measurement for the bottom, then cut the bottom piece from the 2' x 4' piece of 1/2" oak plywood. I then test fitted all of the drawer box pieces, then glued it up and installed the pocket hole screws. I checked it for square, it's good. I moved it indoors for the glue to cure.
I cut the dividers from 1/4"x4" oak and then clut slots in them so they lock together. The slots aren't perfect since I did them with the miter saw (I should've done them on the table saw while I still had the dado cutter set up for 1/4"). But they work and should be more than sufficient since the dividers fit snugly in the slots in the drawer.
Here's a picture of the drawer box while I was checking that the dividers will fit.

The coolerguys 3U fan panel arrived. It's just OK at best. I probably should have just designed my own. My main beef at the moment is that the fan splitter has a very hokey barrel connector to connect to the power supply. And sure enough, it's intermittent; if I just look at it wrong, it stops working. :-( I really only wanted the panel anyway, since I don't want ball bearing fans (I want Noctua with SSO bearings).
-
Den
- January 28, 2024
-
Den
More work on the window bench...I finished most of the SketchUp work for the wide drawer. I need 1" thick spacers on the bench stretchers in order to mount the drawer slides. The SketchUp drawing has the drawer box made of 1/2" and 3/4" thick pieces, with 1/4" internal dividers.
-
Den
- January 27, 2024
-
Den
More work on the window bench...I decided I want a wide drawer under the open part of the bench. I started working on incorporating it in my SketchUp drawing. I also picked up a 2' x 4' piece of 1/2" thick oak plywood to use as the bottom. I haven't decided what to use for the drawer sides, mostly because I don't want to drive to Novi to get baltic birch plywood. I might have enough scrap 3/4" plywood to use.
I bought 20" soft-close drawer slides, 100 lb. rated.
-
Den
- January 25, 2024
-
Den
More work on the window bench...I ordered a coolerguys 3U rackmount fan panel with low-speed fans from Amazon.
-
Den
- January 24, 2024
-
Roof
The nasty freezing rain filled my gutters with ice, and one on the rear of the house came halfway off and kinked. There's a huge ice load on the roof at the moment, and the gutter is still full of ice. I went to ACE Hardware and bought some screw-in gutter fasteners, but I'm going to need new gutter. A big part of the issue with the house since the beginning has been insufficient downspouts. I fixed that problem in the front of the house, but not the back. In the spring I'll put at least one more downspout in the back of the house. When it rains hard, the gutter is overwhelmed because it only has two downspouts.
-
Roof
-
Den
More work on the window bench...I picked up the rack rails at the Post Office. And since I had put a small scratch in the top of the bench by dragging something on it before the last coat had cured, I sanded and put another coat of wipe-on polyurethane on it. I'll put another coat on it in a couple of hours.
I installed the rack rails, and started installing the drawers. At the moment it looks like this:

- January 23, 2024
-
Den
I rescreened a second window. I used aluminum here, since it works better with the Andersen aluminum C-channel splines. As it turns out, the clarity is better than the fiberglass (the fiberglass mesh is finer, with a higher material to open ratio). It's also just better quality; the fiberglass has some insonsistencies in the mesh. I need to buy more aluminum screen for the third window. It's a little harder to work with than the fiberglass, but the end result is better.I stopped at Home Depot and bought a 48" x 25' roll of aluminum screen. I then rescreened the third window in the den. I have enough screen left to do the two screen doors and redo the center window in the den when desired.
-
Den
- January 22, 2024
-
Den
More work on the window bench...I thinned the remaining satin wipe-on polyurethane in the open can, using mineral spirits. I lightly sanded the bench top with 400 grit and wiped on another coat of the satin polyurethane. I think this is the final coat.
I rescreened the window under the bench. The screen had a pretty big hole in it. I used standard fiberglass, after hemming and hawing about using small insect screen. The visibility through the small insect screen is considerably lower, so I decided against it. I haven't had issues with no see 'ems or other tiny insects, and I like my view.
My screens are Andersen, hence I could order TruScene insect screens, but it's more money than I want to spend at the moment. But it's worth noting that the C-channel splines used in Andersen screens aren't great with fiberglass screen. This is the first time I've used fiberglass screen with the Andersen splines; I used aluminum screen on the other windows I've rescreened. We'll see if it stays put. I'll start the other den windows tomorrow, but I think I have aluminum screen for those if I want to go that route.
-
Den
- January 21, 2024
-
Den
More work on the window bench...I assembled the bench. I still have finishing work to do on the top, but wanted to do it with the top in place.
I don't know what happened with my rack rail delivery. The post office hasn't delivered it nor left a notification.
I wound up doing more sanding and polyurethane work on the top than I expected, only because I wasn't thrilled with some inconsistencies in grain fill. I used a sanding block to bring it down a bit, then applied a new coat of wipe-on gloss and 3 coats of wipe-on satin. Part of the issue here is that I'm getting below the 25% mark on my cans of wipe-on polyurethane, and despite the fact that I shake it vigorously before every use, it gets thicker over time. For now I'm waiting overnight for the latest coat to cure, then I'll sand again and add some mineral spirits to the remainder of the first can of satin before using again. I have a new can in the waiting, but am hoping to not need to open it yet.
The good news is that I like the final result. It didn't match the base color perfectly, but that's mostly a function of the grain. It's a little lighter than the base pieces. But even among the base pieces, the leftmost front leg absorbed quite a bit more stain than the others. It was cut from a different piece of stock than 4 of the other legs. It's all OK; I was aiming for a rustic looking material in a simple utilitarian design. It's very substantial (wil far outlive me), and deliberately plain.
I am atill considering a small table that tucks under the right side of the bench. The trick here is that this area needs to remain as open as possible since the room's only HVAC register is under this side of the bench. Right now it's more than open enough to be a non-issue.
-
Den
- January 20, 2024
-
Den
More work on the window bench...On the agenda for today...
- DONE - Lightly wetsand the bench top
- DONE - Apply a second coat of gloss wipe-on polyurethane on the top
- DONE - Lightly wetsand the left base assembly
- DONE 3PM - Apply a second coat of gloss wipe-on polyurethane to the left base assembly
- DONE 3PM - Apply third coat of wipe-on gloss polyurethane to the bench top
- DONE 4PM - Lightly wetsand the right leg assembly, apply third coat of satin wipe-on polyurethane. Pull the masking tape from the feet, this part is done!
- DONE 6:30PM - Apply 4th coat of wipe-on gloss polyurethane to the bench top
- DONE 7PM - Apply third coat of wipe-on gloss polyurethane to the left base assembly
- DONE 11PM - steel wool the left base assembly
- DONE 11:45PM - Apply first coat of wipe-on satin polyurethane to the left base assembly
The objective for the base parts is 6 coats of wipe-on polyurethane. For the top, I'd like 8 to 10 coats. What would be 3 coats of brush or spray works out to 9 coats of wipe-on. I've put roughly the equivalent of 7 wipe-on coats on the top already. 1 more gloss and 2 satin should be plenty.
I decided to wait until tomorrow for more finishing steps on the top. Given the heavy lifting involved in final assembly, I want to get the top on the base and legs before I do final finish coats on the top.
It looks to me like I don't need another coat of satin on the left base assembly. Tomorrow I can assemble the bench and put the remaining coats on the top.
-
Den
- January 19, 2024
-
Den
More work on the window bench...I applied gel stain to the top and edges of the top. I later sprayed on a sealing coat of shellac. Later still, I flipped it over and sealed the bottom of the edge trim.
I put the first coat of wipe-on polyurethane on the top (gloss).
I put a coat of gloss wipe-on polyurethane on the left base assembly. It looks like this at the moment:

Before I went to sleep, I sprayed a coat of gloss polyurethane on the top. This just helps me get to a build thickness faster, since my next step is wetsand anyway and I can take advantage of the build thickness of the spray by sleeping while it's curing.
-
Den
-
Driveway
I spent 4 hours clearing snow. I would've done this sooner, but I wasn't prepared when the snow hit (snowthrower, wheel weights and chains not on the tractor, mowing deck still on the tractor). And after all these years, I remembered that my snowthrower was missing some of the hardware when I bought it. the important part: a clevis pin and the corresponding lock pin. I've been using the quick-attach pins (for the bumper) as a substitute, but the bearing finally fell outt of one of them. I rigged it for now, but I need to order the correct parts from Weingartz. Sigh, the clevis pins alone are $16 each and I need two of them.I noticed an oil leak, and tracked it down to a missing valve cover bolt. Hmm, why did it vibrate loose?
I ordered the clevis pins and lock pins to attach the snow thrower, and also ordered the missing valve cover bolt. When I pick them up, I'll also get a quart of oil.
Why 4 hours? Well, I had a base of about 10 inches of snow, with drifts up to 18 inches. And the road commission plowed a bunch of snow into the cul de sac (which is where my driveway is), and dumped a bunch of salt there. Which only served to turn the piles into big blobs of ice. :-( I sort of miss the days when they didn't clear my road at all. I cleared the road and 3 of my neighbor's driveways while I was out, but that only took about 30 minutes.
There is a monster tree down between my driveway and my neighbor's. It's too big for me to do anything about in this kind of weather (wind chill is 3F), but it's blocking their driveway and not mine.
- January 18, 2024
-
Den
More work on the window bench...I removed the clamps from the top edge trim. I routed it flush with the top, and did some of the edge shaping of the top edge (roundover bit, sanding).
I later mostly finished the shaping process of the top, then flipped it over. I removed a few hardened glue drops with a chisel, then routed and shaped the bottom edge. I'm using 60 grit paper on the random orbtial for the shaping, which is aggressive but what I needed. Unfortunately it's my last piece of 60 grit for the random orbital. I don't use it often, but I'll need to replenish.
I later sanded by hand with 220 and put a sealing coat of thin cut shellac on it. Tomorrow I should be able to get stain on it.
This piece turned out good but not great. Which is OK; I didn't want fancy here, since it's a seating surface that will get wear and tear and will eventually be covered by a cushion. Very rounded corners everywhere to avoid knicking knees, snagging pockets, etc. It's built to take a lot of abuse.
-
Den
- January 17, 2024
-
Den
More work on the window bench...I glued and screwed the second end trim piece on the top. It's clamped up while the glue cures. The clamps don't really need to stay since the pocket hole screws are more than strong enough. I'll leave them for a couple of hours.
I later removed the clamps from the end trim and reconfigured the pipe clamps as four 36" long clamps. I then glued the final piece of edge trim on the top. It is clamped with four pipe clamps and 3 parallel clamps. I'll be leaving this overnight.
-
Den
- January 16, 2024
-
Den
More work on the window bench...I released the clamps from the front trim of the bench top. I can't start on the other pieces without more clamps. I ordered some bar clamps and blakc steel pipe from Home Depot for in-store pickup. Since I don't need 6' long clamps very often, I ordered four 3' long pieces and a pair of couplers. Since I'm going to use pocket holes for the end trim pieces, I only need a pair of 6' long clamps; the pocket hole screws will do the rest.
I later picked up the clamps, pipe and couplers. I assembled two 6' long clamps in preparation to attach the end trim pieces. I drilled the pocket holes for both ends. The right edge trim is now glued, screwed and clamped. I was originally going to do both ends at once, but decided to do one at a time due to the endgrain to face grain joint. I'm not worried about the joint long-term, the pocket hole screws alone are a very strong solution. But I don't like to have my endgrain to face grain joint starved of glue due to endgrain glue absorption. I brush a first coat on the end grain, wait a few minuttes, then brush on another coat before I put glue on the face grain piece and stick them together. The joint here is 33 square inches and I didn't trust myself to get everything glued, screwed and clamped during the work time of the glue. I'll leave thtis clamped overnight. Next up here is the other end trim piece.
-
Den
- January 14, 2024
-
Den
More work on the window bench...I released the top from the left side of the base. I put the base upside rigt on the floor, and placed the top on it, bottom side up. I had to replace one of the threaded inserts. It sucks that 2 of the 10 in the pack had buggered threads; these inserts aren't cheap. This is the second time I've used this type, and I've come to dislike them versus the flaged ones for softwood. Even in oak, the hardwood versions are kind of a nightmare to install straight. And if only 8 out of 10 are good out of the box, well... they're a poor investment. Next time I'll just use the flanged ones that are intended for softwoods. I seem to recall having a similar issue when using the hardwood inserts in the past.
I put a little bit of Titebond III on the raw wood from chipout while installing the threaded inserts in the underisde of the top.
Hours later, I lightly sanded the bottom of the top and wiped on a coat of wipe-on gloss polyurethane.
I realized that I don't have enough clamps to do the trim work on the benchtop, not any clamps long enough for the end pieces. I need to pick up 4 pipe clamps and two pieces of 10' long 3/4" black iron pipe which I'll cut to 6.5' and 3.5'. That will give me two clamps for the end pieces (I'd prefer 4 but don't want to but that much pipe).
I spent over an hour vacuuming some of the garage, to clean up the area around the tractor (I need to put the winter gear on it) and pick up most of the acetal shavings that were all over the place. I emptied my shop vac first, which was full of sawdust and acetal shavings from work at the router table and table saw.
I cut the 1x2 pieces to trim the top of the bench, to rough length. They'll be cut down later, I just wanted to get them indoors.
I'm starting to think I might dowel these in place. The original thought was biscuits, but at least one of these pieces (the front edge) will see decent amouts of shear forces. But given that the trim is only 3/4" deep, I can't get a lot of dowel in it without using dowels that pass all the way through. At that point I might as well use wood screws and plugs?
As long as I clamp it well, I think the front and rear trim pieces can just be glued. It's face grain to face grain. For the end pieces, which is end grain to face grain... pocket holes from underneath is probably as good as anything, and perhaps polyurethane adhesive instead of PVA? I like this idea because the Kreg pocket hole screws have flanged heads, and since I don't need to plug the holes (not visible unless you lie on the floor under the bench), they could be retightened and the joint reglued if 20 years from now it gives way.
It looks like I have enough clamps to glue one of the long trim pieces but not both; the width exceeds the capacity of my 24" clamps once both trim pieces are placed. So I glued on the front piece, with extra on the ends to be cut flush later.
-
Den
- January 13, 2024
-
Den
More work on the window bench...On the docket for today:
- drill the remaining dowel holes (20) in the left side legs. Estimate 90 minutes.
- Release the clamps from the middle leg assembly.
- Glue and clamp the left side leg assembly.
I had to wait for the garage to warm up. There was a winter storm last night; 8" of wet snow followed by colder temperatures and high winds. I don't have the snoowthrower, wheel weights and chains on the tractor, nor the time to do it right now. For the moment I want to finish the dowel hole drilling for the window bench. Once the third leg assembly is glued up and clamped, I can think about snow removal.
I cleaned the right side leg assembly and wiped on gloss polyurethane. The plan is 3 coats of gloss followed by 2 coats of satin.
I released the middle leg assembly from the clamps.
I drilled the 12 dowel holes in the rear left leg. I then drilled the 8 dowel holes in the front left leg.
I assembled the left leg assembly. It's clamped up (4 parallel clamps) and I'll let it cure overnight.
I sanded the right leg assembly with 400 grit and applied a second coat of wipe-on gloss polyurethane. I'm starting to think I might finish the base in gloss; the front of this assembly looks good in gloss.
I later applied a 3rd coat of wipe-on gloss polyurethane to the right leg assembly.
-
Den
- January 12, 2024
-
Den
More work on the window bench...I stopped at Menard's for wipe-on polyurethane, 2 cans of spray shellac and more cheese cloth.
I marked the 12 front-to-back holes of the center leg assembly. This takes a long time due to the dowel guides not being easy to remove from the dowel holes in the stretchers, and the fact that I only have six 1/2" dowel guides since I don't use 1/2" dowels very often.
I had missed masking two of the joints on the rear lef leg, so I reverse masked those spots and sanded with some 80 grit paper by hand.
I marked all of the legs for their dowel holes, and labeled all of the joints with masking tape. The goal for tonight is to get the two middle leg dowel holes drilled, then the middle legs glued up with their stretchers.
I completed the dowel holes in the middle legs, then glued the middle leg assembly together (2 legs, 2 stretchers). I'll leave it clamped up overnight.
20 more dowel holes to drill tomorrow, then I can glue and clamp the left leg assembly. On Sunday I should be able to glue the left and center leg assemblies together, and possibly install the remaining threaded inserts in the bottom of the top.
-
Den
- January 11, 2024
-
Den
More work on the window bench...I removed the clamps from the right side leg assembly. I positioned it on the bench top and marked for the holes for the threaded inserts. I then removed it and drilled the holes for the threaded inserts and installed the inserts. I then fastened the leg assembly to the bench top using 3" long 5/16"-18 316 stainless steel hex head bolts with 316 stainless steel washers. It fits perfectly.
I'll be removing it shortly so I can complete the finishing process. But it's very strong, and doesn't need side-to-side stretchers.
Note to self: the hardwood threaded inserts are pretty brutal. They specify a 15/32" diameter hole, but that inevitably will cause the insert to splinter the surface grain. A non-issue for me since these are concealed, but just the same I'm going to try a 31/64" hole on the next one.
I masked the joint areas of the remaining legs and applied a thin cut of shellac. I later applied gel stain, then later a thin coat of spray shellac. The four legs also now have a single coat of wipe-on polyurethane. I also applied the shellac spray on the front stretcher. The goal here is to just make the pieces ready for dowel hole drilling and then glue-up. The thin coat of shellac is sufficient but there's no harm in a first coat of wipe-on polyurethane afterward since satin polyurethane will be the final finish.
I flipped the bench upright just to remind myself of the overall height (propped up on the legs).
I ordered the Middle Atlantic RRF-8 (8U) rack rails from Sweetwater. I'm not in a hurry here since it'll be a while before I'm ready to install the rails, and at the moment I haven't decided on the drawer configuration. I'm thinking a pair of TD3 and a single TD2, but I think I only have one relocatable TD3. I'm also considering a 3U fan panel and a TD3 and TD2. This would help move air from the register that's under the open side of the bench, and would probably be appreciated by Julie in the summer.
I need to stop at Menard's for 2 more cans of spray shellac and a new quart of wipe-on polyurethane.
-
Den
- January 10, 2024
-
Den
More work on the window bench...I decided that the drill press creates more work than necessary for the holes for the threaded inserts in the bottom of the legs (to attach the acetal feet). I am now using one of my drill guides at the workbench, which is faster.
The third leg now has the rough-cut acetal foot attached.
I marked the bottom of the remaining three legs for the holes for the threaded inserts. I then drilled the holes, installed the threaded inserts and installed the rough-cut feet. I then routed the feet to match the legs (with a flush cutting bit), then rounded off the feet and legs with a roundover bit. This made a huge mess since acetal shavings cling to everything, but it's done.
Here's a picture of one of the completed feet. Note that there's 1/4" of acetal to wear away before the bolt heads could touch the floor. That's not going to happen in my lifetime or anyone else's, it's a bench and not a sled.

Worth noting that I hate several things about my trim router (a Bosch Colt). The lock is unreliable due to plastic threaded parts, and today it jumped on me as a result (and took a chunk of skin off my right ring finger). The power switch is too recessed to use with gloves, which to me is a disaster. The whole move toward 'safe' power switches has actually made this tool more dangerous in normal operation; if I have gloves on, it's difficult to impossible to turn the router on safely. Another nit is the acrylic base plate. It scratches very easily if you happen to pass the base over a tiny protrusion like an ever so slightly protruding pin nail, which makes the whole thing pointless eventually (can't see through it anymore, and it's no longer slippery). My oldest router (a 1990's Porter-Cable) has none of these problems but is full-sized.
At any rate, wound dressing changes slowed me down today. But I drilled the dowel holes in the legs of the right side. I sanded the finish off of the joint area on the leg I had already stained but did not mask. I stained the other leg, avoiding the joint areas. I then masked the joint areas and sprayed a light coat of dewaxed shellac on the leg. This is my usual process for preventing smearing of the gel stain during the first coat of polyurethane.
Once the shellac dried, I glued up the right side leg assembly: front and rear legs and the stretchers that connect them. It's all clamped up and I'll leave it overnight.
I'm pretty sure I'm going to run out of wipe-on polyurethane before the bench is completed. I'll need to get more before I start working on the top of the benchtop.
-
Den
- January 9, 2024
-
Den
More work on the window bench...I updated my SketchUp drawing to include all of the holes for the dowels, threaded inserts and bolts.
I lightly sanded the bottom of the bench top and applied a coat of wipe-on polyurethane. I don't think it needs anything else; it already had 2 coats of shellac.
The 1" thick acetal for the feet arrived (McMaster-Carr 8492K172), along with threaded inserts for hardwood (McMaster-Carr 90192A127) and 3" long 5/16"-18 316 stainless steel hex head bolts (McMaster-Carr 93190A595). I quickly cut 6 feet from the acetal to rough size. I then marked and drilled the countersunk holes in all of them.
I marked and drilled the holes in the bottom of one of the legs, installed the threaded inserts and installed one of the feet using the 5/16"-18 1 1/4" long 316 stainless steel hex bolts with a 316 stainless washer. I then routed the foot flush with the sides of the leg, then ran a roundover bit on the bottom of the feet and the vertical edges of the leg. It turned out perfect, so I did the same for a second leg. I have 4 more legs to go and I still haven't marked and drilled the dowel holes in the legs.
Here's a screenshot from SketchUp with faces in X-ray mode.

-
Den
- January 8, 2024
-
Den
More work on the window bench...I put two coats of dewaxed shellac on the bottom of the bench top. This is just to seal it up well before I lightly sand it and start applying polyurethane. It won't be visible once the bench is assembled, but detaisl matter.
All of the stretchers have dewaxed shellac over the gel stain, except for the front lower one that won't be routed until after it's glued in place. I can wetsand them and start putting polyurethane on the others tomorrow night.
-
Den
- January 7, 2024
-
Den
More work on the window bench...I drilled the 7/8" diameter countersinks in the underside of the upper stretchers. I then drilled the concentric 3/8" diameter through-holes. The fasteners are 3" long 5/16"-18 316 stainless steel bolts. The 3/8" hole allows a bit of wiggle during assembly.
I routed the edges of all of the stretchers. I cleaned the pencil marks from the lower stretchers, sanded them and applied thin cut dewaxed shellac just to seal them.
I cleaned the pencil marks from the upper stretchers and put a coat of dewaxed shellac on the countersink hole walls. Once it dried I sanded and sealed these stretchers for later sanding and stain.
I am still hemming and hawing over the exact height. It's really all about front appearance and drawer space for the left side. I know I don't want to go more thnn 17+1/4" oak length, which would put the bottom edge of the top slab at 18+1/4" (due to the 1" thick acetal feet). 10U of rack space is 17.5"; too much. So I'm planning for 8U at the moment, and 1.5" tall stretcher below the drawers:

I cut a piece to length to use as this front stretcher.
I cut all six of the legs to length, 17+1/4".
I applied gel stain to the upper stretcher pieces. I'm doing it at this stage just to not have to deal with glue preventing stain penetration after glue-up. I later sprayed a light coat of dewaxed shellac on them.
I applied gel stain to the bottom of the top slab.
I applied get stain to the lower stretchers, except the one that's not drilled for dowels yet.
I am considering a top rear stretcher, but it would be removable. If glued, I'd need more than just a single stretcher since the whole frame as one piece would need to be movable without risk of breaking a joint. I'm not really in the mood for barrel nuts again, especially since I'd have to buy more fasteners. Pocket hole screws might be reasonable, Hmm...
-
Den
- January 6, 2024
-
Den
I have started assembling a window bench for the den. A rough drawing from SketchUp:
It will not span the whole bay, only the center window wall. The bench top is 1+38" glue-laminated red oak, normally a countertop surface. The goal here is strength and to match the other furniture I've built for the den. The top is 60" long and 24" wide. With 1x2 oak trim, it'll wind up 61+1/2" x 25+1/2". This is near perfect lengthwise, since the center window wall is 63" wide.
I am able to utilize scraps from my desk legs for four of the six legs. Hence I only needed to buy a 4' long oak 4x4 for the other two legs. I also bought two 8' long oak 2x4s to cut up for the front-to-back stretchers. Only part of the rear of the bench will have length-wise stretchers, just to keep it square. I want to maximize space available under one side. I'm using beefy framing here to let me keep it simple but also be able to easily handle the weight of two seated people or one napper.
I am out of some consumables I need, so I ordered them from McMaster-Carr. 1" thick acetal for the feet, 5/16" threaded inserts for hardwood and 3" long 5/16"x18 316 stainless steel bolts to bolt the top to the stretchers from underneath. I can't put together the framing until the acetal arrives, since the work I need to do for the feet is much easier before the legs are attached to anything. While the dimensional tolerances of the oak 4x4s are quite good, it's still wood; I always have to use a flush cut bit on the acetal to make the feet exactly match the bottom of a perticular leg.
I can work on drilling and other preparation. Last night I cut all six of the front-to-back stretchers (15"). Today I marked all of them for 1/2" dowel holes, 3 in each end (6 total per stretcher). I've drilled the 36 dowel holes.
I cleaned the top with isopropyl alcohol, mostly to get rid of the scuff marks on the underside. Menards only had two of these slabs in stock, neither of which had wrapping. I picked the better of the two, but it had forklift grit on it. I then sealed it with a thin cut of shellac, just to prevent me from staining it while I work on it. It will eventually get the usual finishing rigamarole.
I cut the rear stretcher 2x4 oak pieces to 19+1/8". This is to provide rack-width spacing between the left legs and the center legs. My intent is to put Middle Atlantic TD drawers in the front of this side. I marked and drilled the dowel holes in the end of these stretchers. I also marked the upper stretchers for the countersink holes for the 5/16" bolts. The countersink here is 7/8" diameter and 1.25" deep.
-
Den
- January 1, 2024
-
Master bedroom
I finally got around to removing the pant hanger from the wall. It was mostly broken when I bought the house, so I only used it to hang belts. But the tangs had sagged so much that it wasn't great for that purpose. But I need a place to hang belts, so I scavenged the 11 remaining tines from the pant hanger to make a belt hanger. I cut the tines to about 4". I cut and routed a 1" thick piece of 3.5" wide oak, then drilled holes for the tines. The tines will be angled upward slightly. I drilled the holes on the drill press with a 5/8" Forstner bit since the tines are 5/8" dowels. I also drilled countersunk holes to mount it using toggle bolts. The sanding and initial finishing of the oak piece is done and I glued the tines in place. It'll need some polyurethane after the glue dries.I'm probably going to make some similar pieces to hang some of my baseball caps. Mostly to utilize the small bit of space still available in the closet, above where the new belt rack will be bounted.
-
Master bedroom
- October 30, 2022
-
Den
I re-terminated the basement end of the Cat6A for the In-Wall HD wifi access point twice more, but continued to not get all 4 pairs good (needed for 1G ethernet). I knew my final termination was very good via visual inspection with magnification. So... on to the other end. It turns out that the low-cost shielded Cat6A plugs I have are not great for actual Cat6A (23AWG) wiring. Despite having more than one good tool for Cat6A crimping, the insulation displacement blades deflected pretty badly without penetrating the insulation. Sigh, they went around the insulation instead of through it. I decided to separately test a couple more of them. They're super finicky, but I got one to work OK on the Cat6A run I was working on. Note to self: buy more of the Klein pass-through versions (VDV826-705) or better, the cheapos aren't a good substitute.
-
Den
- October 29, 2022
-
Den
The under-desk rack is fully populated and in place.Today I spent some time hemming and hawing about where to put the Ubiquiti InWall HD access point. I knew I wanted it on the wall between the door and the built-in shelving, despite the cold-air return in that space. The issue was the height. Low on the wall, which would be typical, would leave it blocked by the rolling drawer cabinet I intend to place there. High on the wall isn't pretty, but at the same time these things aren't pretty anywhere. So I placed it just high enough to be above my printer atop the rolling drawer cabinet. This would also be just above the taller cabinet if I decide to turn that into a rolling cabinet.
I mounted it and ran the Cat6A cabling to the switch in the basement. However, I'm only seeing it connect at 100 mbits/sec. I suspect the termination in the patch panel jack in the basement; I didn't find my preferred punchdown tool for these jacks, and hence probably didn't get the wires all punched down correctly.
-
Den
- October 19, 2022
-
Den
I've been moving small amounts of gear into the den each night. My Mac Studio is partly set up, in a temporary manner since I don't yet have the speakers set up nor the under-desk rack. But I can use my headphones for now, and I used a 10GbaseT port (Cat6A) in the wall plate to get 10G connectivity to the basement.Tonight I moved a couple more pieces into the new rack; the CloudPlate, a pair of patch panels and the US24 ethernet switch. I also installed the grounding terminal block for the rear patch panels and the AC Infinity fan controller for the rear exhaust fans.
I haven't done the hardest part yet: the UPS (it's super heavy). I also haven't moved the important ethernet switch (the US-16-XG).
-
Den
- October 15, 2022
-
Den
The second desk overbridge is assembled. The porcelain insert is installed and grouted.
-
Den
- October 13, 2022
-
Den
I wiped another coat of polyurethane on the bottom of the top of the second desk overbridge.
-
Den
- October 12, 2022
-
Den
I sanded (400 grit) the third coat of wipe-on polyurethane on the top for the second desk overbridge, then wiped on the 4th coat.The third coat of wipe-on polyurethane is on the base, except for the parts that require fpilling it over.
-
Den
- October 10, 2022
-
Den
I put the first coat of wipe-on polyurethane on the base of the second desk overbridge, except for the front of the front legs.I sprayed the overbridge top with dewaxed shellac and sanded it. I brushed a coat of wipe-on polyurethane on the bottom of it. The bottom isn't visible in use, and brushing on the wipe-on polyurethane creates a slightly thicker first coat. Saves me time.
I cut the piece of porcelain for the overbridge. I needed to do this today because it's a messy, wet job with a crappy handheld tile saw since the porcelain is too long to use my tile saw with sliding table.
-
Den
- October 9, 2022
-
Den
I stained the top of the overbridge.
-
Den
- October 8, 2022
-
Den
The top of the second overbridge is assembled wood-wise; trim pieces installed and trimmed flush with router, edges rounded over with router, sanded and SealCoated. The 3/8" plywood to support the porcelain is also installed (Titebond III and #6 x 5/8quot; wood screws). I drilled the pilot holes to attach it to the base.
-
Den
- October 5, 2022
-
Den
Change of plans for tonight. I sanded the pocket hole plugs flush on the base of the second overbridge. Mainly because I want to get a protective coat of dewaxed shellac on it soon.
-
Den
- October 4, 2022
-
Den
I sanded the top frame of the second desk's overbridge flat. I then centered the oak plywood on the bottom of the frame and marked the screw locations. I drilled the countersinks and the pilot holes in the plywood. I then brushed Titebond III on the frame and joined the plywood to the frame with #8 x 1 1/4" cabinet screws (28 screws total). Yes, it's overkill, but I want these desks to be very strong.Tomorrow night I'll try to cut the trim pieces that cover the edges of the oak plywood and possibly get started on their installation.
-
Den
- October 3, 2022
-
Den
I routed the front edges of the second desk's overbridge shelf with a roundover bit. I also routed the remaining touchable edges of the rear panel assembly. I drilled the 11 pocket holes in the shelf of the overbridge and then the 4 pocket holes in the rear panel assembly. I assembled the base and plugged 11 of the pocket holes. I will plug the remaining 4 tonight.I marked the end pieces of the frame of the overbridge's top for dowels. I then drilled the 12 dowel holes. Using dowel guides, I then marked the long pieces of the frame for dowel holes and then drilled those holes (12). I then assembled the frame with dowels and Titebond III. It's clamped on my bench for overnight cure.
I brought the overbridge base indoors and installed the remaining 4 pocket hole plugs.
-
Den
- October 2, 2022
-
Den
I assembled the rear panel of the second desk's overbridge base. Nine pieces, 24 dowels. It is glued and clamped for overnight curing.
-
Den
- October 1, 2022
-
Den
I finished the roundover routing on the side pieces of the second desk's overbridge base. I then lightly sanded them.10:30 AM. I routed the edges of two of the legs of this overbridge base, and marked and drilled the dowel holes to attach them to a side panel.
11:30 AM. One of the overbridge base sides is assembled and clamped for curing. That's two legs and a side panel assembly.
13:00. Both side asemblies of the second overbridge's base are clamped and curing. Watching some football. Go Blue!
-
Den
- September 30, 2022
-
Den
The top and moulding are installed and finished on the on-desk cabinet. I glued the porcelain insert in place with Loctite PL Premium, it is curing with a 50 lb weight on top of it. I also filled a small knot hole on the top with cyanocrylate.I'd like to make some progress on the second overbridge and second rolling cabinet this weekend.
I cut the 1x2's and the shelf for the second overbridge. I then cut the oak plywood for the top, the 3/8" plywood for the top and the 1x3's for the top frame. I now have all the pieces for the second overbridge except the 3/4" pieces to cover the edges of the oak plywood and the porcelain piece. I'll cut the trim pieces and porcelain once I have the rest of the top assembled. The plan for tonight is to get some of the overbridge base ready for assembly (dowels and glue).
I marked all of the 2 1/4" 1x2s for dowel holes. I then drilled the dowel holes (40 of them).
I marked and drilled the 1x2 side rails for dowels (32 holes). I then assembled the side panels an clamped them to cure overnight. Tomorrow I'll start by doing the remaining roundover routing on the side panels, then mark and drill the legs, route the desired rounded edges of the legs and then attach the legs to the side panels. My hope is that I can the base of this overbridge assembled tomorrow, and then get started on the assembly of its top. I have 24 more dowel holes and 15 pocket holes to drill for the base.
-
Den
- September 18, 2022
-
Den
I cut the pieces for the legs of the second desk overbridge.I cut the oak pieces for the top frame of the on-desk cabinet. The frame is glued and clamped. Given that these are endgrain miter joints with just glue, I will wait a full day before doing more work on it.
-
Den
- September 17, 2022
-
Den
More work on the desks...I installed one of the small draw latches that will help keep the desks abutted as desired. They're easy to release when needed, and are not visible without getting on the floor. Seems to be good, so I installed the second draw latch. These are small, I got them from Amazon.
I taped off the edges of the top of Desk #1 in preparation for the porcelain installation.
I installed the porcelain in the top of Desk #1.
I installed the power strips on the underside of the top of Desk #1, as well as cable tie bases and ties to keep the power cords hidden.
I later grouted the joint around the porcelain in the top of Desk #1. Normally I would wait until the adhesive was fully cured, but I'm short on time.
Next up is the top frame and porcelain tile for the on-desks cabinet.
-
Den
- September 16, 2022
-
Den
More work on the desks...The top of Desk #1 now has 5 coats of wipe-on poluyerthane on it.
I brought thee top of Deesk #1 into the den and installed it on its base. Carrying it it without the porcelain installed was slightly easier.
-
Den
- September 14, 2022
-
Den
More work on the desks...Desk #1's top: I glued and nailed 1/8" thick support strips to the 1/2" BCX that will make sure the porcelain stays where I want it height-wise while the SikaBond cures. I did the same thing when I assembled the top for Desk #2, but I don't think I mentioned it and these strips were not in my drawing.
I wiped a third coat of polyurethane on the frame of the top.
-
Den
- September 13, 2022
-
Den
More work on the desks...I put the second coat of wipe-on polyurethane on the frame of the top of Desk #1.
-
Den
- September 12, 2022
-
Den
More work on the desks...I bought more Sikabond on my way home from work. I need it for the porcelain insert for Desk #1.
I put the first coat of wipe-on polyurethane on the frame of the top of Desk #1.
-
Den
- September 11, 2022
-
Den
More work on the desks...The polyurethane on the bottom of the top of Desk #1 cured overnight. Examining it, it doesn't need another coat on the plywood. The edges of the oak will get more finish while doing the top.
I flipped the top over on the bench and did the final pre-stain sanding of the top frame. I managed to give myself a couple of thumb blisters in the process. I then blew it off with a blow gun and put a coat of SealCoat on the 1/2" BCX plywood. The BCX was thirsty as expected.
I then stained the top frame with General Finishes gel stain. Later I sprayed a coat of dwaxed shellac on it just to seal it.
After the shellac cured, I wetsanded it with 400 grit in preparation for the first coat of polyurethane. Unlike Desk #2, I used gloss spray for the first coat, just to see if the clarity winds up better in the end. The final coats will still be wipe-on satin.
I'm sort of on schedule, in the sense that I got the finishing process started on this piece.
-
Den
- September 10, 2022
-
Den
More work on the desks...I marked the location of the threaded inserts on the bottom of the top of Desk #1. I then drilled the holes and installed the threaded inserts.
I applied gel stain to the bottom of the top of Desk #1.
A few hours later, I sprayed a coat of dewaxed shellac on the bottom of the top of Desk #1. Once it dried, I lightly sanded it, then wiped it with microfiber, then brushed on a coat of wipe-on polyurethane. This winds up thicker than when wiped on, which I want here; no one sees the bottom of the desk top, and there will be sanding after this step anyway. So it saves me a bit of time.
I'm a bit behind schedule, but at least I'm now in the finishing process for the top. I can't do other things in the garage during this process since I don't want to kick up a bunch of dust while finish coats are curing.
-
Den
- September 8, 2022
-
Den
More work on the desks...I routed the top edge of the frame of the top for Desk #1. I then flipped the top over on the bench and assembled the base on the upside-down top. I need to mark the holes for the threaded inserts. I also need to check my stock of threaded inserts and 3" long 5/16-18 stainless hex head bolts.
-
Den
- September 7, 2022
-
Den
More work on the desks...I'm a tiny bit ahead of schedule. The final edge piece of the top for Desk #1 is installed and routed flush. I also routed the whole bottom edge with a 3/16" roundover bit, and sanded the bottom and the edges. The edges will get sanded again when I flip the top over on the bench, but this is a good start. My main target is to get the porcelain insert installed on the weekend of the 16th, so I just need to keep doing little bits of work each night after work.
Worth noting that I love how Desk #2 turned out. Having a porcelain top is wonderful. It looks great to me, it's super durable, and I like the feel of it under my forearms. The mid-design change replacing the top 3/4" frame pieces with 1" thick pieces on top of the 3/4" oak plywood with the plywood edges covered by 3/4" thick oak turned out to be fantastic. The 1.75" thickness is more proportional to my eye with the beefy base, and the 1.5" thick overbridge top is now more proportional with respect to the desk top. It has aesthetic and structural substance.
It's also worth noting that I completely failed in finding any similar desk builds on the Internet. I'm fairly certain I'm not the only one to build some desks with single-piece porcelain tops with wood frames. But for the life of me I couldn't find any, despite my fairly good Google skills (I've been on the Internet since the late 1980's). While it's unlikely someone else would use the mix of fasteners I used, and probably unlikely that someone else would use the overkill acetal feet, I find it hard to believe that no one else has done something similar top-wise.
Room stuff...
I still need to decide where to put the in-wall access point. I need to look up the beam pattern; I suspect it wants to be fairly low on the wall (samee height as an AC receeptacle), but I need to check.
-
Den
- September 6, 2022
-
Den
More work on the desks...I installed three of the four edge pieces on the top for Desk #1 using Titebond III and the Bositch 18-gauge nailer with 1.5" nails. I ran out of clamps (insert woodworker's curse here about never having too many clamps), so...
I routed one of the long edge pieces flush with the frame.
Tomorrow I'll install the final edge piece, and hopefully on Thursday I'll be able to route and sand the remaining edge pieces and frame. That will allow me to put the base on the top to mark the underside of the top for threaded inserts on Friday, and hopefully get them installed. I really need to get the finishing started on Saturday; the top needs at least 7 coats of wipe-on polyurethane before I install the porcelain.
-
Den
- September 2, 2022
-
Den
More work on the desks...Last night I glued a desktop frame together with 5/16" dowels and clamped it overnight.
I put a coat of 1 lb. cut dewaxed shellac on the bottom of the 3/4" oak plywood for the first desk's top. This is just to seal it. I then placed it on top of the 1" thick frame and marked all of the screw holes.
I drilled the countersinks in the 3/4" plywood, theen drilled the pilot holes. I then removed the plywood, spread wood glue on the frame, then put the plywood in place and screwed it to the frame with 1 1/4" wafer head screws.
I marked the location of the screw holes on the 1/2" plywood that will support the porcelain insert. This piece of plywood is a bit warped, so I put my tractor wheel weights on it to help flatten it. I drilled the countersinks in the 1/2" plywood, removed it, then ran a roundover bit over the inside of the frame since it wouldn't be possible once the 1/2" plywood is installed.
I brushed Titebond III onto the 3/4" oak plywood and then attached the 1/2" BCX plywood with screws.
I roughly sanded the frame and put a coat of thinned SealCoat on the top just to protect it from any stains when I flip it over on the bench.
-
Den
- August 28, 2022
-
Den
More work on the desks...I cut the 3/4" and 1/2" plywood for the second desk top.
I ripped the frame pieces for the top and cut them to length.
I drilled the 5/16" diameter x 3/4" deep dowel holes in the frame end pieces. 16 holes.
I need the second desk to be done before I can start moving into the den; the cabinet that will hold my audio gear will straddle both desks and I need it. At the moment I am wishing I had thought about how to get started with one desk when I designed and built the other furniture. Oh well.
I don't need the second overbridge right away, but will work on it once the second desk is in place.
In order to do any of the remaining work, I need to clear off my workbench.
-
Den
- August 25, 2022
-
Den
The TREBLEET Thunderbolt dock arrived for the Mac Studio. I installed a Samsung 980 Pro 1TB drive in the M.2 slot for testing. It appears to work well, at 2800 MB/s write and 2700 MB/s read.
-
Den
- August 24, 2022
-
Den
The shoe moulding installation is done. I haven't sealed the nail holes yet.
-
Den
- August 21, 2022
-
Den
I ordered some Cat6A copper and LC fiber patch cables from fs.com. Just a few in a few different lengths, mixed colors.On the way home from work on Friday, I picked up some cable management miscellany from The Container Store. Just cable clips and some spiral loom.
I ordered some clip-on cable labels, saddle type cable tie bases and a Thunderbolt hub from Amazon. I decided to try the TREBLEET, mainly because it has what I need all in one tidy package. I can put an NVMe and an SATA SSD in it, and it has the slots I need access to on the front that are absent on the Mac Studio front (USB-A, CF) and an additional USB-A on the rear.
-
Den
- August 18, 2022
-
Den
I continue to work on shoe moulding. I can't do much on weeknights, but I do a tiny bit each night. In total I need 11 pieces of shoe moulding. I've installed 5 of them, plus 2 of the 3 small blocks at the outside corners. Tonight I cut and sanded the 6th piece of shoe moulding, then put the first coat of stain on it. When I get the 8th piece installed, I can put the first desk where it belongs. After the 9th piece, the spot for the second desk (not completed) will be available. I'm trying to figure out a schedule to finish the second desk, as well as a schedule to move my work area into the den. Both are a lot of work but I'll keep plugging away.There are still some tech items I need to buy. One is the little stand for the Mac Studio from Etsy, which I jusr ordered. The second item is a dock of some kind to give me more USB-A ports for the Mac Studio. I really only need one USB-A on the front, but it'd be nice to also have NVMe inside for a second drive. That has me looking at the TREBLEET, but the reviews are mixed. Fortunately I'm not in a hurry at the moment.
-
Den
- August 14, 2022
-
Den
I did some more work on the shoe moulding. It's slow because I have to sand the moulding to rough up the existing finish, then apply two different colors of stain, then clear coat with shellac and then polyurethane.I installed two 9-outlet power strips on the underside of the top of the desk, in the back. They are staggered to make access a bit easier, but sadly the outlet orientation is on axis with the length of the strips. Meaning there isn't a lot of room for wall warts. That's one reason I I installed two: to get a total of 18 outlets. I won't need near this many, but having the space helps deal with wall warts and the like. The other reason: UPS. I like to have the important things on UPS, such as my desktop computer and monitor. But other things aren't critical, and hence don't need UPS: speakers, lighting, chargers, etc. So I like having two main strips: one that is plugged into UPS and one that is not. This allows me to maximize UPS runtime on battery; I don't load the UPS with things that can lsoe power without disturbing my work.
I need a new charging dock for my iPhone, Apple watch and airpods. I put one in my wish list on Amazon; it's the smallest desktop footprint I could find. I can continue to use my Elevation Labs phone dock and my existing watch dock in the interim.
How do I want to charge my trackpad? And where do I stash the power brick for the CalDigit TS3 Plus?
-
Den
- August 13, 2022
-
Den
One of the desks is now fully assembled and in the room. I want to get some 1/8" rubber for the feet of the overbridge, but that's minor.The transition strip from the foyer to the den is fully installed. Countersunk 2.5" #9 construction screws, countersinks filled with oak dowels, sanded, stained and coated with polyurethane.
I'm working on the shoe moulding, first by creating the corner blocks. I hemmed and hawed on this since I can't perfectly match the color of the old wood, but just from a durability perspective, it's the right thing to do. The exterior corner block will get bonked quite a bit when vacuuming. Having this be a solod oak block makes sense.
-
Den
- August 5, 2022
-
Den
I wiped a second coat of polyurethane on the rear assembly of the base of the second desk, except for the 2x6 stretcher.
-
Den
- August 4, 2022
-
Den
I wiped the first coat of polyurethane on the rear assembly of the base of the second desk, except for the 2x6 stretcher. I later put the first coat on the 2x6 stretcher.I put the ensomotion wheels on the second Aeron chair.
I'm still debating
-
Den
- August 3, 2022
-
Den
I finished staining the rear assembly of the base of the second desk. I then sprayed a light coat of shellac on one side of it.
-
Den
- August 1, 2022
-
Den
I put another coat of wipe-on polyurethane on the second leg assembly of the second desk. I believe this is the final coat. I still need to stain the rear panel assembly and put polyurethaner on it.I drilled countersinks in the piece I'm trying as a transition. While I can make this work, I'm not sujper thrilled with it at the moment. This is the lazy route, which relies on the fact that I can twist this piece torsionally. If I put a gloss or even semi-gloss finish on it, it'll probably stick out like a sore thumb. I'll try a satin finish and see what I think. I won't be plugging the screw holes until I'ver decided it's god enough to go with.
The real right solution is to make my own, shaving a shallow angled depth channel in one side using a pattern bit in my router. Or make a jig that I can use with the table saw and dado cutter.
-
Den
- July 31, 2022
-
Den
I had to run out and get a new coffee maker. I stopped at Menard's and bought some oak boards to make a transition strip and for work I need to do on the desks. I also bought a pre-made unfinished oak transition strip that I think I can use effectively. I also bought some spray polyurethane to use on the shoe moulding, and another gel stain color to try on the shoe moulding.I cut some pieces of shoe moulding for the area to the north of the door. But I don't like my options to mate it with the vertical corner moulding. I think the only way it will look decent is with outside corner blocks. The shoe moulding is profile 9596. It's 3/4" deep by 1.25" tall. If I make my own blocks, I'd like them to be 1/8" thicker than the shoe moulding. Hence 7/8" of thickness. I only need 3 of these blocks, and they'll be diminutive in height; I have no baseboard and don't want it since the wood walls were proportioned to not have it. At the moment I think I make my own from 2x2 (1.5"x1.5" actual) oak stock. I'll use the dado cutter to remove a 5/8" corner from the stock, cut to length and shape the tops at the router table.
I put the doors on just to see how much I might need to trim from the bottom of the doors to clear the transition strip I'm trying. It looks like the answer is 'none' for the south door and it's really close for the south door. I'll wait until the strip is installed before making a final judgement.
I did a quick cleaning of the north door.
I lightly sanded the right leg assembly of the second desk with 400 grit, in preparation for another coat of wipe-on polyurethane. I've been using the last of an old can, and it's a bit thick. It cured fine on the first coat, and I think I'll only need a second coat; there is dewaxed shellac under the polyurethane. This is one of my beefs with the Minwax wipe-on polyurethane; despite me giving it a 15 to 30 seconds shake before use, at the end of the can I wind up with thicker material. It probably has something to do with the shape of the can and the lack of an agitator. Or me just not having time to shake it for minutes before each use.
I'm pondering the transition strip installation. It's a solid piece of shaped red oak, unfinished. It came with holes pre-drilled, but the screws are way too short for what I need. Regardless, I'm not thrilled with the idea of exposed screw heads. At the moment I'm thinking I can countersink a torx-drive #9 construction screw in each pre-drilled hole, making the countersink with a 1/4" Forstner or doweling bit. After the screws are driven, I can plug the countersink with 1/4" oak dowel and sand the plugs flush. The trouble here is simply the amount of wood available. It looks like the countersinks will need to be quite shallow, and 1/4" just fits the #9 screw head. That'd leave little good surface for wood glue (the outer circumference of the plug). So I'm considering 1/2" diameter countersinks. This also greatly reduces the precision required for centering the countersink on the existing holes.
-
Den
- July 30, 2022
-
Den
Other than maybe some touch-ups, I'm done grouting the floor.The prefinished oak shoe moulding I bought is too light in color. I didn't expect a perfect match, but it's not close enough. I played with putting fel stain directly over the finish, but most of it winds up being wiped off. So I'll try sanding it a bit first. PITA since it's profiled and I have a lot of it (and not very many sanding sponges).
I sanded the second leg assembly of the second desk in preparation for wipe-on polyurethane.
I sanded a short piece of the shoe moulding and put a coat of Minwax 'Aged Oak' gel stain on it. This was after trying other colors (General Finishes 'Colonial Maple' and Minwax 'Cherry Wood'). I'm not going to get an exact match to the walls, but I think this might be the closest. I'd like to try some amber shellac over it, but I don't think I have any at the moment. Of course I don't want a gloss finish, so I'll just go with polyurethane. I need to buy some rattle cans of it to make my experimentation easier. I'm thinking 3 cans of gloss and 3 cans of satin. I'll use the gloss for the first coat and the satin for the final coat. The gloss is just for clarity.
-
Den
- July 20, 2022
-
Den
I've been working on grouting the floor. I did a round of cleaning yesterday, then hemmed and hawed over using grout release (which I don't have on hand). I also ordered more SpectraLOCK Pro Premium parts A and B, after reading that I shouldn't use SpectraLOCK Pro and SpectraLOCK Pro Premium on the same floor due to possible color differences. I had planned to use the SpectraLOCK Pro parts A and B that I bought last year for part of the floor. Oh well. The 4 mini kits I ordered yesterday should arrive on Friday.I used the first SpectraLOCK mini kit today. I don't need grout release, I just need to use my usual epoxy washdown procedure. I mix the cleaning packets in 2-gallon buckets as prescribed, but I also use two additional 5-gallon buckets of clean water (one for the initial washdown, another for the second washdown). I rinse the sponge in the 5-gallon bucket before dunking it in the 2-gallon solution again. In my experience, this greatly reduces gummy build-up in the sponge, at the expense of more water. It's worth it; I wind up with no grout haze. I thought I might need grout release just because this is the first time in a very long time that I've used SpectraLOCK on textured tiles. But I have no haze that I can see or feel, so I'm good to keep going.
I later used the second mini kit. I can do almost 3 rows of tile per mini kit. I have 22 rows remaining, so I estimate I need 8 more kits, plus one for final touch ups of any low spots. So I think I ordered just the right amount, but I won't know until I'm closer to being done. Some joints are deeper than others.
Tomorrow I need to clear out the remainder of the room and start working in the bay window area, which hasn't been cleaned yet. I need to work from the permiter toward the door. Now that I'm over the hump of the cabinet overhangs, and have revived some grouting muscle memory, things should go a little faster. Unfortunately, due to the washdown timing, it won't be that much faster. I'm hoping to get through 3 or 4 more kits tomorrow. If I can get 4 done, I'll be about 2/3 of the way done with grout. I'd like to get the grout and the shoe moulding done before this weekend concludes.
-
Den
- July 18, 2022
-
Den
I finished pulling up 4 tiles for lippage and a chip. I removed the DITRA underneath, then cut a couple of pieces to replace it. I adhered it with Loctite PL Premium MAX, combed with a v-notch adhesive spreader. This bond will be considerably stronger than the original thinset bond, which is good since the pieces are smaller. I didn't remove the original thinset, since it was bonded well to the plywood.I managed to salvage one of the original tiles, but it took hours of scraping and acetic acid to make it clean enough on the backside to re-use. Why did I do this? Well, from the boxes of tile I have open, I didn't have a tile of the right color. I didn't want to open another box for a single tile if I could get this one tile out intact.
I set the four replacement tiles. Not perfect lippage-wise, but better than the originals.
-
Den
- July 17, 2022
-
Den
Near the end of cleaning the tile, I found a tile with a chipped corner that I didn't notice during installation. If it were a small chip, I'd leave it since the look of this tile is reclaimed wood anyway; it already has a worn/used look. But the chip was a triangle of about 1/2" and took a little bit of the tile body with it (not just the glaze). So I'm replacing it. In the process, I'm going to replace two adjacent tiles. They both have more lippage than I want, and if I'm mixing thinset anyway, I might as well get all three of them. There is some lippage in other areas of the floor, but it's minor compared to these two tiles. And yes, both of them happen to be over KERDI-BAND. Sigh.For these tiles I am going to replace the Ditra too. Mainly because it lost some of its bond to the subfloor from me hammering on the tiles. This isn't a huge deal in the grand scheme of things since Ditra is never that firmly bonded to the subfloor; the fuzzy backing of the Ditra will yield fairly easily. I believe this is by design, and very similar to how we used to mud plywood subfloors back in the day, where tar paper was tacked down before mudding the floor to basically create a floating floor that won't crack from expansion and contraction of the subfloor.
At any rate, this probably adds two days to my floor work, since I'll have to wait for the Ditra to bond to the floor and the thinset to cure. :-( During this period I'll go back to putting finish on the base of the second desk, and possible start grouting the floor on the other end of the room. I might also start adding stain to the shoe moulding. Despite the fact that I bought prefinished oak moulding in hopes of avoiding some work, it's lighter than desired. I'll put gel stain on it, or Polyshades pecan.
-
Den
- July 16, 2022
-
Den
I've spent the last two days cleaning the tiles in preparation for epoxy grout (Laticrete SpectraLock Pro Premium). As usual, I wish I had spent more time cleaning up while the thinset was wet. I'm using an old el-cheapo wood chisel and a light deadblow where needed, which necessitates frequent trips to the grinding wheel (thinset is hard stuff). I'm using a scounring pad and a strong mix of 30% acetic acid and water to clean the surface of the tiles, then wiping with plain water and a microfiber. I'm trying to do a thorough job because I know from past experience that epoxy grout haze and thinset dust/sand is a horrible combination. :-) I'm almost done cleaning, but it's 12:30 AM and I'm sore from spending so much time on my hands and knees. However, I'm hoping I can start grouting tomorrow.My choice of grout color was a compromise, as it almost always is. I've never been a fan of really dark or really light grout, no matter whether it's cementitious, epoxy, urethane or acrylic. Grout lines collect dust, might get hard water marks, etc. Cleaning it is never fun, even when it's epoxy (which is near impossible to stain) And in this case, the tiles are many different colors. I knew I wanted a mid-tone, and a brown. But no one local carries SpectraLock Pro Premium, and you can't really trust color swatches. For that matter, with the epoxy grouts, you can't really trust the color of the aggregate (Part C) to be represenative either; many colors will be darker once it's mixed, and of course it finishes with some gloss. The good news is that it's very color consistent, no matter how many units you need to finish the job. And it's still the most durable and maintenance-free grout.
We'll see what I tihnk once I've started grouting. There's pretty much no turning back at this point since it's expensive, extremely difficult to remove, and non-returnable since I bought it online. I went with 'Tawny', based largely on the color of the walls in the den and the mid-tone tiles. I often choose natural gray for its neutral nature, hopefully I won't regret not going that route.
My personal keys to using epoxy grout: a good float intended for epoxy grout, working quickly, getting as much of the grout off of the tiles while grouting, and proper washdowns per the instructions. The time until the first washdown varies by temperature and humidity, but I usually want at least two 5-gallon buckets of water and several sponges ready for the first washdown. It's better to have too many than too few; if the sponge gets really gummy or the water gets too dirty, you won't have time to fill another bucket.
-
Den
- July 14, 2022
-
Den
I went to Menard's for a new epoxy grout float, margin grout float and sponges so I can grout the floor. I still have work to do before I grout; three tiles to replace and then cleaning.I replaced the 3 tiles that had unacceptable lippage.
I spent several hours cleaning up thinset from the tile joints. I'm not done. This is one of the downsides to tile levelling systems; they get in the way of cleaning up thinset squeze-out during installation, which means you're doing it after the thinset has cured. Of course I could have been more fastidious cleaning joints as I went. And I wound up with more squeeze-out than planned.
Tomorrow I'll be doing more joint cleaning and will be wiping the tiles with vinegar and then water to remove any thinset film before I grout.
-
Den
- July 13, 2022
-
Den
I pulled up 3 tiles to correct severe lippage. Two of them were from last night and against the wall, hence not difficult to remove. The third was a field tile that I installed a long time ago. It took many hours of carefully chipping away with a chisel to remove the fully cured thinset without ruining the Ditra. I'm preparing to mix thinset to replace these tiles.It's worth noting that almost all of my lippage issues have been with tiles over the Shluter KERDI-BAND. This isn't a product issue, it's the fact that I hadn't used it before and didn't fully appreciate how it would swell with water and thinset. I should not have put any mortar on it until I laid the tiles. There's also the fact that I really should have used a 1/4" × 3/8" notched trowel instead of a 1/2" × 1/2" notched trowel. There's more mortar under the tiles than I need. I had followed the advice for LFT tiles, but to me, realistically, a 6x24 tile is not LFT. It used to be considered an LFT tile, but these days, it's actually on the smaller side of things. I should know this, given that I am working with 30" × 60" porcelain tiles for the desks.
There's no real harm in the extra mortar, but it has made my installation work more difficult. Lesson learned. Today, when someone says LFT (large format tile), they're probably referring to something larger than 6" × 24".
-
Den
- July 12, 2022
-
Den
I placed the final tiles on the floor. The ones against the toe kick of the built-in cabinets were difficult, and probably have some lippage. I'm not going to worry about it since you can't walk on those tiles.I ordered SpectraLock Pro part C (powder) mini kits in Tawny, and additional parts A and B mini kits. Yes, epoxy grout, which I don't really like working with but that's why I ordered mini kits instead of the full size. I'm slow at applying this stuff, and it has a fairly short work time.
-
Den
- July 11, 2022
-
Den
I am almost done tiling the floor. One more batch of thinset will do it. I would have finished tonight, but tornado sirens went off and we had impending severe weather. The worst of it passed JUST north of me. I got to watch a spectacular lightning show while washing out the mixing bucket.I still haven't picked a grout color (Part C of Laticrete SpectraLock), but I'm leaning toward Tawny. It's amazing to me how color sample swatches online are so different, on my monitor (color calibrated and accurate for a non-reference monitor). I don't know if Laticrete is to blame, or the retailers. But some of them aren't even remotely close to each other. Sigh. I'm not talking about installation photos; I'm talking about square uniform color swatches. Are people converting them? Crazy.
-
Den
- July 10, 2022
-
Den
I cleaned up a bit just to make a bit more room to continue the floor tile work. I lifted all of the labelled tiles and stacked them according to row. I then vacuumed to prepare for thinset.I installed 11 tiles. 24 to go.
I think I am going to run out of thinset. I am going to use up what I have before I buy more.
I keep heming and hawing on the window seat design. The problem is accomodating the HVAC register, which is under the center window on the floor. I'm not worried about the winter, it's the A/C in the summer. This is the only duct in this room, I need it. So I've been looking at providing some fan asistance to allow the air to immediately turn 90 degrees and go under the window seat, while still allowing storage.
-
Den
- July 9, 2022
-
Den
I cut the remaining tiles for the floor. I have 35 tiles left to install. I numbered all of them and marked them for the location of the tile levelling stems.
-
Den
- July 8, 2022
-
Den
I installed two more rows of tile, with Julie's help on the second row.I later realized that one of the tiles had more lippage at the end than I am willing to accept. I broke that tile out and cleaned out the mortar. I'll install a new tile when I install the next row.
-
Den
- July 7, 2022
-
Den
I installed another row of tile on the floor. I still have a ways to go, but I'm getting close enough to the built-in cabinets that I'll need to start working while kneeling on tile I've already placed. Hence I should cut and prep multiple rows and work diagonally. Three rows feels about right for how many I can get done in an afternoon.Worth noting that I'm still using a 2:1 mix (by volume) of thinset to water for my small batches. The thinset is Mapei Uncoupling Membrane Mortar (unmodified). It's probably slightly more than 2:1 since I use a heaping cup of the dry mortar, but it's close. It has worked well so I can mix batches in sizes this non-pro can use before it becomes unworkable. I'm pretty good at tile work (learned a bit from my dad who did it for a living), but I'm slow, especially when I need to backbutter awkward-sized tiles.
-
Den
- July 6, 2022
-
Den
More work on the desks...I installed the porcelain on the first desk's overbridge, using SikaBond construction adhesive. I misted the SikaBond with a spray bottle after I spread it with a V-notch adhesive spreader, since the center will not easily get any moisture (required for curing). I'm going to let it cure for at least a couple of days before grouting. I'm pretty sure it's going to take weeks to fully cure, and the center may never fully cure. That's OK here, this surface will be stationary and unstressed.
I sanded the right leg assembly of the second desk with 150 grit on the detail sander. This was just to reduce glue lines from the glue-up.
I stained the right leg assembly of the second desk. I later sprayed a coat of dewaxed shellac on it.
-
Den
- July 5, 2022
-
Den
Unfortunately, the Jet parallel clamps on the first desk's overbridge created marks in the polyurethane. I had forgotten that the Jet clamps are harder than the Bessey, and have sharper edges (no separate pads). So I had to sand the top again, touch up with gel stain, spray a thin coat of shellac and start the polyurethane again. When I build the second one, I won't start finishing the top and sides of the overbridge top until after it's attached to its base. I need the oomph of the parallel clamps to squeeze out excess Loctite PL Premium; it's a lot more viscous than PVA glue.I didn't get more done today because I had a full day of yard work.
-
Den
- July 4, 2022
-
Den
I wiped a 7th coat of polyurethane on the first desk's overbridge top.I wiped two more coats of polyurethane on the first desk's overbridge base.
I positioned the first desk's overbridge top on its base, and clamped it in place. I then used the previously drilled holes in the top to drill the pilot holes into the base for the screws that will hold the top to the base.
I started the screws into the top, then removed the top from the base. I put a bead of Loctite PL Premium on the edges of the base, then put the top back on using the screws to properly align it. I then clamped the base to the top with 6 parallel clamps, and drove the screws into place.
A few hours later, I removed the Loctite PL Premium that squeezed out of the joints. This is the part I always dislike about using Loctite PL Premium, since it expands quite a bit. Squeeze out is inevitable, even if it doesn't show up with the initial clamping. But that's also a benefit, since it fills gaps and will bond where a PVA glue will not. It's the nature of polyurethane adhesives.
Messing around a bit, the overbridge's construction is overkill. It's MUCH stronger than it needs to be. But that means it won't have any issues at all with my existing monitor arm for my 38" ultrawide monitor, and I don't think it'd have any problems holding a dual monitor arm. It's the combination of the 3/4" oak edges and the 3/4" plywood plus a very strong base. I'm not going to complain; it's better to have too much strength than too little. But I probably could have used 1x4 instead of 2x4 for the legs.
I spent a decent amount of time today working on the SketchUp for the window seat, while polyurethane was drying on the desk overbridge parts.
-
Den
- July 2, 2022
-
Den
I wiped the 5th coat of polyurethane on the first desk overbridge top's frame.I wiped the 2nd coat of polyurethane on the bottom of the base of the first desk overbridge, and the 1st coat on the outside.
I went to Home Depot (twice) to get #9 × 2" bugle head screws, #9 × 2+1/2" screws, more shellac spray and sandpaper for a mouse sander. I needed the screws for the final assembly of the first desk overbridge.
I went to Menards (twice) for a mouse sander, more cheese cloth and some oak pieces to start building the second desk overbridge. Unfortunately they were out of 3/4" thick 2' × 4' oak plywood, so I can't quite build the top yet. But I can get started on the base and the frame of the top once my bench is clear of the first overbridge.
I sanded the first desk overbridge top's frame. It should only need one more coat of wipe-on polyurethane (the 6th coat). It's probably worth noting that my rough estimate of wipe-on versus brush-on polyurethane is about 3:1. i.e. 3 coats of wipe-on is roughly equivalent to one coat of standard polyurethane. This varies quite a bit since you can wipe on a thick coat or brush on a thin coat, but it's a reasonable rough estimate for my own tendencies. For touch surfaces, I prefer wipe-on since it means less sanding and no brush cleaning (cheese cloth is dirt cheap and I just dispose of the small folded piece I use for each coat). No brush marks, no runs.
-
Den
- July 1, 2022
-
Den
I wiped the first coat of polyurethane on the first desk overbridge top frame.I wiped the first coat of polyurethane on the top and inside of the first desk overbridge base.
I wiped the second coat of polyurethane on the first desk overbridge top frame.
I wiped the third coat of polyurethane on the first desk overbridge top frame.
I wiped the second coat of polyurethane on the top and inside of the first desk overbridge base.
I sanded the first desk overbridge top frame with 400 grit in preparation for the 4th coat of polyurethane. I then wiped on the 4th coat of polyurethane.
I wiped the first coat of polyurethane on the bottom of the first desk overbridge base.
-
Den
- June 30, 2022
-
Den
I stained the first desk overbridge top. I later sprayed it with a coat of dewaxed shellac.I marked and drilled pilot holes from the underside of the first desk overbridge's top. These are for the #9 screws I'll be using to hold the top to the base.
I sprayed a coat of shellac on the first desk overbridge's base.
I lightly sanded the underside of the first desk overbridge top, and applied two thicker coats of wipe-on polyurethane. This won't be a visible surface, it's just for moisture protection.
-
Den
- June 29, 2022
-
Den
I sanded the pocket hole plugs flush on the first desk overbridge base. I then sanded the entire base.I trimmed the first overbridge frame's remaining trim pieces flush with the top of the frame, then used the belt sander to even things up. I then ran a 3/16" roundover bit over all of the edges, and sanded all of the trim and frame.
I put a coat of SealCoat on the frame and the top of the 3/4" plywood of the first overbridge top. I also put a coat on both sides and all edges of the 3/8" plywood. I then marked and drilled countersink holes in the 3/8" plywood to fasten it to the 3/4" oak plywood. I then glued and screwed the 3/8" plywood to the 3/4" oak plywood with TiteBond III and 3/4" long #8 screws. I updated my SketchUp drawing to show the holes for these screws.
I updated the SketchUp drawing to include holes for screws to hold the top to the base. Most of the strength here will be from glue, but the screws will hold it in place while the glue cures. I'll be using Loctite PL Premium or Loctite PL Premium MAX here since I want some gap filling that isn't accomplished with Titebond. I'll probably use PL Premium just because it's less expensive and it's medium to light brown instead of gray.
I sanded the top and edges of the overbridge frame with 220. I also checked the fitment of the porcelain insert again, mainly for height. I think it'll wind up flush or very close to flush once I've installed it with adhesive. Of course that's several days away, since I need to do some finishing before I attach the top to the base, and the top needs to be attached before I install the porcelain (the porcelain will cover the fasteners).
-
Den
- June 28, 2022
-
Den
I went to Menards for a Bosch Colt trim router, since I'm tired of trying to balance my full-size Porter-Cable router when flush cutting. A trim router is designed for this purpose.I also bought a Red Devil adhesive spreader for $2.
I went to Home Depot for SikaBond to adhere the porcelain to the desk tops. I decided on the 29 ounce cartridges since in the end I expect to use much more than 10 ounces per desktop and buying the larger size saves money and time.
I bought a Husky 29 ounce caulk gun to dispense the SikaBond. I wanted one with 26:1 thrust ratio, but could not find one locally in stock. The Husky is switchable from 9:1 to 18:1. So 18:1 will have to suffice.
The plan for this evening is to get the trim pieces on the first desk overbridge top. Sadly no one locally has 1.25" 23-gauge pin nails in stock, so I'll have to be conservative with the nails.
I glued and pin nailed one of the trim pieces on the first desk overbridge. I clamped it for a couple of hours. I then used the new Bosch Colt trim router to trim it flush with the frame. Wow... a night and day difference in ease of use versus my full-size router for this kind of task. Plenty of power, and much easier to keep the base plate flat on the edge of a 3/4&qout; board.
I glued and clamped the second piece of trim on the top of the first overbridge, and pin-nailed it while it was clamped. 90 minutes later, I removed the clamps and routed the edge flush.
I glued and clamped the remaining two pieces of trim on the top of the first overbridge and pin-nailed them in place while clamped. Given that it's dark outside, I'll wait until the morning to route them flush.
I plugged the pocket holes in the first overbridge base.
I finally got around to filling some minor spots on the desk left leg assembly, with CA glue. Cosmetically they were not an issue, but I didn't like the fact that a rag would snag them; I want to be easy to dust them. I filled the holes, then later used a chisel and sandpaper to make them flush. They're not perfect but a microfiber towel no longer catches on them.
Note that I've read negative reviews about the Colt router. Mainly that the micro-adjustment threads get stripped on the motor body. Beyond the soft material issue, I think part of the problem here is that there's nothing preventing you from moving the dial to full lock with the threads misaligned, which will eventually chew up the aluminum threads. I'll wind up lubricating the threads a bit which will help, but ultimately it's only a matter of time and unlock/lock cycles that will determine the life of the tool. Of course I can try to be careful when locking, but thus far I haven't developed a feel for when the locking dial is causing the threads to be shaved. If you ask me, this is disappointing. Most of the time, I don't need micro-adjustment on a trim router, since I'm using it with flush-cutting bits and roundover bits which can easily be eyeballed (I'm going to sand anyway). But the threads on the motor body should be hardened steel; the bolt is easy and inexpensive to replace, it should be the sacrificial part.
-
Den
- June 27, 2022
-
Den
I finished the assembly of the first overbridge base.I positioned and clamped the 3/4" oak plywood to the oak border of the first overbridge top. I then drilled countersinks and pilot holes. I removed the plywood, brushed on TiteBond III, then glued and screwed the plywood to the border.
I cut the 3/4" solid oak pieces that will cover the edges of the oak plywood. I haven't installed them yet because I'm considering an LED light bar in the front edge to illuminate my keyboard. Though my current keyboard has backlighting, there are times when I'd like to have dye-sublimated PBT keycaps without backlighting.
-
Den
- June 26, 2022
-
Den
I marked and drilled all of the dowel holes for the rest of the first desk overbridge. 12 dowel holes in the 24" shelf support, 24 dowel holes in the 2.25" stiles and 6 dowel holes in each of the 7.5" top supports. I then drilled the pocket hole in each of the 7.5" top supports, 2 pocket holes in the 24" shelf support and the 11 pocket holes in the bottom of the shelf.I routed the edges of the 2.25" long stiles for the rear of the first desk overbridge, as well as the bottom edges of the 24" shelf support and the front edges of the shelf. Just a 3/16" roundover on edges I expect to get bumped. I also routed the exposed ends of the 7.5" long top supports.
I glued and screwed the shelf support to the shelf with Titebond III and pocket hole screws.
I installed the three 2.25" left stiles in the shelf support with dowels and Titebond III. I installed the left side 7.5" top support on top of the three 2.25" stiles with dowels and Titebond III. I then clamped with a pair of parallel clamps.
I installed the three 2.25" right stiles in the shelf support with dowels and Titebond III. I installed the right side 7.5" top support on top of the three 2.25" stiles with dowels and Titebond III. I then clamped with a pair of parallel clamps.
I am going to run out of 1/4" dowels. I think I've concluded that I prefer the fluted dowels over the spiral-cut dowels from Rockler. Mainly because they're a little bit easier to tap into a tight dowel hole, but also because they retain more glue during installation. I'm ordering 200 more fluted dowels from Amazon.
-
Den
- June 25, 2022
-
Den
I marked and drilled the dowel holes in the right legs of the first desk overbridge. I routed three of the edges of each leg with a 3/16" roundover bit, then assembled the right leg assembly with the 1/4" dowels and Titebond III. It's clamped while the glue cures.
-
Den
- June 24, 2022
-
Den
I marked and drilled some of the holes for the first desk overbridge. I routed the edges of some of the 1x2s, marked and drilled the dowel holes for some of the 1x2s, and assembled the left side panel with dowels and glue. It's clamped in one of my woodworking vises to cure for a bit.I later assembled the right side panel, which is now clamped in one of my woodworking vises while the glue cures.
-
Den
- June 23, 2022
-
Den
I cut the border pieces for the top of the first desk overbridge. I marked and drilled the dowel holes in the end pieces. I then marked and drilled the dowel holes in the front and rear pieces, and assembled the four pieces with dowels and Titebond III. I clamped them up and will let them sit for a few hours.I cut the remaining 1x2s for the first desk overbridge.
I cut the 12+1/4" × 24" × 3/4" solid oak shelf for the overbridge.
I cut the 14+1/2" × 46+1/2" × 3/4" piece of oak plywood for the overbridge.
I cut the 11" × 43" × 3/8" plywood for the overbridge. This is underlayment for the porcelain.
I cut the 42+7/8" × 10+3/4" piece of porcelain. The inexpensive handheld saw I bought for this works but is difficult to use for these kinds of cuts in porcelain. Even with a really good backing setup, it chipped out at the end of the rip cut. This is really about being able to steady the tiny saw with no guide edge on the base plate, and the fact that the water feed is poorly implemented (poorly placed, insufficient flow). When I see sparks from a westsaw, I know that the water feed isn't sufficient and/or the blade is poor quality. I got the cuts done, but they're not perfect. For the second overbridge, I will likely ask for help to just dump water on the porcelain with the garden hose while I'm cutting.
-
Den
- June 22, 2022
-
Den
I lightly cleaned/scufffed the top frame of the second desk with a scotchbrite pad and then wiped on the 4th coat of polyurethane. I expect to apply 6 to 9 coats in total, since this is a high contact area and each coat of the wipe-on polyurethane is very thin.I sprayed a thin coat of shellac on the left leg assembly of the second desk, just to prevent smearing of the gel stain with the wipe-on polyurethane. I applied the first coat of wipe-on polyurethane.
I put the 5th coat of wipe-on polyurethane on the top frame of the second desk.
I cut the legs for the first overbridge, from scrap left over from the desk bases. I'll need another oak 2x4 for the second overbridge.
- I cut the 2.25" long 1x2s for the second overbridge.
- I wiped on the 6th coat of polyurethane on the top frame of the
second desk after very light sanding with 400 grit. I think I can
stop here, and move the desktop off of the bench.
I applied the second coat of polyurethane to the left leg assembly.
I went to Menard's for 1x3 and 1x2 pieces and 3/8" plywood for the overbridge.
-
Den
- June 21, 2022
-
Den
I finally adhered the porcelain to the first drawer cabinet (which I built last year). I used what remained of the Loctite PL Premium MAX that I used for the same purpose on the under-desk rack cabinet.I wiped on 2 coats of polyurethane on the second desk's top frame. I'll probably lightly sand with 400 grit before applying 2 more coats. It's over 90F today, so I'm trying to take it easy.
I am definitely going to run out of Colonial Maple gel stain before I finish the den furniture. I might be able to finish the second desk, but I'll need more for the second cabinet and the window seat.
I applied the 3rd coat of polyurethane to the second desk's top frame.
I sanded the right leg assembly of the second desk with 150 grit.
-
Den
- June 20, 2022
-
Den
I grouted the top of the under-desk rack cabinet. Nothing fancy here, I used TEC Ready To Use Grout, slate gray color.I stained the top of the second desk. I later sprayed it with dewaxed shellac and sanded. There were a couple of spots I needed to sand back to bare wood and restain due to what I'm assuming were glue marks from my handling of the top. I'm probably going to let the stain cure for a few days instead of adding another coat of shellac. I basically use the shellac to allow me to apply the wipe-on polyurethane a little sooner, but als as a sanding surface to smooth things out before I start the wipe-on polyurethane, Shellac sands very nicely compared to polyurethane, and if I wetsand, it doesn't clog the sandpaper.
I sanded one of the leg assemblies for the second desk, and applied gel stain except for the bottom of the 2x6 and 2x4.
-
Den
- June 19, 2022
-
Den
I installed the filters in the under-desk rack cabinet with my pin nailer. This should keep them firmly in place.Using Loctite PL Premium MAX, I adhered the porcelain tiles to the top of the under-desk rack cabinet. They are very slightly recessed in the frame, which is exactly what I wanted. Just enough to keep screws from rolling off when I'm installing or uninstalling gear in the rack. All that remains in building this cabinet is the grout.
-
Den
- June 18, 2022
-
Den
I sanded the final filter for the under-desk rack cabinet, then applied gel stain.I lightly sanded the side filter frames with 400 grit and applied a coat of wipe-on polyurethane.
I went to Home Depot for a piece of 11/32" plywood to underlay the porcelain on the under-desk rack cabinet. I went to Menard's for more wipe-on polyurethane.
I cut the 11/32" plywood underlayment for the porcelain on the under-desk rack cabinet on the table saw. I then got out the tile saw and cut the porcelain tile piece (there are two tiles, one whole and one about 8.25"). I beveled the edge a bit after cutting. They fit well for my intended narrow grout lines (less than 1/8").
I sprayed a coat of dewaxed shellac on the final filter frame for the under-desk rack cabinet. I wiped on a second coat of polyurethane on the side filter frames. I'm approaching the finish line for the filter frames.
I marked the 11/32" underlayment for the top porcelain for screw placement. I drilled countersink pilot holes for all of the screws. I then brushed on Titebond III and screwed the 11/32" plywood in place. The total wood thickness of the top is now 1+27/32": 3/4" of oak, 3/4" of plywood and 11/32" of additional plywood. All this means is that it's stable enough to firmly attach the porcelain. I don't have room nor need for thinset, so I'll be using Loctite PL Premium MAX here. I'll need to mist it a bit to aid in curing, but it should work well here.
I finished the polyurethane on the final filter.
-
Den
- June 17, 2022
-
Den
I finished assembling the two side filters for the door of the under-desk rack cabinet. I put a coat of SealCoat on them, sanded them and stained them. In a few hours I'll spray a coat of dewaxed shellac on them and sand again so I can start applying wipe-on polyurethane.I had intended to order more stainless steel filtering cloth to complete the final filter. It's McMaster-Carr 9230T51. However, in the name of conserving materials, I'm making make the final filter frame a little differently. It's the top filter, and thinking about it, a center strut makes sense. It won't affect air flow and will provide more support. And it'll save me the shipping costs of more stainless steel filtering cloth.
I cut the oak pieces for this final filter, including the center strut. I glued the center strut in place with Gorilla Super Glue Gel. I let it cure for half an hour, then glued the rest. I then cut the stainless steel filtering cloth and galvanized mesh and installed them with a bead of hot glue. I sanded the assembled filter and applied a coat of SealCoat. It turned out so nicely that I'm considering using it as the bottom filter, since the top filter won't be visible.
The bottom filter has its final coat of polyurethane. The side filters are ready to be sanded and wiped with polyurethane.
-
Den
- June 16, 2022
-
Den
Work on the second desk...I stained the bottom of the desk top. After a couple of hours, I sprayed 2 thin coats of shellac over it. This is simply because I've had bad luck with the curing of the gel stain; even when I've waited 5 days, I've had it smear when wiping on wipe-on polyurethane. Of course, applying shellac so early should be a no-no, but I've done it many times with no ill consequences. It allows me to lightly sand with 400 grit sooner than later, and then start applying wipe-on polyurethane.
Of course I'm doing this on a part of the desk that will essentially never be seen unless I'm on the floor looking up at it. It's the bottom of the oak plywood. It doesn't really need much protection and doesn't need to look perfect. And it doesn't regardless of finish; it has exposed cabinet screw heads. I just want the color to roughly match the rest of the desk and for it to be sealed from swings in humidity.
I sanded the shellac and wiped on a coat of polyurethane.
I finally got around to working on the filters for the under-desk rack cabinet. I bought the stainless steel screen (does the actual filtering) and 1/4" square galvanized mesh (to prevent damage to the stainless steel screen) a long time ago, but hadn't gotten around to making the wood frames. I'm sort of doing this on the fly, though the base frames are in my SketchUp drawing. I finished building the filter for the bottom, and it turned out fairly nicely.
-
Den
- June 15, 2022
-
Den
Work on the second desk...I cut the trim of the oak covering the edges of the top plywood to be flush with the top frame, using a flush-cut bit in my router. I then ran a 3/16" roundover bit on all the edges and sanded the edges.
I cleaned up dust and shavings.
It's hot today, 104F is the heat index. But I put a sealing coat of SealCoat on the back of the top and sanded it with 400 grit. I also put a coat of SealCoat on the oak frame of the top and sanded it lightly with 150 grit.
I tested the fitment of the porcelain one last time. I think it's going to be fine. It will be recessed a bit, but I consider that a good thing. If I spill coffee on the top, it won't run off onto the floor. In fact that's been an annoyance with my current desk, since it has a big cutout in front of my keyboard for the rack spaces. With a tile floor it's not that big of a deal, but just the same, it's nice to have containment here.
I have three 9 oz. cartridges of Loctite PL Premium MAX adhesive. Henkel's data sheet says I should get about 28 linear feet of a 1/4" bead from each cartridge. That's a little over 5 passes end-to-end for the porcelain. With three cartridges, I should be able to get about 15 passes. That's a bead every 2 inches. I'd prefer a bead every inch. Not for adhesion, but for support. But at more than $11 per cartridge, it probably makes sense to consider alternatives. And I need to think about open time; while I have the correct caulk guns to dispense thick adhesives, they flow slowly by nature. The open time of Loctite PL Premium MAX is 20 minutes. I think it's unlikely that I could lay down thirty beads of 60" length and get the porcelain on top of it in under 20 minutes.
VHB tape is an option, but it's very expensive.
I'm starting to think I should use SikaBond Construction Adhesive. The working time is 2 hours, and I can use a notched trowel to spread it. It remains flexible, which is probably a good thing.
-
Den
- June 14, 2022
-
Den
Work on the second desk...I bought 1/8" hardboard from Home Depot to use as furring strips at the edges of the porcelain. I cut strips from it and glued them to the front and back edges of the 1/2" plywood support. This should alleviate the problem with the bowing of the plywood. I am assuming I can easily lay down beads of the adhesive that are thicker than the furring strips.
I put a sealing coat of shellac (SealCoat) on the border frame, just to help prevent staining it while I work on attaching it.
I aligned the border frame to the oak plywood, clamped it and drilled pilot holes into the border frame (through the pilot holes I had already drilled in the plywood). I brushed on a coat of Titebond III and placed the border frame, then installed alost all of the screws. This was difficult only because I was working from underneath and it's over 85F in the garage.
I cut and installed the solid oak pieces that cover the edges of the oak plywood. I used Titebond III and pin nails. Once the glue cures, I'll trim them flush with the frame using a flush cutting bit in my router, round them over and sand.
I'm still concerned about cracking the porcelain if I install it and then move the top. So the current plan is to wait until I'm ready to put the desks in the den before I install the porcelain and grout it.
The heat index is expected to be 105F tomorrow. I was hoping to do some tile work, but it's probably not wise. Instead I'll probably get the trim of the desktop routed (about 10 minutes of work) and stain some of the base.
-
Den
- June 13, 2022
-
Den
Work on the second desk...I glued the border pieces of the top to each other. There are four dowels in each joint. It's clamped up on my workbench.
Many hours later, I released the clamps and cleaned up the excess glue with a chisel and then the random orbital sander.
I drilled the pilot holes for the screws that will hold the border pieces of the top to the oak plywood. I then routed the edges of the border pieces with a 3/16" roundover bit and sanded them with the random orbital sander.
I need to deal with some bowing of the 1/2" plywood. I haven't decided how I want to do this yet. The simplest answer would be self-levelling compound, but the ones I've used are Portland cement based products, which will likely crack when I move the top (it's strong but doesn't meet the deflection requirements of a typical tile floor). I might try DAP Flexible floor patch and leveler from ACE Hardware. My other option is furring strips around the perimeter of the support, which is probably a better option given the reviews of the DAP stuff.
-
Den
- June 12, 2022
-
Den
Work on the second desk...I finished drilling the holes in the border pieces of the top. I will be using 5/16" dowels, 4 per joint. These are really just to keep the pieces flush with each other; they will all be screwed to the 3/4" oak plywood.
-
Den
- June 10, 2022
-
Den
Work on the second desk...I bought 5/4" × 6" and 5/4" × 4" oak boards at Menards for the top borders. The actual thickness is 1". This accomodates the thickness of the 1/2" plywood and the porcelain, with room for a layer of adhesive under the porcelain. It's also quite a bit stiffer than 3/4" thick boards, making the desk top stronger. Of course I don't need super strength, but preventing sag is a good thing. I also think it's more proportional to the beefy desk base.
I cut the boards to length, checked the fitment, then ripped them to width. Tonight I'll drill the 5/16" dowel holes and get them glued and clamped.
-
Den
- June 9, 2022
-
Den
Work on the second desk...I marked the location of all of the screws to hold the 1/2" BCX plywood to the 3/4" oak plywood top. I then drilled the slight countersinks in the 1/2" plywood with a 1/2" forstner bit. I'm be using #8 washer-head cabinet screws here,
I checked the fitment of the porcelain. It's good.
I glued and screwed the 1/2" plywood to the 3/4" oak plywood using Titebond III after checking the fitment and aligning it. I have about 150 pounds of weight on it at the moment to keep it flat while the glue dries. In a few hours I'll probably flip it over and start preparing for the threaded inserts to attach it to the base.
I added the dowel holes for the top trim to my SketchUp drawing and checked it in.
I flipped the top over on my bench and positioned the base parts on it. I then bolted the base parts together and positioned the base. I then marked the locations in the top for the threaded inserts and moved the base out of the way. I drilled 3/8" holes for the threaded inserts, installed the inserts, and then bolted the base to the top. The assembly is very strong.
I'm out of threaded inserts (only have one left) and 5/16-18 × 3" stainless steel bolts. I ordered more from McMaster-Carr in preparation for the other desk.
I miscalculated a little bit on the height of the plywood and porcelain. It's really close to 3/4" where I was hoping it'd be just shy of 3/4". I definitely don't want thinner plywood since I want the support provided by the current thickness. I could use 1" thick oak trim boards, which isn't a terrible idea; it would allow a real layer or mastic under the porcelain and provide additional strength. Menard's has them.
-
Den
- June 8, 2022
-
Den
Work on the second desk...I cut the 3/4" oak plywood and the 1/2" BCX plywood for the desk top. It started sprinkling as I finished, so I'm in a holding pattern. I need to buy the plywood for the top of the first desk, but don't want it to get wet.
I put a coat of SealCoat on the rear assembly.
I made a run to Home Depot and Menards for wood screws, a gallon of Titebond III, a cheap foam roller, some foam brushes and more cheese cloth. The screws, glue and foam applicators are for bonding the oak plywood to the BCX plywood.
I updated my SketchUp drawing to include the screw hole pattern to hold the two pieces of plywood together.
I haven't figured out what I'm going to use to bond the porcelain to the plywood. I could use mastic, or Loctite PL Premium MAX. I don't want any thickness here, since I need the top to stay at 1.5" total thickness and the porcelain is 6.5mm thick. Honestly, it doesn't really need any adhesive since the porcelain weighs 38 pounds. But if I ever want to take the desk apart and move the top, it'd be nice if I didn't need to move the porcelain piece separately with suction cups. On the other hand, I can't easily replace it if it's adhered strongly. I'm leaning toward mastic at the moment, though it'll take a long time to cure.
-
Den
- June 7, 2022
-
Den
Work on the second desk...I sanded the left leg assembly with 150 grit by hand. I sealed the large countersinks in the left leg assembly with shellac.
I sealed the right leg assembly with shellac (Zinsser SealCoat), cut slightly with denatured alcohol (3 parts SealCoat, 1 part alcohol).
I need more spray shellac to seal the stain once it's done. This is mostly because I'm impatient. In my experience building the new den furniture, I've found that I need to wait a week after applying the gel stain before I can apply wipe-on polyurethane, else I risk the gel stain being removed by the wipe-on polyurethane. Spraying a light coat of shellac atop the gel stain a day after applying the gel stain has prevented this problem and allowed me to work faster. I haven't seen any downsides; the pieces I finished last year look good as new.
Have I mentioned how much I love dewaxed shellac? :-) It's so useful for so many things. It dries really fast, it's a dream to sand, it doesn't yellow, and it is compatible with almost everything. It's not the most durable topcoat, but on the other hand it's easy to repair.
-
Den
- June 6, 2022
-
Den
Work on the second desk...I aligned the left leg assembly with the rear assembly and marked the location of the leaded bronze bushings. I then drilled the 7/8" shallow holes for the flanges and then the 5/8" holes for the bushings. I then installed the bushings in the leg assembly and the locating pins in the rear assembly.
I clamped the left leg assembly to the rear assembly and drilled the start of the holes for the bolts that go into the dowel nuts in the rear assembly. I then detached the left leg assembly from the rear assembly. Using a drill guide, I completed the holes in the rear assembly.
On the drill press, I drilled the holes for the dowel nuts. I then tested the fitment of the left leg assembly and rear assembly. It's good.
I repeated all of the above for the right leg assembly and right side of the rear assembly.
I plugged the pocket holes in the rear assembly and later sanded them flush.
I sealed the left leg assembly with shellac cut 50/50 with denatured alcohol. This is just to reduce blotching when staining. But it raises the grain a bit so I'll have to sand and seal again.
So... why does the base assembly take so long? It's the number of holes that have to be carefully drilled. For the rear asssembly, it was 33 holes in the 2x6, 38 holes in the 2x4, 46 dowel holes in the stiles and 12 pocket holes. That's 129 holes, 4 of which were 2-pass holes due to the large countersink. For the side leg assemblies, it's 63 holes each plus 20 pocket holes. So the total is 295 holes. And all require a clamped guide of some sort, or the drill press.
-
Den
- June 5, 2022
-
Den
Work on the second desk...I drilled the remaining holes for the rear panel of the second desk. 46 precisely placed holes for dowels (a slow process). I then assembled the rear panel. This one was more difficult than I remember for the first desk, but some of that is probably due to my bench being cluttered and hence having to do it in a vertical position with the bottom bridge in one of my woodworking vises.
I am essentially ready to line up this panel with the completed leg assemblies and mark the locations for the flanged bushings in the side assemblies.
I sanded down the pocket hole plugs in the leg assemblies.
-
Den
- June 4, 2022
-
Den
Work on the second desk...I finished drilling the holes in the stiles for the rear panel. 46 precisely placed holes for dowels, and 12 pocket holes.
-
Den
- May 31, 2022
-
HVAC
My air conditioning is not working. It got uncomfortably warm in the house last night as a result (heating up all day while I was out for holiday). The heat exchanger fan doesn't come on, nor does the compressor. I checked the 24V and the breakers.It looks like it's the contactor; the contact looks like it's toast. Coincidentally, Julie's A/C is out too (different problem, evaporator coils freezing up). Neither one of us had any luck getting someone to come out today (I guess it's that time of year). So I'm looking at finding a replacement contactor locally. They're not expensive but finding one that works without having to reterminate wires is proving difficult. Worth noting that my old one has set screw blocks on the input and ring/spade terminal screws and fast-on tabs on the output. It's a 40A single pole (shunt from L2 to T2, only L1 to T1 is switched). To my knowledge I don't need a single-pole; there's no neutral return even if something inside needed 120V round-the-clock.
I verified that the contactor was the problem by jumpering around it with 4-gauge wire. The compressor and the fan came on.
I could only find a suitable replacement contactor in stock locally at Menard's. There were two options, both with enclosed contacts (good), and both 2-pole. Both made by Eaton. Neither had the terminal configuration of my old contactor. One had set screw block terminals for input and output, the other had ring/spade terminals and fast-on tabs. I bought the one with ring/space terminals, and bought the correct size ring terminals to use for L1 and L2. It's the Eaton C25BNB240T-M. I crimped the ring terminals to the L1 and L2 wires and swapped in the new contactor. My air conditioning is working again.
-
HVAC
- March 13, 2022
-
Den
Work on the second desk...I cut the remaining pieces for the base of the second desk: the 2x4 and 2x6 for the rear assembly, the 1x2 pieces for the rear assembly, the 1x4 for the rear assembly and the 1x4s for the rear assembly that are ripped to 3" width.
-
Den
- March 12, 2022
-
Den
Work on the second desk...I cut the legs to length. I drilled the holes for the threaded inserts for the feet, then installed the threaded inserts and the feet. I then trimmed the edges of the feet flush with the faces of the legs using a flush cut router bit and a chisel.
I cut the 2x4, 2x6 and 1x2 pieces to make the sides. I will mark these and drill all the holes next, then route the edges before starting the glue-up.
-
Den
- February 19, 2022
-
Den
More work on the first desk...There are two coats of wipe-on polyurethane on the right piece of the desk base. I don't think it needs a third coat.
I put two coats of wipe-on polyurethane on the left piece of the desk base.
-
Den
- February 6, 2022
-
Den
More work on the first desk...I stained the back and left pieces of the desk base with gel stain. I then sprayed a coat of shellac on the back piece. The shellac is to give me a base I can sand smooth and to protect the stain from migrating when I apply the wipe-on polyurethane.
-
Den
- February 5, 2022
-
Den
More work on the first desk...The base assembly is done. I took apart the three pieces (left, right and back) and sealed them with SealCoat dewaxed shellac mixed 1:1 with denatured alcohol.
-
Den
- January 30, 2022
-
Basement
I buttoned up the furnace, it's been working fine since my repair yesterday.For kicks I opened up the old 50E47-70 controller, just to see if it used a relay for the MV output. Indeed it does. I suspect the relay failed. It's rated for 100,000 electrical cycles. At say 20 times per day, that's about 13 years of operation if the heat were used every day. Obviously the heat isn't used in the summer. But the furnace is more than 25 years old. Hence I'm not surprised that this relay finally gave up the ghost.
I'm inclined to replace this relay (and the others) and keep this board around as a spare. The PCB is trivial and all of the components are through-hole parts. Hence it's easy to work on. Unfortunately, I haven't been able to easily find a suitable replacement relay. Hence the old controller is going in the trash.
-
Basement
- January 29, 2022
-
Basement
I finally got my furnace working again. It was completely out for a day and was failing every night for several days, leaving the house between 50F and 55F in the morning and causing me to scramble to keep the house warm enough. Runs to the gas station for 10 gallons of kerosene per day, running the gas fireplace when I was home, etc. My initial troubleshooting seemed to point toward a limit switch problem, and I do still need a new one, but a cleaning and adjustment seemed to resolve things. But the furnace would work for a day and then fail in an incosistent manner. Sometimes the burner would not ignite at all. Other times it would ignite and then go out when the blower kicked on (and I'd see jumping movement on the limit switch before I cleaned it).So I had a second problem. I cleaned the flame sensor but it wasn't very dirty. Furnace worked again but failed overnight.
The last symptom was that the burner would never ignite. It seemed the gas valves were no longer being opened in the startup sequence (igniter -> burner gas -> blower). It turns out that this is the one thing that the old controller can't diagnose, hence no flashing LED fault code (except the steady one for lockout when it would fail to fire up the burners and observe flame via the flame sensor). I used my digial multimeter to measure the voltage at the valve coils and saw nothing. However, I didn't trust my observation because it's not easy to probe due to the location and position of the valve assembly. The same was true of the other end (the MV outputs on the old White-Rodgers 50E47-70 controller).
I wound up rigging some probing with small alligator clip leads and put my oscilloscope on the controller outputs for the thermostat (TH), the igniter (IGN) and the gas valves (MV non-common). The thermostat and igniter signals were correctly sequenced in time, but I still saw nothing on the MV output for the valves.
Next I decided to act at the controller in order to test the valves. I disconnected the valves from the MV output of the controller and attached them to an alligator clip lead. At the correct point in the ignition sequence, I clipped the other end to 24V (TH). The valves opened and the burners ignited. I left them for approximately 10 minutes with the thermostat set way above normal to keep the burners on. Everything worked fine. I repeated this process two more times, everything worked.
The local service places I called did not have a replacement controller in stock and said it would be several days to get the part. They also wanted a minimum of 800 dollars to replace it. The cost was secondary here; the time to repair was a big problem. I'm very busy at work, and we had multiple nights of low temperatures below 0F (it was -8F when I got up this morning). I don't have time for reduced sleep from runs to the gas station for kerosene and tending to things 24 hours a day. I needed it fixed now, not days from now. Amazon and Home Depot shipping would take days. Grainger said "limited availability" on their web page for all stores within driving distance, and they're all closed on the weekend.
I wound up finding the part in stock at a small HVAC supply store in Hamtramck. It's about a 50 minute drive from my home and they were open on Saturdays. I called to reserve the part, then drove to get it. A new White-Rodgers 50E47-843 "universal" controller to replace the old White-Rodgers 50E47-70 whose MV output had failed.
The 50E47-843 can be set to act the same as many of the old White-Rodgers controllers, via small PCB keys that plug into the side of the unit. It's a bit hokey (hope those bare PCB contacts don't corrode over time), but I understand the idea: one product instead of a slew of variants. However, their cross-references specify the blue PCB key when replacing a 50E47-70. The numbers don't match; the 50E47-70 has 2 ignition retries, while using the blue key with the 50E47-843 yields 0 retries. Further, the blue key causes the igniter warm-up to be 45 seconds. In the service records for my furnace from before I bought the house, the igniter was replaced twice. From observing the igniter, 45 seconds is much longer than necessary. It comes to full brightness/temperature in well under 10 seconds (more like 6 seconds, even with very cold intake air). I think the igniters have been burning out due to being run much longer than necessary at ignition. Hence I chose the orange PCB key for the 50E47-843, which sets it for 2 ignition retries and 17 seconds of igniter warm-up. So far, this works great and will yield 62 percent less wear and tear on the igniter.
The furnace is working great again. Summary: flame sensor cleaned, new filter installed, limit switch cleaned and adjusted, 50E47-70 controller with failed MV (burner gas valve) output replaced with a new 50E47-843 with orange key.
-
Basement
- January 23, 2022
-
Den
More work on the first desk...I drilled all of the 1/4" holes in the 1x2, 1x3 and 1x3.5 pieces for the rear. I marked and drilled all of the 1/4" holes in the 2x4 and 2x6 for the rear. That's 92 holes in total, which obviously took a while.
I drilled the pocket holes in the rear 1x3 pieces and 1x3.5 piece for the rear, a total of 12 holes.
I installed the locating pins in the rear 2x4 and the leaded bronze bushings in the rear legs. I then drilled the holes in the 2x4 for the dowel nut bolts and the holes for the dowel nuts. The 2x4 fits well to the rear legs.
I installed the 1x3 pieces on the 2x4 with 1/4" dowels and Titebond III, then the pocket hole screws.
-
Den
- January 22, 2022
-
Den
More work on the first desk...I marked and drilled the six 1.5" diameter holes in the rear 2x4 with a new 1.5" Forstner bit. Since these are intended as potential cable pass-through holes, I also rounded the edges of the holes and sanded them to help prevent cable snags from chipping the wood.
I drilled the four 7/8" countersink holes in the rear 2x4, then the concentric 5/16" through-holes.
I drilled the 1/2" holes in the rear 2x4 for the guide pins.
-
Den
- January 16, 2022
-
Den
More work on the first desk...I aligned the right rear leg to the right side structure, and used dowel centers to mark for 1/2" and 1/4" dowel holes. I then drilled the dowel holes in the rear leg and routed the edges of the leg on the router table.
I attached the right rear leg to the right side structure with dowels and Titebond II, then clamped in place and installed the pocket hole screws.
I aligned the right front leg to the right side structure, and used dowel centers to mark for 1/2" and 1/4quot; dowel holes. I then drilled the dowel holes in the front leg and routed the edges of the leg on the router table.
I attached the right front leg to the right side structure with dowels and Titebond II, then clamped in place and installed the pocket hole screws.
I tweaked the SketchUp drawing to make the dowel nuts holes go all the way through the rear 2x4 and 2x6. If I don't do this and they get into a bad position, it could be difficult to reposition them. With the holes all the way through, I can drive them out easily with a punch or dowel.
I also removed the large notches in the back 2x4 and am now using 1.5" diameter holes. It doesn't look as nice, but it's stronger and at the moment I don't have plans for any cables that need to run through there. At some point I'll possibly have a headphone and microphone jack on the underside of the desk that will use one of these holes.
-
Den
- January 15, 2022
-
Den
More work on the first desk...I drilled the 7/8" diameter, 1" deep countersink and 5/16" diameter through-holes in the top right 2x4.
I drilled the 1/2" dowel holes in the top right 2x4.
I drilled the 1/2" dowel holes in the bottom right 2x6.
I drilled the 1/4" dowel holes in the right side 1x2 pieces.
I drilled the 1/4" dowel holes in the right side 1x3 pieces.
I routed the edges of the right side 2x4 and 2x6.
I marked the right side 1x3 pieces for pocket holes, and drilled the holes.
I routed the edges of the right side 1x3 and 1x2 pieces.
I marked the right side 2x4 and 2x6 for pocket holes.
I marked and drilled the 1/4" dowel holes in the right side 2x4.
I marked and drilled the 1/4" dowel holes in the right side 2x6.
I drilled the 1" diameter 1" deep contersinks and 3/8" through holes in the right rear leg.
I drilled the six pocket holes in the right side 2x4.
I drilled the eight pocket holes in the right side 2x6.
I glued and clamped the 1x2 pieces to the 2x4 and 3x6 with 1.5" long 1/4" diameter spiral cut dowels. The 1x3 pieces are in the clamp-up to keep everything where it should be, but not fastened since I need them to be loose for now.
I ordered 1/2" steel guide pins (McMaster-Carr 31445A114) and leaded bronze bushings (McMaster-Carr 7815K31) for the rear panel. I'll only be using 2 on each end. They're just additional support and alignment aids, while allowing me to still take the desk apart into 4 pieces. They're in my new SketchUp drawing.
Final pieces for the under-desk rack...
I added an input air filter design. Just something simple, made of wood. A 1/4" thick frame with the stainless steel cloth protected by 1/4" square mesh. To execute it, I need a new hot glue gun to glue the 1/4" mesh and the stainless steel cloth into the frame.
-
Den
- January 9, 2022
-
Den
Work on the first desk...I drilled the holes in the left side 2x4. A pair of 7/8" diameter 1" deep countersinks and 5/16" through holes that will be used to fasten the top, the 1/2" diameter 1" deep dowel holes on the ends, the 1/4" diameter 3/4" deep dowel holes for the thin stiles and the pocket holes to secure it to the 4x4 legs. I also routed the edges that will be exposed, with a 3/16" roundover bit.
I drilled the pocket holes in the left side 2x6.
More dowel centers arrived from Amazon, which I used to mark the left rear 4x4 leg for the 2x4 dowel holes, and drilled those holes.
I glued and clamped part of the left side together: the 2x4, 2x6 and the 1x2 pieces. It didn't go together as easily as I expected, probably because this is the first time I've used the spiral dowels; while it's nice that they're likely much harder to pull out than fluted dowels, it also means they're more difficult to get fully seated. At any rate, having this part done will allow me to then mark and drill the remaining dowel holes in the left side legs.
I routed the edges of the rear left leg with a 3/16" roundover bit and then sanded it just to knock down the grain a bit.
I also received 1/2" x 2" and 3/8" x 1.5" fluted hardwood dowels. I am still waiting for 1/4" x 1.5" fluted dowels, but I have spiral dowels to use for now.
-
Den
- January 8, 2022
-
Den
Work on the first desk...I drilled the 1" diameter 1" deep countersink holes in one of the rear legs and the concentric through holes for the bolts that will hold the rear rails to the rear legs via dowel nuts.
I started changing my SketchUp drawing a bit. I didn't like the spacing of the dowels at the end of the vertical 1x2 pieces, I moved them outward by 1/8". This provides better torsional support, and doesn't really compromise the strength (there is 1/4" of wood on each side of each dowel).
I'm considering replacing the dowels that connect the rear to the rear legs. Since the whole idea here is to be able to break down the base by disconnecting the rear from the sides, it'd be smarter to use guide pins and flanged bushings, much like I did for the door on the under-desk cabinet. McMaster-Carr 31445A113 locating pin and 9440T18 flanged sleeve bearing is as big as I can center and cut cleanly (brad point bit and dowel jig).
I cut the pieces I need for each side: a 2x6, a 2x4, a pair of 1x3 and three 1x2. I marked all of these pieces for dowel holes. Note that the markings on the 2x6 and 2x4 are only for guidance; the real marking will happen with dowel centers.
I drilled the 1/4" dowel holes in the ends of the 1x2 pieces. I also drilled the 1/4" holes in the sides of a pair of 1x3s, and drilled the 1/2" holes in the ends of a side 2x6. The latter doesn't match my drawing where I had 3/8" dowels; I'll correct the drawing.
I marked up the left side 2x4 for dowel holes and the through holes that will be used when attaching the top. This piece and its corresponding piece on the right side are kinda riddled with holes, but there's more than enough material left to be very strong.
-
Den
- January 5, 2022
-
Den
Work on the first desk...I installed the acetal feet I created on the oak 4x4 legs I cut to length weeks ago. I decided that I only needed two threaded inserts per leg for the feet. The feet themselves are very strong and rigid (since they're 1" thick), and the inserts in the legs are way stronger than I'll ever need. While the inserts specify 15/32" holes for hardwood, I found that 31/64" was better for this usage. A lot of this has to do with the fact that they're going into end grain. It took a decent amount of oomph to get them installed, and they are definitely never going to be a problem. These legs and feet will far outlive me.
-
Den
- January 3, 2022
-
Den
More work on the under-desk rack cabinet...I wiped on the final coat of polyurethane on the door.
I cut and installed the UHMW bottom. Easy peasy, it fits nicely. It's fastened only front and rear, with countersunk #6 screws. The front screws are behind the front of the rack rail faces, meaning they'll be hidden by whatever is in the bottom of the cabinet (for now, my UPS).
I installed the rack rails. I put them at the same distance from the edge as my existing Middle Atlantic MDV-R12, so everything will transfer without complication.
-
Den
- January 2, 2022
-
Den
More work on the under-desk rack cabinet... I installed the first draw latch on the door and cabinet, though it'll come off shortly in order to continue cabinet finishing. Sadly but not unexpectedly, the first brass screw broke off with almost no torque at all. I made an attempt to remove it, but in the end it was easier to just remove part of it and then move the draw latch to cover the hole. I used steel #8 screws instead of the #10 brass. They are much stronger, and recessed. I like the look of brass screws and may eventually use them, but for now I am OK with the steel screws. I'll order some 316 stainless screws too.Both draw latches mounted, they work really nicely.
I sanded the inside of the cabinet with 220 grit, then applied a coat of wipe-on polyurethane. The inside of the cabinet won't be visible, but I still want it relatively smooth and I want the wood sealed up. The bottom is getting a piece of UHMW since I want the UPS on a slippery surface (no rack rails), but the wood still needs to be sealed. I'll be applying a second coat tonight.
I put the first coat of polyurethane on the top frame. This was mostly just to protect it a bit while I work on the rest of the cabinet.
I sanded the inside of the cabinet with 220 grit, then wiped it clean. I then applied a second coat of polyurethane. This means that I can install the rack rails early this week, though I'd like to wait for the UHMW bottom. My experience with UHMW says that if I want to glue it in place, I should use 3M 90 or 77 spray as the reasonably priced adhesive. They're messy to apply, I'd rather have an empty cabinet interior (masked off) when I do it.
I put another coat of wipe-on polyurethane on the top frame and most of the outside of the door. Another coat on the outside and I'll be able to install the window.
I put dewaxed shellac on the window quarter-round, sanded it, then put a coat of polyurethane on it. It's unlikely that I'll put another coat on it; I just need it to be reasonably sealed, it's not a cosmetic item. I'll be using my pin nailer to pin it in place to hold the window.
I'm still thinking about intake air filtering. I have stainless steel cloth on the way, but I'm pretty sure it's quite fragile. I'd like to use it, mostly to keep out pet hair and big dust bunnies. I don't want a lot of restriction, since the equipment fans aren't designed for static pressure and there will be negative pressure at the front of the cabinet. The door, while a very good fit, isn't sealed. So there's only so much that's worth doing here, and the cosmetics are important since the door will be the most visible part. I'm thinking I can make some wood frames to hold the stainless steel cloth inside the door with magnets, possibly with a stronger wire grid to protect the stainless steel cloth. McMaster-Carr 92725T4?
-
Den
- January 1, 2022
-
Den
More work on the under-desk rack cabinet...I bought three 12 oz. cans of spray shellac at Home Depot, since I used the last of my supply yesterday on the door. I also bought 3/4" long #10 brass screws for the draw latches for the door.
I lightly sanded the door and put a coat of wipe-on polyurethane on the inside and 3 of the 4 sides of the outside (all but the hinge side). I also put a coat on the left side of the cabinet. I'm trying to get to the point where I can mount the door again and drill the holes for the draw latches.
-
Den
- December 31, 2021
-
Den
More work on the under-desk rack cabinet...I put a coat of dewaxed shellac on the inside of the cabinet. I also put a coat on the cove moulding and edge of the top that I sanded yesterday.
I sanded the whole door with 220 grit, by hand. I double checked the fitment of the door on the cabinet, it's good to go.
I put a coat of gel stain on the inside of the door, then three of the outer sides.
I put a coat of gel stain on the cabinet, inside and out.
I applied gel stain to the remaining side of the door.
I sprayed a light coat of shellac on the inside and outside of the cabinet, let it dry, then brought the cabinet indoors.
I put a thin coat of shellac on the door, let it dry, then brought it indoors..
-
Den
- December 30, 2021
-
Den
More den furniture work...I ordered a drill guide from McMaster-Carr (9550T16) to assist in drilling the 15/32" holes in the desk legs for threaded inserts. I also ordered the UHMW for the bottom of the under-desk rack cabinet (4296A48), brass screws for the draw latches (92114A244), 316 stainless steel wire cloth to possibly cover the ventilation holes in the door (keep out pet hair), and some ring-grip quick release pins (98404A103 and 92342A404) for the draw latches.
I put the under-desk rack cabinet upside down on the bench and trimmed and sanded the pocket hole plugs in the inside of the top.
While I had the cabinet upside down, I sanded the pencil marks from the ACX plywood overhang. I also sanded one side of the ACX flush with the oak side panel.
I stained the bottom of the cabinet, though it will not be visible. I then stained the edges of the top ACX plywood and the underside of the ACX overhang, using painter's tape to protect other areas. These will not be visible either, but I wanted to further seal them up. I sprayed a light coat of shellac over these areas after staining, mostly just to allow me to handle the cabinet without mucking up the stain. I then removed the painter's tape.
I need to give the stain and shellac a little bit of time to dry, and will then cut and install the cove moulding to conceal the edge of the top ACX plywood.
The cabinet is getting heavy enough that I need to consider the order of execution from here on out, to avoid dinging it.
I cut and installed the cove moulding. I then trimmed and sanded it flush with the edge of the oak top.
I trimmed and sanded the pocket hole plugs in the bottom of the inside of the cabinet. I need to find a better way to cut off pocket hole plugs. The oscillating tool is risky while my pull saws aren't flush-cut (have teeth on both sides). What I really want is two double-sided flush cut saws. One fine tooth, one larger tooth.
I cut the polycarbonate for the window of the front door, using a new 80-tooth blade for plastic on the table saw. It cut nicely, as expected (it's much easier to cut on a table saw than acrylic). I test the fitment in the door, it's perfect.
-
Den
- December 29, 2021
-
Den
I finished sealing the door of the under-desk rack cabinet. I also glued the pocket hole plugs in the top of the inside of the cabinet. The brass draw latches arrived for the door, and they're beautiful. Thanks to my friend Matthew Meyer for the nautical suggestion.Sidetracked a bit... I installed a new seat on my 1996 Herman Miller Aeron chair. I also replaced the arm bolts with stronger bolts and serrated Bellevile washers from McMaster-Carr. Should be good for another 25 years. It still needs a new back, but wow... it's so nice to be able to get parts to refresh a chair I've been using daily for 25 years!
-
Den
- December 28, 2021
-
Den
More work on the under-desk rack cabinet...I removed the face frame from the door, then reassembled with Titebond II glue and the pocket hole screws. I then sanded three of the face frame edges flush with the top, bottom and right side. I need to remove the hinges and sand the left side.
I glued all of the pocket hole plugs in the inside of the door. I am out of oak plugs, so I used maple. I also glued all of the pocket hole plugs in the bottom of the cabinet, again using maple. Sadly, my local big box stores don't have anything but the paint grade plugs in stock right now. However, it's OK to use them inside the top of the cabinet; they won't ever be visible.
I bought some 3/4" oak cove moulding at Menard's, to cover the edge of the top ACX plywood. I only bought enough to do the sides and the front, since I intend to just put a flat piece of oak on the back. I also bought a piece of plywood as the underlayment for the porecelain tile inset, some premixed grout, some sandpaper and some 1/2" dowels. I may or may not use the dowels for joining the desk base parts, but I also needed some to help me sand the holes in the door.
I trimmed and sanded the pocket hole plugs on the door. I removed the hinges and did a bit of sanding in the side holes with a 1/2" dowel and sandpaper, 60 grit paper. This was to remove tooling marks, but I am leaving a bit of the router burn marks. I think of it as a reminder that it's hard for me to get a good feed rate across end grain in such a small space, and that I should buy a spindle sander before I do something like this again.
I sanded the left side of the door face frame flush with the left side of the door. It is ready for finer sanding.
-
Den
- December 27, 2021
-
Den
More work on the under-desk rack cabinet...The skirt is now installed on the base. I used Loctite PL here, simply because it expands to fill gaps (useful when gluing to the edge of plywood). I clamped everything in place and then drove the screws in the hidden support pieces. Once the Loctite PL cures, the skirt will be very strong.
I marked and drilled holes in the top ACX plywood to drive screws into the top of the oak box. Just the countersink area for now (with Forstner), and two full-depth holes. I lined up the top on the oak box and clamped it iun place, then drove two screws at opposite corners to mark the alignment.
I then removed the top, applied many beads of Titebond glue, then put the top back on and sunk the two alignment screws. I then drilled the pilot holes for the remaining screws in the top, and drove those screws. Finally I installed all of the pocket hole screws that hold the top to the sides of the oak box.
As is, this cabinet is very strong. And it rolls easily, for now (it's empty). It should work well. Still a long way to go, but making progress.
-
Den
- December 24, 2021
-
Den
More work on the under-desk rack cabinet...I lightly sanded the bottom of the ACX plywood base and sealed it with two coats of dewaxed shellac.
I sanded the outside of the oak box and applied one coat of dewaxed shellac. This is just to prevent me from staining it while I continue working.
Belleville washers (McMaster-Carr 90127A115) and 316 stainless 5/16"-18 x7/8" hex head bolts (McMaster-Carr 93190A582) arrived for the casters. Brass-plated draw latches (McMaster-Carr 1766A3) for the door also arrived. I'm still waiting for the screws for the draw latches.
I installed the casters in the base. I had to slightly modify the front right one: I made the two front holes 1/32" larger. This was due to slightly missing the mark when installing one of the threaded inserts in the ACX plywood. The other three fit perfectly without modification.
I started working on the skirt. The pieces are mitered, routed, and ripped to width. The fitment looks OK. I installed some of the inside supports just to help me with fitment checking. I glued these pieces together, with corner block supports in place.
I always have trouble making these skirts since they are only attached at the edge. I should find a better way to build them. It doesn't help that my miter saw isn't all that accurate at 45 degrees. The table saw is, but it's much less convenient and I don't have an accurate cross cut guide for it. If I didn't want the weight of the cabinet to sit on top of the ACX edge-to-edge, this would all be easier; I'd extend the side panels to serve as the skirt, and just put a panel in the front. Adding a skirt for decoaration would then have some support. The only downside is that the casters would be more inward, but that's not a problem for this rack; the far and away heaviest item (the UPS) will be in the bottom, hence it'll have a very low center of gravity.
-
Den
- December 23, 2021
-
Den
More work on the under-desk rack cabinet...I cut the ACX plywood for the top support. It fits well.
I ordered more McMaster-Carr 93190A582 7/8" long 5/16"-18 316 stainless steel hex head bolts for the casters. For now I am using the ones intended for the second rolling drawer cabinet. I also ordered McMaster-Carr 90127A115 serrated steel lock washers for the caster bolts. Finally, I ordered new draw latches (McMaster-Carr 1766A3), which are the same as the original ones I bought which were nickel plated. With the hinge descision, I now want brass plating.
I cut the top oak frame pieces and glued them together. I gave up on the dowels after breaking one. I don't need them; the frame is now attached to the top piece of ACX plywood with 22 screws.
I sanded the top frame, and softened its edges with the sander. It looks nice. I then added a coat of dewaxed shellac to seal it.
I added dimensions of the screw holes to attach the top to the oak box to my SketchUp drawing.
I attached the base ACX plywood to the oak box. I trimmed the edges of the ACX flush with the oak box sides using a flush cutter in my router.
I did a little bit of sanding on the oak box, just to soften the edges and remove pencil marks. I haven't finished sanding here, but I'm getting tired and I have the box clamped in position while waiting for glue to cure.
-
Den
- December 22, 2021
-
Den
The threaded inserts for the desk legs arrived, as well as the guide bearing for the door of the under-desk rack.I drilled the pocket holes in the sides, top and bottom oak panels of the under-desk rack.
I assembled the oak sides, top and bottom of the under-desk rack, without glue yet. I refit the door temporarily, in order to mark the location for the guide bearing. I then drilled the shallow 1/2" diameter hole for the guide bearing flange and then the 3/8" diameter hole for the body of the guide bearing. Both holes were drilled using the Rockler dowel jig and brad point bits with stop collars. I then installed the guide bearing with a bit of contact cement.
I installed the guide pin in the door and checked the alignment. It's perfect.
I placed the oak box on 2' x 2' ACX plywood, drew cut lines on the ACX plywood and thencut the ACX plywood on table saw. I then checked the fitment, it's perfect. Before I move the table saw fence, I'll cut the ACX plywood for the top support.
I marked the location of holes in bottom ACX support for threaded inserts for caster bolts. I double checked that the casters will clear the skirt.
I drilled the 7/16" holes for McMaster-Carr 92105A023 threaded inserts. I then used those holes as guides to mark the center for shallow holes in the bottom of the oak box. I drilled the shallow holes (about 1/4" deep) in the bottom of the oak box with a 1/2" Forstner bit. These holes just allow clearance for the threaded inserts (which are a bit longer than the thickness of the ACX plywood, which is .705") and the caster bolts.
I installed the McMaster-Carr 92105A023 threaded inserts (16 of them) in the bottom of the ACX plywood for the caster bolts. I then tested the fitment of the ACX to the oak box, it's all good.
-
Den
- December 19, 2021
-
Den
I've started building the under-desk rack. I finished fabricating the wood parts for the door, including the chiseling for the twin pin hinges and the hole for the guide pin. The front stiles and rails are also done. I'll glue and screw it together this week.I think I'm basically done with the design of the desks. They will be a lot of work to make, but it'll be worth it. I did the basic work for the feet of the desks this weekend (1" thick black Delrin); they've been cut and drilled with countersinks for the bolts that will go into threaded inserts in the legs. I want Delrin here simply because it'll make it easy to slide the desks on the porcelain floor.
-
Den
- November 15, 2021
-
Den
I ordered rack rails and screws for the second rolling drawer cabinet and the UPS/switches underdesk rack.
-
Den
- November 14, 2021
-
Den
I stained the second bookcase, except for the bottom.I bought some of the wood to make the cabinet with rack rails for UPS, ethernet switches, power conditioning and patch panels. I haven't finalized the design yet, but it'll be on concealed casters much like the first rolling drawer cabinet.
-
Den
- November 10, 2021
-
Den
I finished the assembly of the second bookcase. Next up is sanding and finishing.
-
Den
- November 7, 2021
-
Den
I continued working on the second bookcase. Shelf holes drilled, pocket holes drilled, and two halves assembled individually. I also cut the back piece to width. Some evening this week, I'll finish the assembly.
-
Den
- November 6, 2021
-
Den
The remaining 2 recessed LED fixtures arrived. I installed them.
-
Den
- October 31, 2021
-
Den
I haven't finished the floor yet, but I'm about 3/4 of the way done with laying the tile.I've long been tired of working with poor lighting in this room. There were two 6" cans in the ceiling, both very close to the same wall (where the built-in shelves are located). I decided I wanted more recessed lights long ago. Today I cut the holes in the ceiling for them, and... found an empty 6" light can rolling around on top of the drywall with snipped-off conduit. Sigh. I suspect I'll find a second one in the joist cavity for the other existing light. So my assumption is still valid that whoever did the lighting in this room didn't know the basic rules of recesed lighting (can spacing should be equivalent to one half the height of the ceiling), but at least someone had planned for more lighting. I'm guessing the electrician didn't finish and they drywallers ripped the unwired cans out and stuffed them in the ceiling. Losers.
I am installing 8 modern LED fixtures designed to fit into the same holes as a 6" can. They have a nice built-in nightlight feature that has a glowing ring at 2000K color temperature. Their main lamps are color temperature adjustable and 900 lumens max each. I have 4 of them wired and installed. They don't require a can since they don't get very hot. They're a bit of a pain to install, only because the driver boxes have almost no room to work in (and the already-attached connectors only have 2 positions so you can't use them alone to run lights in parallel). No chance of fitting 6 wire nuts in the driver box. It turns out that these connectors aren't very secure anyway; I have been able to remove them from the wires by just twisting and pulling, with no damage to the wires. So I'm just replacing them with wire nuts and dealing with the fact that I have to be fairly exact about how much solid wire I can fit in the box.
Getting the 2 old cans out of the ceiling through the 6" holes wasn't easy but I managed. I installed a junction box to split the two rows, and am using 14/2 Romex.
In the process I forgot to double-check that I had turned off the correct breaker, and sure I enough I shorted hot to ground when removing one of the old canisters. It tripped the breaker, but unfortunately it also killed the triac in my existing Lutron Maestro dimmer. I didn't intend to use this dimmer long-term, but I didn't want to destroy it. Oh well, it was time for a Lutron Caseta with Pico remote anyway. Due to the layout of this room (French doors that swing into the room), the dimmer for it is in the foyer. Not very convenient when you're in the room. The Caseta with remote solves this problem. It's now installed.
I intend to install a Lutron Smart Bridge Pro and some more Caseta switches where it makes sense. And I might replace some more of the existing recessed lighting with ones with a nightlight feature. The second floor hallway, for example. And I might put a couple of 4" versions in the underside of the second floor overhang.
-
Den
- July 12, 2021
-
Den
I've been very lax with updates...I long ago put Schluter Ditra on the floor, and taped and mudded the seams. I'm in the process of putting porcelain tile on the floor. It's going slowly for a number of reasons: I'm down a thumb for now, I'm using large-format tiles, and I'm back-buttering every tile. But I'm somewhere between 1/3 and 1/2 of the way done laying the tile. Which means I need to make a grout color decision soon.
-
Den
- April 18, 2021
-
Second floor hallway
I patched and spot-primed the walls of the second floor hallway and the stairwell. Lots of dings and gouges from the previous owners. I used Kilz Original for the primer.I removed the cold air return grille in the second floor hallway in order to put some flat black latex paint on the drywall and studs behind it. The Victorian style grilles don't hide the area behind them. I did the same in Bedroom 2, and it worked well.
I ordered Victorian cold air return grilles from Home Depot to replace the one in the second floor hallway, Bedroom 1, the master bedroom, the one above the thermostat and the one on the north family room wall.
I ordered 8 more acanthus appliques for second floor doorway header trim.
-
Second floor hallway
- January 1, 2019
-
Den
I spent some time sanding some of the areas of the floor with my belt sander. I'm probably not done patching and levelling, but I'm getting there.I recreated parts of the expansion joint at the east wall of the room that had been contaminated with Henry 555. I again just used GreatStuff Gaps & Cracks. The objective here was just to prevent thinset from going all the way to the wall when I put down the Ditra.
-
Den
- December 31, 2018
-
Den
I chipped out the remaining parts of the GreatStuff that had been contaminated with Henry 555 at the perimeter expansion joint.I sanded and ground a little bit more of the floor levelling and patching.
I went to Home Depot and picked up some sanding belts for my belt sander, a dozen 1/4 sheet sandpaper pieces for my palm sanders, sill seal foam for perimeter expansion joint, 3 fresh bags of VersaBond thinset, and 3 rolls of Kerdi Band. While I technically don't need the floor to be waterproof (not a wet room), I like the idea of sealing the joints of the Ditra before tiling. We'll see if I bought enough; I probably need one more roll, but at $20/roll, I don't want to buy more than I need.
-
Den
- December 29, 2018
-
Den
Well, I applied too much Henry 555 and didn't spread it around enough. I had a feeling this might be a problem, and Henry unfortunately doesn't provide mix ratios other than mixing the whole bag. And it covered more than quoted in the instructions. So I spent some time today with a diamond cup wheel on the angle grinder, removing some of it. Dirty, dusty job, especially this time of year when I would not normally open a window and place an exhaust fan. But I had no choice, so it was cold in the room for a while. I opened the front door of the house for air intake and put my double industrial fan at the window to blow the dust outside. Obviously I wore a good respirator. I'm not done grinding, but I had to clean up before dinner. I used my electric leaf blower to coax the remaining dust toward the exhaust fan, which worked well.I chiseled out the small areas where the leveler flowed over the top of my original foam expansion gap. I will probably pick up some SilSeal foam before I do the thinset for the Ditra.
-
Den
- December 28, 2018
-
Den
I applied a coat of Henry 555 Primer to the area of the floor I need to flatten more effectively than I can do with Henry 549. I applied a second coat a few hours later since the plywood was very dry when I started (it's the winter and I have forced-air heat). When it dried, I poured and spread Henry 555 LevelPro.
-
Den
- December 23, 2018
-
Den
I applied 3 more coats of Henry 549 to the low area of the floor. I'm now using much smaller batches, 6 to 8 cups of Henry 549 at a time. I'm also mixing by hand with a margin trowel to avoid air bubbles, and using a 6:3.5 compound to water ratio instead of the recommended 2:1 ratio. This makes it more workable, and should not significantly compromise the strength. I've noticed no difference in hardness once cured.I'm glad I bought a new 14" concrete finishing trowel; I could probably use a longer one, but it's a good length for what I need to do with the other areas of the floor. I am not using the new Ridgid mixer for the Henry 549 now since I'm mixing in small batches in a 2 gallon bucket. But the mixer will be used again when I get to the thinset for the Ditra.
-
Den
- December 22, 2018
-
Den
The largest area of the floor I need to flatten is marked with masking tape. I also marked a few other spots I need to skim, if I have material left over from my first mix.I ran a bead of GreatStuff Gaps and Cracks around the perimeter of the room, just to maintain an expansion gap when patching and later thinset and Ditra. Once it cured, I trimmed it where it was too thick.
I applied the first coat of Henry 549 in the largest area. I used the whole 7 lb. box but will need to apply more. It's not much fun to work with due to a short setting time, but I think I did well given I haven't used suich a product in over 10 years.
-
Den
- December 21, 2018
-
Den
I've been debating whether or not the floor needs SLC (self-levelling compound). Actually, it could use it since there are low spots in a couple of places. However, I can't seem to find Henry 542 or equivalent locally. Everything available requires metal lath when poured over plywood. Lath is 1/8" thick, and I'd need to pour 1/8" minimum thickness over the height of the lath. That's a bit more height and weight than I'd like to add to the floor. Additionally, it's nearly impossible to apply SLC to a floor this size when working alone.So for the moment I'm back to using the Henry 549. I think I'll be OK going this route. It's not like I haven't flattened a floor before (did mortar tile beds with my father). And mistakes here are easier to correct than SLC gone wrong. I need to mark up the floor using my straight edges.
-
Den
- December 20, 2018
-
Den
I sanded the whole floor lightly with 80-grit sandpaper on my 1/4 sheet palm sander. I then swept and vacuumed.
-
Den
- December 18, 2018
-
Den
I scraped some of the joint compound from the subfloor, and added a few screws in the subfloor where needed. I'll be adding some more screws later.I picked up some supplies and tools at Home Depot:
- 3.5 mil 10' x 25' plastic sheeting (to protect shelving from dust)
- 3' x 168' red rosin paper (to protect floors)
- Ridgid mixer (to mix thinset, etc. without burning out my drill)
- 3M blue masking tape (to protect walls from thinset)
- 200 more Ridgid LevelMax tops (tile levelling system)
- Ridgid 1/2" x 1/2" square notch gold finish trowel
- Henry 549 7 lb. FeatherFinish (to patch/skim/level subfloor)
- 16" magnesium float (for subfloor skimming and pressing Ditra)
- 80 grit sandpaper (for sanding subfloor with 1/4-sheet palm sander)
-
Den
- December 17, 2018
-
Den
I removed the remaining carpet, padding, tack strips and staples.
-
Den
- December 16, 2018
-
Den
I started removing the carpet, padding, tack strips and staples from the floor. I still need to remove a few things from the room, but I wanted to get a sense of the state of the subfloor and how many staples were in the carpet padding. Nowhere near as many staples as the 2nd floor bedrooms, which explains why the carpet felt softer. I've removed 1/3 of the carpet and padding and found no staples in the field (only at the edges). Yay, less work!
-
Den
- December 15, 2018
-
Den
I ordered 5 SpectraLock Pro mini units of parts A and B from floorlife.com, along with a Laticrete grout color chart. I'll order the powder after deciding on color.I picked up a 1/4"x3/16" V-notch trowel at Home Depot to install the Ditra to the floor.
I moved the final Middle Atlantic MDV-R12 out of the den. It was the final piece of furniture that needed to be removed.
-
Den
- December 12, 2018
-
Den
Many months later, I'm nearly done reinforcing the floor joists under the den. I wound up doing somewhat of a patchwork due to obstacles: ductwork and electrical. Each joist now has a custom-made flitch beam of 1/8" x 2" steel and 1.75" x 3" LVL, 6' long. I cut a channel for the steel in the LVL, and the steel is sandwiched between the LVL and the existing joists with Loctite PL Premium and screws. It took a long time to do these because each one had to be cut, channeled and drilled. They are installed at the top of each joist, against the subfloor plywood, near the center of each span.I then custom cut 2x10 lumber to sister the remainder of the accessible parts of each joist, and installed with screws and Loctite PL Premium where possible. Some areas were difficult to reach due to ductwork.
To make the most of this work, I then created custom X-braces for each inter-joist gap from 1.75" thick LVL. These will prevent the joists from twisting. I removed the old 1X crossbraces before I sistered the joists, since they were in the way. They've been replaced with the much stronger and stiffer LVL X-braces, and I added a second row of LVL X-braces.
I have one or two flitch beams and sisters to do, though as near as I can tell with my bounce tests, they're not necessary. But I bought the wood and steel, I might as well use it. My bounce tests are just me bouncing on the floor with a floor lamp loctated elsewhere in the room. Before I started this work, the lamp would wobble a LOT. Now it doesn't appear to wobble at all. I have yet to redo my dial indicator measurements, but I don't think it's necessary. I can't do any more reinforcement of the joists, I'd need a support beam and floor jacks to make it any stifer. I'm avoiding that for now since I am not at the point where I can start designing basement finishing.
-
Den
- June 30, 2018
-
Den
I bought a pair of 1.75" x 11.875" x 10' 1.9E LVL beams at Menards to reinforce the floor joists under the den. This is to reduce deflection to avoid any issues with cracking of tiles or grout after I install the tile. Given the electrical throughways and cross bracing that I don't want to remove or rerun, I don't intend to fully sister the joists; I will rip narrower pieces of LVL to run above and/or below the throughways.I bought 5 bags of Mapei Uncoupling Membrane Mortar (thinset) at Lowe's. This is an unmodified thinset, which is what I need for use over Schluter Ditra.
-
Den
- June 23, 2018
-
Den
I bought the Marazzi Montagna Wood Vintage Chic 6" x 24" porcelain tiles from Home Depot, along with 2 bags of CBP Versabond modified thinset to bond the Ditra to the subfloor. I also bought a new tile saw blade and a thinset mixing paddle.I tweaked my back and right bicep moving all of this weight (over 1000 pounds) from the store to my truck and then my truck to the basement. It'll probably take a couple of days for my back to recover.
I would like to use Ditra-Set as the thinset for the tiles. It's expensive but it's a quality unmodified thinset and doesn't void the Schluter Ditra warranty. It appears that I'll have to order it online.
-
Den
- June 16, 2018
-
Garage
Workbench continued...I installed oak plugs in the pocket holes of the top trim. I then sanded the legs and faces.
I moved my stacked double fan into the back door of the garage and turned both fans on high to exhaust dust. I opened the garage window and turned my wall-mounted dock fan on high for intake. I then used my electric leaf blower to blow some of the dust out of the garage.
Once the dust was gone and settled, I put a coat of polyurethane on the new workbench. I don't expect to put a second coat on it, since it's just a workbench; I just want it reasonably sealed. All of the surfaces I coated today are vertical except for edges, and hence won't ever have liquid pooled on them. The top is laminate, and when I'm working on something wet, I'll be covering the workbench.
-
Garage
- June 14, 2018
-
Garage
Workbench continued...I drilled, chamfered and filed 21 of the bench dog holes that are aligned with the end vise. I'll likely stop here, since I don't foresee a need for more holes. I can clamp anywhere on the perimeter of the bench top,
-
Garage
- June 13, 2018
-
Garage
Workbench continued...I sealed the bench dog holes for the front vise with a coat of polyurethane. This is just to help prevent spills from seeping between the plies of the plywood.
-
Garage
- June 12, 2018
-
Garage
Workbench continued...I drilled, routed and deburred the remaining 12 bench dog holes that are aligned with the front vise. It's a slow process with the drill guide. I sped things up a bit by creating a 1/4" plywood sled to hold the wood block that holds the drill guide. This will also be used for the holes that will be aligned with the end vise.
-
Garage
- June 10, 2018
-
Garage
Workbench continued...I filled some of the dimples in the top of the bench with water putty. This was just so they don't telegraph through the surface of the laminate.
I also filled the remaining pocket holes in the legs with water putty. They'll likely need a second application.
I set up my sawhorses and some scrap plywood to hold the laminate for the application of contact cement. I put a coat of Weldwood contact cement on the plywood bench top, then a coat on the back of the laminate, then a second coat on the plywood bench top since it soaks into the plywood a bit. Once it dried to slightly tacky, I put 6 3/4" dowels on top of the bench and then put the laminate on top of the dowels in order to position it. Once positioned, I removed the dowels one at a time, working from the center outward, and rolled it flat with my laminate roller. I then trimmed it flush with a 3-flute flush cutting bit in my router.
I drilled the laminate where the vise mounting bolts will be countersunk. I messed up a bit on the ones for the end vise, but it's no big deal. It's a workbench, not a piece of furniture. I didn't make any mistakes on the ones for the front vise.
I mounted the vises in order to figure out the edge trim. The vises are nice, and very secure.
I cut the trim pieces to length for the front and sides of the top. They're solid oak. I drilled the pocket hole screws to hold the side pieces to the front piece. I drilled countersink holes for the mounting screws at the drill press. I installed the trim pieces using screws and Titebond III. I ran my flush cut bit around the trim pieces once installed, to make it flush with the laminate, then used a wood chisel to trim the tiny strip I intentionally didn't cut with the router bit (to avoid hitting the laminate). I sanded a bit with 100 grit sandpaper, but didn't do all of the sanding since I need to plug the pocket holes. I'm debating whether or not I'll plug the screw holes in the edge trim of the bench top.
I drilled 6 of the bench dog holes for the front vise, then chamfered the top edges of the holes with a 25 degree router bit. They work nicely with the Kreg bench dogs.
-
Garage
- June 9, 2018
-
Garage
Workbench continued...I rounded the edges of the foot pads with my palm sander, just to prevent snagging the outer ply with something in the future.
I installed the casters, cut the carriage bolts to length with a metal EZ-Lock cutting wheel on my Dremel, then smoothed the cuts and top of the nuts with a 3" Roloc sanding disk on my die grinder.
I installed more pocket hole plugs. I miscalculated the number of pocket holes, so I'm out of the 100 plugs I bought. I'll probably fill the remaining holes with water putty, since I'm not looking for beauty here; I just want a flush surface. I used my die grinder to sand the plugs flush.
I turned the bench upright again. It rolls very nicely on the new casters.
I drilled the countersinks for the vise bolts a little deeper so I can use a router bit with a bearing guide to trim the laminate around these holes once the laminate is installed. It will also let me stack washers inside the countersinks, which will help prevent the washers from becoming conical.
I think I'm ready to apply the laminate. I haven't done this in a very long time, and the piece will be a little big to handle solo, but it should be possible. I cut the laminate slightly oversized so I can trim it with a flush cutting bit in my router once it's installed.
-
Garage
- June 8, 2018
-
Garage
Workbench continued...The Schioppa GL 412 NTE G L12 casters arrived from Amazon. I think these will work well.
I drilled the holes and countersinks for the 5/16" carriage bolts in the remaining foot pads, using the drill press. These will hold the casters to the legs of the bench. I then put the carriage bolts into the first layer of the foot pads and installed the first layer of the footpads on the bench legs with the carriage bolt heads sandwiched in the joint. I used Loctite PL Premium adhesive, pocket hole screws and deck screws to bond the feet to the legs. For the most part, it's the Loctite PL Premium that I expect to hold the pads to the legs. I then used Titebond III and deck screws to attach the second layer of the foot pads. I'll let this cure overnight before attaching the casters in order to cut the carriage bolts to length.
-
Garage
- June 7, 2018
-
Garage
Workbench continued...I glued and screwed the remaining plywood foot supports to the sides of the workbench legs.
I also drilled 5/16" holes in one of the 1.5" stacked plywood feet to match the pattern of the new casters. My intent here is to use 5/16" carriage bolts with the heads hidden inside the feet, so I can change the casters if ever necessary without compromising the feet of the bench. The downside is that like most casters, the Schioppa L12 casters don't have enough clearance for a standard height nylon locknut, and I'll have to grind off the carriage bolts to just the right height after I install the casters. Not a big deal, and I think it's worth the effort to make it easier to swap out casters if ever necessary. I expect the new casters to last a long time, but I'd rather have bolts and nuts here rather than lag screws.
-
Garage
- June 3, 2018
-
Garage
Workbench continued...I installed The first layer of 3/4" plywood for the top of the bench. I used Loctite PL Premium and 1-5/8" deck screws to fasten it to the base.
After letting the first layer cure for about an hour, I slathered about a pint of Titebond II on the top and installed the second layer of 3/4" plywood.
Later I glued down the 1/4" final layer, and used my 18-gauge brad nailer to keep it in place while the glue cures.
I patched the chipouts in the 1/4" plywood that happened when I drilled the holes for the vise bolts. I just used Loctite PL Premium.
I ran my Freud flush-cutting bit around the top of the bench to bring the 1/4" top piece flush. I'll be using it again when I install the laminate.
I ordered some 3/8"x4" 316 stainless steel button head hex drive screws, 316 stainless steel washers and 316 stainless steel serrated flange locknuts from McMaster-Carr to secure the vises. I decided against the carriage bolts because I want to be certain that I can fully tighten the fasteners, and I want washers to better distribute the pressure on the plywood under the head of the screws.
I've decided that the Everbilt casters I bought a long time ago to use on the bench aren't sufficient. I learned this the hard way from the smaller version of these casters on my router table. Their brake levers are weak and bend if you activate the brake with the wheel in a position where the teeth for locking the spindle are not aligned. So I ordered some Schioppa L12 casters from Amazon. I ordered some with nylon wheels that have a load rating of 375 pounds, and some with polypropylene wheels rated at 275 pounds. Hopefully slipperiness will not be an issue, but we'll see. I considered polyurethane wheels, but they're all rated at 275 pounds or less. I don't know the total weight of the bench, but it's probably close to 300 pounds once the vises are installed. I generally prefer my casters to be able to handle a lot more weight than what they're supporting, since there will be times when I'm rolling it over uneven surfaces (in/out of the garage) or working on something heavy on top of the bench. And in the garage, the bench will occasionally be used as a platform when working on something on the ceiling.
At any rate, I intend to use the nylon wheel casters. I bought the polypropylene ones because they were really cheap at $9.32 each. I will likely wind up using them for my basement bench.
-
Garage
- June 2, 2018
-
Garage
Workbench continued...I trimmed and sanded the pocket hole plugs that I installed in the interior of the torsion box last night. I also sanded the remainder of the interior of the torsion box and applied one coat of polyurethane and then a second coat on the bottom of the interior. This doesn't need to look pretty, it just needs to be sealed reasonably well.
-
Garage
- June 1, 2018
-
Garage
Workbench continued...I installed the remaining 1x2 supports for the bench top, and also installed the 1.5" thick support for the end vise. Everything feels pretty solid at this point.
I glued most of the pocket hole plugs in place (paint grade). I stopped after my new box of 50 was empty.
Tomorrow I hope to do some sanding of the inside so I can put a coat of polyurethane on the interior of the torsion box. I can then start installing the two sheets of 3/4" plywood and single sheet of 1/4" plywood that will be the top of the bench. The first piece will be glued to the base with Loctite PL Premium and then screwed down. The second piece will be glued and screwed to the first using liberal amounts of Titebond II, and the final piece will be glued and screwed to the second using liberal amounts of Titebond II. I basically want the top to behave as a solid 1.75" thick piece of plywood. Dimenstionally stable and strong. For the top finish, I have a very dark gray piece of Formica brand laminate that I'll glue in place with Weldwood contact cement. I bought some 3/4" dowels that I'll use to position the laminate once the contact cement is tacky.
After I trim the laminate, I'll drill the bench dog holes using the drill guide bushing and drill bit I bought for this purpose.
The end goal is a bench I can use for woodworking.
-
Garage
- May 31, 2018
-
Garage
Workbench continued...I finished installing the front vise support. It's very solid, and will be even more so once the 1.75" of plywood top is installed. I used Loctite PL Premium as the adhesive, and several pocket hole screws to secure the 1.5" block to the vertical plywood parts of the torsion box. There are also four Simpson GA2 gussets as additional support.
-
Garage
- May 28, 2018
-
Garage
I glued and clamped the two pieces of 3/4" thick plywood for the front vise support, and marked it for cutting. I also cut the vertical pieces that will act as stands for this piece.The second vise arrived today. I finished drilling the mounting holes for both vises, through the total of 3" of plywood. I also marked the 1/4" plywood so I can later cut larger holes in it to let the carriage bolt heads pass through it. I haven't drilled these holes yet since I want to glue the laminate to the 1/4" plywood before I drill those holes.
I have a 3/4" drill guide bushing and precision 3/4" drill bit that I am hoping to use to create dog holes in the top of the workbench. As of yet I'm not sure how well the bit will work for laminate. But it looks much like the one sold at leevalley.com that's intended for dog holes, but I bought mine from McMaster-Carr. I'll test it before I start making holes in the actual benchtop.
-
Garage
- May 27, 2018
-
Garage
I cut the plywood for the bottom of the torsion box of my new workbench. I then drilled all of the pocket holes. I ran a bead of Loctite PL Premium around the bottom frame, dropped the new plywood piece in place, clamped it and then installed all of the pocket hole screws.I cut the interior pieces of plywood, notched the corners to allow 1x2 to pass through, and drilled the pocket holes. I then applied Loctite PL Premium on the bottom edge of these pieces and some Titebond III to the sides, tapped them into place with a mallet, then installed all of the pocket hole screws.
I cut the two 3/4" thick pieces of plywood that will support my end vise. I then clamped them together and drilled the holes for the Wilton 79A vise. I then glued them together with Titebond III and clamped them for curing with the carriage bolts in place to keep them aligned.
I cut the three pieces of plywood for the bench top. Two 3/4" thick pieces and a 1/4" thick piece. I drilled the holes for the end vise carriage bolts in the 3/4" thick pieces. The 1/4" thick piece will get larger holes that will allow the head of the carriage bolts to be countersunk (and visible from the top of the bench).
I cut the rear oak 1x2 that will be installed at the top of the rear face on the inside, to provide more screw area for the top and to provide a little more strength against flexing.
-
Garage
- May 26, 2018
-
Garage
I am slowly but surely making progress on my new torsion box workbench. Today I cut the holes for storage in the front face and routed the edges with a roundoff bit. I then cut the front 4x4 legs and glued and screwed the front face in place. The 4 legs and 4 side faces are now assembled.I ordered the second Wilton 79A vise. Amazon says it will arrive Monday, but I'm not inclined to believe that since Monday is a holiday.
I also cut and installed the support framework for the bottom of the torsion box part of the bench.
-
Garage
- May 16, 2018
-
Garage
I installed the remaining door support struts on the north garage door.
-
Garage
- May 12, 2018
-
Garage
I finished installing the door support struts on the south garage door. I still need to install 2 on the north door.
-
Garage
- May 7, 2018
-
Garage
I picked up 4 more garage door support struts at Menard's. These are more beat up than the first two I bought years ago, so I'll probably need to tweak them a little bit before I install them. But they will help with the stability of my doors, which still flex more than I'd like when they're open or moving.
-
Garage
- May 6, 2018
-
Garage
I picked up plywood, 6 pieces of 1x2 oak, a piece of dark laminate, deck screws, Kreg 1.5" screws and some T25 bits from Menard's. These are most of the pieces I need to build my torsion box bench so I can get rid of the old fixed bench in the garage. The new one will be much more rigid, and give me a place to install woodworking vises that I need.
-
Garage
- November 21, 2017
-
Basement
I finished tidying up the shielded cat6a runs for the master bedroom by shuffling the cables in the conduit and then tie wrapping them into the bundle.I have a decent plan for the remainder of the cabling I need. I need fiber to the den, which is relatively easy as long as I do it before I migrate the second floor ethernet runs into the conduit. I also need fiber to the family room, the area in the basement that will eventually be home theater, and Bedroom 2.
-
Basement
-
Master bedroom
I'm now patching the remainder of the oversized hole for the electrical box that houses the cable and satellite coax in the master bedroom. To me it looks as if the hole for this box was created with a claw hammer. It's a mess but I'll get it fixed up.
- November 20, 2017
-
Basement
I finally installed the second hasp on the wall-mounted switch enclosure, so there are now two hasps to hold the front door shut. Not strictly necessary, but I had bought both hasps at the same time and it made sense to use the second one since I have no other use for it.
-
Basement
-
Master bedroom
I continued patching the oversized hole for the electrical box that houses the cable and satellite coax in the master bedroom.
- November 19, 2017
-
Master bedroom
I finished installing the two cat6a runs to the master bedroom and tested the runs for basic connectivity. They're both working.I also started repairing the oversized hole for the electrical box that houses the cable TV and satellite cables. I started with joint compound just to get a good hard base to cling to the gypsum.
-
Master bedroom
- November 18, 2017
-
Basement
I pulled the second run of shielded cat6a for the master bedroom, and terminated both runs in the bedroom with shielded cat6a jacks. Later tonight I'll terminate at the patch panel and test both runs.I still need to order more short shielded cat6a patch cables, 6 meter fiber patch cables and fiber keystones for the den, and fiber patch cables for the family room, master bedroom and Bedroom 2. I don't want to run more cat6a until I run the fiber, since I want to be gentle on the LC connectors on the fiber. I need space in my conduits to accomodate the LC connectors in order to be gentle on the fiber as I pull those runs.
-
Basement
- November 17, 2017
-
Basement
I cut the hole in the wall in the master bedroom for data jacks, and installed a Carlon low-voltage old work box in the wall.
-
Basement
- November 13, 2017
-
Basement
I drilled 5 more holes in joists in the basement to extend my data cabling to reach the living room and master bedroom. I installed support plates with Loctite PL Premium and 4 screws, even though they're not necessary. I then installed the Cat6a for LR_D3 and LR_D4 ports in the living room, terminating in a 3-port keystone wall plate I had installed a long time ago.I also ran cat6a to the master bedroom but haven't installed the jacks yet. The previous owner hacked up the wall where I want the jacks. He cut two giant holes in the baseboard, and the hole for the wall plate in that wall is much bigger than the wall plate. I'll need to patch this up when I remodel the master bedroom.
-
Basement
- November 3, 2017
-
Basement
I started rerunning the ethernet for the den, to get the cat6 inside the new conduit setup. I also drilled larger holes to the east side of the den to accomodate the new cat6a shielded cable and a future OM4 LC duplex run. I later did the same for the west side of the den.I finished connecting the new cat6a for Den_6 at both ends, and reconnecting what are now Den_4 and Den_5. I buttoned up the wall plate for these connections, using the new Leviton 3-port brown Decora insert.
I then did the same thing on the west wall, with Den_3 now being cat6a and connected to a 10GbaseT port on the main switch. I rearranged the keystones in the patch panel a bit since I wanted Den_3 closer to port 49 and 50 on the switch.
I'm trying to figure out what I need mid to long term in the den to migrate to 10 gigabit ethernet. For now I only need my hackintosh to have 10 gigabit connectivity to kiva and www, but in the long run I'll probably want at least one more machine in the den to have 10 gigabit connectivity (whatever Julie's future machine turns out to be). I think I'd be fine with a Netgear XS708E. But I'd like to add a Ubiquiti ES-16-XG in the basement to allow ria, kiva and www to all have 10 gigabit connectivity and to allow fiber uplinks to other rooms like the den, the family room and the future home theater in the basement. Right now, 10GbaseT is a power hog, and cat6a cable is huge and has all the typical problems with copper (EMI, etc.). And the future is fiber; we're not getting beyond 10 gigabit with copper in the home.
-
Basement
- November 2, 2017
-
Basement
I finished installing 2" PVC stubs in the new holes in the floor joists. I still need to finish drilling the smaller holes for 1.5" PVC stubs to support wiring to the master bedroom. I'll then install small plywood support plates as I did for the 2" PVC stubs. They're superfluous just as they were for the 2" conduit, since the holes are well under 1/3 the height of the joists. But they provide a little more support under the PVC stubs to keep them level, and certainly cause no harm. At 1/2" thickness they also don't impinge much on the space between the joists.I cut the holes in thirteen support plates for the 1.5" PVC stubs using a hole saw on the drill press. Obviously it was slow going since it's not easy to remove the plug from the hole saw after each hole. I then installed all of these plates, mostly because I wanted to use up the Loctite PL Premium before it turned solid.
These holes are oversized for 1.5" PVC, but that's OK. I want some wiggle room. I installed PVC stubs in 10 of them, but did not primer and glue them since dry fitting is sufficient. Each stub is just a short piece of PVC pipe passing through the joist and support plate with a hub-to-hub coupler on each end to keep it in place.
-
Basement
- November 1, 2017
-
Basement
I cut the holes in all of the support plates for the 2" PVC stubs for ethernet cabling, on the drill press with a hole saw. I then installed all of the support plates for the 2" PVC stubs on the floor joists to contain ethernet cabling. This wasn't necessary for joist support since I'm well within code for hole size, but it will help keep the PVC stubs straight. But the plates are glued with Loctite PL Premium polyurethane adhesive and screwed in place with four #8 x 1.25" Spax wood screws. The screws were really just to hold them in place while the glue cured, since polyurethane adhesive expands as it cures.
-
Basement
- October 31, 2017
-
Basement
I cut a bunch of 8" x 8" pieces of 1/2" thick plywood to use as support plates on the floor joists where I'll be installing PVC stubs to support ethernet wiring. The plan is overkill, but I want more support for the cabling than just the joists and want a reasonably slick surface instead of wood to avoid damaging the jacket of copper and fiber ethernet cables.
-
Basement
- October 13, 2017
-
Basement
I've been preparing to install a new-to-me ethernet switch in the basement since I ran out of ports on my old switch and I wanted to bump a few machines to 10 gigabit connections. I am using SFP+ DAC cables for two machines in the rack, but will be using a 10GbaseT connection to the den for my desktop. The new-to-me switch has two 10GbaseT ports and two SFP+ ports, all independent. So I'll have one spare 10GbaseT port on the switch. But the basement part... I want to run cat6a to the den and the family room, and later to other rooms (replacing the cat5e and cat5). It's also possible that I'll run fiber at some point since 10GbaseT is very power hungry and I don't think we're that far away from twisted pair with RJ45 connectors being end-of-life. It takes too much power, even at 10G, to run it all over the place at home. And getting to 40G or above is a nightmare on copper. But for what I need right now, 10GbaseT will suffice. I will run cat6a shielded cable, but I don't intend on replacing all of my existing wiring right now. Just a new run to the den. So I want to keep my existing keystone jacks, and add shielded jacks. But I need shielded keystone panels, so I ordered two of them for dirt cheap from fs.com.To ground the keystone patch panels, and also ground my incoming Comcast connection (sigh, the tech didn't ground ANY of it), I installed an Eaton grounding block on the plywood panel on the basement wall. I ran AWG6 bare copper ground wire to a bronze grounding clamp on the cold water pipe that's already bonded to my service ground (in the main breaker box). My new clamp is literally a few inches from the one that goes to the service ground. I ran AWG10 solid wire with green insulation to the first Comcast splitter/amplifier so it's now grounded. For the new patch panels for cat6a, I have to wait until they arrive. I know they have ground wires included, with unknown length. There appears to be a spade connector on the end. I bought a cheap terminal block to distribute ground to the patch panels. Note that this grounding is NOT for safety. It's only for the EMI shield inside the cat6a cabling.
I need to mount the new patch panels. I considered a few different 4U hinged wall-mount rack brackets, but I don't want my jacks to be perpendicular to the wall. Given that my cables need to go to my 25U rack enclosure, I want them at roughly 45 degrees (downward). This reduces cable strain and bend radius issues, and also helps prevent dust in the contacts. So I bought some 4U rack rails and will fabricate a mount from plywood. I'm working on a design in SketchUp.
-
Basement
- October 4, 2017
-
Garage
I bought some PVC pieces to make a mouse bait/poison feeder for the driveway. Not something I want, but after a $900 truck repair bill from mice chewing harnesses, I need it. My traps inside the garage seem to be attracting ants but not mice, and as much as I dislike using poison, it's always been more effective than traps for me. I need a habitrail sort of feeder to keep squirrels and woodchucks out. So I assembled a simple but larger-than-necessary setup and put some Tomcat bromethrin
-
Garage
- October 3, 2017
-
Basement
I've been working on cleaning up data wiring. I rotated my 14" structured media enclosure by 90 degrees so that it is now upright. I originally had it at 90 degrees to help accomodate CATV feeds, but I'm moving those out of the enclosure since there just isn't enough room to have my ethernet patch panels and CATV splitters/amplifiers in the same enclosure. Rotating the enclosure was a decent amount of work since I had to remove and reinstall most of the keystone jacks, but it's done.I've decided that I don't need or want my CATV feeds in an enclosure. I don't expect to ever make this part of the basement finished, so all I really need is a piece of plywood to which I can attach the splitters/amplifiers. So a couple of days ago I finished cutting, priming and painting a 32" x 24" piece of 2/4" thick plywood to attach to the wall. My structured media enclosure will be attached to it, along with CATV splitters/amplifiers and my cable modem. I'm also attaching a power strip with a 10' long cord that will be plugged into one of my UPS systems. That will allow my cable modem and CATV amplifiers to be on UPS so I won't instantly lose Internet during a power outage (important for the notifications sent to my cell phone when a UPS goes to battery). I haven't yet decided how to attach the cable modem. While it has 3 mounting slots, they don't provide a desirable orientation without adding some type of mount on the plywood. I guess I'll need to create that mount, or a small shelf.
I cut and pre-drilled a pair of 32" long furring strips from 1.5" wide x 3/4" thick oak. I attached one of them to the wall with Red Head 1/4" x 2" hammer-set anchors. Obviously I had to hammer drill the holes for the anchors, which I did with my old Porter-Cable 1/2" hammer drill. I wish I had an SDS hammer drill, it would go a LOT faster. I removed the structured media enclosure and the old small piece of plywood behind it, which required grinding the heads off of the old Red Head hammer-set anchors. I then installed the second furring strip.
I installed the new plywood piece with 1/2" nylon spacers on top of the furring strips. This leaves me just a bit of room to run cable behind it as needed. I then installed the structured media enclosure on the new plywood, then a power strip that's connected to my main UPS, then my cable modem, the CATV amplifier and the CATV splitter. I will later need to install a new CATV amplifier with more ports since right now I'm only feeding one TV and Comcast only gave me a single output 15dB amplifier. The setup seems odd since the run to my TV is short and I'd normally expect somewhere near +15dB coming into the house, but Comcast did this work before they moved the head closer to my house. I'm guessing that I could get away with less amplification now, but I'll probably just leave this amplifier in place and replace the downstream splitter with a unity gain 8-output amplifier.
I'm now making new shorter coax cables to clean things up. The CATV amplifier power cable was very long but can now be very short. Ditto for the cable from the splitter to my cable modem. And with the coax removed from my structured media enclosure, I can now add two more 12-port keystone patch panels (though I likely only need one for the foreseeable future).
-
Basement
- September 27, 2017
-
Basement
I'm trying to figure out what to do about the fact that my main ethernet switch has no remaining ports. Probably the right thing to do is to get a stackable switch with at least a couple of SFP+ and/or 10GbaseT ports. I'm not in desperate need of 10G ethernet right now, but getting another unmanaged 1G switch just feels like buying soon-to-be-obsolete gear and creates a bottleneck for switch-to-switch traffic. If I didn't need NAS and didn't do backups over the network, I wouldn't need 10G ethernet for quite a while. And I still don't desperately need it for end-to-end host connections. But ganging switches together that don't have SFP+ or 10GbaseT links is asking for trouble with my over-the-network backups, Plex server and SVN repository. It's planned obsolescence with a horizon that's not far away. I _could_ theoretically move to a 48-port switch, but that's more ports than I need and consumes more power. And all of the 48-port switches I've looked at are managed, datacenter switches by nature and hence cost significantly more. In fact a pair of 24-port stackable switches is about the same price, but less noisy (due to lower density).
-
Basement
-
Den
I moved one of my Middle Atlantic MDV-R12 units from Bedroom 1 to the den, then moved my HP LaserJet 4050TN printer to the den. I connected it to the Den_3 ethernet port in the den, and checked that it's reachable. It's working fine.
- September 26, 2017
-
Basement
I created 3 Cat6 patch cables, 7' long, for the new den connections. I also created several more 7' long patch cables to replace the odd length ones that were running from my main ethernet switch to the patch panel. I also color-coded a bit using different colored boots. Now that my patch cables are the same length, I was able to neatly bundle them with velcro straps from the patch panel to the rack which makes it easier for me to open/close the rear rack door when I need to do something there. So the patch panel is now at least usable by being neat and labelled. I am running out of space on the patch panel, and I'm out of ports on my main ethernet switch with several rooms as yet unwired.
-
Basement
- September 25, 2017
-
Basement
I drilled a new set of 1" holes in the floor joists for additional wiring. The existing holes are full. I started with a Forstner bit for cleaner holes than a spade bit, but then switched to a 1" hole saw for speed. I need these holes to run the remaining wiring to the den and ethernet to the master bedroom. It was a messy job and a lot of holes to drill. I hope to get it cleaned up today. Not sure I will since my truck has an MIL and no oil pressure reading in the DIC (Driver Information Center). I have a feeling that Al Serra Chevrolet botched the installation of the oil filter, since the oil pressure sender is on the oil filter housing. Bowman Chevrolet is booked until Thursday but I'm going to take it up there anyway to see if they can take a quick look at it (read DTCs, check the oil filter installation).
-
Basement
-
Den
I cut a new hole in the wall near the room door for a new electrical box. I drilled to the basement to run wiring.I picked up a Square D QO 15A single pole circuit breaker for the new outlet in the den, and 100' of 14/2 NM-B wire. I ran the wire through the basement, installed an old-work electrical box and a Leviton R05-T5632-0BE outlet with USB charging ports (3.6 amps). I then installed the circuit breaker in the subpanel since the main panel is completely full (and already has a large number of tandem breakers in it). Kind of a shame that I used a breaker for a single outlet, but it is what it is. A tandem breaker is 3 times the price, and until I refinish the basement, I don't need it.
I cut another hole in the wall near the room door for a pair of ethernet ports. I fished two cat6 cables and terminated one with orange Cat6 keystones on each end (one for the wall plate, one for the patch panel) and one with white keystones on each end. These are 'Den_3' and 'Den_4', respectively. I tested both runs after terminating, then installed the keystones in the patch panel. I then installed the keystones in a Decora keystone insert and installed it in the new electrical box in the wall, and installed a new wall plate.
- September 23, 2017
-
Basement
I spent some time creating labels for my patch panels. Unfrotunately I've come to realize that there isn't a snowball's chance in hell that I can continue using them or my current structured wiring enclosure. My setup is too small. What I need is some standard 19" rackmount keystone patch panels and to build my own enclosure out of wood.
-
Basement
- September 22, 2017
-
Den
I installed a basic Leviton 15A decorator outlet on the south side of the den's door. I installed a Brainerd beaded wall plate in Venetian bronze.I pulled two Cat6 cables to the new box in the west wall of the den. I terminated one cable with Legrand Cat6 blue keystone jacks on each end. This one is "Den 1". I labelled it with Dymo heatshrink label tubing just outside of the enclosure in the basement. I terminated the second cable with Commercial Electric Cat6 beige keystone jacks. This one is "Den 2". I ran out of heatshrink label tubing and hence labelled this one with flexible nylon labelling from the Dymo Rhino 6000. In the den, I installed a temporary Leviton 2-port white decorator keystone insert and installed the jacks (later to be changed to black). I installed a Brainerd beaded wall plate in Venetion bronze color.
I hemmed and hawed about where to place one of the USB charging receptacles on the west wall. I decided the northmost receptacle was the correct one. I installed it there and installed the Brainerd beaded wall plate. Two things worth noting: the Leviton black receptables are glossy, and dinged/scratched pretty good before packaging. I'm not a fan, I probably should've ordered the Hubbell ones in brown or just bought the lower-current Legrand brown ones (which are matte finish). Or sanded them with 1000+ grit sandpaper before installing to knock off the sheen. Second note: the receptacle I replaced had two hot wires (one black, one red) but only one neutral. I'm not sure why the receptacle was used to chain hot but not neutral, and I didn't have time to prod with my DMM.
I need to install two more ethernet ports, on the east wall. These will likely be used for one of my networked printers, and possibly the Ooma Telo.
I discovered that the AC receptacle in the northeast corner of the room is too close to the panel moulding to accomodate anything but a standard width wall plate. Even then, the receptacle has to be as far as possible to the other side of the enclosure, and the standard wall plate is crammed against the panel moulding. Sigh, why can't finish carpenters do the right thing when they run into this kind of problem? Or better, why did the electrican position this box crammed into the corner?
At any rate, I can't use a matching wall plate in this spot without quite a bit of demolition or an ugly hack to the mouldings; the wall plates I bought are wider than standard, and I did that because someone overcut some of the holes for the AC outlets and I wanted to hide the overcuts. Sigh.
-
Den
- September 21, 2017
-
Second floor hallway
I moved 18 boxes of the hand-scraped hickory hardwood from the den to Bedroom 2. That's 936 pounds of wood. I am clearing space in the den to move my temporary office in Bedroom 1 to the den.
-
Second floor hallway
-
Den
I cut the hole in the west wall for the low-voltage old-work box for ethernet wiring. Wouldn't you know it, I made an error and my first hole was in one of the two cavities for cold air return from Bedroom 1. So I'll wind up with a blank wall plate there unless I bother trying to replace the wood panel (maybe with oak veneer library panel. My second attempt was in the right location, and I installed the low-voltage old-work box.
- September 20, 2017
-
Second floor hallway
I scraped most of the high spots off of the subfloor. These were joint compound, paint and construction adhesive.I'm trying to decide when to gel stain the banister and its base. It would make sense to do it now since the base is as exposed as it will ever be.
I went to 'Pigeon in the Parlor' in Holly for two quarts of General Finishes Java Gel Stain and two quarts of Arm-R-Seal.
I stuffed all of the old carpet padding into a large contractor's trash bag for this week's trash collection.
I put a couple of test coats of the gel stain on a small section of the handrail, using an old sock. I don't know how far I'll get with this technique; it works, but I think I might decide to paint it on with a brush instead since I'm aiming for a fairly dark result.
-
Second floor hallway
- September 19, 2017
-
Second floor hallway
I removed the remaining baseboard from the 2nd floor hallway. I scraped the caulk ridge from the drywall with a 1.5" wood chisel.I started removing the carpet, carpet pad, tack strip and staples from the subfloor. I'm about done; it's all removed, but I need to haul the trash to the garage, scrape the subfloor, and vacuum. Tomorrow I need to make a plan for moving my desk to the den as part of clearing out Bedroom 1. The den is full of stuff right now, including 18 boxes of hardwood that I will be using in the second floor hallway and Bedroom 1.
-
Second floor hallway
- September 18, 2017
-
Basement
I removed the Lutron MS-OPS5M from the stairwell from the foyer to the basement, along with the rocker switch that was paired with it. I replaced it with a Lutron MACL-153M-RHW-WH pair. That's a master dimmer and companion dimmer. This is more convenient for the basement stairs for now since I can leave it on while I'm working in the basement and then turn it off when I come back upstairs. There is an issue with the box at the top of the stairs. It's very thick-walled, and given its color (gray), I suspect it's an outdoor box. Which means it doesn't allow room for the wall plate screws to pass by it. And it's mounted with its edges flush with the outside of the drywall. I didn't notice until after I had started driving the wall plate screws. Which means I stripped the hole for the wall plate screw on the bottom of the MACL switch. :-( Eventually I'll have to do something about that box and the stripped hole in the new switch. Sucks since the pair of switches was $54.00. I can replace the stripped one for $30.00.
-
Basement
-
Second floor hallway
I moved some of the items out of the hallway, but still have more to clean up. I then removed the hallway side door casings from the bathroom door, the door to Bedroom 2 and the door to Bedroom 1. I also removed most of the baseboard. I removed all of the nails from these pieces so I can burn them in the fire pit. I cut the carpet at the seam between the hallway and Bedroom 1 so I can start removing the hallway carpet and then the tack strips. -
Full bathroom
I replaced the ceiling fixture 75W incandescent light bulb with a Cree LED equivalent. I replaced the shower fixture 100W incandescent light bulb with a Cree 60W equivalent. This one will need to be changed to a brighter bulb, but I don't have one on hand at the moment.I replaced the overhead light switch with the Lutron MS-OPS5M I pulled from the basement stairwell. I replaced the old paddle switch for the shower light with a Lutron MS-OPS2.
- September 17, 2017
-
Bedroom 2
I installed the door stop for the closet door. This one was installed with a stainless steel wood screw since there's a stud behind it. It's the same as the stop for the room door: a Rockwood 404.15 over the top of a plastic wall protector.
-
Bedroom 2
-
Second floor hallway
I am trying to plan for laying the floor in the hallway and Bedroom 1. The hallway will be a little tricky since once side of it has a gradual curve (the part with railing that overlooks the family room). I also have to account for the joint at Bedroom 2, stair nosing, and if I want a continous run into Bedroom 1, making sure I don't wind up with a too-narrow board at a wall in Bedroom 1. I don't yet know what's pssible since I need to clear the hallway and bedroom of tools and other stuff from remodelling Bedroom 2 and then pull the trim and carpet. One of my concerns is how to handle the transition from the hallway floor to the railing base. Obviously I need an expansion gap, but what can I use to hide that gap? The height of the railing base is 1" according to the depth gauges on my Mitutoyu calipers. That doesn't leave me much room for a wood piece since the flooring is 3/4" thick and the Floor Muffler is .08" thick. But if it's oak or hickory, I might be OK with making a custom cover piece. It won't get walked on, so 5/32&quout; or 1/8" over the flooring is probably durable enough as long as it's not too wide. It's tempting to remove the ballusters which would allow me to just notch 1/2&qout; out of the railing base. -
Den
I need to install ethernet ports in the den so I can move my desk in there while I install the flooring in Bedroom 1 and the 2nd floor hallway. As of yet I haven't decided where I'm going to install the rework box. It's not yet obvious from the basement where the AC power wires go into this room and hence where the wall bottom plate sits. The walls of this room are all wood, so I don't want to make a mistake with placement.
- September 16, 2017
-
Bedroom 2
I scraped the outside of the west window and then cleaned it with Windex. It's still not perfectly clean, but it's good enough for now.
-
Bedroom 2
- September 15, 2017
-
Bedroom 2
I put a second coat of paint on the final set of window grilles. I later installed them.
-
Bedroom 2
- September 14, 2017
-
Bedroom 2
I cleaned, sanded and primed the final set of window grilles. I then sprayed the first coat of paint on them.
-
Bedroom 2
- September 13, 2017
-
Bedroom 2
I removed the attic access box and insulated it with R19 fiberglass.I cut back about 1/2" of the drywall in the attic access hole, above the trim, to accomodate weatherstripping. No visible change to the closet, just correcting a poor job by the original builder.
Using some Strong-Tie braces, I installed a 1x4 piece of pine at one end of the attic access hole. It's on edge, flush with the bottom of the trusses. This is to help prevent blown-in insulation from falling into the closet when accessing the attic.
I went to Lowe's for some D profile weatherstripping for the attic access box, a pair of 3.25" diameter white wall protectors (to protect the walls from doorknobs), and some new Mechanix gloves to alleviate some stress on my hands when doing yard work later this week. The wall protectors will go underneath my Rockwood door stops. I'm doing this because I had to put a fairly significant patch on the wall from the room doornob going through the drywall before I bought the house. I need the additional surface area to make sure I never blow out my patch from the knob hitting the door stop.
I moved some of the blown-in cellulose insulation adjacent the attic access hole and installed two layers of R19 fiberglass in its place. This gives me a place to set the attic access box when entering the attic without dragging a bunch of cellulose into the closet. I then marked the bottom of the attic access box for weatherstripping and installed the weatherstripping on the attic box. It fits fine.
I installed the newly configured closet storage.
I installed the newly patched and painted room door. I also installed the Rockwood 404.15 door stop, on top of a 3.25" diameter wall protector. I like it, and the wall protector helps spread the load on my patch of the damage done by the previous owners who had no door stop at all. It's installed with a Snaptoggle, and I removed the adhesive tape from the wall protector using WD40 and then dish soap to clean off the WD40. Hence I can easily change to a different bumper or entirely different stop if ever desired. But these Rockwood ones are hefty cast solid brass, much nicer than the stamped crap at Home Depot and Lowe's that have visible dimples.
-
Bedroom 2
- September 12, 2017
-
Bedroom 2
I installed the new cold air return grille.I removed the builder's paper from the north part of the room and installed the new Signature Hardware floor register.
All of the electrical outlets are installed, with the new wall plates.
I went to Lowe's and Home Depot for Decora inserts and more wall plates so I can install matching wall plates for the gigabit ethernet ports, phone jacks and cable TV jack.
I installed a Lutron MS-OPS2H-WH light switch for the closet. It's set for vacancy mode (manual on, auto off) with a timeout of 15 minutes. I installed the new wall plate for it.
I installed a decora keystone insert and a coax connector in the box for the cable TV. I installed a new wall plate for it.
I installed a decora phone jack insert and new wall plate to replace the old phone jack/plate.
I installed a 2-port keystone decora insert and wall plate for the pair of gigabit ethernet connections.
I now have all of the outlets, switches and jacks installed with matching wall plates. Probably a rarity in a home of this age, but the details matter to me.
-
Bedroom 2
- September 11, 2017
-
Bedroom 2
I taped the closet ceiling in preparation for the second coat of paint.I mixed the second gallon of Sherwin-Williams Duration 'Concord Buff' with the Shur-Line mixing paddle on my old Black & Decker drill. The speed control on this drill is horrible, and as a result I slopped some paint on the bathroom floor. Not a big deal since it's ceramic tile. I cleaned it up.
I applied the second coat of edge paint on the walls in the closet.
I rolled the second coat of paint on the room walls and the closet walls.
I cleaned another window grille, this time with Dawn dish soap and then denatured alcohol. I then sanded, primed and painted it. It turns out that the original finish is a faux wood finish; gel stain over off-white paint, so it sanded fairly easily. I wasn't looking to completely remove the finish, just smooth the rough spots.
I removed the masking tape in the room. The paint job looks good.
Once the paint was dry to the touch, I installed the wall plate on the room light switch. I installed a Legrand LED nightlight wall receptacle and new wall plate just inside the door of the room.
-
Bedroom 2
- September 10, 2017
-
Bedroom 2
I put the second coat of paint around the edges of the windows and under the crown moulding over the windows. The 3M blue tape on the crown moulding is crap, I've reattached it multiple times but it keeps coming off. Same problem I had with the window sashes. I need to throw out those rolls so I can stop making the same mistake. I'll likely need to touch up the crown moulding after painting the walls.No problems at all with the green Frogtape.
I cleaned one of the window panelizer frames. I then sprayed two thin coats of Rust-Oleum Adhesion Promoter primer on it and a coat of Rust-Oleum enamel in satin white (same as the window sashes). This one is basically a test to see if I can get away with just painting them instead of buying white ones. Unfortunately, hours later I found a couple of spots had wrinkled. I know I didn't apply too much paint, and most of it is fine. My conclusion is that I need to clean the frames with a mild solvent before priming. I have no idea what may have been spilled on them before I bought the house.
After dinner I put the second coat on the remaining edges inside the room. I also noticed that there was some severe roller shedding on one of the walls. I think this was from a roller cover I used when priming my repairs. Wish I had noticed it before applying the first coat of paint. I sanded most of them out. I'm not overly concerned about it since they were only vislble if a light was placed in contact with the wall, and I'm using flat paint to help hide the massive amount of repair I had to do after removing glued-on chair rails and wallpaper.
-
Bedroom 2
- September 9, 2017
-
Bedroom 2
I finished taping all of the straight edges of trim in the room, in preparation for painting the walls. I then painted all of the edges of the walls. I later rolled on the first coat, including the closet. Coverage looks good so far, so hopefully it'll only need 2 coats.
-
Bedroom 2
- September 8, 2017
-
Bedroom 2
I put the second coat of paint on the baseboard and shoe moulding in the room. I then touched up the areas I had caulked on the west and north windows.Once the baseboard paint was dry, I painted all the edges in the closet. I didn't tape the ceiling or the door casings. I should have, since it takes me longer to cut in with a sash brush and get a decent line than it does for me to tape. Especially since I'll have to do it again on the second coat.
I started taping the main room in preparation for painting the walls. I'll probably tape the closet ceiling while I'm at it.
-
Bedroom 2
- September 7, 2017
-
Bedroom 2
I put the second coat of paint on the east window.I caulked two spots in the closet. I then put the second coat of paint on the trim inside the closet, including the door jamb and door stop. I put the second coat of paint on the casings on the outside of the closet entry, and also the closet door entablature. When it dries, the closet will be ready for wall paint.
I put the second coat of paint on the room door casings, interior jambs and entablature.
-
Bedroom 2
- September 6, 2017
-
Bedroom 2
I put the first coat of paint on all of the baseboard and shoe moulding, including inside the closet. I then started the second coat of paint on the window trim. I finished the second coat on the west and north windows.I removed the masking of the window jamb liners, then decided I didn't like the visible gap between the jamb liner edge and the jamb. So I caulked all of those gaps with DAP Alex Plus. This means I'll need to touch up the west and north window jambs with another coat of paint since the caulk will yellow if it's not painted.
The Victorian style return air grilles arrived. For the one I'm using in this room, I needed to slightly enlarge the hole in the wall, vertically. I would need to do this even if I were reinstalling the old grille, since the crown moulding impinged on the space available for the top flange of the grille. We're only talking about roughly 1/4", not a big deal. I enlarged the hole using my Bosch MX30 oscillating tool, then drilled pilot holes for the screws and tested the fitment. It's good.
I like the grilles, but we'll see what I think after I've installed one. They're obviously not in the style of anything else, but they're nicer than the builder-grade stamped metal grilles they will replace.
The floor registers arrived from Signature Hardware. Wow, one day delivery?
-
Bedroom 2
- September 5, 2017
-
Bedroom 2
The ceiling looks good. I installed the new light fixture in the room.I put the first coat of paint on all of the trim that didn't have a first coat, except for the baseboard and shoe moulding and the north door casing inside the closet. The latter just because that was a logical place to stop since my PaintPal was out of paint. I haven't done the baeboard and shoe because I haven't caulked it yet, though it doesn't look like it needs caulk anywhere. I'll probably caulk it anyway with a thin bead of Alex Plus, then put the first coat of paint on the baseboard and shoe so I'll have the first coat on all of the trim. Then tomorrow I can hopefully apply the second coat and be ready to tape for wall painting on Thursday. I'm probably going to try painting the closet walls without taping, just to see how it goes.
I put a coat of flat black paint on the inside of the wall cavity behind the cold air return grille.
-
Bedroom 2
- September 4, 2017
-
Bedroom 2
I reinstalled the LED light fixture in the closet.I ordered a Victorian style cold air return grill from Home Depot. I would have preferred a different style, but I couldn't find anything nice-looking that wasn't ludicrously expensive. I don't need cast iron or solid brass for a grille that will never be touched (it's located 7' off the floor).
I ordered a solid brass floor register from Signature Hardware, in brushed nickel finish. The same as the registers I used in Bedroom 3.
I need some flat black paint to paint the inside of the wall behind the cold air return grille. I picked up a quart at ACE Hardware today.
I spent a little bit of time creating a template for the curve I want for pulvinated friezes above the bedroom doors on the hallway side. Bedroom 1 must have one since it doesn't have room for anything but a pulvinated frieze (or no door entablature at all). I need to figure out what I want to do for the top casing and architrave. For the cornice I'm assuming I'll use the same stackup I used inside the room; a cove and a Classical. But I should probably swap the order; the piece routed with the Classical bit should really be underneath the cove piece since it's technically a load-bearing profile while the cove is a terminating profile. It's a little vague with the Classical router bit since it leaves almost 3/8" untouched and leaves a small horizontal fillet, but I usually think "last curve convex = load-bearing" and "last curve concave = terminating". The smart thing to do is create a small model and see if I like the cove on top. Part of the reason I haven't done cove on top is that the window tops will get touched on occasion (window treatments yet to be decided), and the cove edge is fragile if unprotected. OK for solid hardwood, not so good for MDF.
I put the second coat of paint on the ceiling.
-
Bedroom 2
-
Bedroom 1
I ordered a Victorian style composite cold air return grill from Home Depot. I would have preferred a different style, but I couldn't find anything nice-looking that wasn't ludicrously expensive. I don't need cast iron or solid brass for a grille that will never be touched (it's located 7' off the floor).I ordered a pair of solid brass floor registers from Signature Hardware, in brushed nickel finish. The same as the registers I used in Bedroom 2 and Bedroom 3.
-
Second floor hallway
I ordered a Victorian style composite cold air return grill from Home Depot. I would have preferred a different style, but I couldn't find anything nice-looking that wasn't ludicrously expensive. I don't need cast iron or solid brass for a grille that will never be touched (it's located 7' off the floor).
- September 2, 2017
-
Bedroom 2
I put a third coat of paint on the crown moulding. It's covered now.I did the first round of cut-in paint on the ceiling. However, I'm now thinking I might need to prime the ceiling. Ceiling paint doesn't cover very well.
I removed the light fixture in preparation for rolling the ceiling. I'll be installing a new fixture that I bought a long time ago.
I rolled the first coat of paint on the ceiling.
-
Bedroom 2
- September 1, 2017
-
Bedroom 2
I put a patch of wall paint on the wall to the west of the north window, just to see what it looks like with one coat. I was mainly interested in the level of contrast with the trim paint. It's not a lot since the paint color is light (Sherwin-Williams 'Concord Buff'). I honestly would probably prefer a little more drama due to the amount of time I put into the trim work, but it'll suffice.I finished putting the first coat of paint on the crown moulding. I put the second coat on the north wall crown moulding. Later I put the second coat on the remainder of the crown moulding. Due to the crappy brush I used on the first coat, the crown moulding will need a third coat.
-
Bedroom 2
- August 31, 2017
-
Bedroom 2
I sanded the section of base and shoe moulding between the room door and the closet door and primed it.I caulked the top of the window entablatures with DAP 3.0 since those gaps were about 1/8" and I want a good, crack-free seal here.
I caulked the closet interior baseboard and casings with Alex Fast Dry, and decided it's too runny to use elsewhere. Might be an old tube since Home Depot is notorious for selling ancient caulk. It was literally thinner than the Sherwin-Williams Premium Wall & Wood Primer.
I bought 3 tubes of DAP Alex Plus at ACE Hardware and started caulking the room. I'm not caulking all joints, since some of them don't need it. I caulked the areas on the windows that needed it, and the crown moulding joints to the ceiling and wall.
I put the first coat of paint on the crown moulding above the west and north windows. I then put the first coat of paint on the west and north window casings, jambs, stools and aprons. This is really just a protective coat and to see what it looks like in daylight tomorrow when I'll brush on a bit of the wall paint. I need to finish painting the crown moulding and paint the ceiling before I really paint the remaining trim.
-
Bedroom 2
- August 30, 2017
-
Bedroom 2
I put the second coat of Zinsser B-I-N on the door jamb.I bought some Premium Wall & Wood Primer at Sherwin-Williams. I bought some Floetrol and a gallon of satin pure white paint from Home Depot.
I primed the window trim, all of the closet trim, the door casings and all of the base and shoe moulding except one section with the Sherwin-Williams primer.
-
Bedroom 2
-
Second floor hallway
I bought and installed Cree 100W-equivalent LED retrofit recessed lights in the hallway. I needed more light, and I also wanted the higher CRI of the new Cree LEDs (they're 90+).
- August 29, 2017
-
Bedroom 2
I put some joint compound in the larger gaps between the crown moulding and the walls and ceiling. I will still be caulking, this was just to get the larger spots.I did some minor patching of baseboard and crown. I sanded where needed, then put a second coat of primer on the crown moulding. I also put a second coat of primer on the west and north window jambs.
-
Bedroom 2
- August 28, 2017
-
Bedroom 2
I sanded the east and north wall crown moulding. I then sanded the northwest corner, and vacuumed all of the crown moulding.I remasked the closet floor in preparation for a coat of primer on all of the trim.
I put the first coat of primer on the crown moulding. Nail holes and board-to-board joints look good. I now need to fill wall-to-board and ceiling to board gaps. I think I'm going to use joint compound since it's easier to work with than caulk and the boards are so firmly attached to the walls and ceiling that they shouldn't move relative to each other.
I put some primer on some of the corners of the base and shoe moulding, mostly just to protect my spackling.
I put the first coat of primer on the west and north window jambs, as well as the room door jamb (finally). They'll all need a second coat to make sure the wood stain never leeches into the final finish.
-
Bedroom 2
- August 27, 2017
-
Bedroom 2
I finished sanding the south and west wall crown moulding. It's slow going due to the contours. I scraped all of the excess spackling out of the six corners with a wood chisel to maintain some of the resolution.
-
Bedroom 2
- August 26, 2017
-
Bedroom 2
I started sanding the spackling on the crown moulding. I'd like to complete this step this weekend and get a first coat of primer on the trim.
-
Bedroom 2
- August 25, 2017
-
Bedroom 2
I installed the center piece of the crown moulding. I then applied the first round of spackling to fill the nail holes and some of the joints.
-
Bedroom 2
- August 24, 2017
-
Bedroom 2
I finished installing the lower detail of the crown moulding.
-
Bedroom 2
- August 23, 2017
-
Bedroom 2
I've had no luck finding studs above the windows with my ancient stud finder. And all of the drywall in this house is glued and not screwed (except a very few screws 'in the field'), so my magnetic ones don't work either. I need a new stud finder to finish the crown moulding work since I don't want to make a bunch of holes just to find the studs in the walls that have no other means of finding them (no outlets, etc.).I picked up a Zircon HD900 at Home Depot. It works better than my old stud finder, but like my old one, it doesn't find the studs above the windows. However, I'm going to keep it. It works better, I like the center indication for studs, and I like the AC wiring detection. I bought a Klein multimeter case to store the Zircon HD900 when it's not in use.
I also bought some Bessey clutch-type clamps. I've run short of clamps on some projects for the house, and as every woodworker always says... you can never have enough clamps. Home Depot's current price on the Bessey clutch-type clamps is better than anyone else's price.
I also bought some 9V batteries since the HD900 doesn't come with one and I was out. I also bought some CR2032 batteries since my Wixey depth gauge's battery was dead.
I finished the crown moulding cornice installation on the ceiling.
I marked the studs on the west wall and tacked support blocks to the west wall in preparation for the crown moulding lower detail installation. This piece is about 130" long with a 45° bevel on the south end and a 22.5° bevel on the north end. I cut and installed this piece. I then cut and installed the lower detail piece over the west window, which was roughly 48.5" long with 22.5° bevels on each end. Two more smaller pieces and one more 11 footer and I'll be done installing the lower detail. I'll probably do a first pass fill and prime on these pieces before I start the center crown pieces, just because it's easier to do some of it before the center piece is installed.
-
Bedroom 2
- August 22, 2017
-
Bedroom 2
I marked the projection and drop on the ceiling and walls for the crown moulding. I wound up not needing the projection marks since I'm using a full-width 3.5" wide MDF board as the cornice piece. Mainly so that I know I have a sufficient nailing surface of the cornice to the ceiling and the crown to the cornice.I installed two pieces of cornice on the south edge of the ceiling, with a scarf joint in the middle since I wasn't able to find primed MDF 1x4's locally that were longer than 8'. I cut two more pieces but haven't installed them yet.
I created support blocks for the lower detail, tacked them in place, then cut and tested the fitment of the lower detail on the south wall. After marking the location of studs in the wall with masking tape, I installed the lower detail on the south wall. Not easy since it was more than 11 feet long, I'm working alone, and MDF is floppy.
I installed the first cornice piece on the east wall and the first cornice piece on the west wall. I also cut and installed the second piece on the west wall; 39+7/8" long with a 22.5° miter on one end and a 45° bevel (for scarf) on the other end. I then started working my way around the bay window with the cornice. All of these pieces are nailed and glued to the ceiling with Loctite PL Premium.
-
Bedroom 2
- August 21, 2017
-
Bedroom 2
The spackling and sanding of the trim is done.I remasked the room, with the tape flush against the shoe moulding. I don't really need the masking for paint, but I'm using shellac-based primer and hence want to protect the floor since I can't just wipe shellac off with a wet rag.
I decided I want crown moulding. I bought what I need from Lowe's. I'm not going to fly it with LEDs; it'd be more work than I'd like and I'm just not thrilled with the idea in this room. Dedicated theater room, sure. Bedroom that will be used as an office, no.
I cut some short pieces from each of the three types of MDF I'll be using to make the crown moulding, and mocked up a small model. I tacked this model above the room door with a sngle 18 gauge nail. At the moment it feels like it's too big, but for a 3-piece crown, I don't have easy-to-attain smaller options. The main piece is 3.625" wide, and I've got what I consider a minimal reveal on the wall piece and a symmetric reveal on the ceiling cornice piece, which works out to 7/8". It might look like it's too big by virtue of it being very short and hence proportionally odd. The total projection is 3.375" and the total drop is 4.4375". The total diagonal is a little more than half an inch less than the height of the baseboard, so I'm still within basic rules of proportion. I'm going to run with it for now, so I created a gauge block for the drop and projection so I can mark the walls all the way around the room.
-
Bedroom 2
- August 20, 2017
-
Bedroom 2
7:00: I'm almost done with the first round of spackling and sanding on the trim. I finally spackled the left side of the west window stool to the wall and the right side of the north window stool to the wall, and the west side of the door casing to the jamb. Those areas will need to be sanded once it dries. I can then remask the floor with the masking flush against the shoe mouldings, so I can start priming all of the trim with Zinsser B-I-N.I continue to debate whether or not I want to install crown moulding, and whether or not to install it flying so I can install variable white LED lighting. Since this room will be used as an office, the indirect lighting would be very nice to have.
-
Bedroom 2
- August 19, 2017
-
Bedroom 2
More spackling and sanding on the trim, but making progress. Seems like it's taking forever, but if you want a high resolution paint job where the trim looks like an integral architectural detail instead of just cut and nailed on, this step is critical.
-
Bedroom 2
- August 18, 2017
-
Bedroom 2
Still working on spackling and sanding on the trim. As much as I like the look of fluted casings, they're a lot of work to spackle and sand.
-
Bedroom 2
- August 17, 2017
-
Bedroom 2
On my hands and knees for several hours, spackling and sanding nail holes and gaps on the baseboard and shoe moulding. I still have at least another day of this work before I can do some priming. I need a coat of B-I-N on the window and door jambs and the top casings/cornices. I will then likely use Sherwin Williams Premium Wall & Wood Primer as my unifying primer coat.I had to repatch an area to the left of the closet door due to being too aggressive when scraping joint compound off of the door casing. That spot will probably get a thin coat of B-I-N after I sand it, just because B-I-N works well for sealing and reinforcing thin wall patches.
-
Bedroom 2
- August 16, 2017
-
Bedroom 2
I tested the fitment of the new attic access box. It fits well, though I need to trim back about 1/2" of the drywall above the trim frame to provide more support for the access box on the north side. I needed this for the old access door too, but never got around to doing it. Right now there's only about 1/4" of support on that side, not enough for a narrow strip of weatherstrip I want to install.I cut and nailed the baseboard in the closet. Seven pieces, two straight cuts and twelve miters (none of which were 45 degrees since the walls aren't quite square in the closet). I also nailed the plinth blocks in place. I then cut and installed the shoe moulding. I'm done nailing all of the trim inside the room and closet.
I spackled the nail holes and gaps of the trim inside the closet. I then started the first round of sanding in the closet.
-
Bedroom 2
- August 15, 2017
-
Bedroom 2
I went to Home Depot for shoe moulding and R-19 fiberglass insulation for the attic door/box. I also finally bought a Great Stuff Pro dispensing gun since I'm tired of dealing with the mess and waste of the consumer cans of Great Stuff.I cut and installed all of the shoe moulding in the room.
I put two coats of primer on the new attic access door/box, sanding after each coat. I then put one coat of paint on it.
-
Bedroom 2
- August 14, 2017
-
Bedroom 2
I cut and nailed all of the room baseboard. A couple of the cuts were not the expected 22.5° or 45°, and hence I was glad to have the Starrett angle gauge. The plinth blocks are also installed. I still need to find the studs and fully nail a couple of the pieces of baseboard, but it's all tacked in place.I created a new attic access door/box out of 1/2" plywood. It's an open box so that I can put insulation inside it on the attic side. I cut the pieces on the table saw and sliding compound miter saw, then glued and screwed it together. Tomorrow I'll start putting a finish on it. Eventually I'm going to properly brace the attic opening so I can add an additional weatherstrip and install some fiberglass batts around the attic access door so I'm not always losing blown-in insulation when I enter the attic.
-
Bedroom 2
- August 13, 2017
-
Bedroom 2
I removed the new LED light fixture from the closet ceiling, then applied the first coat of paint to the ceiling and the second coat around the edges.I cut and installed some thin pieces of aluminum flashing between the jamb liners and window jambs to serve as pprimer/paint edgers when I prime and paint the window jambs. Taping them just wasn't working as desired, and I don't trust myself to get a perfect paint edge with a brush here since I want to get right to the edge where the jamb meets the liner but not bond the paint or primer to the jamb liner.
-
Bedroom 2
- August 12, 2017
-
Bedroom 2
I'm done painting the door to the room.I did some more spackling on the east window.
I prepared to paint the trim around the attic access door and the closet ceiling. But the closet walls needed another coat of primer; the Kilz Original went on thin on part of the walls, probably due to not stirring it enough. I applied another coat.
I also applied another coat of primer on the room walls where I had done a lot of patching from removal of the chair rails and wallpaper.
I went to Lowe's for drill-operated paint stirrers (one for water-based products, one for shellac and oil-based products). I should have bought these years ago, they make stirring paint or primer that's been sitting for a while very easy without getting paint in the rim of the can. I also bought a paint can opener and a paint can lid/spout for when I open the cans of Sherwin-Williams paint for the walls of this room.
I used one of the new stirrers to stir the trim paint and then put the first coat on the ladder access door frame and the ladder protection panel frame. They'll both need a second coat. Normally I wouldn't separately paint the ladder access door frame, but I'm in and out of the attic at least a few times a year and the ceiling paint is flat. I wanted the satin finish of the trim paint because it's easier to clean scuffs from a higher-sheen paint.
-
Bedroom 2
- August 11, 2017
-
Bedroom 2
I slotted the remainder of the 5/4" pine for closet track covers, cut it to width, and cut a relief for the metal that's flush with the wall, with a little extra to allow space for the mounting track screw heads.I sprayed a coat of of Zinsser B-I-N on the ladder protection frame. It should be sealed well enough now to just use regular primer (I'm using Kilz Original). I also sprayed a thin coat on the closet door jambs. I also created a spray paint blocker out of aluminum flashing and sprayed part of the east window jamb. It works, but it's messy. I think I'll go back to brushing.
I applied a coat of Zinsser B-I-N to the east window jambs and casings.
I wiped down the closet ceiling and walls. I primed the walls with Kilz Original.
I sprayed what I hope is the final coat of satin white enamel on the hallway side of the room door.
-
Bedroom 2
- August 10, 2017
-
Bedroom 2
At 6:30 I went to Lowe's for paint tray liners and sash brushes. I then went to Home Depot for 5/4" x 3 select pine, 3 cans of Zinsser B-I-N spray, denatured alcohol and brush cleaner. While I was there I got another can of Great Stuff Pest Block, since I still need to seal up the sill plate in the basement.I set up the table saw to cut the slots in 5/4" pine to cover the closet storage rails. I cut a 10.75" long piece and slotted it. It fits fine on the storage rail.
I removed all of the closet storage except for the rails. I'm going to leave the rails in place while priming and painting.
I cut and installed the door casings and rosettes in the closet.
I did some more spackling of nail holes, and the joints between the fluted casings and the rosettes inside the closet. Filling those joints is truly a pain in the butt. However, if done correctly it makes a big difference in the final result. Sometimes all that's needed is a couple of coats of primer, but sometimes I need to use spackling or joint compound.
I finally put the sealing coat of Zinsser B-I-N on the ceiling hole patch, some other wall patching, the frame of the attic access and the frame of the ladder protection panel. I also put a coat on the closet half of the closet door jambs.
I started taping the east window jamb liners so I can prime the stained wood jamb that hasn't been converted to white yet. But tape isn't really the right solution here. I need a new paint guide since I can't find my old one from many years ago. On the other hand, it would save time to just spray these spots but I'd need a larger paint guide. Lowe's has them.
I used joint compound to fill some of the gaps between the closet door casings and jambs. Every time I work on a doorway, I wish that trim carpentry hadn't become a hack profession. Several of the doors in the house were not hung properly centered on the walls, so one side of the jamb protrudes from the wall by 1/8" while the other is recessed by 1/8". With starter trim it gets covered up, but when upgrading to a thicker, more rigid trim, it becomes a pain to work around. I don't have time to rehang doors so I'm doing what I can to the trim to accomadate it and then filling the remaining 1/16" or so of gaps.
-
Bedroom 2
- August 9, 2017
-
Bedroom 2
I put the first coat of paint on the hallway side of the room door. I'm not thrilled with it, I can see some areas that I should have sanded more when it was primed. I sanded again and put a coat of paint on it. It will need one more coat.I took out the north wall closet storage and cut 5/16" from the length of the top and then trimmed it flush with the west vertical. I also cut 5/16" from each of the shelves and the support blocks. I tested the fitment again, it will now clear the door casings and rosettes I will be installing.
I cut the top of the east wall closet storage to clear the frame of the ladder protection panel's frame, then checked that it fits. It's good to go.
I measured for the closet door casings. The side casings need to be 74.125" long.
I spackled a deep divot on the back wall of the closet that I missed in my first round.
-
Bedroom 2
- August 8, 2017
-
Bedroom 2
I went to Home Depot for two 6' long 11.75" wide melamine boards for shelves for the new closet storage configuration. Some of it will likely be used for some bracing. I also bought some 1.75" long #8 Spax MDF and hardwood screws, a 5-gallon bucket, a cheap bucket tool organizer, 5mm shelf pins and two cans of Kilz Original spray. I wanted Zinsser B-I-N, but the store had none.I'm hoping to finish the closet storage configuration today. That means getting it to the point where I know I can install it without dinging the new paint. I'm doing this now so I can fix any damage before priming and painting the walls.
I temporarily installed the old closet organizer supports and top on the north wall of the closet in order to get measurements for the width of new shelves. They need to be 12 7/16" wide. I cut 5 shelves for this space that was previously not utilized. I also cut more shelves for the narrow space on the east closet wall. There are now eight shelves there, good for shoe or knick knack storage.
I sanded the room side of the door, vacuumed it and wiped it with a damp rag.
I cut some melamine to use as supports for the new closet shelving configuration. I will use the new Spax MDF/hardwood screws to attach them.
I figured out that I need to take about 1/8" off of the length of the unit on the north wall to accomodate the door casings. Previously, it was extremely close to the builder-grade door casings. My new casings are a bit thicker, and 3/4" wider. I also need to trim the top to be flush with the west support vertical for the same reason, or notch it to avoid the door casing. I sgould probably move everything eastward by 1/4" or so, to avoid banging the door casings when I reinstall the closet storage. That's 1/4" to remove from the 5 shelves I cut today, and 1/4" from the top on the east side (which is notched).
I removed the narrow shelf section of the east wall and installed the supports on it. Just a couple of pieces of 3" wide melamine fastened with the Spax MDF/hardwood screws. I also fixed the center shelf with 4 Spax MDF/hardwood screws. This just adds rigidity to this part of the closet storage. I put it on the wall again to test fitment and to prepare to notch the top of the storage for the ladder protector frame.
At 20:15 I put the first coat of paint on the room side of the room door. At 21:00 I applied the second coat. Sometime tomorrow I should be able to turn the door over to paint the hallway side.
-
Bedroom 2
- August 7, 2017
-
Bedroom 2
I removed the closet door, hinges and catch from the closet door jambs in preparation for priming the jambs with B-I-N to seal in the wood stain.I sanded the hole patch in the ceiling. I think it's ready for primer.
I started filling gouges on the door with Zinsser B-I-N. It will take several rounds to complete.
I need some more pieces of melamine to fix the closet storage. Whoever installed it the first time left a significant unusable area in the unit closest the door, presumable because they didn't have the correct tools (a trim carpenter or homeowner, not a finish carpenter). There is about 15" of space (horizontally) where they didn't install another vertical for shelves because the standard organizer unit depth would get in the way of the unit on the back wall. But another vertical could be installed, it just needs to be ripped narrower and then slotted with a 1/4" router bit for the French cleat. That's my plan, but since I wasn't able to find undamaged pre-drilled melamine shelf supports at Home Depot or Lowe's, I'll cut and drill a plain MDF board that can thensupport shelves.
I'm a little concerned about the French cleat's ability to hold the weight. This type of French cleat is normally only rated for about 100 pounds if it is screwed to 3 studs. I should probably add another one.
I modified the storage on the back wall so it won't be completely in the way of the attic door. It still intrudes a bit, but it's workable. I took 2.25" off of its depth, so it's now 11.75" deep. I cut this off the back of the top shelf, middle shelf and the three vertical supports. I then routed new slots in the back of the supports with the new spiral upcut router bit, to capture the French cleat on the wall. I also shortened one of the clothing rods since I need the rightmost support to be further away from the right wall to clear my ladder protection panel's frame. It all works fine, so I cut a few more shelves for the narrow section. The narrow spot is probably only useful for shoes, but since this room will be used as an office, it could also be used for printer paper, etc..
I did one round of filling and sanding on the room side of the room door. I'll put another coat of B-I-N on it tonight.
Going back to the closet storage, I slotted a 11.75" wide melamine board I had on hand for the french cleat on the side wall. This will be a third support for the space that was not utilized by the previous configuration. Since it's shallower than the other supports, I'll need to drill new shelf holes in one of the existing vertical supports to support the front of shelves. I also need to drill new holes along the back of this support since the existing ones are a bit further from the edge than I'd like for shallower shelves (I don't want them to be easy to tip). I also need to drill 2 rows of holes in the new board since it's a blank slate.
I drilled 37 holes along the back edge of the existing center support for the new setup, 2.125" from the back edge. I then drilled 37 holes that are 10.75" from the back edge, so they'll fall 1" from the front of the new shelves. I did this with the Kreg 5mm shelf pin jig since the existing shelf pin holes are 5mm. I then drilled all of the holes in the new piece of melamine, which worked out to be 36 holes per edge since the board is about 1/2" shorter than the original verticals and hence there wasn't room for the 37th hole.
I brushed another coat of Zinsser B-I-N on the room side of the room door. If I'm lucky, I'll be able to sand this coat and be done with the patching and priming stage.
-
Bedroom 2
- August 6, 2017
-
Bedroom 2
I sanded and then applied some lightweight joint compound to the hole patch in the closet ceiling. Hopefully this is the last round. There isn't really enough room to effectively use my 8" or wider taping knifes, so I'm using a 4" putty knife.I removed the room door and took it to the basement. I started the filling/patching of the door. After several rounds of filling and sanding, I'm almost done patching up the hallway side of the door. I vacuumed it and wiped it down with a damp rag. I eventually got 2 coats of Zinsser B-I-N brushed on this side. It will need a light sanding before I paint this side, but now I need to patch and prime the room side. Kind of crazy that almost all of the doors in the house have lots of gouges on both sides. Almost as if the previous owners were housing a wild animal, but I'm sure it was just a rambunctious dog who figured out he could open the doors by clawing at the door handles.
I went to Lowe's and Home Depot for some supplies and tools. Since I'm using the basement for a lot of refinishing work, while also doing spackling and joint compound in the bedroom, I've been hauling my small Shop Vac (that can take fine filtration bags) from the 2nd floor to the basement and back many times per day. I finally got smart and bought a second one (same model, different color) so I can leave my old one in the basement. Like my existing one, I bought the 12' crush-resistant accessory hose since it's much more durable and flexible and I need the length so I can keep the vacuum exhaust far away from the joint compound and spackling dust when I'm vacuuming it up after sanding. I bought some velcro straps to manage the hose when the vacuum is not in use. Having the two vacuums will save me time and mojo. I also bought a 1/4" spiral upcut router bit so I can slot the MDF of the closet storage supports after I modify them. I also bought a Lutron Maestro dimmer set for the basement stairs, since I was never able to get the pairing of a Lutron Maestro occupancy switch and a plain old rocker switch to work correctly in a 3-way setup. I intend to move the occupancy switch to the closet of Bedroom 2, and set it for vacancy mode (manual on, automatic off).
Lowe's didn't have the radiused MDF boards I wanted for my storage modifications, despite their web site showing dozens in stock. I wound up buying just a couple of 4' long straight edged pieces at Home Depot. I bought a Kreg shelf pin drilling jig and some 5mm shelf pins.
At night, I made the mistake of trying to sand the joint compound I had applied in the morning. It looked and felt dry, but beneath the surface it had not cured. I should know better, joint compound always takes a day to dry. A glob of it came out. So I used a hair dryer to cure what remained, sanded and applied spackling compound in the quarter-sized spot where the joint compound had come out. Spackling compound dries faster, though not as hard. That's OK on the ceiling, especially since I'm going to prime this spot with Zinsser B-I-N. Hopefully tomorrow, since I'd really like to have the closet priming done so I can start the trim and then paint the closet so I can put the storage units back in it.
Speaking of the closet trim, I haven't decided whether or not I'm going to fabricate a top casing and cornice or just use casings and rosettes. I'm leaning toward the latter to save time and space. The storage unit adjacent the door could run into anything much wider than the casings I'm using.
I flipped the door over in the basement, cleaned it with denatured alcohol and sprayed a coat of Zinsser B-I-N on it. It will need some filling and sanding cycles before I can paint it.
-
Bedroom 2
- August 5, 2017
-
Bedroom 2
I lightly sanded the top casings and cornices for the closet door and room door. I then nailed them in place.I started some of the nail hole and joint filling on the window trim.
I temporarily remounted the room door on the new hinges so I can cut and nail the new door stop moulding and to make sure the door easily clears the new flooring. I cut and installed new oak door stop moulding. Tomorrow I'll remove the door again for patching and refinshing. It has multiple holes in it (former owners liked to lock children in rooms?), and severe dog claw gouges around the door knob. I'll fill, sand, prime, sand and paint the door. It should look like new when I'm done, but painted instead of stained.
-
Bedroom 2
- August 4, 2017
-
Bedroom 2
I pulled the masking from the east window sashes. Unlike the west window sashes, these won't require touch up. I'm going to give the paint another 6 hours or so to cure, then reinstall the sashes.None of the drywall edges around the closet door were fastened with screws or nails. If I tapped on it, it rattled against the door framing. I screwed it down on both sides with drywall screws. While the trim nails will help hold the drywall to the framing, it's just not a good thing to not have the drywall fastened here.
I measured for the closet door side casings and cut and installed them. I am not installing the plinth blocks yet since I want the floor to remain taped until I'm done with most of the joint compound work. I cut the pieces for the top casing and cornice pieces on the miter saw and table saw.
I temporarily installed the new hinges for the room door, then measured, cut and installed the interior door side casings. I then measured for the top casing and cornice pieces and cut them on the miter saw and table saw.
I glued, clamped and pin nailed the top casing and cornice pieces for the closet door. I then did the same for the pieces for the room door. I then sprayed a coat of Zinsser B-I-N on them.
I reinstalled the east window sashes along with the final piece of new jamb liner.
-
Bedroom 2
- August 3, 2017
-
Bedroom 2
I had to touch up the west window's lower sash. The 3M blue masking tape I used is crap, it lifted in a couple of spots and blocked the sprayer. I've had no problems with 3M blue masking tape in the past, but the rolls I used for the east and west windows are much thinner than my other rolls and the tape doesn't adhere to itself. It seems the tape has way too much non-stick on the back of the tape. These are 1.41" wide rolls. I'll go back to using the 1.88" wide rolls.I applied the second round of spackling in the closet, including the patch in the ceiling. Hopefully this is the final round for the ceiling patch so I can get started on priming the closet soon.
I reinstalled the west window sashes and the last piece of new Andersen jamb liner.
I removed the east window sashes and replaced them with foam insulation. I sanded and vacuumed them, then wiped with denatured alcohol. I then primed both of them with Zinsser B-I-N, and sprayed two coats of paint on them.
I put the first coat of Zinsser B-I-N on the plinth blocks for the interior of the room. This is just for the purpose of sanding and reducing the end grain roughness.
I discovered that a large drinking straw is a good tool for applying spackling to the nail holes in the fluted casings. This will speed up my spackling and sanding of the window and door casings.
I think I'm going to try reusing some of the previous MDF storage. the main problem with the old storage was the depth on the far wall unit causing problems getting into the attic. I can rip the MDF down to about 11.5" and still be able to hang clothes. I need a 1/4" up spiral slotting bit for the router so I can cut the slots for the french cleat. And the Kreg shelf pin jig so I can make new shelf pin holes if needed.
-
Bedroom 2
- August 2, 2017
-
Bedroom 2
I touched up the west window's upper sash again. Hopefully this is the last touch-up.I put builder's paper on the closet floor in preparation for drywall patching on the ceiling and walls.
I applied the first round of joint compound in the closet and on some of the north window. I later sanded some of the north window.
I sanded, primed and painted the lower sash of the west window.
I'm still trying to figure out what to do about storage in the closet. The old layout wasn't workable since it obstructed access to the attic and didn't maximize use of the space. The storage next to the door was mostly OK depth-wise but poorly laid out.
-
Bedroom 2
- August 1, 2017
-
Bedroom 2
I touched up the paint on the west window's upper sash.I installed the UHMW panel in the closet. It will rarely be used, but it's nice to have the wall protected from ladders.
I carefully measured and then cut a hole in the ceiling with a 4.125" hole saw and installed a rework ceiling electrical box. I moved the wiring from the existing box to this box.
I removed the old ceiling box. I then screwed some short pieces of 2x4 to the ceiling joist to support a patch for the hole left by the old ceiling box. I screwed the cutout from the new hole to the 2x4s to fill most of the hole from the old ceiling box. I applied the first coat of spackling just to fill the gaps around the patch, which will allow me to apply Fireblock expanding foam on the attic side tomorrow. I need to put builder's paper on the floor in the closet before I do more drywall patching work.
It will be nice to have a nearly flush light in the closet that doesn't get in the way when accessing the attic. Not to mention 2000 lumens of 4000K light using only 23 watts.
-
Bedroom 2
- July 31, 2017
-
Bedroom 2
I removed the sashes from the west window to prime and paint them. In their place is some foam insulation (it's 85F today). I sanded the top sash, primed it and put two coats of satin white enamel on it. I've got a run in one spot that will need to be sanded and touched up tomorrow.I shaved the width of four plinth blocks on the table saw to get a workable reveal inside the room without having to do a lot of patching of the door jambs.
I'm now working in the closet. I worked up a plan fir the UHMW panel to protect the wall from ladder dings when climbing into the attic. I created a frame for it from 3/4" thick oak, ripped to 2.25" width. I cut a 3/4" wide by 1/4" deep rabbet in the back to hold the UHMW. The UHMW won't be attached, it'll just be held against the drywall by the frame. That will allow me to replace the UHMW if it gets too beat up, without having to create a new frame. Of course I hope to never need to replace it; current price is $41.59. It can of course be flipped over since it's the same on both sides.
I need to route the edges of the frame, then figure out if I can use biscuits to join it. At the moment I'm leaning toward using pocket hole screws.
-
Bedroom 2
- July 30, 2017
-
Bedroom 2
I had to pull the right side casing from the east window due to the window jamb standing too proud from the wall in the upper right corner of the window. This caused a gap I couldn't really accomodate with the top casing and cornice. After carefully removing the casing, I planed the edge of the window jamb to be nearly flush with the wall, then reinstalled the side casing. I then installed the top casing and cornice that I finished fabricating yesterday.I installed the applique in the center of the top casing of the center window. I primed two more appliques to install on the east and west windows, and installed them.
I installed the cove transition pieces on the east and west windows. So as of now, all of the window trim is installed. I need to fill the nail holes, sand, etc. But I now need to continue removing sashes and refinishing them, since removing the jamb liners scrapes on the stools a bit.
I masked the glass of the upper and lower sashes of the east and west windows in preparation for removing the sashes and refinishing them (sand, prime, spray with enamel).
I removed the door stop from the room door jambs. I'm going to do some first-pass patching of the door jambs before installing the new oak stops. Someone drilled a hole in one of the side jambs, and it's gouged near the catch from the previous owner's dog.
I am looking at the plinth blocks for the doors. I might need to shave a bit off of their width to attain a symmetric reveal. It partly depends on how much work I want to do on the jambs. The previous casings were the typical 2.25" builder-grade casings, and they were installed with almost no jamb reveal. Some of the nail holes are close to the inner edge of the jamb. I don't really want to spend time filling holes in the edge of the jambs, but I will need a little bit more jamb reveal from the casing in order to correctly install the plinth blocks. I didn't do this in Bedroom 3, and I regret it. Those jambs were more beat up, and I didn't feel like replacing them and cutting new hinge mortises. So there I had little reveal and put the plinth blocks flush with the casing on the inner edge. It looks OK but not great. The only reason it looks OK at all is that I spent a lot of time making the casing and plinth block joints disappear so it looks like they were cut from one piece of wood.
-
Bedroom 2
- July 29, 2017
-
Bedroom 2
I installed the side casings on the west window. I finished creating the window top casings and cornices and glued the parts together.I was recently asked (again) how I got such perfect miters on my window trim returns. For example:

The answer is that I cheat. Those aren't miter cuts. Where possible, I create my trim stackups out of solid boards, and route the edges on my router table. That window trim is really just three routed pine boards stacked and nailed and glued:

Clearly the advantage to doing it this way is the lack of miter joints to open/close with humidity changes, house settling, etc. The disadvantages: it takes more time to get the trim on the wall, and pre-gluing means you wind up with a rigid piece that you can't flex to accomodate a less-than-flat wall. Even if you use MDF trim boards (which are a little bit more flexible), the glue joints add significant rigidity. Also, you can't avoid miter cuts for inside corners. And of course this doesn't work well for stained trim; no one wants to see the end grain, and with a highly detailed contour, good luck sanding out the router burns on the end grain without losing some of the sharpness of the contour.
-
Bedroom 2
- July 28, 2017
-
Bedroom 2
I installed the new hinges on the closet door and door jamb and rehung the closet door, just to I could install the new oak door stop moulding in the right place. I then cut and installed the door stop moulding (Julie helped).I cut and installed the side casings on the east window.
I started fabricating the top casing and cornice. I've decided to not use the rosettes. I cut a bead in a flat piece of select pine for the top casing. I cut a cove in a flat piece of select pine as the lower part of the cornice. I used a classical but for the bottom ede of the top part of the cornice.
-
Bedroom 2
- July 27, 2017
-
Bedroom 2
I reinstalled the lower sash of the center window, and then the new lower left jamb liner.I put a coat of Zinsser B-I-N on all three of the new apron boards.
I installed the stool of the center window, using silicone caulk at the sill per Andersen's instructions (which the original installer did not do).
I installed the center window's apron and the cove transition. In the process of installing the apron, I realized I was out of 2.5" 15-gauge nails for my Senco SFN40 and running low on 2" 15-gauge nails. So I made a run to Home Depot for nails, and also picked up the satin nickel door hinges and a few pieces of 1x4 select pine..
I installed the center window's side casings. I measured and cut the frieze, but I'm still debating the design of the entablature so it's possible I won't use it. I was planning to use the same design as Bedroom 3, which doesn't really have a frieze; it's just a flat casing the height of the rosettes, with the cornice directly on top.
I put the second coat of paint on the room side of the closet door. Tomorrow I'll probably install the new hinges just so I can hang it briefly and cut/install the new door stop pieces so I can start patching and priming the door jambs.
I installed the west window stool and apron, then the east window stool and apron. I've yet to install the cove transitions on these aprons.
-
Bedroom 2
- July 26, 2017
-
Bedroom 2
I flipped the closet door on my sawhorses and put the first coat of satin white spraypaint on the room side of the door. It will need a second coat, and a bit of touching up; the nozzle dripped when I was almost done with the first coat.I masked a second window sash for sanding/priming/painting.
I measured for the center window apron. It needs to be 46 5/16" long. I then created all three apron boards out of oak with the table saw, miter saw and router table. I used a Rockler 1/4" beading bit and a 1/4" roundoff bit on the router table to create a bead on the bottom of the apron. The whole stool/apron stackup I'm doing is inspired by Greek Revival style. Bullnose stool on top of simple beaded apron, with a cove transition.
I sanded and primed the second window sash. I should be able to get paint on it before I go to bed, though it needs sanding in one area.
I went to Home Depot for more builder's paper, Zinsser B-I-N spray, some 1x4 poplar boards, adhesion promoting primer for plastics, stainless steel wood screws to replace the ones the original window installer broke in the jamb liners, .94" wide masking tape and some cheap microfiber towels. I forgot to get the door hinges I need, but I'm not in a big hurry for those since the doors will not be reinstalled for a while.
I sanded the rough spot on the second window sash and touched it up with primer, twice. It's still not perfect, but I can live with it. I'm not sure what caused the damage to this sash, since it was from the previous homeowners.
I sprayed two coats of satin white enamel on the second window sash.
I sanded the aprons in preparation for priming. Obviously I'll prime after installation, caulk and joint compound. But the first coat is to prevent tannin bleed, and for that I'll use Zinsser B-I-N.
Tomorrow I hope to put this sash back and start working on the window trim for this window, and also starting the sash refinishing on the second window. I also want to start the light fixture planning for the closet, which I think is going to require some drywall patching.
-
Bedroom 2
- July 25, 2017
-
Bedroom 2
I removed the masking on the upper sash of the center window, reinstalled the hardware and reinstalled the sash in the window. It slides OK, so I don't think I need to worry about my painting affecting the sash's ability to move in the jamb liners. I just need to continue doing the preliminary sanding before priming and painting, and not overdo it on the primer or paint. I will buy some silicone lubricant to make the windows glive even easier than now.I patched the gouges and holes in the room side of the closet door. I then sanded and applied 2 coats of Zinsser B-I-N.
The humidity in the basement is around 75%. I turned on one of my dehumidifiers so that the next steps will be a little shorter.
I later sanded the room side of the closet door, then flipped it over and sprayed one coat of satin white Rust-Oleum 7791830 on the clkoset side. The basement humidity is still above 60%, since the dehumidifer tank filled up while I was weed wacking and mowing the lawn (a many hour job).
I need to go to Home Depot and Lowes for some supplies.
-
Bedroom 2
- July 24, 2017
-
Bedroom 2
I installed all three sets of the new jamb liners. I haven't screwed down the final piece of jamb liner in each window since I'll be pulling them in/out over the next day or two while I paint and prime the windows.I lightly sanded, primed and painted the top of the middle window after masking the glass with masking tape and newspaper. Given where I am with this project, I'm probably going to have to put some plastic sheeting in the window. I'd like to allow the paint to dry for 48 hours before reinstalling the window. It's going to make this project very slow, but slow is the only way to do it right. I can't match the durability of a factory finish, but I'm using an oil based alkyd paint (Rust-Oleum 7791830) that has worked well in Bedroom 3 on the door and closet doors.
I started taking measurements for the west window apron and casings. The apron should be 38.25" long. I haven't really decided on the height, but 3" seems reasonable since the casings are 3" wide. If I use cove moulding from the apron to the stool, what is the reveal between the bullnose stool and the cove?
-
Bedroom 2
- July 23, 2017
-
Bedroom 2
I went to Home Depot for some oak door stop moulding, satin white spray paint for the windows and doors and a 1'x2' LED panel light for the closet. The existing fixture in the closet is jammed against the moulding for the attic access door, and because it's a bulbous flush-mount, I bonk it every time I go in the attic. The moulding I want to use for the attic access door won't fit around the existing fixture's placement without cutting it (which would be an ugly hack like what's in there now). I also bought a quart of Zinsser BIN to prime the window jambs and door jambs.I made the final near-the-wall cut of the hardwood ends along the east bay window using the Dremel Ultra-Saw. The reviews were correct: the blades don't last very long. Granted, hickory is a hard wood. But I only made about 16' of cuts total and the blade is starting to burn wood. Thankfully I don't expect to use this tool very often. The tool itself is dandy, but the wood blades are crap. I went gently and never bound the blade in any way.
I cleared the room and vacuumed and wiped the floor in preparation for covering it with paper to protect it from all of the work to come.
I removed the hardware from the closet door and room door, then prepped the closet door for patching and priming in the basement. I lightly sanded both sides with 150 grit just to get a clean surface with a little mechanical grip. I put a coat of Zinsser BIN on the closet side of the door, which doesn't have any gouges. The front side has dog claw gouges that will need a little filling. I might be able to do that with just the Zinsser B-I-N since it sands beautifully. Every time I work with B-I-N, I marvel at how nice it is to use as a primer. Dries REALLY fast, seals well, and the second coat glides on and even self-levels to some extent.
I started putting builder's paper on the floor. I'll probably use a drop cloth too, but the paper is handy for full coverage and no tripping (great before painting a ceiling). It's also very inexpensive, and it breathes.
-
Bedroom 2
-
Second floor hallway
I went to Menards for the saddle color hickory stair nosing, a 6' long 1x6 hickory board for the riser of the step into Bedroom 3, 6 more tubes of Loctite PL Premium, and a 1" sanding drum for the drill press so I can shape the moulding around the step for Bedroom 3.
- July 22, 2017
-
Bedroom 2
I installed the last full-width piece of hickory on the floor, then installed the partial pieces. I cut and installed a sacrificial piece at the threshold to protect the edge of the final row until I install the hardwood in the hallway. I cut the bottom half of the joint off of this piece so it doesn't hold on to the piece I'm protecting and will be easy to remove when I'm ready to do the hallway hardwood. I also cut a large bevel on the hallway edge of this piece.
-
Bedroom 2
- July 21, 2017
-
Bedroom 2
Still installing the hickory flooring. When I was about 12 inches from the final wall, I trimmed off the door jambs so that I wouldn't risk damaging the new flooring in the process.These final rows are going slowly because it's all pre-drilling and hand nailing since I'm now too close to the wall to use the floor nailer. I have one full board remaining, then the final partial row with a special cut for the threshold area. My knees are sore despite the new knee pads, and I need to open a new tube of Loctite PL Premium. Hence I'm calling it a day and will finish tomorrow morning.
The floor feels rock solid.
-
Bedroom 2
- July 19, 2017
-
Bedroom 2
I finished installing the hickory flooring in the closet. Phew, that wasn't easy. Very little room to work, and hand nailing of 4 rows. I double the nail schedule when hand nailing since the finish nails don't have the gripping power of the floor cleats from the pneumatic nailer. The shoe moulding will cover the face nails in the final row. I pre-drilled 3/32" holes before installing those nails to avoid splitting.I installed 3 more rows of hickory in the room.
I went to Home Depot for a Dremel Ultra-Saw (US40). It was marked down to $99 today (from $129) and I had a Home Depot gift card. I'm using this to trim off some of the flooring edges on the bay window walls that wound up closer to the drywall than I'd like. I've already done one of them, using the flush-cut blade. The blade guard acts as a shoe when using the flush-cut blade. I kept it away from the wall a bit since I'm not actually flush cutting, but eyeballing the normal wood blade led me to conclude that I needed the flush cut blade since I only want a 1/2" gap. It's no Festool TS55, but it works. I suspect the blades don't last long, but for my needs right now, it works well. It does make a huge mess, and while there is a dust port attachment available, it looks to me like it would not be very effective (an afterthought, like many tools other than Festool). The dust port is on the opposite side of the housing from the blade, and it's very small. With the flush cut blade, it probably does almost nothing since the flush cut blade winds up on the outside of the blade guard. This isn't a tool for a flooring professional; they'd want a Festool TS55 or the like. And a dedicated jamb saw.
-
Bedroom 2
- July 18, 2017
-
Bedroom 2
At 30 rows of flooring, I successfully navigated a tricky spot at the other side of the closet door jamb. I now have 36 rows of flooring installed.I did a little bit more work in the closet. Finishing the closet floor is the first thing on tomorrow's list.
For what it's worth, I just finished the 4th tube of Loctite PL Premium 3X. I assume I'll use 2 to 3 more tubes on this room. It's inexpensive in the grand scheme, but it means I'll need more once I start working on the hallway and Bedroom 1. One tube per 22 sq. ft., roughly. It'll be less for the 4" wide boards.
-
Bedroom 2
- July 17, 2017
-
Bedroom 2
26 rows of flooring are installed. I was sidetracked a bit today by a trip to Menard's for the hallway hardwood, some knee pads, more 6D finish nails and a new tape measure.
-
Bedroom 2
-
Second floor hallway
I picked up the 4" wide hand-sculpted hickory from Menard's for the second floor hallway.
- July 16, 2017
-
Bedroom 2
22 rows of flooring are installed.I wound up needing to notch around the closet door frame. Not a big deal, and it turned out nicely. To alleviate the headaches of backtracking in the closet, I fabricated some spline to reverse the direction of the layout in the closet for a few of the boards. I used a scrap piece of flooring that had an incomplete tongue, and cut the spline using my table saw and router table. I then installed the notched piece leading into the closet, along with one piece of flooring attached to the notched piece with the spline. I used 6D finish nails to install the piece that is too close to the closet wall to use the floor nailer, after pre-drilling with a 3/32" drill bit. I'll do the same for the remaining boards to reach the closet wall. The closet is now ready to be covered in concert with the rest of the room.
I'm still waiting for Menard's to confirm the readiness of the remaining hickory for the hallway and Bedroom 1, hence I didn't get kneepads today.
-
Bedroom 2
- July 15, 2017
-
Bedroom 2
19 rows of flooring are installed.I cut off the bottom of the closet door jambs to accomodate the new flooring. I did this old-school style: double-sided Japanese-style pull saw, guided by a piece of scrap flooring tacked to the floor with my finish nailer. IMHO, this is a better way to cut off door jambs than using an oscillating multi-tool, unless you will run into nails. Check for nails first!
From measurements it looks like I might get lucky on the first door jamb, and will not need to notch the flooring there. It's VERY close from my measurements, so we'll see when I get there. It would be a bonus since I need to track backward several boards once I'm around the jamb, and it's always a little tricky to get this just right without face-nailing a bunch of rows. I could of course just install a sill piece, but I'd like to just flow right into the closet with no visual break.
My knees are starting to bug me from all the kneeling on hard surfaces. Since I have a lot more flooring to do in the house, I'll be picking up some knee pads from Menards tomorrow.
-
Bedroom 2
- July 14, 2017
-
Bedroom 2
The first 11 rows of flooring are installed. It's been going slowly because I've been fussing about color distribution and I'm still in the bay window area which means angled cuts on each end. One more row will complete the bay window area, but not long afterward I'll run into the closet area which will be tricky.I went to Home Depot to get a pull bar, some 6D finish nails and some 3/32" drill bits. I'll need these in the closet as well as on the final rows of the room.
-
Bedroom 2
- July 13, 2017
-
Bedroom 2
I finished installing the Floor Muffler underlayment, including the closet. I marked floor joist lines on the underlayment so I know where they are when driving the floor cleats.I cut and installed the first board. It's 2" wide on the face, and the full length of the space between two of the bay windows. Hence it is angled on each end. I then cut a long piece for the second row, which had to be cut for the HVAC duct. I used a brand new Bosch T101BF blade in my Bosch jigsaw, and it worked well.
I finished the first 4 rows of flooring. Like Bedroom 3, I am putting a thin bead of Loctite PL 3X in each tongue and groove joint. It makes the installation slow, but in combination with the Floor Muffler, it pretty much guarantees that the floor will never squeak. The floor ends up being a single slab.
-
Bedroom 2
- July 12, 2017
-
Bedroom 2
I stopped at Home Depot for some Loctite PL 3X and some new blades for my Bosch jigsaw. I stopped at Lowe's for some more Bostitch FLN-200 flooring cleats.
-
Bedroom 2
- July 11, 2017
-
Bedroom 2
I finally cleaned up the subfloor and started putting down the Floor Muffler underlayment (same stuff I used in Bedroom 3). It's going slowly since I'm stapling it down, and that requires two layers of packing tape under each staple. Without the tape, the staples just penetrate/rip the Floor Muffler. I did the same thing in Bedroom 3, but I didn't use as many staples. I'm using more this time to help it lie a little flatter. I'm using the Arrow PT50 pneumatic staple gun with 5/16" T50 staples. Once a few rows of the hickory flooring is in place, the staples will be irrelevant.Layout wise, my starter strip of hickoery needs to be cut to 2" of face width, and spaced 1/2" from the exterior wall. I haven't checked yet if that's enough space to utilize the ratchet strap tools, but I believe it's sufficient.
-
Bedroom 2
- July 7, 2017
-
Bedroom 1
I purchased 18 cartons of Great Lakes hand-sculpted 4" wide x 3/4" thick hickory hardwood flooring from Menard's. It's saddle color. It was on sale for $4.99/sq.ft., the best price I've seen them advertise. I managed to escape a nasty thunderstorm by just a few minutes when leaving the store, so the wood stayed dry. I had to rush it into the house when I got home, but it's now inside and acclimating.
-
Bedroom 1
- February 18, 2017
-
Garage
I finished the router table enclosure. The front is hinged on the bottom edge, and a magnetic catch keeps it closed. I installed A small cheap knob for opening/closing.
-
Garage
- February 4, 2017
-
Garage
I installed the left, right, back and bottom panels of the router table enclosure. They all have multiple coats of polyurethane inside and out.
-
Garage
- January 29, 2017
-
Garage
I continued working on enclosing the underside of my router table. I don't think I need a polycarbonate front; I don't need to see inside when the front is closed. All I need is a full-width front door for router access. And I'd like to finish this with parts and scrap I have on hand.I cut and glued some oak supports on the side and back panel of the new enclosure just to provide more glue/screw area for the bottom. On the buttom panel, I glued a 1/2" thick piece of plywood near the front edge to provide more support for the front door hinges. The front panel will hinge downward so it stays out of my way when it's open. I'm using some door hinges I bought for something else but wound up not using.
I cut and glued together some pieces of 1/2" plywood to hold the commonly used router tools: the allen wrench for above-the-table height adjustments and the two wrenches for bit and collet changes. I'll glue this to one of the side panels.
I put a coat of polyurethane on some of the panels. This isn't for beauty, it's just to seal the plywood.
-
Garage
- January 28, 2017
-
Bedroom 2
Still sick, but I cleaned one of the window screens with ammonia/water. It was very dirty. I also cleaned two of the windows, inside and out. Not thoroughly, since I will soon be removing the sashes to paint them on the inside. Hoping for some warmer weather.
-
Bedroom 2
-
Garage
I started enclosing the underside of my router table. I needed to get the plywood out of my way. I need some tool storage, and a means of providing dust collection from under the table. I also needed to mount the safety switch.I cut 1/2" plywood pieces to create the router enclosure. I tested the fitment of the sides and the back, and drilled the holes to mount the sides to the table. The fitment of the rear piece is really tight, I need to shave it down a bit. I am not going to install this piece until later, after I buy and install a dust collection port. For the front, I need a piece of polycarbonate and some hinges since I need access to the router when changing bits or locking/unlocking the router height adjustment.
- January 27, 2017
-
Bedroom 2
Still sick, but I stopped at Home Depot on my way home from work to pick up two gallons of ceiling paint and another gallon of Kilz Original.
-
Bedroom 2
- January 25, 2017
-
Bedroom 2
I'm sick today, so all I did was remove the remaining closet organizer unit from the closet's back wall and sanded the tiny spot of joint compound I had applied over the weekend to patch ladder marks.
-
Bedroom 2
- January 24, 2017
-
Bedroom 2
I ordered white jamb liners from parts.andersenwindows.com Head, left, right bottom and right top for all three windows..
-
Bedroom 2
- January 23, 2017
-
Bedroom 2
I finished drilling the holes for the long nails in the window stools. I also put a first coat of joint compound on the rough areas from the old window stools. They shouldn't need a second coat, but I'll know tomorrow. Other than this patch work, I'm ready to install the new window stools. But...I'd like to replace the jamb liners with white ones since I'll be painting the jambs and sashes white. I shouldn't install the stools until after I've replaced the jamb liners. I will put the jamb liners on my wish list. I need upper and lower right, left and top jamb liners for all three windows. I really shouldn't do the window work for a couple of months when it's reliably warmer outside.
I removed the remaining (junk) blinds and also removed the faux pane dividers.
-
Bedroom 2
- January 21, 2017
-
Bedroom 2
I went to Home Depot to buy a piece of 1/2" x 4.25" MDF that I intend to use as part of the window entablatures. I also bought a Stanley Surform plane to touch up the planing I did on one of the window jambs, and two 2' x 4' pieces of 1/2" sanded plywood to box in part of my router table.
-
Bedroom 2
- January 20, 2017
-
Bedroom 2
I used the Bosch PL1632 to plane a bit of one of the window jambs that protruded too far from the wall. This isn't really what I wanted to do since the window jamb was straight while the framing and drywall is not, but it was the easiest thing to do to allow the window casings to be installed.
-
Bedroom 2
- January 18, 2017
-
Bedroom 2
I continue to prime and sand the window stools. I was hoping to dramatically reduce the depth of the visible grain, but I don't think that's going to happen. It's too deep. I could have slurried with shellac and fine sawdust, but they're window stools, not fine furniture. And given the thermal expansion and contraction they'll see, I probably don't want a thick coating. Some visible grain is desired, since it reveals that it's real oak. I think I'm going to call it done for now and move on to final wall patching around the windows and inside the closet. But the next set of painted window stools will likely be poplar just to avoid the deep grain issue.
-
Bedroom 2
- January 17, 2017
-
Bedroom 2
The doorstop for the door to the hallway arrived. The UHMW to protect the wall from ladders in the closet arrived.I put a coat of Zinsser B-I-N on the top of the new window stools. After it dried (less than 30 minutes), I sanded the window stools and sprayed a coat of Kilz Original on the bottoms. After it dried, I put a coat on the tops.
-
Bedroom 2
- January 16, 2017
-
Bedroom 2
I ran the east and west window stools through the router table again, this time with the fence in an outboard configuration. This cleaned up the end-of-cut issues. The window stools are now ready for primer; I sprayed a coat of Zinsser B-I-N on the bottom sides.
-
Bedroom 2
- January 15, 2017
-
Bedroom 2
I went to Sherwin-Williams and bought four gallons of Duration paint for the walls of Bedroom 2. Color SW7684 (Concord Buff), flat.I went to Lowe's and bought a Bosch PL1632 planer to fix the jambs of the windows, some of which are nowhere near flush with the drywall. I bought ten more cans of Rust-Oleum satin white spraypaint to refinish the doors and the window grills. I bought a can of Great Stuff window and door sealant, and another tube of Loctite PL Premium.
I bought four more of the Legrand NTL885TR-WCC6 electrical outlets with nightlight that I like. I bought casters, plywood and fasteners to make my router table mobile. I also bought a box of fifty 42-gallon contractor bags since I was running low.
I ordered a piece of UHMW for the wall in the closet. This will provide protection from the ladder, which scars up just about anything else when I'm using it to access the attic. The UHMW is white, 1/4" thick and 24" square. It won't be beautiful, but it will look better than scarred up wood and drywall and it's in a small closet; very few people will ever see it.
I removed the center window screen and then removed the window stool. I cut and routed the replacement. I had to make a second pass at the router table with the fence guiding the non-cut side of the stool (i.e. as an outboard fence). This is because my router table fence doesn't have offset capability.
I put my router table on a mobile base. 3/4" plywood bolted to the stand with 1/2"-13 grade 8 bolts and locknuts, and 4 fully locking 3" casters bolted to the plywood. I need to loosen and retighten the stand bolts since it's not quite square, and build sides and shelves, but at least I can now move it easily.
-
Bedroom 2
- January 14, 2017
-
Bedroom 2
I bundled up the carpet and padding with packing tape so I can take it to the landfill and recycling center on Monday. I swept the floor and then vacuumed most of it with my smaller shop vac.I mounted the Bosch 1617EVS router in my Rocker router table. Despite what Rockler had claimed, their router plate doesn't accomodate above-the-table height adjustment for the Bosch 1617EVS. I removed the router plate and drilled a hole in it on the drill press so I can use the Bosch 1617EVS above-the-table height adjustment.
I removed the west window stool. I finished cutting and routing the window stools for the east and west windows. The Freud 99-462 router bit works nicely with the new router turned down a bit from full speed. And I love that the new router has speed control ad well as the smarts to keep the bit at a constant speed under load.
Tomorrow I'll remove the center window stool and create its replacement. I'm probably going to take a break from working on the room to get some plywood and casters. I want to enclose my router table and make it mobile. I need a place to store the router tools and spare parts, as well as the bits. And lifting it is hard on my back. I will leave part of it open for easy access to the router, but I want a covered bottom area where I can put Systainers.
-
Bedroom 2
- January 13, 2017
-
Bedroom 2
I stopped at Home Depot for some 3" long finish nails I need for the window stools. I also bought three 6' long 1x4 select pine boards and 16' of cove moulding to create simple window aprons.I removed the remaining carpet padding and staples in the room. I removed the carpet, padding, tack strips and staples from the closet.
-
Bedroom 2
- January 12, 2017
-
Bedroom 2
The Freud 99-462 router bit arrived. I believe this will work nicely for the window stool edges.I removed the remaining carpet from the room. I still have more padding to remove, and I have not removed the carpet from the closet.
-
Bedroom 2
- January 11, 2017
-
Bedroom 2
I started removing the old carpet. I didn't get much done (less than 30% of the room), but I'll do more tomorrow night. I'm removing the tack strips as I go, but will need to go over the whole floor to remove padding staples when the padding is fully removed. From what I have seen of the subfloor, it's in better shape than the subfloor of Bedroom 3 and hence I shouldn't need to replace any of it before installing the FloorMuffler underlayment and the hickory flooring. I will of course still be using Loctite PL for each joint to prevent squeaks since I've had great success doing it elsewhere.
-
Bedroom 2
- January 10, 2017
-
Bedroom 2
I ordered a Freud 99-462 window stool router bit from Amazon to route the edge on the new window stools. It should be here on Thursday.I cut some oak to length for the left and right window stools, then cut the rabbet joint on the underside that rests on the window sill frame (metal). For the right side stool, I cut the notches to allow it to fit into place. I tested the fitment, it appears to be good. I haven't cut the stool to width yet since I haven't decided if I want a little more depth than the original stools and Freud doesn't publish detailed dimensions of the 99-462 router bit I am going to use for the edges. I cut the length of the stools 1/2" longer than originally planned just in case I need the length to account for the depth of the edge profile after routing.
My plan is to install all of the window stools on the same day in order to have fresh caulk from a single tube. My plan is to use DAP 3.0 Window, Door, Trim and Siding caulk.
-
Bedroom 2
- January 9, 2017
-
Bedroom 2
I stopped at Home Depot to buy appliques for the window and door entablatures. I also bought a 3-pack of microfiber rolloer covers since I like the one I used for the sealing coat of primer. Finally, I bought new locking pliers since my old ones are trashed. I bought the Milwaukee TorqueLock ones, two sizes of the long-nose and two sizes of the regular. I needed some fully functioning locking pliers to pull the nails from the bottom of the window side jambs after removing the stools. I used one of the new plier sets to pull the nails remaining from the removal of the first stool.I measured the length of the left and right window stools. They're just over 38.75" long. I want the new stools to be about 1.5" longer to accomodate the new casings, so I'll make them 40.5" long.
-
Bedroom 2
- January 8, 2017
-
Bedroom 2
I burned all of the old trim that was removed. It took a while since it's 8F outside (wind chill 0F).I sanded the additional joint repairs. I then cleared out the room and vacuumed in preparation for a sealing coat of Kilz Original primer on the walls.
I put a coat of Kilz Original primer on the walls to seal the drywall repairs. I'll need another coat before painting, but the room already looks much better than it did when I bought the house.
I removed one of the window stools. Sigh, it wasn't caulked. I will need to fix that issue when I install my own stools.
-
Bedroom 2
- January 7, 2017
-
Bedroom 2
I've been working on the joint compound on the walls to repair the drywall damage from the old pair of chair rails that were up high on the walls. Several coats and sanding, with the last coat being Plus 3 (thinner than the all-purpose compound I used on the first few coats). Today I sanded again, and wiped the wall again with a 1:4 mix of ammonia and water (the parts without joint compound). I then patched the small dings that were not part of the trim removal repair. I am hoping to sand those and apply a sealing coat of primer tonight.I removed all of the wall plates. I also removed the window aprons.
This room will likely get flat paint since I've had to do so much drywall repair, but I won't be painting for a while. Once the first coat of primer is on, I intend to start the hardwood floor installation.
Late at night I wound up doing more joint compound, namely around the windows, between the door and the nearest perpendicular wall, and the northwest wall joint that was taped and joined poorly when the house was built. I'll need to sand these areas tomorrow, and maybe finally get a coat of primer on the walls.
-
Bedroom 2
- January 4, 2017
-
Bedroom 2
I finished sanding the first coat of joint compound on the drywall repair from the horrible old border trim. I then applied another coat of joint compound to cover shrinkage from the first coat. I didn't do the area between the northeast window and the closet, only because that area needs a 10" knife. I'll do that tomorrow. There are a couple of areas where the patching is thick (near the door), those will probably need another coat before I do everything with a 10" knife.
-
Bedroom 2
- January 3, 2017
-
Bedroom 2
I sanded a bit of the joint compound repair work. I think I'm going to be able to complete the repair without having to resheet the room.
-
Bedroom 2
-
Bedroom 1
I installed a Hubbell USB15WZ electrical outlet with USB charging ports beihnd where my desk is teporarily located. It might be moved later, but for now it's where I need it to charge my iPhone while I'm at my computer.I installed a Legrand NTL885TR-WCC6 electrical outlet with nightlight between the closets (the spot least likely to be blocked by furniture). the nightlight has 4 selectable light levels as well as 'off', and also has an optional louvred lens. This will give Julie options for its use. I have it set at the highest level and am using the clear lens for now. I like these, I will probably buy more of them soon.
- January 2, 2017
-
Bedroom 2
I removed the casings from the third window. I removed the door casings facing the room on the room door and the closet door. I removed the base moulding in the room.I removed one of the shelving units from the closet wall in order to gain access to the door casing inside the closet. I then removed the door casing inside the closet and the base moulding in the closet. After I dispose of all of the trim, I can start removing the carpeting. I might leave it in place for a bit while I try to patch up the walls and do the window trim.
I scraped glue residue from the wallpaper removal. However, there is so much damage to the drywall from removing the horrible job someone did with wood wallpaper border trim that I fear I can't really patch it up without a tremendous amount of labor. I'm looking at doing some sort of covering, but we'll see how I feel after a first pass with primer to seal the exposed torn drywall paper and a skim coat of joint compound. It's not looking promising at the moment.
I applied a coat of Zinsser B-I-N to the exposed drywall paper and gypsum. I used B-I-N here because it sands nicely and just about anything will stick to it. It's commonly used as a primer before plaster texturing, so I expect joint compound to stick to it. I will need to scrape and sand a bit before applying joint compound. I'm probably going to need a new 14" joint compound knife for the final feather if this repair effort works; my old one has seen better days.
-
Bedroom 2
- January 1, 2017
-
Bedroom 2
Eyeballing the new casings on the windows with a scrap piece of casing, the stools aren't wide enough to accomodate them. I had a feeling this might happen. I went to Lowe's and bought 1x6 oak boards so I can create new stools. I debated the type of wood to use here since I'll just be painting them, but oak is harder and stronger than poplar or pine so I went with it. This isn't going to be trivial work since it's winter, but it shouldn't be too bad. I haven't decided on the aprons yet. I have three windows to do.
-
Bedroom 2
- December 31, 2016
-
Bedroom 2
I finished migrating my office to Bedroom 1. It was a lot of work to disassemble and move my office since my desk is huge and has 8U of rack mounted audio equipment that of course all had to be disconnected and removed before disassembling the desk itself. Then it all had to be reinstalled and reconnected in Bedroom 1. Then there are the three MDV-R12 rack furniture pieces loaded with drawers, a 4U UPS and a gigabit ethernet switch. Lots of weight, lots of wiring.I removed the casings from two of the three windows.
I removed the wallpaper from the remaining two walls.
I removed the mid-wall wood trim on the remaining two walls. God awful trim carpentry by someone. Only a small section was nailed, and not well (incorrect nails, they weren't long enough to penetrate the drywall). The remainder was glued to the wall with construction adhesive. All of the nails were 1.25" 18-gauge. The chair rail is 3/4" thick. The drywall is 1/2" on the interior walls. Do the damn arithmetic. Who hires these kinds of morons? I'm tempted to resheet the whole room, given the damage to the drywall from removing these pieces. Taping and mudding new drywall is probably less work than patching the damage.
-
Bedroom 2
- December 29, 2016
-
Bedroom 2
I got the chair rail and wallpaper off of two of the walls. Removing the two chair rail strips has been a nightmare due to it being glued on with construction adhesive, but I'm going at it with abandon at this point since I know I will have a lot of joint compound and priming work to do.I started migrating my office from Bedroom 2 to Bedroom 1. I'm hoping to finish the move tonight. This is a temporary move, I will eventually move into the den (after it gets a new porcelain tile floor). But I need Bedroom 2 to be empty so I can install the hardwood flooring and do all of the wall repair and replace all of the trim.
Late at night, I finished clearing cruft from my desk and removed all of the non-essential rackmounted gear from it (6U of audio equipment and the 1U power conditioners that supplied the audio gear and other stuff).
-
Bedroom 2
- December 28, 2016
-
Bedroom 2
I was having no luck removing the wallpaper strip on the wall. I went to Lowe's and bought a wallpaper scoring tool and a Wagner Power Steamer 705 wallpaper steamer. Hopefully this will allow me to remove the wallpaper easily. I started using the wallpaper steamer and it makes it easy to remove the wallpaper.Unfortunately, some moron used construction adhesive to attach the chair rail pieces above and below the wallpaper strip. And it looks like this trim was done with scraps; there are way too many scarf joints (most poorly done). Even one of the 12" long pieces has a scarf joint in the middle of it! Sigh, I hate hack carpenters/homeowners. This room is going to be a lot more work than others just due to the fact that this trim is glued to the wall. Even with a heat gun, the construction adhesive isn't letting go and of course too much heat trashes the latex paint on the wall. I'm going to need to repair the drywall after removing this awful trimwork.
-
Bedroom 2
-
Basement
I installed my fifth Nest Protect, replacing the old smoke detector in the basement near the foot of the stairs. I configured DHCP and DNS, it is named protectbm.
- December 27, 2016
-
Bedroom 1
I moved the remaining bookshelf unit out of Bedroom 1 and into Bedroom 3. I also moved the remaining books, except those I'm going to throw out.I finally got around to fixing one of the heat ducts in this room. It was poorly placed relative to the hole in the subfloor, and the hole was actually a little too small for the duct by about 1/8" lengthwise. So the duct would fall into the cavity between the floor joists and hence not really heat or cool the room. I enlraged the hole a bit with my Bosch oscillating tool, then pulled the duct up to 1/8" below the top of the subfloor. I then put a few narrow crown staples through it into the subfloor edges to keep it in place. It should now stay in place. I reinstalled the el-cheapo register, but I'll be installing new ones when I put hardwood flooring in this room.
-
Bedroom 1
- December 26, 2016
-
Bedroom 2
I went to Home Depot and picked up two 100 sq. ft. rolls of FloorMuffler underlayment and 4 tubes of Loctite PL Premium for the hardwood floor installation. I went to Lowe's and bought 2 boxes of Bostitch FLN-200 flooring cleats and two more of the Legrand nightlight electrical outlets that I like.
-
Bedroom 2
-
Second floor hallway
I cut the hole in the ceiling for the Nest Protect outside of Bedroom 2. I then installed the metal joist-mounted ceiling box, using 4 screws to mount it to the joist in the attic.For the power, I'm drawing from the box for the Nest Protect outside of Bedroom 1. This was at the end of the chain, and hence the box isn't crowded. I'm using 14/3, so I can run the communication wire (red) despite the fact that the Nest Protect units use wireless communication and hence don't use the communication wire. I pulled the wire through the box outside of Bedroom 1 and fed it into the new box from the attic and cut and wirenut everything. I then set up the Nest Protect and DHCP to give it a fixed address. It's working fine.
- December 23, 2016
-
Second floor hallway
I bought some 14/3 wire and an octagon metal box with joist nailing plate so I can finally install the third Nest Protect smoke/CO detector on the second floor. This one will go outside Bedroom 2. I figured out where I'm going to place it, but haven't yet decided if I'll use the new metal box or the plastic rework box I have. The Nest Protect isn't heavy and hence either will work. The advantage of the metal box is that it'd be screwed to a joist. The disadvantage is that it is much shallower and hence more difficult to stash wires inside. I also need to decide from which other detector I'll run the power wiring. I don't recall which one is the end of the chain, and I'd like to draw from the final one just to avoid too much wire and larger wire nuts being crammed into a box.The next Nest Protect will probably go in the basement, replacing the basic detector that is there now.
-
Second floor hallway
-
Bedroom 3
I put the first coat of paint on the front of the second bi-fold closet door. Later I touched up a couple of spots with sandpaper and then sprayed the second coat. Finally, I later put the hardware back on and installed the door.
- December 22, 2016
-
Bedroom 3
I finished painting one of the closet bi-fold doors earlier this week, and it is now installed. Today I primed both halves of the second one, and spraypainted the backs and sides.
-
Bedroom 3
- December 17, 2016
-
Bedroom 3
I installed the Rockwood 403.15 door stop on the wall.
-
Bedroom 3
- December 15, 2016
-
Second floor hallway
I finalized the location of the new Ubiquiti UAP-AC-PRO access point on the ceiling of the second floor. I drilled a 5/16" hole and ran the ethernet through it from the attic. I crimped an RJ45 connector on it and installed the baseplate with drywall anchors. I then plugged the ethernet into the main port of the UAP-AC-PRO and installed the UAP-AC-PRO on the base plate. I wired the other end in the basement.The MAC ID on the back of the UAP-AC-PRO reads 1619K802AA88026C7-m857w6. This means 80:2A:A8:80:26:C7. I configured DHCP to always give it the same address, and configured DNS.
I am running the controller on my hackintosh at the moment. Later I'll run it on one of my servers. I noticed a problem: the UAP-AC-PRO was always negotiating 100 Mbits/sec FD on the ethernet switch. This won't do for 802.11ac clients. So I decided to upgrade the firmware on the UAC-AP-PRO to 3.7.29.5446. This appears to have fixed the problem; I've reset the UAP-AC-PRO multiple times and it always negotiates 1000Mbits/sec FD.
-
Second floor hallway
- December 13, 2016
-
Second floor hallway
I drilled a test hole in the ceiling where I want to install a Ubiquiti UAP-AC-PRO access point. This location should yield excellent WiFi service fo the family room and the second floor. It might yield great coverage for the whole first floor, but that remains to be seen. I am planning to install another one in the basement and possibly one in the garage, but only if needed. In any event, I hope the cat5e cable I ran into the attic is long enough. I'll try to finish the installation this week, but it's very cold in the attic since the outdoor temperature is headed for single digits (Fahrenheit).
-
Second floor hallway
- December 11, 2016
-
Bedroom 3
I installed the door. The Rust-Oleum white is several shades darker than the trimwork, but I'm OK with it. It should be more robust since it's not water-based, and it'll be easier to clean. And it much way easier to spraypaint the door versus painting it with a brush.
-
Bedroom 3
- December 10, 2016
-
Bedroom 3
I sprayed a coat of paint on the door, both sides. Rust-Oleum satin white. The hallway side got 2 coats. The hallway side of the door is probably the only side that will ever be seen, since this room is being used as a reading room and not a bedroom. Hopefully I can hang the door tomorrow.
-
Bedroom 3
- December 9, 2016
-
Bedroom 2
I picked up my hardwood flooring order at Menards.
-
Bedroom 2
- December 5, 2016
-
Bedroom 2
The hickory arrived at Menards, two weeks early. I'll need to pick it up sometime this week. This throws a wrench in my plans, but on the upside, the wood will be acclimated in time for the holiday break.
-
Bedroom 2
- December 4, 2016
-
Bedroom 3
I applied the second coat of paint to the door headers, casings, jambs and plinth blocks.I removed the hinges and knob from the door in preparation for patching and priming the room side of the door. I'm priming with Zinsser B-I-N to help prevent color bleed of the original stain. The second coat of primer might just be Kilz Original since it's cheaper.
-
Bedroom 3
- December 3, 2016
-
Bedroom 3
I put the first coat of paint on the door headers, casings, jambs and plinth blocks. I put the second coat of paint on the baseboard and shoe moulding between the door and the closet.
-
Bedroom 3
- December 2, 2016
-
Bedroom 3
I installed magnetic catches on the fold-down window sill extension. These will help prevent accidental release of the supports. I spaced them from the sill with some 3/8" thick acetal. This allows the acetal to act as a stop when hinging out the supports. The magnetic catches just keep them in position once they're hinged out. It works well, I shouldn't have any problem with pets or humans accidentally releasing the supports.
-
Bedroom 3
- December 1, 2016
-
Bedroom 1
I installed a new Progress Lighting P3479-09 brushed nickel flushmount ceiling light fixture to replace the original that had shorted out and destroyed the Lutron remote control dimmer. I also installed a new Lutron remote control dimmer. The remote from the destroyed dimmer works with the new switch, so this room now has a spare remote control.
-
Bedroom 1
- November 29, 2016
-
Bedroom 3
I received some pieces of white acetal and some ball-detent latches to finish the supports for the fold-down window sill. I'm using acetal to allow the supports to slide easily into position; it's slippery but relatively hard and dimensionally stable. It's also easy to work with woodworking tools. I cut and routed the pieces that will act as the interface between the supports and the sill, and drilled countersunk holes and scewed them to the underside of the sill. Works perfectly.The ball-detent latches will keep the supports in position when the sill is in the raised position while still allowing the supports to be released when I want to fold the sill down.
However, the latches get in the way of folding down the sill. I need to rethink this a bit. If I do similar work to another window sill, I'll want to extend the permanent part of the window sill further to accomodate mechanical latches. For this one I should probably consider magnetic catches.
-
Bedroom 3
- November 27, 2016
-
Bedroom 2
I ordered 6 cartons of Great Lakes Hardwood hickory flooring from Menards. 3/4"x3", natural finish. Combined with the leftovers from Bedroom 3, this should be enough to do the floor of Bedroom 2. I bought it now because it was on sale for $40 less per carton, saving me about $250. It will arrive at the store in a few weeks.
-
Bedroom 2
-
Bedroom 3
I primed the plinth blocks, casings, rosettes and header on the doorway. I also caulked the joints.
- November 26, 2016
-
Bedroom 3
I filled the nail holes in the plinth blocks, casings, rosettes and header on the hallway side of the door. I later sanded them.
-
Bedroom 3
- November 25, 2016
-
Bedroom 3
I cut and installed the plinth blocks, door casings, rosettes and door header on the hallway side of the door. Due to space constraints, the header is just a narrow flat piece.I installed the step using Loctite PL Premium and just a few 18 gauge nails to hold it in place while the adhesive cures. Hopefully I will not need to screw it down like the threshold.
I installed the riser between the step and the threshold.
I had to cut about 1/2" from the support brackets for the fold-down window sill and run them through the roundoff bit on the router table again. I then primed the new cuts and put another coat of paint on the brackets.
-
Bedroom 3
- November 19, 2016
-
Bedroom 3
I put the second coat of paint on the window header and window casings. I put the second coat of paint on the casings and header of the closet. I removed the tape around the window.Two of the tall bookshelves are now back in the room. They're ugly and not part of the long-term plan, but for now this is where they'll love. I also put the coffee table back in the room and sealed its slate pieces with 511 Impregnator.
I installed the door threshold with Loctite PL Premium and 3 screws. I installed plugs in the screw holes, but will need to trim them off and sand them flush later.
-
Bedroom 3
- November 16, 2016
-
Bedroom 3
I put the first coat of paint on the window header and window casings. I put the second coat of paint on the window apron. I put the first coat of paint on the baseboard and shoe moulding in the closet.I put the short bookshelf in the room, and put the TV on top of it.
-
Bedroom 3
- November 15, 2016
-
Bedroom 3
I put the second coat of paint on the baseboard and shoe moulding, except the inside of the closet and the section between the door and the closet.
-
Bedroom 3
- November 14, 2016
-
Bedroom 3
I put the first coat of paint on the baseboard and shoe moulding, except the inside of the closet.
-
Bedroom 3
- November 13, 2016
-
Bedroom 3
It wasn't possible to use the existing phone cable as a pull cable for the new RG6 and cat5e runs to the third bedroom. It was apparently stapled in place before the roof and sheathing were done, since no one larger than a gnome would be able to reach the staple locations. Hence I had to find an alternate route...I wound up using a hole saw in the attic above the second floor to get access to the attic above the third bedroom. This wasn't easy; I had to balance on a roof truss 2x4 with my chest while using a 4.25" hole saw in my cordless drill.
I then created a 6' feed stick from some oak stock, and put holes in each end. From the attic to the side of the third bedroom (which is tiny), I put my fish tape through one of the holes in the feed stick and a wire coat hanger through the hole in the other end. I then fed my fish tape between the roof sheathing and the ceiling joist of the third bedroom using the feed stick. I was then able to snag the fish tape from above the second floor through the hole I had cut with the hole saw. I was then able to pull the cat5e and RG6 into the attic adjacent the third bedroom, which is the wall in which I need the wiring. Yay! Of course this took me most of the day jungle-gyming in attic space, but it means the hard work is done.
I installed the low voltage rework box in the wall for the coax and cat5e keystone connectors, pulled the cables through the box, terminated the cables with the connectors, inserted them into the 2-port keystone plate and installed the wall plate.
I reinstalled the side attic access panel in the wall of the third bedroom closet.
I connected the cat5e in the basement. I tested it with my network cable tester, it's working. I will connect the RG6 in the basement at a later date, after I have a better amplifier/splitter in my structured media box.
I still need to finish the work for the Ubiquiti WiFi access point, which isn't really part of the bedroom work.
-
Bedroom 3
- November 12, 2016
-
Bedroom 3
I reinstalled the casement window cranks and then nailed the repaired finish pieces in place. Once I fill the nail holes, there will be no ecidence of the damage the previous owners had done to the windows.I put the first coat of paint on the window apron. I am preparing to paint all of the trim, but I want to install the door threshold first. I'm looking at that now.
I need to run ethernet to the location where the TV will be located. I also need to relocate the coaxial cable. I'm not sure how the original coax was run. I glanced in the attic today, and that part of the attic isn't accessible from the attic above the second floor. Which leads me to believe that the original coaxial was run from below.
I pulled two cat5e cables and an RG6 from the basement to the attic above the 2nd floor. One of the cat5e is yellow for PoE to the new Ubiquiti WiFi access point that Julie gave me for my birthday. I'm hoping to be able to run the other one and the RG6 into the third bedroom for the TV. Given the lack of access, it's likely that I'll need to use the old phone wire as a pull cable. Since I have no need for phone wiring in this room (or anywhere else in the house), it should be OK. Assuming the holes for it are big enough to accomodate an RG6 and cat5e cable...
Jungle gyming in the attic was very difficult due to my injured thumb. I'm taking a break for now.
-
Bedroom 3
- November 11, 2016
-
Bedroom 3
All of the trim is taped off and caulked. I put the first coat of paint on the closet header and door casings. Tomorrow evening I'll try to get the first coat of paint on most of the trim. However, I can't do the door jambs until I decide how I'm going to install the new threshold (adhesive alone or adhesive plus fasteners). I haven't install the outside casings and plinth blocks since I need to install the threshold first.
-
Bedroom 3
- October 29, 2016
-
Bedroom 3
Still sick, but I put a second coat of primer on the door stops and jambs, and put 2 coats of paint on the parts of the window that required it to be open. I really needed to rest, but this might be the last warm day of the year.
-
Bedroom 3
- October 28, 2016
-
Bedroom 3
I'm sick, but I managed to install the oak door stops and get a coat of primer on them and the jambs.
-
Bedroom 3
- October 25, 2016
-
Bedroom 3
I sanded most of the trim, as well as the spots I filled in the door jambs. Tomorrow I hope to start preparing to prime by taping kraft paper to the floor and taping the walls.
-
Bedroom 3
- October 24, 2016
-
Bedroom 3
I'm almost done spackling the nail holes and gaps in the trim (baseboard, shoe moulding, door casings, etc.). I also put putty in the dents and gouges in the door jambs, as well as the gap at the door header. Some of the trim has been sanded. Tomorrow I'll sand some more and spot prime the areas that need it. I'll eventually finish sanding and apply the unifying coat of primer.
-
Bedroom 3
- October 20, 2016
-
Bedroom 3
I put the second coat of satin white spraypaint on the attic access panel. Once it was dry enough, I installed rubber weatherstripping on the back, which will be sandwiched against the drywall. I then installed it with four 2.5" long exterior screws, countersunk in the trim. It seems to be buttoned up tight, it shouldn't leak air and hopefully the insulation is sufficient. It's certainly much better than the original access panel.
-
Bedroom 3
- October 19, 2016
-
Bedroom 3
I filled the nail holes and gaps in the attic access panel, sanded lightly and then sprayed a coat of Kilz Original on it. After it dried, I sanded it lightly and put the first coat of paint on it (Rust-Oleum satin white spray). Tomorrow I'll put a second coat on it.
-
Bedroom 3
- October 18, 2016
-
Bedroom 3
I installed the last few pieces of shoe moulding, including the closet. Tomorrow I can start the slow process of filling nail holes and gaps in trim.
-
Bedroom 3
- October 17, 2016
-
Bedroom 3
I installed the last piece of baseboard outside of the closet. I also installed the remaining plinth block and door casing on the closet. All that remains for trim installation is one piece of shoe moulding ontside the closet and the shoe moulding inside the closet (if I choose to install it there).
-
Bedroom 3
- October 16, 2016
-
Bedroom 3
I went to Home Depot for a Cree 3-way LED light bulb for the floor lamp, a 75W-equivalent LED bulb for one of the table lamps, some weatherstripping for the attic access panel, and some aluminum flashing to use as paint splash protection when I paint the trim.I ordered a Systainer 2 to hold my squaring clamps. I also ordered a Starrett 505P-7 miter saw protractor.
I installed the baseboard in the closet.
-
Bedroom 3
- October 15, 2016
-
Bedroom 3
I reinstalled the closet door hardware, then the doors just so I could make a judgement on the position of the door casings.I installed the plinth blocks and the door casings on the inside of the door.
I installed more of the baseboard and shoe moulding. I also installed the left plinth block and door casing on the closet. I need to decide how to handle the trim in the cramped corner at the right side of the closet, and I also need to install baseboard and shoe moulding inside the closet.
-
Bedroom 3
- October 14, 2016
-
Bedroom 3
I cut some polyisocyanurate foam core insulation to install on the back of the attic access panel. I glued three layers of it together with 3M 90 spray adhesive. I then glued it to the back of the access panel.I finished the hickory flooring in the closet. It was very slow going since I can only effectively use one hand. But now I can remove tools from the room, clean the floor and finish installing baseboard, shoe moulding and door casing.
-
Bedroom 3
- October 12, 2016
-
Bedroom 3
I finished assembling a new attic access panel from plywood and some trim scraps. It fits, I'll prime and paint it later. I need to put some insulation on the back of it.
-
Bedroom 3
- October 11, 2016
-
Bedroom 3
Last night I picked up a new coping saw and some files at Home Depot. I am exhausted due to not being able to sleep well, so I probably won't do much today. I'm one-handed and can't use a mouse or trackball with my right hand, so I won't be updating here either. I wish the local pharmacies had my pain prescription. :-(
-
Bedroom 3
- October 10, 2016
-
Bedroom 3
I cut my thumb badly on the table saw late last night, and had to go to the ER for stitches. I am mostly out of commission as a result; I didn't get much sleep (throbbing pain), and I'm essentially one-handed for a bit. I did install the last of the flooring last night before this happened, except for the closet.Since I need to go out to fill prescriptions, I will pick up a few things I need at Home Depot. I need a new coping saw and some new files for coping the baseboard, and a piece of sanded plywood to replace the half-ass drywall access panel in the closet.
-
Bedroom 3
- October 9, 2016
-
Bedroom 3
I continue to install the hickory flooring. I'm hoping to finish late tonight. I'm working on the last few rows in the room, which I'm face-nailing. I'll then finish the closet.This flooring work has been brutal on my knees and the balls of my feet. I almost couldn't walk this morning. That's what happens when you spend 16 hours squatting.
-
Bedroom 3
- October 8, 2016
-
Bedroom 3
I now have 120 sq. ft. of the hickory flooring installed. The main reason it's going so slowly: I continue to glue the edges of the boards to each other, even though I'm nailing down the floor with 16-gauge cleats. All in the name of preventing squeaks in the future. The other reason is that I'm now running into the remaining obstacles: the closet and the two remaining HVAC ducts. Not to mention that I have to walk a long way to make my cuts since I don't want the sliding compound miter saw in the house. But I'm past the second heat duct now, so the only remaining obstacles are the third heat duct and the closet edges.I removed the closet door supports from the subfloor, since they were just blocks of pine and are visible from outside the doors. Once I run the hardwood over these two spots, I'll just mount the pivot brackets on the hardwood after drilling a pilot hole. The screws that hold the pivot brackets go all the way into the subfloor.
-
Bedroom 3
- October 7, 2016
-
Bedroom 3
I now have 81 sq. ft. of the hickory flooring installed.
-
Bedroom 3
- October 6, 2016
-
Bedroom 3
I now have 55 sq. ft. of the hickory flooring installed. That's a little over a third of the floor. I've racked 4 more rows, and also did a bit of trimming of one side of the door casing to accomodate the new threshold. The new threshold will fit fine, but I've yet to decide how to fasten it. I'm inclined to use countersunk screws and plugs, but we'll see.
-
Bedroom 3
- October 5, 2016
-
Bedroom 3
I installed a bit more of the hickory flooring. I'm not feeling well, so I didn't do much.
-
Bedroom 3
- October 4, 2016
-
Bedroom 3
I installed three more rows of the hickory flooring. These rows went around one of the heat ducts. I tested the fitment of the heat register, it's snug but good. I may need to shave off a bit later to accomodate wood movement.
-
Bedroom 3
- October 3, 2016
-
Bedroom 3
I stopped at Home Depot on the way home and bought 6 tubes of Loctite PL Premium 3X adhesive, 2 bottles of Titebond III wood glue and a box of 1000 flooring cleats (DeWalt brand). I wanted Bostitch cleats, but I couldn't find them in the store despite the web site saying they had some in stock.I am using the Loctite PL to glue the edges of the hardwood floor boards together as part of the nailing process. This adds work to my flooring task, but will help prevent squeaks and also lock together any invisible damage to tongues. I installed 2 more rows tonight using this technique.
-
Bedroom 3
- October 2, 2016
-
Bedroom 3
I finished laying the FloorMuffler underlayment. I hope it works well, since it's more difficult to work with than tar paper.I used #000 steel wool on the riser that will go underneath the threshold, then sprayed a coat of Minwax satin polyurethane on it.
I cleaned up and assembled my straightedge so I can use it to lay the first row of hardwood flooring. I then installed a first row of boards after cutting their width for the expansion gap, face nailing and blind nailing with my finish nailer and 2" 6d finish nails. I then installed the second and third row by blind nailing with my finish nailer and sinking the nail heads with a nail set.
I started racking the flooring, then nailed two rows with my new Freeman floor nailer. So far, so good.
I'm debating whether or not to frame the floor heating registers. It's more work, but it would look nicer. I need to decide before I nail any more rows.
-
Bedroom 3
- October 1, 2016
-
Bedroom 3
I sanded the spackling around the step, and put a coat of Zinsser B-I-N on it just to seal it.I installed the hickory pieces on the step. To avoid visible face nailing, I predrilled holes for 16d finish nails at an angle in the same location on the tongues that my flooring nailer would hit. I then hand nailed these nails most of the way, then drove them just below the surface with a nail set.
I cut the new riser to the correct height, then put a second coat of semigloss polyurethane on it. It will need steel wool after this coat, and then I'll spray on a final satin coat.
I am almost ready to install the oak part of the step.
I marked the location of the floor joists on the bottom of the wall, so I can hit them with cleats when installing the hardwood.
I cleaned up the subfloor and layed about 75 percent of the FloorMuffler underlayment.
-
Bedroom 3
- September 29, 2016
-
Bedroom 3
I stopped at Home Depot for some 8d finish nails. I'll be using these to hand nail hardwood flooring where I don't want to use a nail gun. Pre-drilling and nailing by hand (with a nail set to finish) yields the best results when face-nailing hardwood.I put the first coat of polyurethane on the riser that will be installed below the threshold.
I put some spackling on the holes over the step that were from the trim over the old step.
-
Bedroom 3
- September 27, 2016
-
Bedroom 3
I sanded and then mounted the new closet door entablature and put spackling compound in the nail dimples.
-
Bedroom 3
- September 26, 2016
-
Bedroom 3
I cut the end off of the new closet door entablature where it will meet the wall. Mostly the cornice, and a hair off of the beaded bottom piece of the header. I then sanded a tiny bit and put 2 coats of Zinsser B-I-N (shellac) on the unfinished parts. These are sealing/sanding coats, I'll sand it and install it later this week.
-
Bedroom 3
- September 25, 2016
-
Bedroom 2
I installed Gatehouse L6X203B satin nickel passage door levers on the door to this room and the door to its closet.
-
Bedroom 2
-
Bedroom 3
I finished trimming the closet doors to fit the opening. Sigh, whoever did the trim carpentry in this room was a hack. The doors were too wide for the opening. The metal tabs at the bottom of the doors that are supposed to prevent wood-to-wood contact were bent to where they did nothing, and hence the doors had wood-to-wood contact. And the drywall on both sides of the door opening was chewed up by the door edges contacting it when the door was opened or closed. I didn't remove much from the doors; a thin kerf blade width on each edge with the table saw. This was enough to make the doors functional again.I went to Lowe's and bought new hinges for the door of bedroom 3. I also bought a new passage door lever set, a tube of clear caulk and 12 cans of satin white spray paint. I bought matching door lever sets for the remaining 2nd floor doors. One is a privacy lever set for Julie's bedroom.
I installed three of the four new lever sets, just so I don't lose track of them and don't have more clutter around. The last one is for the bedroom I'm working on, and won't be installed until after I refinish the door.
I used #000 steel wool on the oak step, then sprayed a coat of satin Minwax Fast-Drying poluyrethane on it. This should be the final coat, but I won't know until it's dry.
Having trimmed the closet doors to the correct size, I was able to start measuring and planning for the casings and header trim. This is just so I can create the header before I start flooring. I think I can do the same thing I did above the door to the room, but the trim will have to end early on the right side since the wall is in the way. I made marks on the wall, measured, then cut and routed the pieces I need from MDF. I then glued and pin-nailed it together, minus the applique. The end that needs to be short isn't cut off yet, and none of it has been sanded and primed yet.
I created the riser for the area below the door threshold. It's a piece of hickory running horizontally, with a 5.5" wide piece of oak edge-glued with #20 biscuits on each end to hide the end grain and keep the theme of mixing some oak with hickory. It still needs to be cut to the correct height, which I'll do on the table saw when the time comes.
- September 24, 2016
-
Bedroom 3
I ordered a Festool Systainer SYS 1 to hold the Arrow PT50 stapler and staples.I cut 1/8" off one side of one of the closet doors. I need to do the same on the other door, and probably do the same on the other edges. The doors are too wide for the closet doorway. They press hard against each other (wood to wood instead of just the springs), and the right one shaved away some drywall before I bought the house.
I put the final coat of semigloss polyurethane on the oak step. I'll rub it out and spray a coat of satin on it tomorrow.
I chiseled away about 3/4" width of the threshold subfloor, about 3/32" deep. It was not flush with the subfloor, and this was a problem for installing the hardwood flooring which I'll be running about 1/2" under the final threshold piece. I also lightly sanded the top of the thrshold subfloor, mostly to get a clean, flat surface. I'll be using a bit of Loctite PL 3X adhesive in addition to nails to attach the new threshold.
-
Bedroom 3
- September 23, 2016
-
Bedroom 3
I bought an Arrow PT50 pneumatic T50 stapler at Lowe's. I need this to staple down the FloorMuffler underlayment, and will need it later for similar tasks. I bought a few different lengths of staples.
-
Bedroom 3
- September 22, 2016
-
Bedroom 3
In the morning, I lightly sanded the first coat of polyurethane on the new threshold, then brushed on a second coat (semi-gloss, Parks Floor Finish).In the evening I used #000 steel wool on the threshold, then sprayed on a coat of satin polyurethane (Minwax fast-drying). I expect to apply at least one more coat. The first two coats of semi-gloss were mostly used as sanding sealer.
-
Bedroom 3
- September 21, 2016
-
Bedroom 3
I shaved a bit off of the new threshold to make for better fitment. I also cut the rabbet along the edge that will overlap the hardwood floor, using one of my stacked dado sets in the table saw. I then sanded the whole threshold and applied the first coat of polyurethane.
-
Bedroom 3
- September 20, 2016
-
Bedroom 3
I bought new door stop trim at Home Depot. Even though I'll be painting it, I bought oak for durability.I cut the newly assembled threshold to fit the doorway. I tested the fitment. It fits but needs 1/8" shaved off on each end. I'll do that tomorrow. I also need to cut the rabbet in the edge and run a roundoff bit along the top lengthwise edges.
I need to buy more plinth blocks. EV742PBWHW from Lowe's.
-
Bedroom 3
- September 19, 2016
-
Bedroom 3
I cut the pieces of hickory flooring for the step and tested the fitment. It fits.I finished assembling the threshold.
-
Bedroom 3
- September 18, 2016
-
Bedroom 3
I put a second coat of polyurethane on the new step.I went to Lowe's and Home Depot. I bought a new Hitachi EC99S portable air compressor, since I need one for installing hardwood flooring. I had originally planned to use my main compressor in the garage, but it's a hassle to run back and forth to adjust the regulator and leaving the door to the garage open at this time of year is equivalent to putting a "Welcome, field mice!" sign on my door.
I also bought polyurethane, paint brushes for trim, shoe moulding and a set of lamps and LED bulbs for this room.
I sanded the patched nail holes of the door header.
I carefully removed the door casings on the hallway side of the door, then pulled all of the remaining nails. I also removed the crumbling drywall that was behind one of the stair risers. Not sure who the genius was that thought part of the door threshold could be supported by drywall! I replaced it with scrap 1/2" birch plywood I had on hand, fastened with 1-5/8" Torx head deck screws. I then cut the left and right door jambs at the height required for the new door threshold I'm creating, using my ryouba saw.
I slotted the new step to accept the tongue of the new hickory hardwood. The step is 1" thick, so I need a piece of 1/4" plywood to bring the hardwood level with the step. I cut this piece of plywood and stapled it in place. I then checked that my plan will work. I'm good to go here once I cut and install the hickory pieces.
-
Bedroom 3
- September 17, 2016
-
Bedroom 3
I nailed the new header assembly above the door and put some spackling compound in the nail holes. I haven't attached the applique yet, I'll do that after I sand the spackling compound.I started working on the door threshold. I removed the old threshold as well as the fascia below it. Sigh, whoever did this work was a hack. I will of course make it right. I glued and pin nailed a hickory 1x6 to 1/2" plywood, and will use this as my threshold. It will be edged with a piece of 1x2 oak, and rabbetted to allow it to overlap the hardwood flooring. The new fascia will be oak, and will be properly centered (unlike the original one).
The reason this threshold is important: it's also a step. The floor of this room is about 12" above the floor of the hallway.
I removed the carpeting, tack strips, padding and stapes from the single step between the hallway and the threshold. I also removed the 2x2 piece of overhang that had been glued and screwed to the step. I scraped the glue (construction adhesive) off with a wood chisel. I will be installing an oak stair tread and hardwood to replace the carpet.
I cut the oak stair tread to replace the carpeted step. It was tricky but it's done. I also sanded out the planer marks. I need to put polyurethane on it.
Late tonight, I will try to finish assembling the threshold.
-
Bedroom 3
- September 14, 2016
-
Bedroom 3
I put 2 coats of B-I-N on the header I fabricated for the door. Just the parts that had been cut with the table saw and routed. These are my initial sanding coats. I'll do some of the initial sanding tomorrow if I don't decide to start creating the head trim for the closet.
-
Bedroom 3
- September 13, 2016
-
Bedroom 3
I started fabricating the header for the door. It's basically the same as the header I created for the window, except it has a 3/4" bead piece at the bottom. Total stack height is approximately 5.75": the 3/4" bead, a 3.5" entablature and a 1.5" cornice All of the cutting and routing is done, and I glued and pin nailed it together except for the applique. It needs sanding and a couple of coats of B-I-N primer on the exposed MDF.This isn't the typical process for creating door trim. I want to do as much of the finish work as I can before nailing it in place because I've already painted the walls. Doing it this way also allows for perfect returns. They're actually not returns at all; the beaded piece and both pieces of the cornice are slabs of MDF that I cut and routed. Hence the cornice is two pieces of MDF instead of six, and the beaded part is one piece of MDF instead of three. Creating this on the wall would be more difficult. Doing it on the bench allows me to glue and pin nail it precisely, and attaching it to the wall only involves driving finish nails through the entablature.
-
Bedroom 3
- September 10, 2016
-
Master bedroom
I installed a Lutron timer switch for the master bedroom closet light. I've left this light on all day on more than one occasion. I'm never in the closet for more than a few minutes, so it made sense to install a timer switch. It's currently set for 5 minutes.
-
Master bedroom
-
Bedroom 3
I finished the repair of the sill trim piece in the window. It had a huge chunk broken out of it by the previous owners. Anderson doesn't show this piece as available for purchase, and it is a fairly complex piece to replicate. So instead of creating a new piece, I cut out the bad part and fabricated a replacement from poplar which is glued into place with Titebond III wood glue. It fits perfectly, so I primed and sanded it until I could not tell where it had been repaired. It is now in placed but not nailed in yet.I primed the fold-down windowsill with Zinsser B-I-N. This will prevent tanins from leeching into the final finish.
I used Rock Hard Water Putty to level the seam between the hinged sill mount and the sill. Once it dries, I'll sand and prime this area.
I replaced all of the wall outlets with Decora style outlets. Two of them are Leviton T5632-BW with USB charging ports. One is a Legrand NTL885TRWCC6 with adjustable LED nightlight.
I bought the flooring at Menards. It's 3/4" x 3" solid hickory with a natural finish. It's 16034 from Great Lakes Wood Floors and is made in the U.S.A.
- September 9, 2016
-
Bedroom 3
I bought a quart of Behr Premium Plus Ultra pure white semi-gloss paint, Floetrol, a Wooster Pro brush for gloss, Kilz Original spray, and two tubes of DAP 3.0 white caulk on my way home from work. This is for priming and painting the window trim and fold-down sill. I forgot to buy a gallon can of Kilz Original primer.
-
Bedroom 3
- September 4, 2016
-
Master bedroom
I installed a 24" square, 4250 lumen, 4000K LED light panel in the master bedroom closet. It's SO much better than the original light fixture. I can now tell the difference between navy and black slacks in my closet. It's brighter than the original 2-bulb fixture, and since it's so colse to the ceiling, it does a better job of lighting the top shelves.
-
Master bedroom
-
Bedroom 3
I finished creating and installing the fold-out window sill in the 3rd bedroom. This will allow felines to sit on the window sill comfortably. Since I need support below, the trim doesn't have classic proportions; the apron is taller than usual. I created the apron from a piece of solid poplar. The fold-out sill extension is all solid oak. It is glued, screwed and biscuited to the window sill and the folding part is connected with a piano hinge (46 screws). I routed the edge of the fold-out sill wiht a cove bit.The cross head was created with MDF cut to 3.5" height, with an applique in the center and 3.5" rosettes on each end. There are two pieces of MDF on top of it, one routed with a cove bit and the other routed with a Rockler classical bit. The whole thing (minus the rosettes) was assembled on my bench before installation with glue and my pin nailer. This is easier than creating return pieces, since I was just routing rectangular pieces on 3 edges. I installed the cross head above the window.
I bought 3" wide fluted MDF case moulding and installed it on the sides of the windows. This wasn't my original plan, but the original moulding I bought just didn't look right with a cross head or the rosettes. I needed symmetrical casing, and the fluted MDF fits the bill. It's also inespensive and very easy to cut and install. I sealed the back and ends of it with Zinsser B-I-N before installation, just to help prevent moisture intrusion.
This bedroom has a short ceiling height, which makes the existing light fixture awkward. Someone more than 6' tall would be ducking to avoid it. I bought a 24" square LED light panel to replace it. It's not pretty, but I believe I can put a routed wood frame around it to make it look nicer. I installed it as-is. This room won't normally be lit from overhead since it's intended as a reading room, so it was more important to have a low-profile fixture.
- August 31, 2016
-
Laundry room
The fluorescent ceiling fixture's ballast died last weekend. Since it was a T12 fixture, I decided it was time to replace it with something more efficient: a thin LED panel light. Higher efficacy (4000 lumens, 50W), warmer color temperature (4000K), and no maintenance (it will outlive me). It's a Commercial Electric 74031/HD 1'x4' LED panel, about 3/4" thick. I wish the CRI was a little higher than 80, but it's more than sufficient for my laundry room.
-
Laundry room
- June 5, 2016
-
Yard
Over the last few days I finished laying the 16" patio blocks under the kitchen window. I also layed down some retaining wall blocks around the small tree bunch in the front yard, and filled the center with mulch. This was a very quick job; the blocks aren't level and even, etc. I'll wind up rearranging and levelling the blocks later.I bought some concrete sealer and polymeric sand today to finish the patio blocks under the kitchen window. I couldn't use it today because it rained. I have soil and grass seed to repair the edge area, but I don't want to use it until I've sealed the blocks and applied the polymeric sand.
-
Yard
- May 31, 2016
-
Yard
I bought twenty nine 16" concrete patio blocks at Home Depot to install under the overhang over the kitchen window. This area needs to remain accessible since it's where my electrical mains and gas line enter the house, so I didn't want to plant here. Plus it gets no sun at all since it's on the north side of the house with a full overhang, and it's also where my only front water spigot is located so it gets traffic. Finally, my furnace exhausts here which is probably one of the reasons that even ground cover dies here.I also bought 5 bags of paver base. I need many more, along with levelling sand, but the truck bed was already full of weight. I also need paver edging strips and some topsoil.
I also bought a new tamper, pick axe and square shovel.
I started breaking up the soil near the big rock at the fork in the driveway so I can plant grass there. I'm going to surround the big rock with some retaining wall blocks or edging bricks and fill in with mulch.
-
Yard
- May 29, 2016
-
Yard
I bought 15 bags of mulch and 20 retaining wall blocks at Home Depot. I'll need more, but this will get me started on a couple of things.
-
Yard
- March 8, 2016
-
Bedroom 3
There are now two coats of paint on the ceiling of the third bedroom. I should be able to tape and paint the walls this weekend. The paint color I chose is Behr "Peach Glow". On the wall, it's a little bolder than I planned. But it's a happy color and I like it.
-
Bedroom 3
- February 6, 2016
-
Garage
I have started working on a Raspberry Pi based garage door opener that will be usable from my cell phone. Secured with SSL, of course.
-
Garage
-
Bedroom 3
I wiped down the walls, removed my tools and other items, broke up all of the old trim and put it in a box for the fire pit, and also boxed the old carpet tack strips.I removed the original window sill extension. It was not as long or deep as I'd like, and was also not installed very well. But to use a deeper one, I can't use nails as were used for the original. I ordered a Porter-Cable 557 biscuit jointer so I can use glue and biscuits to attach one I'll make from oak. It will probably be about 1" deeper and about 1" wider. This will accomodate the slightly wider window casing I would like to use.
I primed most of the walls with Kilz Original. I have about half of one wall remaining. I used a full gallon. The objective here was just to seal and cover the blue paint that was on the walls so it doesn't bleed through to my new color. Primer is much less expensive than the paint I intend to use, so if it saves me a coat of paint, it's a win. And being oil-based, the Kilz should seal up all of my patching very nicely.
- January 31, 2016
-
Bedroom 3
I went to Lowe's in the new truck to get some small items. Paint tray liners, garbage bags and a new joint compound mud pan. Part of the reason for this trip was to gauge what my fuel mileage looks like around town when driving with slow throttle inputs. I got roughly 23 mpg, which is better than I expected. Of course it will drop if I'm driving to keep up with everyone in terms of acceleration.
-
Bedroom 3
- January 30, 2016
-
Bedroom 3
I continued sanding and spackling in the small bedroom. I had to cut out some areas of the original joint compound where nails had caused highly visible bumps, then spackle those spots.
-
Bedroom 3
- January 27, 2016
- January 26, 2016
-
Bedroom 3
I stopped at Home Depot and bought a 36" x 11.5" oak stair tread. I was going to try to use this to replace the hokey, incorrectly cut threshold. However, when I got home I realized I need the 48" length. Serves me right for not measuring.I started sanding the spackling I did the other day.
The 16 gauge cleats for the floor nailer arrived, along with the Systainer for my 1/4 sheet sanders. So nice to finally have a case for them. My old Porter-Cable's cardboard box had crumbled apart, and the new Bosch's cardboard box was way too flimsy as a case.
-
Bedroom 3
- January 24, 2016
-
Bedroom 3
I started spackling the walls in the third bedroom.I ordered a Freeman PFL618BR flooring nailer from Amazon. This is a 16-gauge nailer, hopefully it will work with 3/4" hickory without splitting the tongues. I'll be using 16-gauge Bostitch cleats to install the floor. I ordered 4000 cleats, which is more than I need for this room but they'll get used since I intend to install more hardwood flooring once this room is done.
I also ordered a Systainer 2 for my 1/4 sheet sanders since neither of them has a case. And a Systainer Midi II for my router bits; they don't all fit in the Systainer 1 I've been using. The Systainer 1 that I'm currently using for router bits will be reassigned to hold my Porter-Cable PIN138 pin nailer and nails. I printed the labels cards for the new Systainers and sprayed them with lacquer. I'll cut them out later.
-
Bedroom 3
- January 23, 2016
-
Bedroom 3
I removed the door casing from the door, door casing from the closet, and the window casing. They were all slopped with blue paint, and it's less work to install new than to deal with the paint slop. The door casings needed to come off anyway for the floor installation and the installation of a real threshold piece. The existing threshold piece was a horrible hack, probably not done by a finish carpenter. Big gaps, it doesn't go under the door casing, etc. What's really needed here is a stair tread type of piece since there are two steps into this room.I repaired the window trim that covers the window cranks, at least as best I could. One of them has a large chunk missing, but at least now it's back in place. The repair involved bending the beams from the crank to the window back into shape, and removing and replacing the trim pieces. I haven't renailed them into place because I'm probably going to sand and refinish them before putting them back.
I sharpened a 1.5" wood chisel and used it to scrape the paint and caulk ridges from where the edges of the baseboard, door casings and window casing met the sheetrock. I also pulled all of the nails out of the old baseboard and casings so I can burn it and so I don't wind up with a nail in a foot or hand.
-
Bedroom 3
- January 17, 2016
-
Bedroom 3
I removed the old base moulding. It was a slow process since I wanted to avoid trashing the drywall. I still need to remove the door casings. That will allow me to start spackling and other patchwork. I might be able to be ready for paint by next weekend.I need to decide on the millwork for this room. I'm probably going to use plinth blocks and rosettes, mostly to avoid hassles with miter cuts in what's not a completely square room.
-
Bedroom 3
- January 16, 2016
-
Bedroom 3
I started the remodelling of Bedroom 3. I removed all of the books from the freestanding bookshelves, then moved the bookshelves and all other furniture out of the room. I then removed and bundled all of the carpet, in roughly 30" wide rolls. I then removed the carpet pad, then the tack strips. finally, I removed the carpet pad staples.I will eventually apply a coat or two of Zinsser B-I-N to the subfloor to kill odors from the previous owners. But I won't be doing that until I'm done with the walls. I need to remove the baseboard and door casings, which are thrashed so I'll be buying new. Not to mention that whoever painted this room did a poor job; the door casings are slopped with paint, and the paint lines on the arched ceiling are far from straight and clean.
-
Bedroom 3
- January 13, 2016
-
Bedroom 3
I'm starting to figure out what I need for the third upstairs bedroom, which will be a reading room and guest bedroom. Since I intend to install a hickory hardwood floor, I need an 18-gauge floor cleat nailer. I put the one I want on my Amazon wish list.
-
Bedroom 3
- January 11, 2016
-
Bedroom 1
I installed my third Nest Protect outside of the first bedroom. It's hardwired and named protectb1. I updated DNS and DHCP configurations. I've come to really like the latest Nest Protect smoke detectors. No false alarms, scheduled tests, notifications to my iPhone, they look nise, and they have nice nightlight functionality. What's not to like?
-
Bedroom 1
- January 10, 2016
-
Garage
I have continued to tweak my workbench design. I _think_ I'm close to done. I can think about buying materials now. I bought some inexpensive 4" locking casters at Home Depot and cut the support blocks for them from scrap 3/4" oak veneer-core plywood.
-
Garage
- January 3, 2016
-
Garage
I refactored my workbench design in SketchUp. I got rid of the butcher block top, and replaced it with sheets of 3/4" plywood. Mainly because my experience with butcher block in Michigan garages hasn't been all that great in terms of dimensional stability. It's also pricey, and for my use it won't look pretty for more than a week. It's a workbench, not a table. I move the legs and torsion box 3" inward on the front and sides, and the top is now 30" wide. This gives me a little bit of clamping space on the edges for quick clamps and the like, and will make it a little bit more comfortable to use without losing the benefit of the at-hand tool storage. For the top, I'm thinking of using high pressure laminate (Formica or Wilsonart). I ordered some samples in orange and dark gray with a matte patterned finish. Yes, it's a little slippery, but that's what bench cookies and bench dogs are intended to solve. And when I'm lazy enough to not protect the top with roll paper when doing glue-ups, I know I can easily scrape Titebond off of high pressure laminate with a wood chisel. And the slippery aspect will be a good thing when I'm using the workbench as an outfeed or infeed table for the table saw.
-
Garage
- December 28, 2015
-
Half bathroom
I cut the pieces of marble to cover the lower two movable shelves in the wall cabinet. I then moved all of the shelves to where I want them, installed the marble pieces and reattached the shelves to the shelf pins with stainless steel screws.I ordered a restocking of Yankee Candle candles. I've depleted my supply, so I ordered some votives, tea lights, small jars, medium jars and large jars. They had some of the holiday scents marked down 75%, which was nice. It is likely that I'll store some of these candles in the half bathroom cabinet.
-
Half bathroom
- December 24, 2015
-
Half bathroom
I picked up a Porter-Cable PIN138 23-gauge pin nailer at Home Depot. I also picked up some pin nails for it: 3/4", 1" and 1.25" lengths. I stopped at Lowe's to get some more nails for my Bostitch 18-gauge brad nailer too: 5/8", 1" and 1.5".I drilled the hole for the cabinet knob on the drill press. I installed the temporary knob and then reinstalled the magnetic catch.
I installed the glass in the cabinet door using the 1/4" quarter-round I had created yesterday. I used 1" pin nails in the PIN138 pin nailer. What a nice tool; I should have bought one of these for glue-ups years ago.
I installed the door on the wall cabinet. I installed the remaining four screws for the hinges. There are now 4 screws holding each hinge to the door, and 3 screws holding each hinge to the cabinet. It is much stronger than necessary, but that means it should last a long time.
-
Half bathroom
- December 23, 2015
-
Half bathroom
I put two thin coats of paint on the front and sides of the cabinet door.I went to Lowe's and picked up a piece of glass for the cabinet door, and a temporary chrome knob. I also picked up a glass cutter. There was only one option, an el-cheapo Kobalt.
I cut the glass for the cabinet door, and put a thin coat of paint on the back of the cabinet door. I also created some 1/4" quarter-round to pin the glass in place. I would have preferred poplar here for its ability to take nails without splitting, but I'm out of it. I used select pine. I put a coat of paint on the part that will be exposed, without primer.
I need a 23 gauge pin nailer to install this quarter-round. For the heck of it I tried using my 18-gauge nailer, but it split the quarter-round 25% of the time, and I don't have any 3/4" long nails for it and it looks like the local stores don't carry them. The Porter-Cable PIN138 would be a good choice and it's available at Home Depot.
-
Half bathroom
- December 22, 2015
-
Half bathroom
I did a bit of sanding on the wall cabinet door. I then installed the hinges on the cabinet and the door as final fitment. I also temporarily installed the magnetic latch. Everything fits fine. I still need to order a knob for it, and will need to cut and install a piece of glass.Side note: I could not have installed the magnetic catch without the Bosch PS10. Well, a Bosch PS11 would have been better, but to drill the pilot holes in the back of the face frame, a right-angle drill or driver was my only option. I'm so glad I bought it many months ago; I knew I'd need it for cabinetry at some point.
I removed the catch from the cabinet door and removed the door from the cabinet. I put a coat of Zinsser B-I-N primer on the cabinet door.
-
Half bathroom
- December 21, 2015
-
Half bathroom
I picked up the Rockler coping sled at Rockler in Royal Oak. I couldn't trust my home-made sled for the wider rail of the wall cabinet door. I also picked up a Freud 20-301 beadboard router bit to make the single bead in the upper rail to match the mirror. I also bought wraparound no-mortise hinges, a magnetic catch, Insty-Drive self-centering bits to drill hinge holes, and the Rockler 62623 safety kit (push blocks, push stick and a single featherboard). The 62623 is for my table saw, though I'm not sure the featherboard will fit the miter slot.It's worth noting that I need a variable-speed router for my router table. It's a little risky running some of my bits at the high speed of my old Porter-Cable 690. It will be downright foolish to run a raised panel bit, which I will eventually need. I don't need a plunge base, and I'm leaning toward the Bosch 1617EVS.
I measured the depth of the cove cut for the Freud 99-286. It's around .65". When I measured after fitting a joint together, I came up with .625". The stiles I cut are a total of 4 9/16" wide. The opening in the cabinet is 14 1/16" wide, but the hinge consumes 1/16". Assuming a 1/16" gap on the opposite side, I get this as the length of the rails:
14" + 1+5/16" - (1/16" x 2) - (4 9/16") = 10 5/8"
I cut the rails and routed the stiles and rails for joinery and the glass panel. It looks good and it appears to fit the cabinet. I routed the bead in the top rail to match the mirror, then glued the door frame together and clamped it to dry.
It's worth noting that a rail coping sled is a blessing and a curse when using matched stile/rail router bits. The sled can't be used for the stiles, yet you have to adjust the height of your router bit for the sled when cutting the ends of the rails. When I don't use a sled, and I'm using matched router bits, I only have to adjust the height of the router once as long as the router bit is fully inserted. When I switch to the matching bit to cut the with-grain part of the rails and stiles, the height is already correct. But when using the sled, I have to adjust for each bit. What I've learned to do...
After cutting the copes in the end grain of the rails using the sled, I use my Wixey digital height/depth gauge to lower the router by the thickness of the coping sled before changing to the matching router bit to cut the with-grain parts of the rails and stiles. I haven't had to readjust the router height using this technique, but I still make a test cut in a piece of scrap just to be sure I don't need to change it.
-
Half bathroom
- December 20, 2015
-
Garage
I think I'm done with my workbench design. I will need to order casters next month, and pick up the plywood and other supplies to construct it. And given the number of holes I intend to drill in the top, I should probably buy a sacrificial 3/4" Forstner bit.The height of the bench is intended to match the height of my table saw so I can use it as part of an outfeed table.
-
Garage
-
Half bathroom
I created a simple coping sled from Garolite and oak for the router table to allow me to utilize the Freud 99-286 router bit set. I had tried to buy the Rockler rail coping sled, but I didn't get to the store in time. I tested my sled and it will work for what I need to do. The bit height is now set for the Freud 99-286 bit set, and I can cut the rails and stiles for the cabinet door tomorrow. I still want the Rockler sled since mine is very primitive and limited, but I think I can make the stiles and rails of the cabinet door with my homemade sled.I picked up some 12" x 24" pieces of marble at The Tile Shop to use as the top of the wall cabinet shelves. I'll need to cut them to size on the tile saw. I'm just going to lay them on top of the wood shelves; they're heavy and do not need to be glued down.
- December 16, 2015
-
Half bathroom
The tiling of the cabinet shelves was a complete failure. The thinset never fully cured, and the moisture that it trapped (for several days) slightly warped the shelves. What was odd... the thinset crumbled apart easily, and came off of the tile easily. No power tools involved, I scraped it off with a putty knife. I'm assuming something happened to the thinset, perhaps it was moisture cycled too many times sitting in my garage. I'm not a complete noob at using thinset; my father was a cermaic tile contractor (and a very good one), and I learned quite a bit from him.At any rate, I will use the shelves without tile for a while. And if I do this again, I'll use Loctite PL to adhere the tiles. And/or use plywood instead of oak boards for the increased dimensional stability. For now I've sanded the top of the boards and put two coats of paint on them.
-
Half bathroom
- December 14, 2015
-
Garage
I am nearing the completion of a workbench design. It will be mobile so I can move it around and also use it as an outfeed table for the table saw. It is loosely based on the Ron Paulk design, but stronger and with integrated torsion box legs. And of course casters. I will likely build two of them, and install draw latches so I can lock them together for a larger workspace.
-
Garage
- December 12, 2015
-
Half bathroom
I cut the marble tile for the remaining cabinet shelves. This wasn't easy, especially with the mesh-backed sheets. Two of the shelves will hence be covered with the larger marble bullnose tile. So I'll have two with the floor tile and two with just white marble tile. Worth noting that the marble bullnose was much less expensive than the floor tile, and I wanted to save some of the leftover floor tile for any future repairs of the floor.I mixed some thinset and placed the tiles on the shelves. Once it cures (tomorrow), I will grout them.
-
Half bathroom
- December 9, 2015
-
Half bathroom
I ordered the Freud 99-286 router bit set to allow me to create the door for wall cabinet. Pricey but I need it. I also ordered a Systainer MIDI to hold my Kreg pocket hole tools and screws, and another Systainer Cart so I can shrink the size of my stacks of Systainers (almost hurt myself moving a 7' tall one yesterday).
-
Half bathroom
- December 8, 2015
-
Half bathroom
I grouted the bottom shelf in the wall cabinet.
-
Half bathroom
- December 6, 2015
-
Half bathroom
I cut coves in the bottom side of the front of the wall cabinet shelves, sanded the coves, primed and painted. I'm waiting for the paint to dry. I'm done with the paint on the cabinet itself, so I put it back on the wall.I temporarily installed the new door lever hardware on the half bathroom door and hung it again. This allowed me to mark the wall for the new door stop. I then installed the new door stop.
-
Half bathroom
- December 5, 2015
-
Half bathroom
I drilled the new correct shelf pin holes in the wall cabinet. Not too difficult, despite not having the benefit of the drill press.I spot-sanded the inside of the cabinet again to remove some runs from the first round of paint. I then primed again where needed, and painted again.
I went to Lowe's to get another few cans of Rust-Oleum satin white spraypaint, some small stainless steel screws to hold the wall cabinet shelves secure to the shelf pins, and a pair of drywall dust bags for my 5-gallon Shop-Vac. I aslo went to Home Depot and picked up some Spax #8 x 1.25" screws since I was out of them. I bought both fully threaded and partially threaded.
-
Half bathroom
- December 4, 2015
-
Half bathroom
I realized that I drilled the shelf holes in one side of the wall cabinet in the wrong locations. :-( That's what I get for working a long night. I basically measured from the wrong end of the board. Why I didn't check twice, I don't know. Especially before I finished the cabinet. New holes will need to be drilled, without the benefit of the drill press. Certainly doable, but a pain.I filled the old holes with Rock Hard Water Putty, sanded and primed. I'll need to repaint the inside of the cabinet after I drill the new holes.
I continued priming the shelves. I'm looking at covering them with marble, to make them look nicer and make them impervious to fluids. If I go this route, I will likely cut a cove on the front underside of the shelves before I paint them.
-
Half bathroom
- December 3, 2015
-
Half bathroom
I cut three shelves for the wall cabinet from 3/4" oak. I sanded them lightly and started priming them. I'm not sure I'll use all three of them, but it's better to have an extra than to not have enough a year from now.I lightly sanded the runs on the outside of the wall cabinet and then put a light coat of paint on those areas. Given that the sheen is satin, I'm hoping I don't need to do more work on the runs.
-
Half bathroom
- December 2, 2015
-
Half bathroom
I sanded the primed wall cabinet with 220 grit and sprayed 2 coats of satin white enamel on it. I wasn't able to find a satin off-white enamel I trust at the local big box stores. So the cabinet might be brighter than other items in the bathroom. I won't really know until I can put it in there again, which won't be until tomorrow. Enamel takes a long time to cure enough to be handled when the item is heavy (the touching won't be 'light').I did get some runs that I'll need to wetsand out and touch up. I need to wait a couple of days before doing it. In the maintime I will work on the shelves.
-
Half bathroom
- December 1, 2015
-
Half bathroom
I filled the nail holes in the wall cabinet with Rock Hard Water Putty, and finished priming it with Zinsser B-I-N.
-
Half bathroom
- November 30, 2015
-
Half bathroom
I installed the wall half of the French cleat for the wall cabinet and tested the fitment of the wall cabinet. It fits, but it feels a bit too deep. We'll see how I feel about it once the cabinet is finished.
-
Half bathroom
- November 29, 2015
-
Half bathroom
I went to Lowe's and Home Depot for some supplies. 3/4" and 1" long #8 Spax wood screws, various sandpaper, a 1x8 oak board for the wall cabinet shelves, some Zinsser B-I-N shellac-based primer spray, some white satin spraypaint and a 10 oz. tube of Loctite PL.I also picked up a 3"x3"x36" piece of poplar and Kobalt foam kneeling pads. These are for a small project to make a router bit holder for one of my Systainers so I can keep them all in one place. The foam will go in the lid to help keep the carbide tips safe.
With 80 grit sandpaper on the 1/4 sheet palm sander, I sanded down the tops of the vertical fase pieces on the wall cabinet to bring them flush with the top of the box. They were about 1/32" too long. I also sanded the pocket hole plugs again, and lightly sanded the large parts of the rest of the cabinet.
I drilled countersink holes in the French cleat on the back panel of the wall cabinet, then installed 8 3/4" long Spax wood screws. The cleat should be more than strong enough to hold the cabinet.
I started priming the cabinet with Zinsser B-I-N. I need to do this to prevent the tanins in the oak from staining the paint. Using the spray is much worse than brushing, the nozzle is awful (leaks and spits). Lesson learned: always buy Zinsser B-I-N in non-aerosol form and if I want to spray it, just thin it and use my detail sprayer.
At any rate, I wanted to do the priming of the inside of the cabinet before I install the back panel, just because it's easier to get to the back of the front verticals. I later put a second coat on with a brush.
I attached the top pieces of the wall cabinet. There are 7 clamps holding the topmost piece in place while the Titebond III glue cures. The lower top piece is glued with Loctite PL and screwed to the box. Tomorrow I'll fill the nail holes in the beaded front pieces and the screw holes in the bottom decorative piece.
The chrome plated brass concave door stop I ordered should arrive tomorrow. It is a commercial type, but I could not find anything else that I would trust to be mounted on tile or be mounted on the door and hit the tile or marble baseboard. The typical residential ones have too little surface area. The good news is that it looks like it's a nice piece, but we'll see once it arrives.
-
Half bathroom
- November 28, 2015
-
Half bathroom
I routed the beads in some oak pieces to serve as the vertical face pieces for the wall cabinet. One of the beads is wider than the others, due to the difficulty of using the router bit extended so far from the router table. But I can live with it, and in all honesty I think I want the extra wood for strength. I just wish I had planned it a little bit differently.I drilled all of the pocket holes to hold the vertical face pieces to the frame. I then attached these pieces using the pocket holes and wood glue and a couple of brad nails. I installed the wood plugs in the pocket holes. Sfter the glue cured, I trimmed them off with a coarse pad on my die grinder and the random orbital sander.
I cut and routed the bottom decorative piece of the wall cabinet. I used a Rockler classical bit to route the edge.
I cut the two top pieces of the wall cabinet that will be sandwiched together. Using a 1/2" radius cove bit, I routed the lower top piece of the cabinet. I then routed the topmost piece with a classical bit.
I cut the back panel on the table saw from baltic birch plywood, then cut the half of the French cleat that will attach to it. I then glued the French cleat piece to the back of the back panel. I am out of 3/4" long wood screws, I'll need to pick some up tomorrow to finish attaching this piece.
-
Half bathroom
- November 27, 2015
-
Half bathroom
I went to Rockler and picked up some things I need to finish the wall cabinet, along with some general purpose things I need and some things I've needed for decades. Things I had to have for the wall cabinet: a beading router bit, a classic table edge router bit, and a piece of baltic birch plywood. I also bought a Freud P410T 10" saw blade, since I'm tired of swapping blades for rips versus crosscuts and the rip blade I've been using (the one that came with the saw) is sub-par. The P410T is expensive, but gets rave reviews as a fantastic general-purpose blade. And I didn't have a blade to cut the birch plywood for the cabinet, so I needed it.I also bought a Rockler router table. The least expensive Rockler table with stand and fence (as a package). High pressure laminate top and fence guards instead of phenolic or cast iron. I got their 'A' router plate, and my Porter-Cable 690 is now mounted in it. It took me about an hour to put the table together.
I also bought a Jet parallel clamp kit. Something I've needed for glue-ups for a while, since it includes parallel clamp blocks. And the Black Friday price was 50% off.
I also bought the least expensive Freud 8" dado kit. I've needed this for a long time; it would have prevented me from ruining some stock with my router over the years when cutting dados. Including last week. :-( To help me stop botching dados, I also bought a Wixey depth gauge, which was very inexpensive but will be incredibly handy on the table saw and router table.
I also bought some hinges for the wall cabinet door. It's possible that they are too lightweight, we'll see. They were cheap so it's no great loss if I can't use them here.
After assembling the router table, I glued up the main box part of the wall cabinet and used the Kreg pocket hole screws in locations that will not be visible once the cabinet is complete.
-
Half bathroom
- November 26, 2015
-
Half bathroom
I started building the wall cabinet. I cut the pieces for the main box, then routed the slot in the verticals for the plywood back. I had some trouble with the router jumping on the first one. A reminder that I still need a router table. But since it is the back of the cabinet, I can repair the issue with putty after I put the cabinet together. It won't be visible anyway.I marked the right side piece for the holes for shelf pins, then drilled the holes with the drill press.
I drilled the pocket holes in the top and bottom frame pieces.
I need to go to Rockler to pick up some better quality plywood for the back panel, along with a beading router bit.
-
Half bathroom
- November 22, 2015
-
Half bathroom
I think I'm done with the design of the wall cabinet in SketchUp.I bought a drill press today. I've needed one for decades, but kept hemming and hawing on how large it needed to be (throat depth) and of course how slow the spindle speed can be set. In the long run I'll wind up with another one for metal, but that's OK. Switching between wood and metal on the same press is a hassle anyway since cutting oil used for metal will stain wood, necessetating fastidious cleanup before drilling wood, even if you're using a table and fence setup on top of the drill press' stock table. The press I bought is the Porter-Cable PCB660DP. For a 15" floorstanding drill press, it was inexpensive. And it gets good reviews. I'll only be using it for wood, so the 300 RPM minimum spindle speed isn't a showstopper. While I know the chuck isn't high quality, the Jacobs chuck with a Morse taper adapter means it's not hard to swap in U.S.-made components if desired. My current needs (for the half bath wall cabinet) are fairly tame, but we'll see what the runout looks like once I put the press together. I haven't even gotten it out of my car yet.
-
Half bathroom
- November 21, 2015
-
Half bathroom
I glued the edge banding to the mirror. It's clamped up and drying. I decided to not risk tacking it with nails since the banding is thin.I continue to work on the design of the wall cabinet in SketchUp. I made some tweaks to allow me to use the same type of French cleat as the mirror. I'm now debating if I should use oak fluted casing for the vertical face pieces, to match the mirror.
-
Half bathroom
- November 20, 2015
-
Half bathroom
I stopped at Lowe's at closing time to get some 1x12 oak boards and a 24"x24" piece of 1/2" thick birch plywood to start making a wall cabinet. I also bought some 1/2" thick poplar to make edge banding for the mirror to hide the French cleat. I also bought a Skil router bit set since I need a 1/2" radius cove bit for part of the wall cabinet and I didn't own one. I wanted just the cove bit, but the big box stores don't have single cove bits. I hope I can find the 1/4" collet for my router since the Skil bits all have 1/4" shafts.I removed the mirror, took some measurements, and created the edge banding to hide the French cleat. These pieces are 1/2" thick poplar. I ripped the pieces with the table saw and cut them to length on the miter saw. I notched them to fit around the cleat on the back of the mirror with the table saw. I put a coat of Zinsser B-I-N on them, sanded with 400 grit sandpaper, then put two thin coats of Zinsser mold and mildew resistant white paint on them. When they're dry, I'll glue and clamp them on the mirror's back. Seems like a minor detail, but... missed details tend to accumulate and make a room look like it was assembled by a hack instead of a craftsman. I might not be a true craftsman on these things, but I try. And without this banding, the mirror would be able to easily move toward the wall at the bottom when pressed with a finger.
I'm nearly done with a wall cabinet design in SketchUp. I can't call it done because I'm still deciding whether or not to put doors on it (with glass windows) or to just make a cubby. Obviously a cubby is easier, but the main reasons I'm considering it:
- Because it's going above the toilet, it will already be a little cumbersome to use. Doors will make it worse.
- A cubby would allow me to put some of the leftover marble tile on the shelves and it would be more visible.
Of course, given that I'm using oak, adding marble might make the whole thing very heavy.
-
Half bathroom
- November 19, 2015
-
Half bathroom
I mounted the mirror. It looks nice. I need to remove it again to create some edge banding to hide the French cleat.
-
Half bathroom
- November 17, 2015
-
Half bathroom
The mirror arrived early. I like it, it's going to fit it nicely. I created a French cleat for it from 1/2" plywood, and attached one half of the cleat to the mirror. Since there's no recess in the back of the mirror, this means the mirror will be 1/2" away from the wall. Given that I'm trying to prevent intruding on sink space, I ruled out using a 3/4" thick French cleat setup. I will need to buy some .5" thick oak to band the edges of the mirror frame to hide the French cleat. I can get some at Lowe's.In the meantime I marked the wall and the other half of the cleat in preparation to mount the mirror.
-
Half bathroom
- November 16, 2015
-
Half bathroom
I caulked the toilet to the floor and the wall tiles to the drywall and door casing.
-
Half bathroom
- November 14, 2015
-
Master bedroom
Knowing that some of my smoke detectors are ancient, I finally bought two Nest Protect hardwired smoke and carbon monoxide detectors. I installed the most important one, right outside of the master bedroom. The second will be installed outside the third bedroom on the second floor. I will need more: one for the 2nd upstairs bedroom (hardwired or battery?), one for the first upstairs bedroom (hardwired), and one for the kitchen (battery). The setup and installation of the first one went flawlessly once I updated the Nest app on my iPhone. This Nest Protect is named protectmb on my local network, and I updated DNS and DHCP configurations for it.It's a bonus that it's a combined smoke and carbon monoxide detector. As I install Nest Protect devices to replace my smoke alarms, I can remove the ugly CO detectors from my walls and patch the holes.
-
Master bedroom
-
Bedroom 3
I installed my second Nest Protect outside of the third bedroom. It's hardwired and named protectb3. I updated DNS and DHCP configurations.I am aware that new construction in Michigan requires smoke alarms in every sleeping room. However, I have no wiring for smoke alarms in these rooms, and I've never closed a bedroom door for sleeping. Not to mention that I'd have to spend an additional $400 plus tax to put one in every bedroom, and in the master bedroom there isn't a good spot since the double door to the master bathroom is close to the master bedroom entry door.
The 2009 Michigan Residential Code also requires smoke alarms to be interconnected and to receive primary power from building wiring. Right now, I don't have that option in the kitchen noe outside Bedroom 2. It's not too difficult to provide it for Bedroom 2 since there is attic above. And a strict reading of the code says I have to make this change if I ever sell the house. But in the kitchen, I don't have good options until a remodel involving removal of the drywall.
-
Half bathroom
I am working on another cleaning of grout haze on the wall tile. This time with Miracle Sealants Epoxy Grout Haze Remover. It's painstaking, finger-wearing work, but it's progressing.I am hoping to be able to caulk the joint between the wall tile and walls tonight.
- November 13, 2015
-
Half bathroom
I put the second coat of polyurethane on the new head casing. Later I nailed it in place.
-
Half bathroom
- November 12, 2015
-
Bedroom 3
I'm preparing to refinish the third bedroom. Mostly planning at this stage. Hardwood flooring, paint, new oak trim. The room is roughly 13' x 12', so I need about 180 square feet of hardwood (accounting for scrap). This will probably be the room where I start the long process of painting trim and doors, but I haven't committed to that yet. I like stained oak trim, for the natural beauty and of course the dent resistance. But the existing sold wood doors have some deep scars form the previous owners. Presumably from dogs. The cheap and easy fix is to fill and paint. The best fix would be to replace the doors. Something in between would be nice... General Finishes gel stain comes to mind, in a dark color like Java.
-
Bedroom 3
-
Half bathroom
I put the first coat of polyurethane on the new head casing.Using my finish nailer, I finished nailing the left and right side door casings with 15 gauge nails. It doesn't really need caulk at the drywall, though I bought some DAP Alex Flex in white if I decide to caulk there.
- November 11, 2015
-
Half bathroom
I cut 10mm from the bottom of the door using a 60 tooth blade on my circular saw. This leaves enough room for a rug on the floor should I choose to use one.The door side casings are partially installed. All of the 18 gauge brads are fired into the side jambs. I used Loctite PL at the bottom of the door casing to adhere it to the cement board. I don't want to try firing nails into the cement board. The trim is all clamped in place while the adhesive cures. It expands as it cures, so it was important to clamp it. Once it's dry, I'll finish nailing it, with 16 gauge nails from my trim nailer going through the drywall into the door frame.
I had a problem with the top door casing. One of the brad nails hit a hard spot and bent when I fired it, causing it to exit the head jamb. :-( Of course it was the last nail I was going to place. I had to scrap the head casing and cut a new one, and I'll need to patch the head jamb since I wasn't able to remove the nail and had to cut it with a cutting wheel on my Dremel. That's one of the drawbacks of 18 gauge nails; they sometimes break when trying to remove them.
I cut a new piece of head casing, tested its fitment, sanded it, then put a coat of stain on it. Tomorrow I'll put the first coat of polyurethane on it.
-
Half bathroom
- November 10, 2015
-
Half bathroom
I stopped at Home Depot on the way home for a bottle of Floetrol and a few paint roller covers.I put the third coat of paint (with some Floetrol mixed in) on the edges of the walls and ceiling with a sash brush, then rolled the second coat of paint on the walls and ceiling.
Once the paint had dried, I reinstalled the light fixture and the wall plates. I can install the door casing pieces tomorrow. I'll likely wait one additional day before caulking the top of the tile and the door casings, since I'll probably use tape and I don't want to lift any of the new paint.
-
Half bathroom
- November 9, 2015
-
Half bathroom
I rolled the first coat of paint on the walls. It will definitely need a second coat, if not a third. Not thrilled with the coverage of the Behr Premium Plus Ultra. It'll work, but the Olympic ICON that I used in the laundry room was better. And the sheen isn't really what I expect of eggshell; it's closer to satin. I'm OK with that given that this is a bathroom, but it means I need to be more careful with my cut lines on the next coat. And I wish paint wasn't getting thicker over the years in order to satisfy VOC requirements. It makes it much harder to work with. I don't know where to get XIM locally, so I'll probably buy a bottle of Floetrol tomorrow.
-
Half bathroom
- November 8, 2015
-
Half bathroom
I caulked the sink pedestal at the floor with Latisil Natural Gray. I'll have to wait for it to cure before caulking the toilet at the floor. given the tight quarters, I'd risk dinging the sink pedestal caulk if I tried to to do the toilet now.I put a bit of joint compound on the drywall where some paint and paper came up when removing the door casing trim.
After the joint compound dried, I sanded all of the remaining spots I had patched. I then applied a thin coat of Zinsser B-I-N white shellac primer to these areas, plus the area around the ceiling fan that had a slight stain. All of my patching looks good.
I started painting the corners of the ceiling and the walls. I've brushed two coats of paint on all of the edges. I'll do it again after I roll the first coat of paint on the walls, then roll a second coat on the walls. I need to pick up some new Wooster Shortcut sash brushes at Home Depot.
-
Half bathroom
- November 7, 2015
-
Half bathroom
I sanded the door casing pieces and applied a third coat of polyurethane. I should not have needed to do this, but there were some runs on the second coat.I caulked the sink at the wall with Latisil Silver Shadow caulk.
-
Half bathroom
- November 6, 2015
-
Half bathroom
I sanded the first coat of polyurethane on the door casing pieces with a 3M flexible 220 grit sanding sponge. After wiping with a microfiber cloth, I applied a second coat of polyurethane. Once it's dry enough, I can sand the last of the spackling compound on the walls and put some primer on those areas.I taped off the floor around the sink and toilet in preparation for caulk. I'll be using Latisil here. Mostly because I can trust it to be waterproof and to last a long time.
-
Half bathroom
- November 5, 2015
-
Half bathroom
I put the first coat of polyurethane on the door casing pieces. No sanding of the spackling tonight since I don't want to taint the door casing finish.
-
Half bathroom
- November 4, 2015
-
Half bathroom
I put a coat of stain on the door casing pieces. I'm still debating whether or not I'll ultimately paint them white, but all of the trim in the house right now is stained wood.I had to renew my car registrations today and it took longer than expected. Sigh.
I picked up a Bostitch BTFP12233 18-gauge pneumatic brad nailer at Lowe's. I need this to nail the door casing moulding to the edge of the door casing. I will use my 16-gauge finish nailer to hit the header and framing, but from past experience I know that the 16-gauge nailer is risky near the edges of oak. I need to avoid any cracking or splitting. I bought 1.25" and 2" long Bostitch brad nails for the nailer.
I bought a couple of oak rosettes which I may or many not use for the top of the door casing moulding. Ditto for some small plinth blocks I bought. The plinth blocks are not oak, and hence I expect I won't be able to get the color to match with stain. In fact I'm guessing there's no way to stain these nicely.
I put what I believe to be the final coat of spackling compound on the wall. This was just to fill a small divet from one of the old light fixtures. Tomorrow I should be able to sand that area and put some primer on it to hold it until I'm ready to paint (soon). I'll probably use Zinsser B-I-N here just in case I need to lightly sand.
-
Half bathroom
- November 3, 2015
-
Half bathroom
I put another coat of spackling on the patch for one of the old light fixtures.I cut the oak door casing pieces.
-
Half bathroom
- November 2, 2015
-
Half bathroom
I put another coat of spackling on the patch for one of the old light fixtures.
-
Half bathroom
- November 1, 2015
-
Half bathroom
The sink is now fully functional. Took me longer than expected because I had misjudged the local availabilty of 1.25" ID box flanges. When I tiled the wall, I assumed I could get a chrome box flange in the same outer diameter as the original. I was wrong; the local ones all have a smaller outer diameter. After hemming and hawing about what to do, I used one with a 1.5" ID. To make it snug on the 1.25" waste pipe, I sanded down the old brass-plated plastic box flange (thank goodness I had saved it), and glued it inside the new flange. It worked like a charm.I used solid bullnose supply lines for the faucet. They're visible if you're on the toilet, so I didn't want ugly flex lines.
I finalized the position of the light fixture and temporarily installed it. I'm glad I did this before painting. What I couldn't see with my work light became readily apparent: I need to do more spackling of the hole I patched from one of the old light fixtures.
-
Half bathroom
- October 31, 2015
-
Half bathroom
I drilled 4 holes through the tile and cement board near the toilet, then mounted the toilet paper holder. I used a 1/4" diamond coring bit to drill the holes. Thankfully the toilet paper holder came with metal expansion anchors that work fine in tile and cement board, so I didn't have to buy them separately.I finalized the position of the sink. It boiled down to what was possible with the waste pipe. Given the shape and thickness of the sink pedestal, it needs to be nearly centered in front of the waste pipe in the wall.
With the sink positioned, I marked the location of the two holes needed on the wall and the two holes for the floor for the pedestal. I then drilled through the tile and cement board in the wall with a 1/2" diamond coring bit. I used the same bit to drill through the marble and cement board on the floor. I then drilled 3/16" pilot holes in the wood supports behind the wall and the wood under the cement board on the floor. I mounted the sink using 5/16" x 2.5" stainless steel lag bolts with rubber-backed stainless steel washers. It is very solid while having some cushioning to prevent cracking the ceramic.
I taped off the sink and wall so I can caulk the sink to wall joint with Latisil silicone caulk. I haven't done the caulking yet since I want to be sure that I can get the waste pipe positioned, and I'll probably remove the sink from the wall to install the valves and faucet.
I need a box flange for the P-trap. It came with a shallow flange that won't work for my application.
-
Half bathroom
- October 30, 2015
-
Half bathroom
I stopped at the Lowe's in Madison Heights after work and picked up two chrome plated copper bullnose risers to connect the sink supply lines to the faucet, a braided line to connect the toilet, and a 17 gauge chrome plated brass P-trap for the sink waste connection. I also picked up a quart of Zinsser white mildew-resistant paint, satin finish.I caulked the remaining vertical tile joints (wall-to-wall joints).
I installed the toilet and filled it and flushed it once. No leaks found, but I'll check it again tomorrow before caulking.
-
Half bathroom
- October 29, 2015
-
Half bathroom
I cut the water supply lines to length, caulked the gaps around them with Latisil, and installed the escutcheons and quarter-turn valves. All have 3/8" outputs, and I need to buy supply lines.I caulked two of the vertical tile plane changes. I taped the last one, so I have two remaining to caulk plus the ones at the door casings. and should be able to caulk both of the remaining tile plane changes tomorrow. Once that cures, I can finish the wall spackling and sanding and paint the walls. I still need to cut, finish and install the door casings.
-
Half bathroom
- October 28, 2015
-
Half bathroom
I've pretty much worn my fingers and thumbs raw cleaning the epoxy grout haze from the tile. Lesson learned: don't grout when you're tired, especially with epoxy grout. If you do, you'll wind up spending a LOT more time cleaning haze from the tile.I ordered some epoxy grout haze remover from Amazon. I also ordered another Festool SYS 1 Systainer, since the Bosch GLL 2-45 didn't come with a case that will hold the laser cross-hair with its accessories and it's a sensitive tool that needs a good case. I believe I can also put my Husky digital torpedo level in the same SYS 1.
I also ordered a Storacell AA 4-cell battery holder so I can keep the batteries out of the tool. While I will have several uses for the laser cross-hair in the not-too-distant future, it will spend most of its time in the case and I don't want it to be destroyed by leaking batteries.
I caulked the floor to wall joints with Latisil. As far as silicone caulk is concerned, I really like the Latisil. It's easy to work with, and tooling it with my finger (wetted with denatured alcohol as needed) was effortless. I also caulked the lower 4" of the wall joints, i.e. the parts where the marble baseboard pieces meet. I will likely caulk all of the wall to wall joints with the Latasil, but I'm going to wait for the Laticrete sanded caulk to arrive before making a final decision. The sanded caulk would look nicer, and this is a half bathroom; I don't really need 100% silicone on the walls. But I wanted it on the floor and the baseboard marble since those joints will get wet when I mop or sponge the floor. Which will probably be fairly frequent to help prevent scratching of the marble floor.
-
Half bathroom
- October 27, 2015
-
Half bathroom
I stopped at Home Depot on my way home from work. I bought three Cree 75W-equivalent LED bulbs and a Danco Perfect Seal toilet flange seal. I don't expect to use the 75W-equivalent bulbs in the bathroom. I am planning to put them in the kitchen ceiling fan. The 60W-equivalent TW series bulbs that are in the kitchen ceiling fan will be used in the bathroom fixture.I cleaned some of the remaining epoxy haze from the tile with acetone. I was so tired when I did the grouting of the baseboard marble that I did a poor job cleaning it. The acetone works, but it still requires a tremendous amount of elbow grease. I need some good scouring pads for the final cleaning. I ordered some from McMaster-Carr: part numbers 6377T6, 6377T12 and 6377T14.
I started taping the joints for caulk.
-
Half bathroom
- October 26, 2015
-
Half bathroom
I temporarily placed the toilet and sink, just to check how long I can leave the copper supply pipes. It looks like I need to keep the toilet supply line as short as possible; I need 1" plus flange depth if I use the Sharkbite valve. Hopefully that will work. It's nice having the supply line completely hidden, but it requires tight installation tolerances.
-
Half bathroom
- October 25, 2015
-
Half bathroom
I grouted the left wall and part of the final wall.I ordered one more SpectraLOCK MINI kit for the walls, in case I need to do any touch-ups. I also ordered Laticrete sanded caulk in Silver Shadow color. I still intend to use Latisil silicone caulk at the floor and the vertical wall joints, but I may use the sanded caulk at the top of the bullnose. For one, it looks better. Secondly, it's acrylic and can hence be painted. Obviously it doesn't have the durability nor water resistance of the silicone. But these joints would be easy to recaulk.
I grouted the final wall and the baseboard marble. I should have sealed the edges of the marble pieces; there's a fairly dramatic picture framing effect. Which goes to show that it's a good thing I sealed the edges of the floor tile. I don't really mind the picture framing effect on the baseboard pieces, and I'm sure it will dissipate a little bit over the course of a couple of weeks. It actually helps bring a little more gray into the creamier marble pieces, and also makes it more obvious that the baseboard pieces are solid natural stone.
Tomorrow I can likely remove the protective paper from the floor and caulk the floor to wall joints and the vertical wall to wall joints. Or at least prepare to caulk them.
-
Half bathroom
- October 24, 2015
-
Half bathroom
I am grouting the walls. I had almost forgotten how hard it can be to use SpectraLOCK on walls; it took me hours to do 3/4 of the back wall. With all of the sand in the MINI size mix, it's hard to work it into the joints when you don't have gravity on your side. A lot of it ends up on the floor, whether using my full size epoxy trowel or the margin trowel. And the work time is short, so it gets more difficult as you work. And then you have to clean it up quickly before the epoxy haze cures on the tiles.As far as coverage is concerned, the 4-pack of MINI sets that I bought may not be enough. It will be close. I'm hoping I don't have to order another MINI set, since it'll hold me up. I really want to be done with the really messy work before the weekend is over, so I can start cleaning up and prepare to install the toilet.
At the moment, the back wall and right wall are grouted.
-
Half bathroom
- October 23, 2015
-
Half bathroom
I installed the final bullnose and baseboard marble pieces.I made a final pass at cleaning the joints and tiles to prepare for grouting. I also taped the plumbing with painters tape (3M blue) in case I get grout on them. SpectraLOCK sticks to everything, and I don't want to need to clean SpectraLOCK off of the plumbing when I'm ready to fit the valves.
-
Half bathroom
- October 22, 2015
-
Half bathroom
I installed the final wall tiles, all but one of the remaining bullnose, and all but two of the baseboard marble pieces. I need to wait for the final wall tile thinset to cure before installing the final tiny piece of bullnose and the final two pieces of baseboard marble. The ledger board is still in place and will need to be removed to install the final baseboard marble. I'll set the final pieces tomorrow evening.Theoretically, I should be able to grout the walls this weekend. I might be able to caulk the floor to wall joints on Sunday evening, but I'll probably wait until I'm ready to install the toilet and sink since I don't want to waste any of the Latisil caulk since it's $16 per tube.
I need to set aside some time to cut and finish the oak door casings.
-
Half bathroom
- October 20, 2015
-
Half bathroom
I cut the eleven subway tiles for the remainder of the fourth wall. I installed a very small ledger piece for these tiles.The Silver Shadow SpectraLOCK grout arrived a day early. I'll be using this on the walls. The Silver Shadow Latisil caulk arrived in the same shipment. It is 100% silicone. I'm not excited about the look of silicone caulk, but it can't be beat for durability and water resistance.
Twelve of the marble skirt pieces are now cut. I wish I had completely levelled the floor with levelling compound and removed the marble tiles from their inconsistent backing, so I could make all the same cuts. Not a huge issue, but it's more work than it would have been had I used levelling compound on the floor.
-
Half bathroom
- October 19, 2015
-
Half bathroom
I temporarily reinstalled the remainder of the old door casing in order to get a tile measurement for that part of the wall.I removed the ledger board from the 4th wall.
I cut two of the three remaining pieces of bullnose. Tomorrow I'll cut the remaining wall tiles and baseboard marble, and install the remaining wall tile and bullnose. I can then pull out the protective paper on the floor and lay down the tarp and some tape to protect the floor for the baseboard installation and wall grout.
-
Half bathroom
- October 17, 2015
-
Half bathroom
I cut two piece of the baseboard marble just to get a feel for how tall it should be. I think I'm set.I removed the ledger board from the left wall since I don't need it anymore. I did most of the cleaning of the grout joints on the left wall.
I reinstalled one side of the old door casing temporarily, then set the wall tile for the final wall except for the very small part between the door and the left wall which I may do tomorrow. I left about a 1/8" gap between the edge of the tiles and the door casing, which will be caulked after the new door casing is installed.
-
Half bathroom
- October 16, 2015
-
Half bathroom
I finished installing the subway tiles on the left wall.I installed the bullnose tile as the top row on the back wall, and 2 pieces on each of the side walls.
The grout for the walls will be here on Wednesday. I think I can finish laying the tile before it arrives.
-
Half bathroom
- October 15, 2015
-
Half bathroom
I picked up the bullnose tile from The Tile Shop on my way home from work, and a polyethylene tarp at the Lowe's right down the street from there. I have a fever and am not feeling 100%, so I might not do any real work tonight. I quickly checked that the bullnose is going to work as planned, and it looks like it will. I'm anxious to get the tile work done by next week. Winter is approaching and I have much to do before it arrives. I don't want to be dealing with buckets of water and thinset in the cold, much less the wet saw.
-
Half bathroom
- October 14, 2015
-
Half bathroom
I picked up some solid oak door casing at Home Depot on my way home from work.I ordered a 4-pack of Silver Shadow SpectraLOCK MINI grout sets from Tile Store Online. Hopefully this will be enough to do the walls of the half bathroom. I also ordered two tubes of matching caulk. There was a lot of hemming and hawing on my part about using epoxy on the walls. Mainly because my experience with SpectraLOCK from years ago led me to believe that sagging was a problem. If I believe what I've read recently, the newer PRO formulation is firmer. I can't say that was my experience on the floor, but I left out 10% of the sand on the floor due to the narrower joints. In hindsight I don't think that was necessary, and it led to less full joints that I might touch up.
I'm still debating which caulk color to use for the joint between the walls and floor.
I put 6 more rows of tiles on the left wall.
Tomorrow I should be able to pick up the bullnose tile at The Tile Shop. If I'm lucky, I'll be able to finish laying the tile some time next week. I believe the grout won't be here until next week, so that's fine. And I need to cut and finish the door casing before I can tile the last wall.
-
Half bathroom
- October 12, 2015
-
Half bathroom
I bought new marble skirt tiles at The Tile Shop. They were expensive, but the ones I bought at Home Depot just weren't going to work the way I'd like. They were too thin. The good news is that I'll probably find a use for them; I'm thinking about a pair of shelves with the extra floor tile, and they would work nicely to trim the edges. They were really just marble bullnose tiles, just labelled as baseboard tiles due to their height.
-
Half bathroom
- October 11, 2015
-
Half bathroom
I attached ledger boards to the 2 remaining walls so I can tile them after I'm done with the right wall.
-
Half bathroom
- October 10, 2015
-
Half bathroom
I cut the two tiles that surround the sink waste pipe and cold water supply plumbing. I cut a fairly large space for the waste pipe, since the compression nut will be somewhat recessed and I will need room to tighten it.I cut and attached a ledger for the right side wall so I can start tiling there. I didn't use my clamps to hold this one, since I don't want to be tripping over the clamps. I used three screws. I will fill the screw holes with Redgard after I remove the ledger.
I hope to finish tiling the back wall and most of the right side wall today.
On Monday, I should receive some silicone foam rubber bulb seal (McMaster-Carr 9141K177) that I'm hoping to use to cushion the toilet from the floor to avoid scratching the marble during installation and seal the toilet to the floor. Of course I'll likely still caulk it, but the bulb seal will make installation easier. I'll probably use the same bulb seal to protect the floor when installing the sink pedestal.
I should also receive an EPDM foam rubber bulb seal (McMaster-Carr 93085K15) that I intend to use between the sink and its pedestal. The bumpers I tried to use don't work very well; the glazed ceramic is too slippery for their adhesive.
There are 7 rows of tile on the right side wall now.
-
Half bathroom
- October 9, 2015
-
Half bathroom
I tiled more of the back wall. It's almost done. I need one more row at the top, and a couple of cut pieces around the sink plumbing. I will start the second wall this weekend. The remaining walls will be a little easier since they're smaller and have no plumbing.
-
Half bathroom
- October 7, 2015
-
Half bathroom
I ordered 4"x16" carrara gris bullnose tile from The Tile Shop. This matches the wall tile. It will arrive at the store next Thursday.AS of tonight, I have put 4.5 rows of tile on the back wall.
-
Half bathroom
- October 6, 2015
-
Half bathroom
I bought a 12.5 lb. bag of CBP Polyblend grout at Home Depot. This is just for a color test. If I like it for the walls, I will likely order Laticrete Permacolor in Silver Shadow.I covered the new floor with 2 layers of paper protection, in preparation for tiling the walls.
I pinned a 1x3 oak board to the back wall using my long Irwin clamps. Its top edge is where I want the wall tile to start. It was levelled using the Bosch GLL 2-45 and double-checked with my digital level. This will allow me to start the base row of wall tiles with support to prevent movement from sagging. I don't really expect much sagging with the thinset I'm using, but it's best to prevent it.
I set 7 wall tiles, just to get a feel for the spacing. I'm happy with it, and can hence proceed with more tiles later this week. I'm going to change thinset though; the stuff I'm using just doesn't like the 1/4" x 1/4" trowel very much, and I don't want to use a larger notch trowel for 3"x6" tiles.
-
Half bathroom
- October 5, 2015
-
Half bathroom
I continue to hem and haw over the wall tile layout. Given where the cement board ends, I need two 4" tall rows of tiles or a wood border at the transition to drywall. I have 4" tall baseboard tiles I think I'm going to use, which leaves me with another 4". The Isabella listello from tileshop.com woudl be a perfect accent, but I have a nagging feeling that it's quite a bit thicker than the wall tile. I do want the 4"x16" bullnose, or at least I _think_ I do.
-
Half bathroom
- October 4, 2015
-
Half bathroom
I grouted the floor with SpectraLOCK in natural gray. I have one mini kit remaining. If I buy a full unit to do the walls, this should let me finish all of the walls and still have the mini kit remaining to touch up and low spots once all of the tile is grouted. However, I honestly don't think I'm capable of using a full unit on vertical surfaces before it gets too hard to work. I'm probably better off buying some PERMACOLOR. grout. A single 12.5 lb. bag would be enough.I picked up a Bosch GLL 2-45 self-levelling cross-line laser and Bosch BT 150 compact tripod at Home Depot. I need these for the installation of the wall tile, and obviously they'll come in handy for other purposes.
-
Half bathroom
- October 3, 2015
-
Half bathroom
I found another loose square tile. I replaced it using Loctite PL Premium instead of thinset, since it's difficult to get a good bond with thinset of such a tiny surface. I had to do the same thing for a partial square tile at the edge of the toilet flange. It had so little surface area that the thinset couldn't hold it; the tile was taller than it was wide since the tile is almost 1/2" thick. This particular tile will never be seen but I don't want it to be loose.I measured and marked the center of each wall, then drew vertical lines on the walls for every other grout joint that will be present with the subway tiles. I did this using my digital level and a straightedge. These lines are just guides. I will be buying the Bosch GLL2 self-levelling cross-line laser level tomorrow which I'll use when laying the tile. My guide lines will be covered with thinset and hence the laser will be much more useful.
Very late at night and into early morning, I started sealing the marble floor tiles in preparation for grout. Yes, I've decided I'm going to go ahead with the SpectraLOCK, "picture framing" or not. I applied 511 Impregnator to the edges of the tiles, hoping it will prevent most of the picture framing. From what I've read, a single coat such as I've applied should not act as a grout release for SpectraLOCK in the joints. I sure hope that's true. I applied the 511 Impregnator lightly with a chip brush. I did not pour it anywhere, and from my test tile I believe it penetrated into the sides of the tiles with very little remaining on the surface.
-
Half bathroom
- October 2, 2015
-
Half bathroom
I cleaned out the remaining floor joints that had thinset in them that would have prevented good grout depth.
-
Half bathroom
- October 1, 2015
-
Half bathroom
Yesterday I decided that I don't want to risk "picture framing" of the marble on the floor by using SpectraLOCK. There isn't a huge benefit to SpectraLOCK with marble anyway, since the marble itself needs to be sealed and resealed occasionally. And obviously I'll be resealing the grout at the same time. So I bought some natural gray cementitious grout at Home Depot on the way home and I'll use that on the floor. I will of course still use the SpectraLOCK on the wall tiles.I also bought a grout saw, Dremel bit, Dremel diamond EZ-Lock cutting wheel and a grout brush to help me clean thinset out of the tile joints before grouting. Normally I would have kept the joints clean while setting, but with the tight pattern of the tiles it wasn't possible while still cranking out the tile setting. Thinset doesn't stay workable forever, and you can't add water to modified thinset after the initial mixing without compromising its strength. And I didn't want to mix more than 2 batches of thinset due to the shape of the tiles; the tiny square tiles on two edges of each sheet demand that you have a good amount of thinset past each sheet as you lay it down.
Inspecting the floor now that the thinset has dried enough to walk on it, there are a couple of the tiny black marble tiles that are dramatically lower than surrounding tiles. I tried to put extra thinset under those tiles so they wouldn't just be straddling a single thinset pile from the notched trowel, but it looks like I blew it in a couple of spots. I will try to knock those tiles out and reset them. It doesn't matter if I destroy those tiles in the process since I have plenty of extras. In fact I might intentionally do that to avoid risk to surrounding octagon tiles. I was hoping to finish prepping for grout tonight, but it looks like that probably won't happen.
Well, inspection of the floor isn't so great. It's a bit 'lumpy'. That's my fault for doing a medium bed application of thinset with this particular tile. Also, a few tiles were loose; the thinset didn't penetrate the mesh backing and the tile released from the mesh. At the moment this appears to only have occurred on a few tiles, and it was one of the first tiles I installed last night. I suppose I can hope that the thinset wasn't quite ready when I applied that tile.
Thankfully, this is a small floor. But it does make me sad that I might have to rip it out sooner than I'd like. And it makes me think that I should use the SpectraLOCK grout on the floor just to get the additional strength it provides.
Lesson learned: don't use this type of patterned tile in a medium bed application. Despite levelling it while setting, it will move a bit while curing. Especially the tiny square tiles relative to the larger tiles. If I had to do this again, I would have put Ditra on the floor and used a thin bed.
I have replaced the tiles that didn't bond. I also cleaned all of the joints that had thinset in them except the area where tiles have been replaced (tile sheet #13 in my numbering scheme). I did the cleaning with a Dremel grout removal bit, and it went well. I did not find any additional loose tiles. So maybe tomorrow I'll get to clean up the surface of the tiles and grout the floor. That would allow me to start working on the wall tile on Sunday.
-
Half bathroom
- September 30, 2015
-
Half bathroom
I installed the floor tile. There is a bit of lippage in places, but I couldn't do better given the tile inconsistency and the shape of the tiles. You can't do much tile wiggling with this tile shape, and there's only so much you can do to correct lippage within a given meshed sheet (short of removing it from the mesh, which I wasn't up for doing in a tiny space that's hard to work in).I'll need to get some thinset out of various joints before grouting. I chose a gray grout but the thinset is white. I wanted a gray thinset, but the selection is limited at the local big box stores. I also debated this for a while because I wanted the white marble tiles to be as bright as possible. White thinset behind them helps a _tiny_ bit on that front. I didn't want a white grout because even with SpectraLOCK, it will eventually get dingy. And I am going to be using SpectraLOCK because I'm a firm believer in a quality epoxy grout. But it's not going to be easy to apply since the grout joints are less than 1/8" wide but not 1/16". And it's not going to be easy preventing the SpectraLOCK from staining the marble. I will probably try it on a test board first.
-
Half bathroom
- September 29, 2015
-
Half bathroom
I installed the threshold. I left a 1/8" gap between it and the hardwood floor which I'll caulk. This is to avoid cracking from the different expansion/contraction rates of the hardwood versus tile and marble. Marble, once properly sealed, is dimensionally stable but hardwood (and the subflooring) is not.I installed two floor tiles with the remaining thinset. This marble tile isn't fun to install. The tiny black marble squares are the main issue. They're not all properly aligned, and I didn't notice a really bad one on tile #2 until after the thinset was fairly dry. In addition, the mesh ont eh back isn't consistent. Some tiles have one layer, others have two layers overlapped in places, and some have incomplete mesh. This makes it difficult to prevent lippage. I'll have to live with it and hope that I can minimize the lippage. And live and learn: check these issues when buying tile. I backbuttered the tiles to help, but it's not fun when there's lippage built in to an individual sheet due to variable mesh thickness.
Tomorrow I hope to install roughly half of the floor tile. If the pieces I put in today are fully set, I might be able to install all of it.
-
Half bathroom
- September 28, 2015
-
Half bathroom
I removed all of the floor tiles since I'm done with layout. I used a Sharpie to label their locations on the floor, just as another reference. I removed the threshold and lightly sanded the edge of the hardwood, just to take off the sharp corner to avoid snagging a rag or dust map when cleaning and the give a little more surface area for caulk. Tomorrow I will install the threshold.
-
Half bathroom
- September 27, 2015
-
Half bathroom
I continued cutting tiles for the floor. The ones around the toilet flange were tricky, but I finished all of the cuts. I then labelled all of them with masking tape and a Sharpie. I also created a diagram I can reference when reinstalling them, and checked it in to my source code repository so it will get backed up.After I remove all of the tiles, I need to sand the edge of the hardwood floor. And the first piece to be installed MUST be the threshold, else I'll have to remove the door jamb.
-
Half bathroom
- September 26, 2015
-
Half bathroom
I applied a second coat of Redgard to the cement board.Once the Redgard had dried, I checked my layout lines again and then started cutting tiles. Many of the straight cuts are done, and the most difficult cut around the toilet flange is done. But I still have amyn cuts to make for the floor.
I need to lightly sand the edge of the hardwood flooring first, to eliminate the sharp edge at the threshold. This is just to provide a nice easy transition to caulk. I'll do the sanding with my Bosch MX30.
-
Half bathroom
- September 25, 2015
-
Half bathroom
I did a little bit of joint compound sanding. If I need more joint compound work, it's going to have to wait until the tile work is done.I cut the marble threshold to length and trimmed the door casing to accomodate it. The door casing is kind of beat up from the previous owners' dog(s), I may eventually replace it. But it'll work for now and I am now able to install the threshold. Obviously I left room for thinset and color-matched caulk.
The tile saw from Harbor Freight works fine, it went through the marble (which is soft) like butter. The water tray sucks, since its stopper leaks pretty badly. But with the Bosch blade I don't anticipate any problems cutting marble and ceramic. No porcelain involved in this particular job, but I think the Bosch blade would do just fine with it. The pump works fine, and if I put it in a clean bucket of water instead of in the tray, I think it will work for a long time. But I'd like to be able to keep the pump in the tray. What I need is some stainless steel filtering mesh to keep tile silt out of the pump area. McMaster-Carr 9419T11?
I applied the primer coat of Redgard, then the first full coat.
-
Half bathroom
- September 24, 2015
-
Half bathroom
I put more joint compound on the screws I installed yesterday. I'm hoping to wrap up the joint compound work tomorrow and get a coat of Redgard on the cement board (thinned 1:4 with water since it'll be a primer coat). While this room isn't a wet area, I want some protection as well as some isolation.
-
Half bathroom
- September 22, 2015
-
Half bathroom
The American Standard Town Square toilet arrived a day early. I haven't opened the boxes yet. I also received the Moen YB5163CH light fixture, Moen YB5108CH TP holder, Moen YB5186CH towel ring and Moen YB6101CH tank lever.Separately, I received the Bosch TS1003 left side support and Bosch TS1002 rear outfeed support for my Bosch 4100-09 table saw. I installed them. I also received the Leecraft BH-1 zero clearance insert, which I have not yet installed but it looks like a nice piece. I'll cut this one for 90 degree cuts and order a second one for 45 degree cuts. This should help prevent tearout.
-
Half bathroom
- September 21, 2015
-
Half bathroom
I ordered some diamond drill bits from Amazon to cut through tile when installing the sink pedestal and TP holder. I also ordered some stainless steel lag screws and cushioned washers for the sink pedestal, from McMaster-Carr.I put another coat of joint compound on the holes from the old light fixtures. Tomorrow the new light fixture should arrive, and hopefully I can decide where it will go on the wall despite not having purchased a cabinet or mirror.
-
Half bathroom
- September 20, 2015
-
Half bathroom
I taped and mudded the cement board joints.I need to order some 316 stainless lag screws to mount the sink pedestal to the floor. The base of the pedestal is roughly 5/8" thick, the tile is about .4" thick and the backer board is 1/4" thick. 1/4" diameter should work, and I probably need 2.5" long ones. McMaster-Carr 90123A127.
I also need a carbide tipped drill bit to drill through the tile. McMaster-Carr 2954A5?
I also need a cheap plastic level to eliminate lippage when I lay the floor tiles. The red Task Force one at Lowe's is perfect. Cheap and possibly not accurate, but I don't need it to be accurate. I just need it to be straight and non-metal so it doesn't scratch or chip the tiles.
The toilet should be here on Wednesday, at which point I can check that the new supply location will work. The new light fixture, towel ring and TP holder will be here on Tuesday.
-
Half bathroom
- September 19, 2015
-
Half bathroom
I removed the old light fixtures, which were mounted to a 2x4 support behind the sheetrock. There were 4" holes for the mounting boxes, unlike the mess in the master bathroom. I removed all of the old wiring all the way back to the junction box in the basement, then ran new wire for the new 3-light fixture that will go above a mirror/cabinet. I guessed at where it will be located, since the fixture hasn't arrived and I won't be sure of centering until the sink is in place. I only put a 1" hole in the wall for the wire so I can move it and patch if necessary. The key was getting one contiguous run of wire that was long enough, and that's now done. It would not have been possible with the cement board in place, so thank goodness I hadn't fastened the cement board yet!The 2x4 support that was behind the old fixtures was lumpy from screw removal, which would have made it difficult to patch the holes. I used my pneumatic die grinder and a 3" 60 grit aluminum oxide Roloc sanding disk to smooth them out and allow me to put drywall patches in place.
I cut and installed drywall patches in the holes from the old fixtures, each fastened with a single drywall screw. I left about a 3/16" gap around the edge to fill with joint compound. I then applied the first coat of joint compound.
I fastened all of the cement board with my 18V impact driver.
General observation about remodelling versus new construction: it's always the little things you find along the way that slow you down, and you can't plan for everything. Some things you can't see until you've ripped out some sheetrock or flooring. But, some of this is my own fault... I could have planned a few more things if I had made purchase decisions earlier. For example, I waited until the last minute to order the toilet (hemming and hawing between the 1-piece and the 2-piece), which meant I couldn't plan the toilet supply because their requirement for hiding it are different (I have no idea why; the skirt looks the same in pictures). And there are things that are new: I had never used cement board before and while it's not hard to work with, it's not the same as doing a mortar bed. When you need to use the same stud to support the edges of two pieces, it's difficult to not get tear-out. Worse than sheetrock, because you can't use a standard countersink for very many holes before it's dull.
-
Half bathroom
- September 18, 2015
-
Half bathroom
I moved the toilet supply line to a location that should be usable with the new toilet. It's 2.25" inches from the centerline of the trap, and about 5.5" from the cement board. With the tile, it will be closer to the floor than American Standard's recommendation, but from the diagram of the back of the toilet, I think it will be fine. The toilet will be here during the week, and I'll know for sure once it arrives.All of the wall cement board panels are cut, and I tested their fitment. I'm good to screw them down and mud and tape when I'm ready. But before I do that, I need to figure out where I'm going to mount the new light fixture and get wiring in that wall. It will be near impossible to get a fish tape through that section since it's crammed with plumbing, supports and insulation. Hence I need to do it while I have the cement board off since it will be much easier.
-
Half bathroom
- September 17, 2015
-
Half bathroom
I ran into an issue with the plumbing. The toilet supply line isn't in a usable position for the toilet I plan to order. Good thing I checked the installation instructions! It needs to be moved. So I made a run to Home Depot for plumbing parts. While I'm at it I might redo the sink supply lines. This would allow me to put longer copper and caps in place until I'm ready to officially install shutoff valves. Unfortunately they're hard to access from below. I might be able to sweat new pipes in the tees in the wall, but I'll have to be very careful due to proximity to PVC and wood. Wish I knew what I did with that roll of flashing material I had...I installed the remaining blocking between the wall studs to support the sheetrock and cement board, including support for both sides of the sink. I cut three pieces of cement board and installed them before the sun went down.
I then went to work on the plumbing. I wanted longer pipes coming out of the wall for the sink supplies, since their length was iffy once the tile is installed and I knew the ends were not in great shape from the last time I had the valves off. And since I need to install the cement board and tile, I really wanted longer pipes with soldered-on caps so I don't have to worry about them while installing cement board and tile. The hard part here was just getting enough water out of the system so I could solder. Other than the toilet supply in this bathroom, these valves are the lowest valves in the house and are fed by the same branch that feeds the second floor bathroom and the master bathroom. I tried opening all of the faucets, shower heads, etc. and draining into a 5-gallon bucket, but as usuall it wasn't effective. I would up having to use my air compressor with 100' of air hose to blow out the water.
I now have two longer sink supply pipes coming out of the wall, with soldered-on caps. The water is back on, and there are no leaks. So I can proceed with cement board and tile there without worries. When I'm done tiling, I can cut the pipes to length and install valves.
-
Half bathroom
- September 16, 2015
-
Half bathroom
The Redgard dried on the subfloor.I went to Lowe's to get chrome flanges for the plumbing, Miracle sealants 511 impregnator for the marble and sash brushes to coat the edges, and another chrome shutoff valve.
I went to Home Depot to get 8D common nails (just to use as spacers for cement board), 6 Simpson GA2 gusset angles, 22 Simpson A23Z angles and some Simpson screws. The Simpson stuff is to put blocking in the walls to support the ends of the cement board and sheetrock where I cut the sheetrock.
The cement board is now on the floor. I put thinset down with a 1/4 notched trowel, then placed the cement board and screwed it down with backer board screws using my Bosch impact driver. This was a painful process, only because the room is so small that it's difficult to work in. One piece of cut-to-size cement board is 2/3 of the room!
I created most of the blocking supports that I can use, but still need to add a second block to some of them.
I have figured out what I need to do on the left side of the sink in terms of anchoring it to the wall. It's not easy, but it'll work with some creative use of the Simpson A23Z brackets. On the right side, I don't have great options because the PVC waste pipe from the second floor is in the way. I'll probably just stack three 2x4's to the stud. It looks like this is what the original builder tried to do with the original pedestal sink, but they were placed incorrectly (too low). And it was done with 16d common nails, which I probably can't get out without tweaking the drywall on the other side of the wall from torque. I might be able to alleviate some of that issue if I can get some of the nails cut off first. That would allow me to use longer blocking pieces for better support.
At any rate, all of the blocking I can use is installed except for the sink supports and one of the blocks on the left wall where there is plumbing. I just need to cut and stack a second piece there, and I can't do it at night since it needs my table saw. I'll finish these supports in the morning and then start installing cement board on the walls. This will require turning off the water main since I'll need to remove the shutoff valves again.
-
Half bathroom
- September 15, 2015
-
Half bathroom
The SpectraLOCK grout and matching caulk should arrive today.I taped down 2 swaths of protective paper in the foyer to protect it from the demolition work that will get gypsum dust and sawdust on the floor.
On the list for today: remove the toilet, finish removing the hardwood flooring, remove the sheetrock, and figure out how I am going to support the new sink on the wall. There is plumbing in the way, we'll see what I come up with. I also need to finalize how I'm going to deal with the parts that were missing from the sink/pedestal combo, namely the rubber bumpers that suspend the sink above the pedestal. Without figuring this out, I can't accurately determine where the sink anchors need to be placed in the wall.
Well, it took me a couple of hours to figure out what to do to place the sink on the pedestal, before I realized I had it upside down. I feel like an idiot since I spent an hour creating a spacer I don't need, but problem solved. I still need rubber bumpers that were missing from the sink/pedestal combo, but I can make do with cabinet door bumpers for the time being.
I removed the toilet, as a single piece. It wasn't too messy since I used a siphon to get all of the water out of the bowl beforehand. I then removed the remainder of the hardwood flooring. The toilet supply valve leaks just like the others, I'll need a replacement. For now I've got a bowl under it. Very slow drip, but annoying just the same. I've got a 500W halogen light pointing at the subfloor there for now, to dry out the little bit of moisture.
I put my double door fan in the front doorway and then removed the door trim and cut out the lower 42" of drywall.
I cleaned up the subfloor with my Shop Vac and a damp rag after fixing high spots from hardwood floor nail pullouts. I then applied a single thin coat of Redgard waterproofing. I am not sealing the subfloor; my only objective here was to give myself more work time with the thinset that will go between the subfloor and the cement board. Even though I only need to lay two pieces on the floor, it's not going to be easy because the room is so small; there's almost no room to work. So buying myself a little more work time with the thinset is a good idea.
I need to put some blocking in to support to edges of the drywall and cement board. The only tricky spot is the space for the sink plumbing. I might not do that spot, and instead just hope that it will be OK. It's not as if someone can bump into the wall there, the sink will be in the way.
-
Half bathroom
- September 14, 2015
-
Half bathroom
I picked up two more pieces of Hardie 500 cement board at Home Depot. I also picked up a pair of DeWalt sawhorses and four 2x4's to use when cutting sheet goods. I also bought a 4"x36" white marble double-bevelled threshold for the door threshold, and 18 pieces of Greecian White baseboard tile. These aren't a perfect match to the floor or wall tile, but they're close and they were 25% the cost of the matching baseboard ceramic tile from the Tile Shop.I started the hardwood floor tearout. The hard part is done: cutting and removing the boards that traverse the door threshold. I cut across using my oscillating tool. I had to modify a wood blade for my oscillating tool by halving its width with my bench grinder so I could get under the door casing without removing the casing. I may later remove the door casing.
-
Half bathroom
- September 13, 2015
-
Yard
I picked up a spading fork at Lowe's so I can break up some of the mole mounds in the yard. I wish I knew what happened to my old one, it disappeared during my move.
-
Yard
-
Half bathroom
I started the prep work for the half bathroom. I removed the quarter-round and baseboard on one wall so I could get a measurement of the thickness of the hardwood floor. It's 3/4" as I had hoped. Hence my solution of 1/4" Hardie backer should work fine with the marble tile I purchased. I will be doing some more tearout today if I have time after yard work. I also need to make a run to Lowe's for paper drop cloth, and while I'm there I should probably pick up a small amount of clear vinyl tubing to replace the kinked stuff on the tile saw.Given the pulled muscle in my back, we'll see how much I can get done today. I haven't had more than a few hours of sleep at a time in 6 days and it's finally starting to get to me. Hopefully I'll feel better after my run to Lowe's and some yard work. Keeping surrounding muscles loose helps, but at the same time I have to be careful to not overstress the muscle that's injured. Doh!
Well, after the yard work, I feel OK. Not 100%, but today is the first day in a week that I haven't had to take Vicodin just to function. On Thursday I had to take five, and I still didn't sleep much. Yay for some healing!
I picked up a roll of drop paper to protect the hallway while tearing out the half bathroom. I'll do some of it tonight, but I expect to do most of it tomorrow. The trickiest part will be removing the hardwood flooring since it extends into the rest of the house. I need to cut it straight across, which is a crosscut. I think I can do it with my oscillating tool, but it won't be easy.
I removed the baseboard on three of the walls, and removed the door. I'm now preparing to remove the sink. I'm going to need some new hardware there; the existing valves are corroded brass and it looks like there's a poorly rigged adapter setup. The waste pipe is part brass and part PVC. Once the sink is out, I'll have a closer look at what needs to be done. I haven't opened the new sink boxes yet, I'll do that once I have the toilet and old sink removed.
OK, the sink has been removed. Unfortunately, the shutoff valves don't work. They drip fairly regularly when closed. I'll need new ones, preferably chrome and preferably not quarter-turn ball valves such as the ones that are leaking. I'm old school, for a reason. It's damn silly to have el-cheapo quarter-turn ball valves for a bathroom faucet supply. How often do you turn sink supply valves off? Pretty much never, and when you do, it's because you're replacing the faucet or faucet lines. In which case, you surely don't want it leaking.
I think I've decided that I need to buy a marble threshold. That will allow me to keep water in the bathroom if a leak ever develops, and makes the transition to the foyer easier to manage. Not to mention it should look better. It means I'll probably have to trim the bottom of the door, but that's no big deal since it's a solid wood door.
-
Master bathroom
I continued the spackling and joint compound work for the second vanity light fixture. It will probably need one more sand and skim before I can call it done.
- September 12, 2015
-
Master bathroom
I started working on the second vanity fixture. Removing the old one revealed a large rough hole similar to the one found when removing the first fixture. The good news for this one: it was almost centered above the sink, and there was no PVC waste pipe behind it. Hence I was able to use one of the circular rework boxes I bought by cutting a round hole. The box is installed and I test-fitted the fixture before starting the spackling work. I'm glad that I bought a cheap digital torpedo level earlier this week. Using it with one of my 60" straightedges made it easier to get the second fixture at exactly the same level as the first fixture. I couldn't have done it with my 4' level since it isn't long enough and it's too hard to juggle it with the straightedge and a pencil when standing on the edge of the sink. And bubbles aren't perfect in use, whereas the digital reading is in .1 degree increments and is easy to read (big, and bright backlight). Well worth the $39 investment, especially since I previously didn't have any torpedo levels. I'll need it again in the half bathroom very soon.
-
Master bathroom
- September 11, 2015
-
Master bathroom
I put the last coat of Tung Oil Finish on three vanity drawer fronts. Once they're dry, I'll reinstall them and start the next three.I finished patching the hole from one of the old vanity light fixtures well enough to put a coat of Zinsser B-I-N on it to seal it and test fit the new fixture. All is well. See more pictures here.


-
Master bathroom
- September 10, 2015
-
Half bathroom
I picked up supplies and small tools I need to install the Hardie board. Buckets, thinset, grout/thinset mixing paddle, Backer-On screws, FibaTape, 1/8" masonry bit, digital torpedo level, microfiber towels.I also stopped at the Tile Shop and ordered wall tile. I haven't ordered skirt tiles or bullnose yet; I'll do that soon. The skirt tiles are ludicrously expensive; $15 per 5.875" x 8" tile. It is really worth $360 added cost?
-
Half bathroom
- September 9, 2015
-
Half bathroom
I ordered Laticrete SpectraLock PRO ground and Latisil caulk in Natural Gray from Tile Store Online. I'll pick up some thinset tonight.
-
Half bathroom
-
Master bathroom
I put a coat of joint compound on the oblong hole from the previous light fixture above the left side of the vanity in the master bathroom. It's starting to look pretty good. One more coat should fill the hole, then I can skim coat it, sand, and prime it.The second Elk Lighting 52002/3 fixture is on its way here. It should be here on Friday.
I started refinishing three more of the vanity drawer faces. They've been sanded and stained. Tomorrow I'll start applying tung oil finish (which is really just thinned varnish).
- September 7, 2015
-
Half bathroom
I bought .25" thick Hardie backer board for the floor of the half bathroom. I also bought .42" Hardie backer board for the walls (Hardie 500), but I only bought 5 pieces and I likely need 2 more. This coming weekend, I'll start the tearout of the existing bathroom floor and the lower half of the wall that I plan to tile.
-
Half bathroom
-
Master bathroom
I put another coat of spackling compound in the oblong hole in the drywall where the old light fixture was installed. It will need at least one more coat to fill it before sanding. -
Tools
I bought a new Bosch 4100-09 table saw with TS3000 stand at the local Lowe's. It's been on my wish list for several years. For a portable contractor saw, it's quite nice and should serve me well as I start installing hardwood flooring. I also bought a 4.5" diamond blade for my grinder so I can cleanly cut notches and corners out of cement backer board.
- September 6, 2015
-
Master bathroom
I placed some window screen behind the oblong hole in the drywall where the old light fixture was, and started filling the hole with spackling compound.It's worth noting that I suspect the same PVC waste pipe I found yesterday would be in the way of a recessed medicine cabinet in the half bathroom. That's good to know since I have been hemming and hawing over recessed versus surface mount. Now I can take some measurements to determine if the waste pipe is between the studs where I intend to install a medicine cabinet in the half bathroom.
-
Master bathroom
- September 5, 2015
-
Master bathroom
Since I have decided that I'm going with chrome hardware in the half bathroom, I ordered a second Elk Lighting Acadia 52002/3 and will use them in the master bathroom. They're brushed nickel, which will match the hardware theme there. I got a good deal on this second one: $201.60 with free shipping by using a 25% off coupon at 1stoplighting.com.
-
Master bathroom
- September 4, 2015
-
Half bathroom
The American Standard Town Square pedestal sink with pedestal arrived from National Builder Supply. I haven't opened the boxes yet since I was at mom's tonight helping complete her new laundry machine installation and getting a measurement to complete her dishwasher installation.
-
Half bathroom
- September 3, 2015
-
Half bathroom
I ordered a chrome American Standard Town Square widespread faucet from National Builder Supply.
-
Half bathroom
- September 2, 2015
-
Half bathroom
I ordered an American Standard Town Square pedestal sink with pedestal from National Builder Supply. It's model number 0790.800.20.
-
Half bathroom
- August 26, 2015
-
Master bathroom
I installed a Rev-A-Shelf 5WB1-1520-CR under the left sink in the master bathroom, and another one under the right sink. No more digging around on my hands and knees to get something out of the back of the cabinet under the sinks. I put some plastic ridged shelf liner down before I mounted the Rev-A-Shelf units.
-
Master bathroom
- August 17, 2015
-
Master bathroom
I bought a pair of Cree TW Series 65W equivalent 2700K dimmable LED 6" retrofit recessed downlights at Home Depot. I installed one of them to compare to the original bulb/lens setup. It's a night and day difference.
-
Master bathroom
- August 16, 2015
-
Master bedroom
My second attempt to rescreen one of the window screens in the master bedroom was successful.
-
Master bedroom
- August 15, 2015
-
Master bathroom
I finished installing the second Delta Kinley faucet in the master bathroom. I installed the final brushed nickel knob on the vanity.
-
Master bathroom
- August 13, 2015
-
Second floor hallway
I installed Baldwin wall plates on the outlet in the landing and the outlet in the 2nd floor hallway. I'd like to shoot the electrician that installed the boxes in this house. Many of them are crooked, and several of them protrude from the drywall on the side that's fastened to the wall stud (meaning it's not a bent box; it was installed poorly). The one on the wall in the landing can't be shaved back because it's the type with wraparound metal clip fasteners which protrude from the drywall. If I cut those, the box won't be held firmly anymore. I might carefully cut the whole box out of the wall and replace it with a rework box.
-
Second floor hallway
-
Master bathroom
I installed a Lutron Maestro MACL-153MLH in the master bathroom to replace the ancient rocker switch. All four of the light switches in the master bath are now Lutron Maestro.I installed new knobs on the master bathroom vanity. One of the sixteen I bought at Lowe's was apparently a return that they put back on the shelf; the threads were completely stripped out. I'll buy a replacement tomorrow.
I will install the second Delta Kinley faucet tomorrow or over the weekend. I'm not happy with the water flow from these faucets, but that's what happens with regulations. Sadly, low-flow faucets mean I just wind up leaving them on a lot longer while I wait for hot water to reach them. And leave the room while I wait, which means I'll waste even more water. I don't leave my faucets running unnecessarily, I turn them off frequently while I'm using them. I even turn off my shower faucet multiple times while showering; I am water conscious. But sadly most people are not, so we wind up with a forced-upon-us solution.
- August 12, 2015
-
Master bathroom
I installed the first Delta Kinley 35730LF faucet in the master bathroom.I installed one of the Baldwin wall plates (single GFCI for the hot tub timer). While trying to install the 4-gang plate for the light switches, I broke one of the screws. I'll need to pick some up at Lowe's (item 26194). While I'm there I should pick up a Lutron MIR-600THW for the hot tub lights, an MACL-153MLH for the shower light and a pair of Pass & Seymour 1595NTLTRCC4 outlets.
One of the issues with the 4-gang light switch box is that the 4-gang box was poorly installed; it's crooked and comes too far out on one end, and hence gets in the way of the wall plate screws. I might be able to shave it back a bit with my Dremel.
-
Master bathroom
- August 10, 2015
-
Master bathroom
I removed one of the old sink faucets. I installed the drain for one of the new Delta Kinley 35730LF faucets I bought from Home Depot. I need some 3/8" compression to 1/2" FIPS supply lines to finish the installation. I can't find any 12" ones on the Home Depot web site, nor the Lowe's web site. Maybe that's a good thing, since I no longer trust many of the supply lines from the big box stores. I ordered some from McMaster-Carr.
-
Master bathroom
- August 9, 2015
-
Master bathroom
I installed the second towel ring in the master bathroom. I also installed the glass shelf.I ordered new wall plates for the master bathroom from Wayfair. More of the Baldwin Classic Square Bevel design: a 4742.150.CD 4-gang for the light switches and exhaust fan and some 4743.150.CD for the Jacuzzi timer and wall outlets. they should be here on Thursday. I need to replace the wall outlets, and I still have plans to replace the light switches for the shower and jacuzzi.
-
Master bathroom
- August 8, 2015
-
Master bathroom
I bought some hardware for the master bathroom. I don't know how the previous owners dealt with towels, since there were no towel bars in the master bathroom except a single 18" on the end of the vanity. I've never used this towel bar because it's too close to the floor for bath towels. I've been hanging my towel on the shower door, but it was time to install towel bars. There were also no towel rings for hand towels, and no toilet paper holder.Since there is no good location near the shower for a towel bar, I installed a robe hook on the pillar near the shower door. I'll use this to hold my towel while I'm in the shower. I installed a toilet paper holder near the toilet. I installed a double 24" towel bar up high on the wall next to the vanity. A second will be installed underneath it tomorrow. I installed a towel ring to the right of the vanity mirror. A second will be installed on the wall to the left of the vanity tomorrow. I bought a matching glass shelf, but haven't decided where I'm going to install it. It might go above the toilet to hold potpourri or the like, though my original intent was to put it to the left of the vanity to hold my toothbrush charger and other items.
All of these pieces are from the Moen Sage collection, with a spot-resistant satin nickel finish. Obviously they don't match the original brass pieces that remain in the master bathroom, but those will be replaced in due time since I hate the look of brass hardware.
-
Master bathroom
- May 15, 2015
-
Yard
I picked up some Pli-Stix at Home Depot to repair some of the cracks in the driveway. The weather forecast isn't favorable for using it yet.
-
Yard
- April 19, 2015
-
Yard
I put a light amount of Lesco Weed and Feed on the front yard, then overseeded the yard between the house and the circle driveway, adding starter fertilizer in the process.
-
Yard
- April 4, 2015
-
Yard
I ordered an Agri-Fab 45-0299 tow-behind lawn aerator from Amazon. I need this before I fertilize and overseed the lawn.
-
Yard
-
Half bathroom
I ordered an Elk Lighting 52002/3 Acadia light fixture for the half bathroom. I didn't want to order it now, but availability is non-existent for the oil-rubbed bronze version so I figured I had better order the brushed nickel one before it becomes impossible to get. I've had this fixutre on my wish list since last year. I will need to reconfigure the electrical in the bathroom to accomodate it, but that's not a big problem.
- April 3, 2015
-
Half bathroom
I ordered the remainder of the marble tile for the half bathroom floor. I'll pick it up on Friday.
-
Half bathroom
- March 31, 2015
-
Half bathroom
Earlier this month I bought a 10" wet tile saw from Harbor Freight. I also bought a Bosch Premium Plus blade for it. I picked up a sample of marble floor tile from The Tile Shop in Bloomfield Hills. It's 3" octagon white polished marble tiles with small black marble square accents. It's very pretty, and very traditional in style. It's pricey at $15 per square foot, but the half bathroom floor is tiny and it's worth it for a timeless look. I will order enough for the floor later this week.I need to start putting together a list of materials to renovate the bathroom. I will choose wall tile on Friday, but I also need to choose paint, lighting, etc. And come up with a list of Hardiboard, thinset, etc.
-
Half bathroom
- January 26, 2015
-
HVAC
Sometime late last night, my furnace stopped working. When I got up this morning, it felt a little cold in the house. I decided to check the Nest thermostat on my way out the door. It said 60F and that it was trying to heat. But the furnace burner, blower and inducer were all off.I didn't really have time to dig into troubleshooting, other than making sure I didn't have a gas leak. I set up the wick-type kerosene heater, filled it and started it, turned on the ceiling fans, turned off the furnace at the thermostat, and left for work. It was 57F in the house when I left. Checking the Nest a few times throughout the day, the house came up to 65F. Good enough to be comfortable and prevent my pipes from freezing.
When I got home, I started looking into how direct-vented furnaces work. Youtube was helpful, especially grayfurnaceman. After some research, I concluded that my first task was to figure out why the inducer blower was not starting. It wasn't warm, nor humming. It spun freely. Hmm, not getting power for some reason? I opened the lower compartment of the furnace and found the condensation lines full of water. That's an issue for another day, but I did remove them and clean them since I didn't want to get wet if I had to remove the inducer. I then removed the front panel of the control box, and immediately recognized the problem. One of the wires to the inducer relay coil had come off (presumably from vibration). I reattached it, repowered the furnace, and was good to go. I reattached the condensation lines and put all the covers back on.
Simple problem with a simple (and free!) fix.
-
HVAC
- January 18, 2015
-
General
I bought a Panasonic KX-TG7875S cordless phone system from the local Staples. They price-matched Amazon. It's now connected to my Ooma Telo, so I have cordless handsets to use in the house for home phone calls.I exported a very small set of phone numbers to a VCard from my contacts list on my Mac, then transferred it to the Panasonic KX-TG7875S. So I now have a small phone book available from the cordless handsets.
To get things set up in the kitchen, I will need a new wall plate and decora keystone inserts. I put some items in my wish list on Amazon. The hard part will be getting an ethernet cable or two to the wall plate; from what I can see in the basement, the existing phone wiring goes through three sandwiched joists to get to the base plate of the kitchen wall. :-(
-
General
- January 17, 2015
-
General
I installed an Ooma Telo in my office, and connected it to one of my Polycom desk phones. I activated it and It works well. This isn't the intended permanent location. I will eventually put the Ooma Telo in the kitchen and connect it there. I need to disconnect phone wiring to the outside world, and it's non-trivial to do from the basement because the wiring is a complete mess. It looks like the previous owners had 4 separate phone lines from the telco. It also appears that those lines and the alarm system were not installed when the house was built. There's a spaghetti mess of cut and crimped wires in the alarm enclosure in the basement, and I don't see a 66 block anywhere. Nothing appears to be labelled.Since my Ooma Telo is behind my firewall, I only connected its "WAN" port and reconfigured it to allow access to its web interface on that port.
-
General
- January 1, 2015
-
Garage
I finished installing some Azek trim around the north garage door, using my new cordless drill and impact driver. For the top piece of trim, I had to rip two additional pieces 1/2" thick. These were glued and screwed to the full pieces of trim to bring the edge closer to the top of the garage door. Again I used the new drill and new impact driver to install them, and the adhesive was Loctite Premium 3X. I used stainless steel screws.I then my smaller impact driver to install the brush-type garage door seals. It's a good thing that I bought three kits instead of just two; even if you don't make any mistakes, there isn't enough seal in one kit to complete a 7'x16' garage door. False advertising. I bought three kits to avoid additional shipping charges in case I made any mistakes, but it turns out I'll need three kits to cover two doors even without any errors on my part.
I will need one more piece of Azek trim in order to do the same work on the south garage door.
The tape and mud work I did on the ceiling has failed at the joint with the east wall. I believe this happened from moisture that was still in the drywall from the vent boot leak I fixed. I'm reluctant to just redo the mud and tape work, especially now that I have some shelf stays in the way. I will likely install some trim to help hold everything in place and avoid having to do more drywall work. I'm also suspicious of the laundry room cantilever setup. It's a bump-out addition (bumping into the garage), and to me it doesn't look like it's up to code in terms of joist support below. That probably explains the drywall joint crack between the laundry room bump-out and the door to the attic. I think I want to put an LVL beam in the basement to tie the other end of the laundry room joists to the basement floor.
-
Garage
- December 21, 2014
-
Garage
I finally ordered some brush seal kits from Summit for the garage doors. Last year, there was a lot of heat escaping from the garage in the winter due to the typical problems with vinyl garage door seals. It's aggravated by the angled corners of the garage door openings, which cause the seals to get beat up in those spots every time the doors open or close. I'm not sure what architect or builder thinks those angles are a good idea. They might look nice to someone, but functionally they're a disaster; they make it impossible to get a good seal without destroying vinyl seals because they encroach on the path of the folding door. In all likelihood I will remove those angles before new siding is installed.
-
Garage
- October 19, 2014
-
Yard
I replaced the fuel lines and carburetor on my Husqvarna 125BV leaf blower. It would no longer run, no thanks to Husqvarna deciding that it's a good idea to build carburetors that are VERY susceptible to damage from ethanol. If you ask me, these products should be banned in the United States. It's pretty much impossible to buy ethanol-free gasoline here thanks to the corn interest's lobbying. I'd much prefer that we ban ethanol from the pump, but that's not going to happen. My leaf blower is only a coupel of years old and I don't let it sit with fuel in it during storage. My next blower will be a Stihl professional-grade model, probably a BR600 Magnum.
-
Yard
- October 8, 2014
-
Kitchen
I stopped at Home Depot on the way home from work and bought a 3-pack of Leviton GFCI outlets and a 10-pack of Decora outlets, white.The floor registers arrived from Signature Hardware. I installed them.
The Baldwin 4754.150.CD wall plates arrived from Wayfair. I installed nine of them, but most of them are going in the tile backsplash and each of the cutouts in the tile backsplash need to be enlarged to accommodate wall plate screws. Pain in the butt work with the Dremel and diamond wheels. And one of them is in a hole that was cut incorrectly (too large), patched with joint compound and then the outlet and the wall plate were shoved into the joint compound while it was still wet. I'm repairing with water putty and I will wait for it to dry before completing the shaping of it and installing a new outlet and the new wall plate. I have 8 more wall plates to install in the kitchen.
I've decided that I want 3 more of the Pass & Seymour 1595NTLTRWCC4 GFCI outlets with nightlights in the kitchen. Two on the south wall and one above the desk.
-
Kitchen
- October 7, 2014
-
Kitchen
The floor registers from Signature Hardware should arrive tomorrow. The Baldwin wall plates from Wayfair should arrive on Thursday.
-
Kitchen
- October 5, 2014
-
Kitchen
I installed two more of the Pass & Seymour GFCI outlets with nightlights (1595NTLTRWCC4) in the kitchen: one at each end of the dining area. I then installed a third one to the left of the sink and a fourth one to the right of the sink. With one more I think I can disable the motion sensor on the recessed light for the doorway. I intend to swap the location of the motion sensor for the recessed kitchen lighting with the slave switch so the kitchen lights will come on when I enter from the garage or enter the kitchen from the family room but won't come on when I'm in the family room.I ordered two floor registers from Signature Hardware. Antique design, solid brass, brushed nickel finish, 4" x 10". One will replace the crappy wood one, the other will be installed where there was never a register (no idea what happened there... why would the previous owners take a floor register with them?).
I ordered 17 Baldwin 4754.150.CD wall plates. Yes, there are 17 single-gang outlets in the kitchen that still have the original builder-grade nylon wall plates. Some of them are cracked, one has a large piece broken off of the corner, and all of them look hideous. These 17 wall plates will finish the conversion to decent wall plates in the kitchen. If I could get my butt up on the roof to fix the leaking pipe boot, I'd be ready to patch and paint the kitchen.
-
Kitchen
-
Laundry room
The paper towel holder is now installed in the laundry room.
- October 4, 2014
-
HVAC
I bought two BestAir air filters at Lowe's for the furnace. I installed one, the other is a spare. While these filters are efficient and effective, they're a pain in the ass to install. They are 6" deep, with about 25 pleats. No frame at all, and you have to install 5 combs manually. Once the first one is in correctly, it's fairly easy. But getting the first comb to evenly space each pleat takes a while. This is all due to the furnace having a Space-Gard 2200 filter setup. The filters were $23.97 each.Next time I'll order a 4-pack of the real Aprilaire filters from Amazon.
-
Laundry room
I finally started working on installing the paper towel holder in the laundry room. I cut a piece of 1/2" thick plywood to size, sanded it, and put three coats of paint on it. It will be attached to the unerside of the wall cabinet and the paper towel holder will be attached to the mounting block. -
Half bathroom
I bought Brainerd 79003 and 64778 wall plates at Lowe's and installed them.
- October 2, 2014
-
Kitchen
The 1/4" thick 24"W x 36"L piece of chemical-resistant PVC arrived from McMaster-Carr, along with the 1" long stainless steel serrated thread #6 and #8 screws. I cut the piece of PVC to fit the floor of the sink cabinet. Surprisingly, I was able to fit it into the cabinet in one piece. It wasn't easy, but it just fit. I've decided I'm not going to route any cavities in it to catch water, I'm just going to leave it flat.
I installed the locks for the Blum 569R glides on the new drawer for the sink cabinet. I once again checked fitment in the cabinet, with the PVC floor in place. It fits well. I installed it in the cabinet, and reinstalled the Rev-A-shelf unit.
-
Kitchen
- October 1, 2014
-
Kitchen
I put the final coat of paint on the drawer for the base of the right side of the sink cabinet. Tomorrow I will be able to install the locks from the Blum 569R glides on it.I ordered a sheet of chemical-resistant PVC from McMaster-Carr for the floor of the sink cabinet. I also ordered some 1" long serrated-thread screws: #6 and #8. These parts will let me install the Blum 569R glides for the new drawer without having the glides hit the bottom piece of the cabint face, and provide a surface that's easy to clean and resistant to cleaning supply spills. I wish I had planned to do this before I install the cabinet; I don't think I can get a single contiguous piece in the cabinet with the cabinet installed. Not a big deal, I shouldn't have any trouble installing it if I cut it in half. These parts should arrive tomorrow.
-
Kitchen
- September 30, 2014
-
Kitchen
I put the second coat of paint on the bottom of the new sink cabinet drawer.
-
Kitchen
- September 29, 2014
-
Kitchen
I installed Quietex bumpers on almost all of the kitchen cabinets and drawers. The old bumpers appear to have been the originals (20 years old), and were flattened and sticking (som very badly). The Quietex bumpers are a huge upgrade; their contact point is small so they don't hold the cabinet shut, and they do a very nice job of silencing the closing of the doors. I need to order one more sheet of the 3/8" size.
-
Kitchen
- September 27, 2014
-
Kitchen
I finished the design of the roll-out shelf/drawer for the base of the right side of the sink cabinet in SketchUp. I cut all of the pieces, and routed the dado slots in all of the sides which will hold the bottom. It fits together reasonably well, it fits in the cabinet, and the Blum 569R slides appear to fit perfectly. Soon I will glue and screw the shelf/drawer together and start putting a finish on it. Once it has a finish on it, I'll attach the Blum locks that keep the drawer on the glides but allow quick removal.I want to put a 1/4" thick piece of chemical resistant PVC in the bottom of the cabinet before installing the glides. It will be easy to clean as needed, will protect the wood floor, and bring the Blum 569R glides up so they'll clear the bottom piece of the cabinet face. I could probably use a 3/16" thick piece, given that the lip of the cabinet face is .22" above the floor. But a 1/4" thick piece will guarantee clearance for the Blum 569R glides and also allow me to route shallow grooves in the PVC floor to control any slow leaks from kitchen sink plumbing. I need to buy a core box (round nose) router bit. The Whiteside 1405B B6 is about right for what I want to do.
-
Kitchen
- September 25, 2014
-
Kitchen
The Blum 569R slides arrived. I need to hunt down some installation instructions before I start creating a shelf for the right side of the sink cabinet.
-
Kitchen
- September 24, 2014
-
Kitchen
Blum 569R slides should arrive tomorrow. I'm hoping to use these for a slide-out shelf under the disposal side of the kitchen sink.
-
Kitchen
-
Laundry room
I put another coat of paint on the front and side of the wall cabinet. I put some more primer on the oak piece I cut to hold the cabinet out from the wall at the bottom, then later put a first coat of paint on the parts that will be visible. I then mounted this piece to the cabinet bottom and mounted the cabinet. Finally, I put one of the shelves in the cabinet and reinstalled the doors. This cabinet is not screwed to the wall at all, it's just hanging on the french cleat. At the moment I intend to leave it that way so it can easily be removed if desired.I want to change my Stoko Vario dispensers to the white versions. I used the black ones because I already had them, but they stick out like a sore thumb in the laundry room. It's trivial to replace them, and they're not expensive.
- September 23, 2014
-
Laundry room
I put a second coat of paint on the back of the wall cabinet doors. I sprayed a coat of flat white on the inside of the wall cabinet, as well as the outside top and bottom. I then brushed the first coat of paint on the front of the cabinet, as well as what will be the visible side. I also brushed a coat on the bottom.I reinstalled the hinges and knobs on the wall cabinet doors.
Tomorrow I hope to finish painting the cabinet so I can install it on the wall by the end of the week.
-
Laundry room
- September 22, 2014
-
Laundry room
I put the first coat of paint on the back of the wall cabinet doors. I put the second coat on the front of the wall cabinet doors.
-
Laundry room
- September 21, 2014
-
Kitchen
I removed the clamps from the cabinet door I'm trying to repair. I reinstalled it on the cabinet. So far, the glue is holding.
-
Kitchen
-
Laundry room
I removed the wall cabinet from the new french cleat and wiped it clean. I applied a coat of Zinsser B-I-N to it, and later a second coat. I also cleaned up the doors and applied 2 coats of Zinsser B-I-N. I'm using 2 coats of Zinsser B-I-N because I want to be sure that the tanins from the oak pieces don't seep into my final finish.Before I went to bed, I put the first coat of paint on the front of the wall cabinet doors.
- September 20, 2014
-
Kitchen
I put the second coat of polyurethane on the front of the trash can cabinet door.I later wetsanded the trash can cabinet door with 320 and put the final coat of polyurethane on it. Much later, I officially installed the door on the Rev-A-Shelf and put some temporary bumpers on it which will be replaced by the Quietex bumpers when they arrive. With the exception of some caulking of the edge of the PVC cabinet floor to the interior sides of the cabinet, the trash can cabinet project is done for now.
I ordered some Quietex cabinet bumpers from quikdrawers.com. The original cabinet bumpers in the kitchen are toast. Most are worn down. Many of them are sticking, making the cabinet doors difficult to open. The Quietex bumpers are likely the nicest bumpers available. I ordered both .4" and .5". I think I can use the .5" in most places, but I know I'll need the .4" in other places.
I am attempting to repair the broken cabinet door I discovered the other night. I put some Titebond III wood glue in the gaps and clamped it up with 7 clamps. Even if it holds, it won't be perfect since it looks like the split has been there for a long time. But it'll be good enough for now if it holds, sine the split is on the inside of the cabinet door. i.e. it's not visible when the door is closed. A replacement door with no finish will run about $100, so I'm hoping that my repair holds up.
-
Kitchen
- September 19, 2014
-
Kitchen
In the morning, I quickly put the first coat of polyurethane on the front of the trash can cabinet door.In the evening, I sanded the trash can cabinet door with 220 and put the second coat of polyurethane on the back. Tomorrow morning I'll put the second coat on the front. I'd like to have the third coat done by the end of the weekend so I can do the final installation.
-
Kitchen
- September 18, 2014
-
Kitchen
I removed the trash can cabinet door and put the first coat of polyurethane on the back.In the process of wiping down the cabinets, I realized that one of the cabinet doors is broken. The lower frame piece is split all the way across, and the raised panel is warped and has detached from the frame piece. I'm not sure I can fix it, but there's little harm in trying. Worst case, I have to order a replacement.
-
Kitchen
- September 17, 2014
-
Kitchen
The custom cabinet door I ordered for the trash can cabinet arrived from quikdrawers.com. The shape is a near perfect match to my existing cabinets, and the door is well-made. Yay! And thanks to my work in SketchUp, the dimensions are perfect. This is all great news; I now know I can do whatever type of custom cabinetry I'd like in the kitchen and buy perfectly matched cabinet facing from quikdrawers.com. This puts a green light on the desk cabinet addition, as well as whatever changes I want to make to the island and whatever I need to do to accomodate a new cooktop.I put a coat of stain on the door to try to match it to the existing cabinetry. I don't think I could do better. Here's a picture of the door with stain, just sitting on the floor propped against the opening.

I installed the knob and mounted the door to the Rev-A-Shelf with two screws. It needs some adjustment, which is why I put the screws into two of the slotted holes in the Rev-A-Shelf. I'll make the adjustments later and then install the remaining screws. But it looks pretty good.

It feels good to have gone from this:

To this:

For what it's worth, the runner in the picture is my work rug. When I'm done with all of the kitchen rework, I'll be buying a new runner.
-
Kitchen
- September 16, 2014
-
Kitchen
I finished the initial design of the kitchen desk cabinet addition in SketchUp. The main objective here is a place to store my large slow cooker and my Kitchen Aid mixer so they aren't on the counter all of the time. There are no cabinets in the kitchen that will hold them today without removing gliding shelves, and the area under the kitchen desk is just wasted space today. I will be using Knape & Vogt 8000P 20" pantry pullout slides in the bottom for slide-out shelves.The cabinet door I ordered for the trash can cabinet should arrive tomorrow.
-
Kitchen
- September 15, 2014
-
Kitchen
I ordered some Blum 569R bottom-mount drawer slides from ahturf.com. I need these to build a custom drawer for the right side of the sink cabinet.I need to carefully measure the space under the kitchen desk so I can make a cabinet to fit there. It's roughly 21" deep, 30" wide and 24.5" tall, but I need to measure the toe kick and figure out how I want to build the cabinet as well as which hinges I want to use or which drawer slides I want. I'd like to be able to store large items here like my Kitchen Aid mixer and my large crockpot, since I currently have nowhere to keep those. A full-width rollout setup would allow large items.
-
Kitchen
- September 13, 2014
-
Kitchen
I continue to pick up things in the kitchen. I moved my countertop microwave to the basement, along with a tub of old kitchen drawer contents. I emptied the tub of caulk and roofing cement and put cleaning products in it, then put it in the pantry. I put all of the old light bulbs in a tub and put that in the pantry. I wiped the dust off the floor around the dining table, island and kitchen desk. I'm still tryin to put things away that have been sitting out for months to a year. Time flies when you're busy.
-
Kitchen
- September 12, 2014
-
Kitchen
I created SketchUp models for four Futuro Futuro range hoods: Rainbow, Symbol, Step and Razor. I like the Step due to its curved front edge that helps mimic the tile arch, but the chimney is 11" deep and hence would not allow me to keep the tile in front of the chimney. The Razor and Rainbow have 10.25" deep chimneys, giving me the best chance of keeping the front tile. The Symbol has a 10.5" deep chimney. It's worth noting that I don't know if any of these hoods will let me keep the front tile, but given that I intend to use the blower inline instead of inside the range hood, I won't really need to get inside that area after installation. The blower is the only thing that may eventually need maintenance/replacement, and it'll be in the stairwell from the garage to the basement.The hood I really wanted is the Futuro Futuro Galaxy, but it won't allow me to keep the front arch tile since its chimney is 11 3/8" deep. But I need to cut into the tile arch box from the other side to see how much room I really have. If it turns out that none of these chimneys will let me keep the tile arch intact, my basic plan will need to change.
-
Kitchen
- September 11, 2014
-
Kitchen
I started cleaning up the kitchen that has become a disaster zone. I still have a long way to go, but I got some things out of the kitchen and also installed both leaves in the dining table. I don't need the leaves in there (seats 10 with both leaves in), but at the moment I don't have anywhere to store them and I want to put a coat of Formby's Tung Oil Finish on them so they'll match the rest of the table. I had never put the leaves in before. They'll be handy later, but I need some folding chairs. I selected some on Amazon and added them to my wish list.
-
Kitchen
- September 10, 2014
-
Laundry room
I cut 1/2" off of the top and bottom of one of the old cabinets from the laundry room. It was too tall to use above my hand cleaner dispensers.I created a French cleat and installed half of it on the laundry room wall above the utility sink, and the other half on the cabinet. I tested the fitment of the cabinet on the wall, it fits.
I need to prime and paint this cabinet (white). The second old cabinet has water damage to a side and the bottom. Hence I don't intend to use it, though I may save the face and doors and re-use them. The main objective of doing this work right now is getting the cabinets out of the dining room where they've been sitting on the floor for almost a year.
-
Laundry room
- September 8, 2014
-
Kitchen
I caulked the gap between the trim piece of the window well countertop and the main countertop with 100% silicone caulk. This gap is less than an inch from the edge of the sink and hence gets wet regularly. I wish the original installer of the countertops had caulked here, it would have helped prevent the warping of the window sill countertop.One week from now, the door for the waste bin cabinet should be shipped.
I quickly measured the kitchen island so I can start working up a plan to add on to it and get rid of the flimsy two-tier countertop. The island is just over 4' wide, and if I count the second tier of the countertop, it is 6' long. But cabinet-wise, it's only 54.125" long with a 23.75" x 18" cutout.
I continue to try to figure out what to do about a range hood. I'd really like to keep the front of the tile arch, which constrains my options considerably.
-
Kitchen
- September 7, 2014
-
Kitchen
I put two more thin coats of polyurethane on the trim piece of the window well countertop, mostly to make sure the nail heads were sealed.
-
Kitchen
- September 5, 2014
-
Kitchen
I lightly sanded the trim piece for the window well countertop with 320 grit sandpaper, and put a second coat of polyurethane on the parts that will be visible after installation.I discovered an issue here. Due to the window well countertop getting wet where it shouldn't, it is quite bowed on the front (upward). As in more than 1/8". I can shim and flex my trim piece to match the curve, or start over with a 1x3 that's carefully cut to match the curve, but that sort of sucks as a solution. I tried standing on the counter to see if it flexes, but it doesn't. I'd have to steam bend it, and that's not going to happen.
For now I'll flex the trim piece and fill the gap below it with silicone caulk. When I replace the countertops, I'll replace the window well countertop too. The downside of having to flex this piece (other than the gap) is that I'll likely need to put finish nails in it while the glue sets up.
I sprayed 2 more coats of polyurethane on the trim piece. I'm out of spray, so I think I'm done. I don't think I'll have these countertops long enough for more coats to be necessary.
I installed the trim piece using Loctite Premium 3X and finish nails. It looks much better than what was there before. When the adhesive dries, I'll put another coat or two of polyrethane on the wood and then caulk with clear silicone caulk.
-
Kitchen
- September 4, 2014
-
Kitchen
I cleaned, sanded and stained the wood edge trim on the countertop that is in the kitchen window well. It had no finish left on it, and was practically bleach white from loss of color, with some black stains. I then put a coat of polyurethane on it.Unfortunately, the polyurethane isn't drying on this piece. I suspect the problem is that this piece has been so loaded with grease, cleaners, etc. over the years that it's saturated and won't take a finish. I had put another coat of ployurethane on the toe kick of the new trash can cabinet and the first 4" of the inside of that cabinet at the same time, and it's been dry to the touch for many hours.
The trim piece isn't just a simple trim piece. It's 3/4" thick, with only 3/8" exposed and that 3/8" is rounded with a 3/8" radius. It can't just be replaced, because it can't be removed without destroying the laminate and damaging the MDF. It's one of the downsides of this type of countertop; the wood edges can't be replaced without destroying the countertp.
What I decided to do was to cut off the exposed 3/8" using my oscillating tool and wood chisels. It took several hours (ugh). I created a piece to adhere in its place by cutting a 1x2 oak piece to 3/8" thick and 53.5" inches long, and ran a 3/8" roundover bit on the top and sides with my router. This is an exact match to the piece I'm replacing. I will pre-finish in on all sides before installing it, in an attempt to keep moisture out of it. I already started, by putting a coat of Minwax Golden Oak stain on the visible surfaces and then a coat of satin polyurethane on the whole thing.
I will also run a bead of clear silicone caulk on the bottom where it sets onto the main countertop. It looks like this wasn't done with the original countertop piece, hence the problem with moisture seeping into the wood.
The original trim piece was installed using 18 gauge finish nails, and presumably an adhesive. I'd prefer to avoid staples or finish nails, and just use adhesive (Loctite PL Premium 3X). It will of course require clamp-up, but I can manage that pretty easily. An advantage of using the Loctite PL Premium 3X is that it's waterproof, and if I skin both surfaces before bonding, it will provide water protection to both the new trim piece and what is left of the old one.
Due to the countertop window well resting right on top of the kitchen countertop, I did cut the countertop laminate in a few places when cutting off the edge of the window well countertop. This isn't of any real consequence since it'll be covered by the new trim piece and sealed, it was just annoying. I can't help but think that this whole setup was a measurement mistake, and that the sill was supposed to be at the same level as the countertop so one contiguous piece of formica could have been used. It's not smart to stack wood right on top of a surface that gets wet many times a day. If I were feeling more ambitious about this project, I'd rip the whole sill out and replace it with HardieBacker 500 and porcelain tile or a piece of quartz countertop. It's worth noting that even though I cut off 3/8", there were still black water stains visible. Hence I would never have been able to make it look good with stain and clear finishes.
The good news is that the new piece I made appears to fit nearly perfectly. I need to clean up the cut I made in the sill a bit (probably using a 3" sanding disk on my die grinder), but the new piece looks much better than what was there before. I will continue working on this piece in the morning, since I intend to make it as smooth as possible and get at least 4 coats of polyurethane on the front of it.
-
Kitchen
- September 3, 2014
-
Kitchen
The Rev-A-Shelf 5349-2150DM-217 pull-out waste container setup arrived. Later the lids arrived, and the piece of PVC from McMaster-Carr that I'm going to put on the trash can cabinet floor arrived.I filled the visible pocket holes of the trash can cabinet with Durham's Rock Hard Water Putty, let it dry, then sanded it flush. These pocket holes are inside the cabinet, and hence won't be visible when the door is closed. But I wanted to eliminate areas where grime might collect and be difficult to clean. I put a coat of polyurethane on the putty to seal it.
The Rev-A-Shelf setup appears to fit in the cabinet, but I need a little more clearance than the PVC provides to go over the lip of the fascia. I went to Lowe's and bought an 18" x 24" piece of .080" thick acrylic. I cut the acrylic and PVC pieces to size and fitted them in the floor of the cabinet. It's perfect height-wise, it brings the floor flush with the edge of the fascia.


I then installed the Rev-A-Shelf unit and put the bins in it. I like it, it's much better than a trash compactor. I have somewhere to put recyclables, and it'll work in a power outage. It's much less likely to fail, and cost a LOT less.


-
Kitchen
- September 2, 2014
-
Kitchen
I put two coats of polyurethane on the inside of the trash can cabinet. I then glued shims into position to make the toe kick line up with both the lazy susan and the sink cabinet. I then glued and screwed the toe kick to the base, and put one coat of polyurethane on it.I put the trash can cabinet in position, then clamped the fascia in position in order to drill the pilot holes for screws that hold it to the lazy susan and sink cabinet. These holes were already in those cabinets from some trim pieces I removed, and I used those holes as drill guides to drill into the sides of the fascia of the trash can cabinet. I also screwed some of the pocket hole screws into the fascia from the trash can cabinet sides. I then removed those screws, put a bead of Loctite Premium 3X on the edges of the trash can cabinet, and reinstalled the fascia. All of the screws are in place, and the cabinet seems to be firmly positioned.
I put a long cabinet screws into the lower back panel, that goes into a wall stud. The cabinet now can't tip forward and stress the fascia. This matters because once the dual waste bin setup is installed, the cabinet would want to tip forward when the bin glides are fully extended. The bin glides are rated for 100 lbs., and with the door and two full bins plus the glides and hardware, there would be enough weight to tip the cabinet if it wasn't fastened well. Of course it can't tip when it's under the countertop, but I don't want the countertop and fascia to be the only stress points.
I applied some real oak laminate to the toe kick, covering the section of lazy susan and trash can cabinet toe kicks. I still have one seam at the sink cabinet, but it's better than two seams and the laminate is a better (but not perfect) match than the red oak toe kick on the trash can cabinet. I used 3M 90 spray adhesive to attach it, since using high heat likely would not have worked on the lazy susan toe kick; it appears to be vinyl coated MDF and I didn't want it to delaminate from heat. I put a coat of polyurethane on the laminate. When I finish coating it, I will caulk the floor joint and the joint at the sink cabinet.
I replaced the cracked electrical wall plate in the trash can cabinet with a beefy cast metal wall plate. I have no use for this outlet, but I don't like having cracked wall plates.
While this cabinet is not perfect, it's MUCH better than the gaping hole with a trashed floor that was left by the previous owners. Once there's a door on it with the waste bins in a gliding rack, I will be very happy with it.

quikdrawers.com sent me an email indicating that the door for my trash can cabinet will not ship until the 15th of this month.
The PVC sheet for the floor of the trash can cabinet shipped this morning, but I don't have tracking information yet. That means it won't be here tomorrow. It shipped from the Cleveland warehouse of McMaster-Carr, so hopefully it will be here on Thursday.
-
Kitchen
- September 1, 2014
-
Kitchen
The new trash can cabinet and fascia fit reasonably well in the space formerly occupied by a trash compactor.I went to Lowe's and found a cabinet knob that's quite close to the Merillat 506 knobs in my kitchen. This knob will be installed on the new door of the new trash can cabinet. I also bought a can of Watco spray lacquer in satin finish, to coat the front of the fascia and the front of the door when it arrives. Why lacquer? Because it is easy to repair. I'd never use it on a horizontal surface (water rings and lack of resistance to alcohol), but it's fine for the front of cabinets and the ease of repair is a benefit over the long haul.
I cut the piece of 3/4" plywood for the floor. I cut a 4" wide piece to support the top of the fascia, and another that will be the bottom back panel. I also cut a 13" tall piece that will be the upper back panel.
I cut 2 pieces of 2"x2" poplar to add to inside of the sides of the base. These will provide additional support for the floor.
I drilled the pocket holes that will hold the fascia to the sides of the cabinet (3 holes per side), at the marks I made yesterday. While it would have been nice to hide these holes by drilling them from the outside of the sides, I need to be able to put the screws in after the cabinet is in position and the fascia is attached to the other cabinets. So I drilled them from the inside of the cabinet, which will allow me to install the screws from inside the cabinet after the cabinet is in position.
I drilled 6 pocket holes in the upper back panel, to hold it to the sides of the cabinet.
I installed the 2x2's in the base of the cabinet, screwed and glued to the side panels. I then installed the floor, using Loctite Premium 8X construction adhesive to glue it to both the oak boards and the 2x2's. I then installed the lower back panel, which sandwiches the floor to the base. I installed the upper back panel using wood glue and the three pocket holes per side to hold it to the side panels.
I tested the fitment again. It looks pretty good.

I put a coat of Cabot Spar Varnish on the outside of the back and sides of the cabinet. These parts won't be visible, and I had some of the varnish left over from the kitchen sink build. I started putting lacquer on the front of the fascia.
I ordered a 1/4" thick, 24" x 24" piece of chemical-resistant PVC sheet from McMaster-Carr. This will cover the floor of the cabinet before installing the Rev-A-Shelf unit, and make it easy to keep the floor clean. It also closely matches the color of the waste bins.
-
Kitchen
- August 31, 2014
-
Kitchen
I cut the side panels for the trash can cabinet. I tweaked them a bit from my original SketchUp. To allow some shimming of the cosmetic toe kick piece to make up for a slight mismatch of the undersink cabinet and the lazy susan cabinet, the toe kick cutout is a little bit deeper than my original plan. That meant I also had to trim down the cabinet base I had already glued up, but I was able to do that with two passes on the table saw.I glued and screwed the side panels to the base.
I clamped the face frame to the countertop and then marked where it needed to be trimmed to fit between the lazy susan and the sink cabinet. I then cut it on the table saw, freehand (no fence). It now fits snugly between the cabinets, though it's not perfect since I cut it freehand and the existing cabinet edges aren't perfectly straight. But it's pretty damn good, and when it's done it'll be much better than the big empty spot between the cabinets!
I also marked the back of the frame for pocket hole screw locations that won't interfere with existing holes in the other cabinet fascias that I'll use to connect this fascia. I then transferred these marks to the cabinet sides.
Tomorrow I hope to get the floor piece cut and make sure everything fits. I also want to figure out how I'm going to keep the cabinet in place; it will want to tip forward when the trash bin slides are extended, and I don't want all the stress to be transferred to the countertop and fascia. I should be able to put some screws through the back and into a wall stud, but ideally I'd use a metal bracket of some sort to fasten the back of the base to a floor joist. However, then the floor of the cabinet needs to be removable.
I need some satin lacquer to finish the front of the face frame and the door when it arrives.
I figured out which knobs I have on the kitchen cabinets... Merillat Masterpiece Satin Silver (506). I can't seem to find a place to buy them, unfortunately. Lowe's has some that are close, I'll compare tomorrow.
-
Kitchen
- August 30, 2014
-
Kitchen
I ordered the door for the trash can cabinet from quikdrawers.com. The image below shows the options I chose. I have no idea when it will get here, but the Rev-A-Shelf hardware will be here on Wednesday the 3rd of September. The chosen height is the same as the height of the adjacent lazy susan's door, and the width was chosen to cover the opening of the new cabinet and provide the same inter-door spacing as the rest of the kitchen cabinetry.
I cut the oak pieces for the trash can cabinet base, and drilled the pocket holes to give the joints additional strength. I then clamped up the pieces to make sure everything is square, then glued and screwed the pieces together.
I cut the pieces for the face of the trash can cabinet, and glued and screwed them together (pocket hole screws). This face will need to be trimmed to the correct width later. I intentionally made it wider than necessary so it can later be trimmed to fit exactly between the existing cabinet faces (which are not quite parallel).
-
Kitchen
- August 29, 2014
-
Kitchen
I ordered the Rev-A-shelf 5349-2150DM-217 from Amazon. I also ordered lids for the waste containers: silver (RV-50-LID-17-1) and green (RV-50-LID-G-1).On the way home from work, I bought wood to build the trash can cabinet, and a quart of polyurethane to finish the sides and floor of the cabinet.
-
Kitchen
- August 28, 2014
-
Kitchen
I wish I had decided to officially refinish the hardwood flooring in its entirety. On the to-do list for October, perhaps...Tomorrow I'll pick up supplies for the trash can cabinet build, and maybe get started on it. It'd be nice to have some of it glued up to dry overnight.
-
Kitchen
- August 27, 2014
-
Kitchen
I lightly sanded the area of the floor that I put polyurethane on last night, then put another coat on it. It looks like hell since it's just a patch of refinishing, but the purpose was just to protect what was bare wood until I can refinish or replace the flooring.I've decided that I want a Futuro Futuro range hood. Mainly because their stack height requirement will allow installation without intruding on the bedroom above the kitchen.
-
Kitchen
- August 26, 2014
-
Kitchen
The Kohler K-8830-VS arrived. It is now installed.In the interest of preventing more damage, I sanded the area of the hardwood floor that had no finish left on it. This area appears to have been severely worn by a child seat at the flimsy, low part of the kitchen island. The floor needs to be refinished, but in the end I really don't want hardwood in the kitchen; it's a very high traffic area and any water left on the floor will cause damage. Obviously I clean up spills as they occur, but there are things I can't clean up right away... a sink leak, condensation from the refrigerator, etc. And big spills will penetrate the gaps between the hardwood boards unless the finish on the floor is relatively new. And then there's just the issue of dents when something is dropped, scratches from chairs, etc. I want porcelain tile, not hardwood.
-
Kitchen
- August 24, 2014
-
Kitchen
I removed the condensation drip pan from the refrigerator after removing the toe kick. The icemaker feed line is in the way of removing the drip pan, thanks to some installer's lack of brilliance. I got it out, but it was full to the brim with water and had a later of mold on the top. The water smelled like bleach due to me pouring blach water in the condensation line yesterday, which means the line is clear. I cleaned the pan, bleached it to kill mold, rinsed it and put it back in place. It looked to me like it had never been cleaned, and the Sub-Zero is 20 years old. I cleaned the decades of gunk from the floor behind the toe kick, vacuumed the dust bunnies from under the refrigerator and reinstalled the toe kick. I believe I've fixed the main condensation issue (clogged condensation drain line and a full drip pan that didn't allow evaporation due to a layer of mold on the top of the water), but minor issues remain due to the door gaskets. I will order new door gaskets next week.I throughly cleaned the condenser using my blow gun and Miele vacuum cleaner. The 50' air hose reel in the center of the garage reached without having to get out one of my extension hoses. There was a lot of dust in the compressor enclosure, it's all cleaned up now too. And I believe the refrigerator is cycling less just from this one cleaning... it needed it badly, I suspect the previous owners rarely cleaned the condenser coils and I suspect they never cleaned the compressor enclosure.
I want to keep the Sub-Zero running as long as possible; these old 532's were built like tanks, and it's upwards of $10,000 to buy a new 48" wide Sub-Zero. Yes, the new ones are fantastic, but a new one is not in my budget.
-
Kitchen
- August 23, 2014
-
Kitchen
I did some more work on the SketchUp for the trash can cabinet. It now has a face on it. To create this cabinet, I need:- 3 pieces of 2'x4' 3/4" thick oak plywood
- 4 pieces of 6' long 1"x6" oak
- 2 pieces of 6' long 1"x2" oak
- 1 piece of 6' long 1"x3" oak

I created a SketchUp model for the area where I'd like to install a 36" cooktop. I need the model in order to plan for the range hood, vented to the outdoors. Given the tile arch, I need the model to figure out what range hoods will fit. I also need it to plan the gas line and electrical.
In this model, there's a Bosch HCP36651UC range hood and a 36" gas cooktop. The hood looks like it will fit, but I don't know if I'll be able to keep the front tile. A bigger issue is the venting to the outdoors. I was hoping to be able to run a duct through the wall and then up through the garage attic using two 45-degree elbows, but it's looking like that won't be possible. It's due to the height of the blower and backdraft flap assembly. It's possible that my only option is an inline blower assembly like the Broan HLB6 or HLB9, combined with a hood that doesn't have a built-in blower.
One additional item I want is a pot filler faucet. There's one shown in the model, but it's not the one I would use. It's just one whoe SketchUp model was readily available.

I also need a SketchUp model for changes to the kitchen 'desk' and the kitchen island.
I cleaned the condensation drain pipe in the refrigerator. It was clogged. However, even after cleaning, I'm getting condensation in the refrigerator compartment. As near as I can tell, it's due to needing a new door gasket. I reattached the gasket near the lower hinge where it was messed up from years of door misalignment, and fiddled with it using a heat gun, but it's permanently messed up. I'll order a new door gasket soon.
-
Kitchen
- August 22, 2014
-
Kitchen
I started the SketchUp for the cabinet to fill the spot previously occupied by a trash compactor. I need to pay attention to the fact that the existing cabinet edges are not quite plumb/parallel. That means I should probably build the cabinet face first, and build the cabinet about 3/4" narrower than the floor space. That will leave me wiggle room to get the face of the new cabinet flush with the existing cabinets. I have an initial cabinet design completed in SketchUp, minus the face.


I do know that I want the Rev-A-Shelf RS5349.2150DM.217. It has 100 lb. slides and includes door brackets and two 50-quart waste bins. I also want two lids: one silver (RV-50-LID-17-1) and one green (RV-50-LID-G-1). I've added these items to the kitchen wish list.
My Sub-Zero 532 fridge is leaking condensation. I believe it's all coming from the fresh food side, because the door was never adjusted properly and hence the gasket is messed up on the lower half of the hinge side of the door. I know the door was never adjusted because the lower hinge still had the shipping screws in it. I adjusted the door, we'll see if the condensation stops. I suspect it won't, and I'll need a new door gasket though I may try reinstalling the old one after giving it a bath in warm water. I can get a new gasket at genuineapplianceparts.com.
I removed the compressor cover from the fridge, cleaned it with my blow gun in the garage, and vacuumed out the dust in the coils and the rest of the compressor compartment.
Tomorrow I'll check the condensation collection system.
-
Kitchen
- August 21, 2014
-
Kitchen
I'm trying to plan the next steps for the kitchen. First up is to fill the area previously occupied by a trash compactor. I want a simple pull-out trash can setup. I can custom order a cabinet door facing from quikdrawers.com. I think I need a CRP10 door of premium red oak with CFP-2 edges, regular framing bead, slant panel raise, no hinge boring. 28" tall and 19" wide. It comes to about $95 unfinished, plus shipping.For the pull-out mechanicals, I can use a Rev-A-Shelf unit. The 5349-2150DM-2 will hold two 50-quart bins. This may or may not leave room for a drawer above, but I'm not desperately in need of more drawer space at the moment.
I still need to spend some time in SketchUp to design an add-on to the island and the kitchen 'desk'. I also need to decide on where to put a new cooktop and how to vent it outdoors. The area of the kitchen with the tiled arch makes the most sense in terms of greasy vapors, but it's furthest from the refrigerator. If I do put a cooktop here, I will use a 42" wide hood since I then have the option of a 36" gas cooktop. This location is much better than the island in terms of venting, if I can manage to do it without having to disrupt the bedroom above the kitchen. I think it's doable; a pair of 45 degree angles will let me pass into the stairwell into the basement and into the garage attic where I can go straight up through the roof.
-
Kitchen
- August 20, 2014
-
Kitchen
The Kohler K-8830-VS should arrive on the 26th of August.The Lutron CA-4PSH-WH 4-way switch should arrive between Aug. 26th and Aug. 29th.
The pie-cut hinges to repair one of my lazy susans arrived today. I put a coat of Minwax Tung Oil Finish on the back of the lazy susan doors and installed the new hinges. I then put the lazy susan doors back on the cabinet. The new hinges aren't as nice as the originals, but they work. The originals are no longer available.
-
Kitchen
- August 19, 2014
-
Kitchen
I ordered a Kohler K-8830 hole cover in vibrant stainless from faucet.com. This will replace the plastic chrome hole cover in the kitchen sink. It should match the new faucet and soap dispenser.The pie-cut hinges to repair one of my lazy susans should arrive tomorrow or Thursday.
I removed the lazy susan's doors, cleaned them, and put a coat of Minwax Tung Oil Finish on the front.
-
Kitchen
- August 17, 2014
-
Kitchen
I bought and installed a Rev-A-Shelf 58-15C-5 for the left side of the sink cabinet floor. It makes it easy to store/retrieve things under the sink.
-
Kitchen
- August 16, 2014
-
Kitchen
I ordered a pair of Hafele 343.90.700 pie-cut hinges from Amazon to replace the hinges on one of the lazy susans. An original hinge is broken. I also ordered the Lutron CA-4PSH-WH to replace the light switch for the outside lights. This will complete my changeover of the light switches in the kitchen/dining room, though I still need to replace several wall plates.I put the doors back on the undersink cabinet, and applied a coat of Minwax Tung Oil Finish. I removed the protective film from the front of the new dishwasher.


I cleaned the floor of the pantry just so I could move a couple of storage bins in there.
I did a little bit of cleaning up in the kitchen, but it's still quite a mess since it's been the clutter area of all of the work I've done on the house to date. I'm hoping that by tomorrow night I'll have much of it cleaned up.
-
Kitchen
- August 15, 2014
-
Kitchen
I stopped at Home Depot on the way home and bought a can of Minwax Tung Oil Finish to apply to some of the cabinet faces and doors. I also bought a new decorator outlet for under the sink and a slightly oversized cast metal wall plate to increase the support for it.I installed the new receptacle and cover plate under the sink. It's much more secure than the old one. At some point I'll probably change the wiring for this receptacle so that one of the outlets is always-on instead of being controlled by the wall switch (for the garbage disposal). That will allow a boost pump for reverse osmosis if I want to put the system under the sink instead of in the basement.
I cut a piece of ribbed plastic shelf liner and installed it on the floor of the undersink cabinet.
I cleaned the front of the undersink cabinet and applied a wipe-on coat of Minwax Tung Oil Finish. I cleaned the left door of the cabinet (door not installed yet). I'll clean the right one tomorrow and put Minwax Tung Oil Finish on both of them as well as the top panels and reinstall them.
I printed the labels for the Festool Systainer 3 T-Loc that is now the case for the new belt sander (which didn't come with a case or bag). I coated them with spray gloss lacquer, cut them out, stuck them on the plastic cards and put them in the slots on the Systainer. I then put the sander away.
Tomorrow I'm going to spend some time cleaning up the kitchen. I also need to spend some time thinking about building a cabinet to fill the space formerly occupied by a trash compactor. I've decided it's a given that I'm going to change the center island, and I can incorporate a wine refrigerator there. The space formerly occupied by a trash compactor should have a pull-out for a trash can.
-
Kitchen
-
Front porch
I bought two more Cree PAR38 90W-equivalent 47-degree flood LED bulbs for the front porch and installed them. These complete the front porch lighting conversion to LED.
- August 14, 2014
-
Kitchen
I caulked the edges of the undersink cabinet at the floor using clear silicone caulk. This is to help prevent HVAC air from leaking under the cabinet instead of going through the new register.I installed the new diswasher. The electrical box is mounted on the inside of the right panel of the new undersink cabinet. I had a little trouble with the hot water supply valve being corroded inside which didn't allow the Bosch supply line to fit. I cleaned the inside of the valve output with a fine-grit stone on my Dremel and all went well afterward.
I ran a half load in the dishwasher. It works well. I do want to do something about hot moist air hitting the underside of the countertop, since it's bare MDF. Spar varnish is probably sufficient, but I may glue a piece of FRP or stainless steel there.
I received a Festool Systainer T-Loc III for the new belt sander. The belt sander is now in it, but I need to print the label cards.
-
Kitchen
- August 13, 2014
-
Kitchen
I changed my mind on the Moen Delaney faucet with MotionSense. Too many users have had the motion sense fail, several more than once. And more than one user has reported the connectors to the control box failing, flooding their cabinet.So on the way home from work I picked up a Kohler Barossa. It has the features I considered essential: pull-down sprayer, magnetic docking system, high arch spout, 360 degree spout rotation, single lever control, ceramic disc valves. It also has the Sweep Spray that's handy for cleaning off plates. And it was only $199, which is much less expensive than the Moen Delaney with MotionSense.
I successfully removed the old faucet control and side sprayer, but have not yet removed the faucet itself. I'm about to do that. The sink has a bizarre 4-hole setup that isn't suited to the new faucet; 2 in the back near the smaller sink well that were used for the old faucet and control, one in the sink well divider that had the side sprayer, and one on the left back corner for the soap dispenser. The one for the side sprayer was truly annoying, since the sprayer sticking up between the sink wells was always in the way. Until I buy a new sink, I'll be using covers to cover the two holes I won't be using. Home Depot only had crappy plastic chrome plated ones in the store, I'll need to order some decent stainless steel ones. I bought one of the crappy ones at Home Depot just to temporarily cover the hole previously occupied by the side sprayer. I'm just going to tape over the other hole until I get a better hole cover. Later I'll be installing a reverse osmosis drinking water system that will utilize this hole.
I removed the old faucet, then installed the new one. I used the hole furthest to the right, which will allow me to fill pots on the counter by just swiveling the faucet. I hooked it all up, it works fine. Lower flow rate than the faucet I removed (which appears to have been original to the house), but that was expected since water conservation is pushing faucets toward lower flow rates.


I'm already looking for an alternative soap dispenser because the one that came with the faucet is a low-grade plastic unit that gets negative reviews.
-
Kitchen
- August 12, 2014
-
Kitchen
The undersink cabinet still doesn't fit under the sink, despite having a decent amount of material from the bottom.I marked the top of the left side panel for the material that still needs to be removed, since that side needed a little bit more removed. I didn't want to take any more material off the bottom. I then used my router with a guide to take off what was necessary. The cabinet is now in position and fits perfectly, and the dishwasher is in position and fits well too. I now need a new kitchen sink faucet since the leaks are a problem, and then I can connect the dishwasher feed, exhaust and electrical and button everything up. I don't want to connect the diswasher lines yet because they'll be in the way when replacing the faucet.
-
Kitchen
- August 11, 2014
-
Kitchen
I bought a Porter-Cable 352VS belt sander on the way home from work. I used it to reduce the height of the new cabinet a bit. I believe it will now fit under the sink. I won't know until tomorrow; I put a new coat of spar varnish on the bottom edges and it will need to dry.I know the bottom edges are now not perfectly straight, but I'm OK with it. We'll see how it looks once it's installed.
If I add quarter-round, I'll need a pin nailer; the Porter-Cable PIN138 would probably be fine.
-
Kitchen
- August 10, 2014
-
Kitchen
The Loctite Premium 8X is cured enough to move the new undersink cabinet. The HVAC register is firmly attached, I don't need to worry about it. I can now continue the final finish work.I glued in the Kreg wood plugs to fill the pocket holes inside the cabinet. They stuck out a fair amount. I sanded them down using my die grinder and then the random orbital sander.
I cut a 2.5" tall rounded notch out of the back of the right side of the cabinet to accomodate the diswasher electrical, supply and exhaust lines. This is bigger than necessary, but the 3/4" thick oak plywood is strong so it made sense to leave myself ample room to feed things through the cabinet. I used a straight bit on my router instead of a hole saw, to get a nice clean notch with no chipping or peeling of the plywood's veneer.
I then put another coat of Cabot spar varnish on the inside of the cabinet and the edges of the new notch.
What's left to do on the new cabinet... caulk the floor where it meets the side panels and fascia, and install the back support after the cabinet is in place under the sink.
I need a new faucet for the kitchen sink. I actually need a new sink too, since I hate the layout of the existing sink. But I can live with it for now. The faucet, however, leaks in use at the handle, and has solid copper feeds that also leak a tiny bit and are severely corroded. I'm hoping I can get by with the existing faucet for a bit, since the replacement I want (Moen Delaney with MotionSense) is pricey.
I cut and installed a piece of FRP on the wall behind the sink, below the sink plumbing. This is mostly to protect the wall from water damage. I used 3M 90 adhesive, which means it's permanent. Any future wall work will mean replacing drywall.
I attempted to install the new cabinet, but it's a bit too tall. I should have been more careful with my measurements. I used the old cabinet's panels to set my dimensions, but it appears that the old cabinet's side panels may have been buckeld at installation and not from water damage. Sigh. Now the real issue is that to adjust the height of the cabinet, I need to shave a bit off of the base. I'll want a brand new fine finish blade for my circular saw. Home Depot has the Avanta 60 tooth, which will likely work fine. Lowe's has the DeWalt 60-tooth DW3596L, which is likely a better blade. I can't use a plywood blade because I need to cut through plywood and solid oak at the same time, and my experience with plywood blades on hardwood is that they get too hot and burn the wood.
Really, my circular saw isn't the ideal tool to remove such a small amount of material (3/32" at most). A power planer would probably work but I'm leery of using one on plywood where the visible layer would be cut across the grain. The ideal tool is probably a belt sander, but I don't own one anymore. Time to buy a new one? The Makita 9903 would likely suit my needs, but it looks like no one has one locally. I can get the Porter-Cable 352VS at Lowe's tomorrow. Or the Craftsman 8A 3x21 at Sears.
-
Kitchen
- August 9, 2014
-
Kitchen
I went to Lowe's and bought a Kreg pocket hole jig and some screws. I also bought a new bi-metal semicircular blade for my Bosch oscillating tool.Undersink cabinet build...
I decided to attach the cabinet fascia today before applying more varnish. This was mainly so I can put varnish on the joints of the fascia during my next coat of varnish, as well as inside the pocket holes. I drilled 6 pocket holes in the side panels for the fascia (3 on the left panel, 3 on the right panel). I then put the cabinet on its back and ran a bead of Loctite PL Premium 8X on all of the edges that would slot into the fascia. I put the fascia on, clamped it in place, then drove in the pocket hole screws. It will take 24 hours for the Loctite to fully cure.
I put another coat of spar varnish on the toe kick. It will probably need one more coat, only because I've had to sand more than I'd like between coats on this piece.
I cut the Great Stuff foam flush with the floor at the wall behind the sink cabinet and dishwasher. I put a coat of polyurethane on it just to seal it up a bit. It remains flexible enough that it won't impinge on hardwood floor expansion/contraction, but the floor was stapled down anyway (not floated) so it shouldn't be moving without the subfloor moving with it.
Much later at night, I glued the new HVAC register into the toe kick with Loctite Premium 8X. I'm not yet certain this will be sufficient, but once it dries I will know. I was cautious about using too much adhesive since I didn't want it to seep out during expansion. Hopefully I used enough. Obviously this isn't a structural piece, but I don't want it to fall out.
-
Kitchen
- August 8, 2014
-
Kitchen
On my way home from work, I stopped at Home Depot to buy some Kilz Original in a rattle-can, a bottle of Titebond III wood glue (just supply replenishment), and a couple more 2" foam paintbrushes. The Kilz is to prime the wall behind the sink cabinet and dishwasher.I put a fourth coat of Cabot spar varnish on the outside of the left panel of the underink cabinet I'm building. I put the third coat on the outside of the right side panel. I put the second coat on the inside of the cabinet.
I cleaned the wall behind the sink and dishwasher with bleach water, then wiped it with a wet sponge and dried it. I then foamed the considerable gap (about 1.5") between the wall and hardwood floor edge with Great Stuff Pest Blocker. Not because it's the ideal solution, but because it's what I had on hand. I then sprayed a coat of Kilz Original primer on the areas of the wall that needed it. When the Great Stuff dries, I'll cut it flush with the floor.
Tomorrow I hope to apply the final coat of spar varnish on the inside of the cabinet, and to glue the fascia to the cabinet.
-
Kitchen
- August 7, 2014
-
Kitchen
I put a third coat of Cabot spar varnish on the outside of the left panel of the undersink cabinet I'm building. I put the second coat on the outside of the right panel. I put the first coat on the inside of the cabinet.The heat register from Signature Hardware arrived. This will be installed in the toe kick of the cabinet. I checked that it fits. Unfortunately, despite their web page, it's a floor register, not a wall register. There is no means of mounting provided. It's thick and heavy, it'd work fine in a floor. Given that I don't see myself ever removing it from this cabinet, I might just glue it in place with clear silicone, which would also serve as a gasket. Or I could drill holes in it for countersunk stainless steel wood screws. Given that I like the look without screws, I think I'll just use the silicone or Loctite PL 8X construction adhesive. Or maybe just 3M VHB tape.
I removed the old cabinet's back from the wall under the sink using my Bosch oscillating tool with a half-round blade.
-
Kitchen
- August 6, 2014
-
Kitchen
After light sanding, I put a third and final coat of spar varnish on the base of the undersink cabinet I'm building. I put a second coat on the outside of the left panel, and the first coat on the outside of the right panel. I don't think I want or need more than 2 coats on the outside of the side panels, so tomorrow I'll probably flip the cabinet upside right to put the second coat on the outside of the right panel and start coating the inside of the cabinet. Before that I'll probably cut the hole for the plumbing of the dishwasher.I'm starting to think I'm going to put a piece of the FRP left over from the garage on the floor of the cabinet. It's easy to clean and very resistant to chemicals (and impervious to water). It's a neutral color and it's easy to slide items on it. It doesn't need to be adhered by anything other than a bit of carpet tape, so it will be replaceable. On the other hand, I suspect I might need to use it behind the cabinet; there's water damage to the old cabinet's back, and I haven't removed that from the wall yet.
I'm looking at how I can add on to the island to get rid of the silly two-level counter and gain storage space and room for a dual zone wine refrigerator. I'd also like room for a 36" cooktop instead of the 30", since it doesn't cost much more and a 30" 5-burner is crowded.
I'm also looking at the Bosch HMC87151UC to replace the crappy microwave. The Bosch is a combination microwave and convection oven. Theoretically, it would kill two birds with one stone. On the other hand, it'd be somewhat of a hassle to have it tied up with cooking tasks when I need to microwave something. And the Electrolux Icon is a better but more expensive option.
-
Kitchen
-
Master bedroom
I installed two more of the Pass & Seymour GFCI outlets with nightlights (1595NTLTRWCC4) in the master bedroom. I thought I might get away with just one more, but I like having light all the way around the bed.
- August 5, 2014
-
Kitchen
I ordered a heat register from Signature Hardware for the undersink cabinet I'm building. It's 2.25" x 10", antique design, solid brass with a brushed nickel finish.I sanded the base of the undersink cabinet and applied the second coat of Cabot spar varnish. I applied the first coat of spar varnish to the outside of the left panel (the panel that will be visible until I fill the space previously occupied by a trash compactor).
I brought the diswasher in the house, unwrapped it, and roughly positioned it just so I could get an idea what I need to do for the electrical work and plumbing.
-
Kitchen
- August 4, 2014
-
Kitchen
Undersink cabinet build...I glued and screwed the sides to the base.

I glued and nailed the floor to the base. I then placed the cabinet on its back and positioned the fascia on the cabinet. This allowed me to position the support wedges at the top and glue them to the sides.

I screwed and glued together the back support pieces after routing the edges of the hardwood parts with a roundoff bit in the router. I installed the lower one in the cabinet. The upper one can't be installed until after the cabinet is under the sink.
I put a coat of Cabot sanding sealer on the sides, back and inside of the cabinet. Once it dries, I'll put a coat on the bottom. I'm not putting any on the toe kick plate because I intend to adhere oak laminate there. I also avoided the front edges since I need to glue the fascia to the cabinet (probably using Loctite PL 8X).
I went to Lowe's to pick up some 3M 90 spray adhesive, a small roll of real oak veneer, some clear silicone caulk, Plast-O-Mat shelf liner, #8 x 1-1/4" wood screws and more foam paint brushes.
I flipped the cabinet upside down and put a coat of sanding sealer on the base of the cabinet.
I cut and installed the small 1x2 pieces to hide the edge grain of the plywood and toe kick board. These pieces are just glued in place with Gorilla wood glue, hopefully that will be sufficient since I don't want to bother with biscuits or dowels. Given the surface area of the glued faces versus the size of the pieces, I think they will be fine for many years.
I cut and intalled the real oak veneer on the front of the toe kick. I've never had good luck using an iron to do this, so I used my heat gun to heat the veneer and a scrap piece of oak to press it. I trimmed it with a sharp wood chisel, and cut out the hole for the HVAC register with a utility knife and then trimmed the hole with a wood chisel.
I put a coat of Cabot spar varnish on the inside base of the cabinet, the toe kick and the back of the rear lower support. I used spar varnish here for its superior moisture protection and its ability to expand and contract. The base of the cabinet serves as an HVAC duct, it will get heated in the winter and cooled in the summer. And being under a sink, it's bound to get wet once in a while. I will be caulking the joints of the cabinet floor with silicone caulk to help prevent any water from seeping into the edges of the plywood.


-
Kitchen
- August 3, 2014
-
Kitchen
Undersink cabinet build...I went to Lowe's to pick up another oak 1x6, a 1/2" straight router bit to make the dado cuts in the plywood sides of the cabinet to accept some support wedges, and a new pair of Mechanix gloves.
I cut the solid oak pieces for the floor support and toe kick plate. All from 1x6 pieces I ripped to 5.125" width per my design in SketchUp. Two 19" long, two 34" long and one 32.5" long.
I used a new rabbeting bit to notch the two side panels to fit into the dado of the cabinet fascia. I tested the fit, it's fine.
I cut the floor and rabbeted the front edge. I cut the two support pieces for the back. I cut the support wedges that will go between the sides and the fascia. I routed the dados for the support wedges in the sides using the new 1/2" straight router bit. I cut the 1x2 pieces for the back supports. I cut the notches on the lower from part of the side panels.
I cut the rectangular hole in the front toe kick piece for the HVAC register. This hole is 2.25" tall by 10" wide to accomodate the register I've selected but not ordered yet. I cut the same size hole in the inner toe kick piece, then glued them together. I then squared, glued and screwed all of the pieces for the base.


I later clamped the sides in position with the cabinet oriented with the back on the floor. I set the old fascia on the front to check fitment. Everything is good, I can finish assembly being confident that the cabinet replacement will be a success.
-
Kitchen
- August 2, 2014
-
Kitchen
The Bosch SHX68T55UC dishwasher arrived today. I don't have much time today, but I'm trying to do more work on the sink cabinet. I installed the new Diablo 60-tooth fine cut blade on the table saw, and made the main cuts for the sides of the cabinet. The table saw worked fine for these cuts. I need to notch the lower front corners of these pieces for the toe kick area, I'll do that tomorrow. I then need to rabbett the front edges to fit into the fascia, and put a 1/2" wide slot near the top to accomodate support wedges that go between the sides and the front fascia.Before I make more cuts, I need to finish my SketchUp of the cabinet so I don't make any mistakes with the joinery plans.
-
Kitchen
- August 1, 2014
-
Kitchen
I went to Lowe's and Home Depot for tools and supplies to repair the undersink cabinet. Three pieces of 3/4" thick 2' x 4' oak plywood for the sides and floor, and one piece of 1/2" thick 2' x 4' oak plywood to attempt to fix the back of the cabinet. I don't really want to replace the whole back since the plumbing was done after the cabinets were installed, which means to do it right I'd have to redo the plumbing and I don't enjoy sweating copper pipes under a cabinet.I bought two 6' long 1x6 oak pieces to build the support for the floor, and some 6' long 1x2 oak pieces in case I need them for whatever I do with the back.
I bought a quart of Cabot sanding sealer and a quart of Cabot Spar Varnish to seal the plywood.
I bought a 60-tooth fine finish 10" Diablo blade for the table saw. I bought a rabbetting bit for my router, the only one Lowe's had that fits my router. It's a wider cut than I need, but I can deal with that using one of my guides. This is just to shave a bit off the edge of the plywood sides to fit into the existing cabinet fascia.
I bought four more of the Pass & Seymour GFCI outlets with nightlights (1595NTLTRWCC4). I don't yet know how many of these will go in the kitchen, I'm assuming at least two. Technically all of the outlets above the counter in the kitchen should be GFCI to meet current electrical code, but it's a lot of outlets and I likely don't want nightlights in all of them. One by the sink and one somewhere else should be enough light to navigate the kitchen and dining room area at night without turning on any lights. While I'm not averse to using the nightlight outlets to replace all of the existing outlets in the kitchen, it gets expensive since they're almost $18 each and there are 16 outlets in the kitchen/dining area.
I removed the fascia from the undersink cabinet and saved it for reuse. While there's some light damage to it from the cabinet staple removal, it's all on the back side that won't be visible. It does need some minor repair since one of the glued dowel joints is loose, it's reusable so I don't need to rebuild it. Which is good news given that I don't have a planer or joiner.
I removed the severely damaged sides of the undersink cabinet. It's worth noting that there was no floor in the cabinet, it was ripped out by the previous owner or monkey boy Howard. The toe kick plate wasn't connected to anything, it was just propped in place.
The hardwood flooring has ancient, deep water stains. Much of the floor here never had a finish applied. There's no point in trying to remove the stains; I'm sure they're much to deep to sand out, and this floor isn't visible when the cabinet and appliances are in place. But I do want it sealed, so I scraped the deposits off with wood chisels, wiped it down with mineral spirits to remove any film, let it dry, then scuff sanded it and wiped it clean with dry microfiber. I then applied the first coat of Minwax Polyurethane for Floors with a foam brush. When it dries, I'll apply a second coat.
Here's a picture of the damage to the right side of the cabinet, from the dishwasher side. The side had buckled from water damage. The buckling follows the dado that's cut in the other side for the cabinet floor that was unceremoniously ripped out before I bought the house.

And here's a picture of it from inside the cabinet.

Here's a picture of the inside of the front left of the cabinet. This side was damaged too, but it doesn't appear to be from water damage. It was damaged by whoever ripped out the cabinet floor. You can also see that the toe kick plate wasn't attached to anything, and you can sort of see how the 1/4" laminate on the front of this piece had delaminated.

Here's a picture of the staples that formerly supported the back of the floor.

Next, a picture with the front fascia of the cabinet removed.
A picture with the sides of the cabinet removed.

The replacement cabinet will have 3/4" thick oak plywood sides. A 3/4" thick oak plywood floor will be supported around its perimeter by 1x6 pieces of oak on edge. The new toe kick plate will be solid oak. I haven't decided what to do for an HVAC grill in the toe kick plate; I don't like most of the ones I've seen online. It's possible that I'll design my own out of stainless steel and order from Front Panel Express since I don't need a damper. However, I do like some of the ones from Signature Hardware. For example, the Traditional solid brass wall register in brushed nickel.
-
Kitchen
-
Master bedroom
One of the Pass & Seymour GFCI outlets with nightlights (1595NTLTRWCC4) that I bought today will go in the master bedroom. Technically I want another one in here too to bring the total to four, but I'm buying these slowly due to needing to spend money elsewhere.
- July 31, 2014
-
Kitchen
I stopped at Restaurant Depot on Maple Road and bought a case of twenty four Libbey 16 ounce mix glasses for $22.80. I've needed new glassware for quite some time. I'll be buying more, this is just the first purchase. These particular glasses are thick and durable (heat-treated), which makes them good for day-to-day use. They're durable enough to chill in the freezer before use, and I'm a fan of simple, clear glassware.My dishwasher will be here on Saturday. I'm not ready for it, so I need to get moving on the cabinet repair.
The existing veneered partical board on the sides of the sink cabinet is roughly .625" thick. It's set into a shallow dado cut in the front pieces. To use 3/4" plywood for new sides, I'll need to either buy a dado set for the table saw or buy a rabbetting bit for my router. I'm inclined to use my router since it'll yield a nicer joint, and I'm not sure I can easily get a dado insert for the table saw I've borrowed. It looks like I need to rebuild the entire cabinet under the sink except the face, including the back. That means the sink and all of the plumbing needs to come out, unless I want to get creative attaching the back of the cabinet. I'm not averse to being creative here, given that taking the sink out will be a lot of work and risks damage to the laminate countertop. A couple of 1x2's or aluminum angle could be used to hold it to the sides of the cabinet on the inside of the cabinet. Or a dado joint, but I'm not inclined to glue the back in place since it'd make it hard to remove if ever needed.
-
Kitchen
- July 29, 2014
-
Kitchen
I downloaded the installation instructions for the Bosch SHX68T55UC dishwasher. I also downloaded the operation instructions and the specification sheet. They're now in the Kitchen section of the Manauls page.
-
Kitchen
-
Family room
I balanced the ceiling fan as best I could, using the balancing kit that came with the fan. It's not perfect, but there is no wobble from speeds 1 to 6. It wobbles a little on speed 7, but I normally run the fan at speed 6 or slower. -
Bedroom 3
More time cleaning carpet in this room. Days ago I realized that the stains I'm trying to remove are actually in the pad, which is why they keep returning. I need to end the obsession since I'm clearly not going to get things clean without replacing the pad, which I'm not going to do. If I pull up the carpet, I'm definitely not putting it back.
- July 28, 2014
-
Kitchen
I measured the pieces of the kitchen cabinetry that I need to replace before installing a new dishwasher. The pieces that form the sides of the undersink cabinet are 34.5" tall by 23.375" deep. Both of these pieces have water damage, but the one on the right side that was nearest the original dishwasher is severely damaged and buckled. I will be replacing them with 3/4" thick oak plywood, which will be stronger than the original pieces.Note that there was no dishwasher when I bought the house; it's just an empty space where a built-in dishwasher once lived.
I also need to build the floor of the undersink cabinet. The previous owner ripped out the floor, presumably because it was severely water damaged. The original floor was simply stapled to the sides and rear of the cabinet, and it appears it was quite thin (less than 1/2"). My intent is to use 3/4" plywood here, with solid oak pieces around the entire perimeter to support the floor. They will need to be thoroughly sealed.
It's worth noting that the space between the undersink cabinet floor and the subfloor is used as ductwork for HVAC; there's a small vent in the toe plate at the front of the cabinet. Because there is currently no cabinet floor, HVAC is going throughout the cabinet. When I rebuild this part of the cabinet and floor, I'll want to seal it effectively to prevent HVAC air from entering the cabinet. Hot air hitting cold pipes is a recipe for condensation.
The undersink cabinet floor was approximately 35" wide. That's somewhat of a guess on my part since the floor is gone and the sides are warped/buckled. In all likelihood, I'll have to wait until the dishwasher is here before I can finalize the cabinet rebuild plan. All I know at the moment is that none of my pieces will be MDF, unlike the current cabinetry. MDF fails miserably when exposed to moisture.
-
Kitchen
-
Second floor hallway
I cleaned the carpet of the second floor hallway.
- July 27, 2014
-
Bedroom 3
I spent another 5 hours or so cleaning the carpet in the small bedroom. Apparently it's become an obsession. But I did make some progress today. I used Oxy Clean powder on my hands and knees, which worked better than other solutions. I think the key wasn't so much the Oxy Clean as the ability to really wring the solution out of the carpet when I'm using the hand tool. I can put a tremendous amount of pressure on the tool, which squishes the solution out of the carpet. While the big stain isn't completely gone, I continued to get dirty water in the waste container and the stain is definitely lighter.
-
Bedroom 3
- July 26, 2014
-
Bedroom 3
I took another small pass at cleaning the carpet in bedroom 3. I had to perform some repairs on my carpet cleaner first, since it was leaking the clean water/shampoo like a sieve. It's working fine now, but the capret in this bedroom didn't get much cleaner.I also did a little bit of carpet cleaning on the second floor hallway, and did som moe cleaning of a spot in bedroom 1.
-
Bedroom 3
- July 22, 2014
-
Kitchen
I'm starting to think I want to change the kitchen island. The shape of the current island is awkward at best, and the lower part of the top is flimsy due to the way it's mounted. It's also too low for adults, and due to its L shape, it just isn't very useful. I'd rather have a contiguous top at one level, and forget about any seating. This would yield a lot more storage space, allow a 36" cooktop, and a 24" wide undercounter dual-zone wine/beverage cooler. I would not necessarily need to build a whole new island; most of the existing island could remain if I can match the wood.
-
Kitchen
- July 19, 2014
-
Kitchen
I installed a Lutron Claro CA-1PSH-WH rocker switch for the garbage disposal.I installed a Lutron MACL-153M-WH for the cove light. I installed a Utilitech LR16DMLED 40W-equivalent LED bulb in the recessed fixture. I was hoping to fit an R20 bulb in here for a little bit more light, but it wouldn't fit.
I installed a Lutron MACL-153M-WH for the light over the kitchen sink. I installed a Utilitech LR16DMLED in the fixture. Like the light over the cove, I was hoping to fit an R20 bulb here to get a bit more light, but it wouldn't fit.
I wish I had looked at the wiring for the outdoor corner garage light switch in the kitchen before I bought the switch. The Lutron CA-3PS-WH won't work because I need a 4-way switch. So I bought a Pass & Seymour 4-way switch at Lowe's to get me by for now. Ultimately I'd like a Lutron CA-4PSH-WH.
I tried to install a Baldwin 4741.150.CD wall plate near the sink, but I broke two of the nickel colored screws due to conflict with the backsplash. This was after cutting away some of the tile with my Dremel. I cut more of the tile away, and bought a 10-pack of screws at Lowe's. I was then able to install the wall plate.
-
Kitchen
-
Master bedroom
I installed two Pass & Seymour GFCI outlets with nightlights (1595NTLTRWCC4). One is next to the door to the hall, the other is next to the door to the master bathroom. I will be installing more of these in this bedroom so I have the option of disabling the occupancy-sensing dimmer for the lights on the ceiling fan. I need at least two more to cover the other side of the bedroom. -
Front porch
I intend to buy two more of the Cree PAR38 47-degree flood LED bulbs to replace the remaining two bulbs on the front porch. They're brighter than the incandescent bulbs they're replacing, while consuming less energy.
- July 17, 2014
-
Kitchen
I ordered some R20 LED bulbs to replace the small recessed bulbs in the kitchen (both of which were burned out before I bought the house). I also ordered two Lutron Maestro MACL-153M-WH dimmers for these lights, a Lutron Claro switch for the garbage disposal and a 3-way version for the outdoor light. This will complete the kitchen light switch conversion.
-
Kitchen
- July 15, 2014
-
Bedroom 1
I bought a Lutron MIR-600THW from the Home Depot in Lake Orion. I installed it in the largest bedroom on the second floor. Now Julie will have remote control of the overhead light.
-
Bedroom 1
-
Den
I bought a Cree BR30 2700K LED bulb to replace the remaining CFL bulb in the den. I'm inching closer to having all of the fixture bulbs changed to LED. I need two more of the Cree PAR38 bulbs for the front porch recessed fixtures, and I will need new fixtures in the master bathroom and full bathroom on the second floor in order to convert them to LED. And there are some recessed fixtures in the master bathroom whose bulbs I haven't replaced since I never use those lights. -
Front porch
I replaced one of the old BR30 bulbs on the front porch with a Cree PAR38 47-degree 2700K LED flood. It is MUCH brighter, and uses less than 1/3 of the electricity of the bulb it replaced. It also fills the housing better and is wet rated. I will be buying more of these bulbs; two more to finish the front porch, three for the back porch, and two for the corner lights on the garage. -
Front foyer
I installed a Lutron Maestro MSCL-OP153M-WH occupancy-sensing dimmer in the front foyer for the foyer lights. I may disable the occupancy-sensing feature, our more likely, put it in vacancy mode, but it's nice to have the option of enabling the occupancy sensing here (coming in the front door with hands full).I installed a Lutron Maestro MACL-153MH-WH digital dimmer for the three recessed lights on the front porch.
I installed an old Lutron Maestro MA-600 dimmer for the single exterior light fixture next to the front door. This is the dimmer I removed from the middle bedroom. It's not a perfect match to current Lutron Maestro dimmers, but it's very close.
I am getting close to having all of the living space light switches and fan controls replaced. I need a simple 3-way rocker switch to replace the switch near the door to the back porch, a simple single-pole rocker for the garbage disposal, a pair of MACL-153MH-WH to replace the switches for the 3" recessed lights in the kitchen, a two-location fan control setup for the master bedroom, an MACL-153MH-WH for the master bedroom closet, an Insteon 2477D for the master bathroom, an MIR-600THW for the master bathroom, an MACL-153MH-WH for the porch off of the master bedroom, an MSCL-OP153M-WH for the full bathroom and an Insteon 2477D for the full bathroom. In total, that's 13 controls. It may seem like a lot, but I've already replaced 35 controls in the living space with Lutron Maestro controls. That means I'm almost 75% done. Of course, there are some minor changes I'd like to make... I want to replace the occupancy-sensing switch by the thermostat with an occupancy-sensing dimmer. And in the long run I'll probably replace the dimmers that control porch lighting with Insteon dimmers so I can set them to turn on from an external motion sensor.
- July 13, 2014
-
Den
I installed a Lutron MACL-153MH-WH digital dimmer for the recessed lights in the den. This dimmer is actually in the foyer, next to the doors to the den.I still need to replace the remaining CFL bulb in the den with a Cree BR30 2700K LED bulb.
-
Den
- July 12, 2014
-
Family room
I installed a Pass & Seymour GFCI outlet with nightlight (1595NTLTRWCC4) on the north wall of the family room near the kitchen. This receptacle previously had its top outlet controlled by a pair of wall switches, which really didn't make any sense since the outlet is in a location where anything placed there would be directly in the way of traffic to/from the kitchen. Hence I capped the red wire in this box, which may later be utilized for lighting on the short part of the family room ceiling. I installed a second Pass & Seymour GFCI outlet with nightlight (1595NTLTRWCC4) on the angled part of the north family room wall near the stairs to the second floor.
-
Family room
-
Second floor hallway
I installed a Pass & Seymour GFCI outlet with nightlight (1595NTLTRWCC4) in the second floor hallway. Now that the stairs, hallway and full bathroom have built-in nightlights, Julie can choose to disable the occupancy-sensing feature of the dimmer for the recessed lights if desired. -
Master bedroom
Of the six Pass & Seymour GFCI outlets with nightlights that I ordered from Lowe's, two will go in the master bedroom. I may add more here later, and I'm definitely going to put some in the bedrooms on the second floor. -
Full bathroom
I installed a Pass & Seymour GFCI outlet with nightlight (1595NTLTRWCC4) in the full bathroom on the second floor, replacing the existing GFCI outlet. I'm glad I did this, since I found the original GFCI outlet incorrectly wired for the downstream non-GFCI outlet, which was dangerous and a code violation. Not the first miswiring I've found in the house, and probably not the last. -
Bedroom 3
I spent another hour cleaning the carpet in the third bedroom on the second floor. It wasn't very fruitful, the stains won't come out. Not a huge issue, this might be the first room where I install hardwood flooring. -
Front foyer
I placed an order at Lowe's for in-store pickup. Six Pass & Seymour 15A white GFCI outlets with nightlights, six wallplates for the master bedroom to hold some of them and a gallon of Zep High-Traffic Carpet Cleaner. One of the GFCI outlets is now installed in the front foyer to provide light at night. -
Stairs to 2nd floor
I installed a Pass & Seymour GFCI outlet with nightlight (1595NTLTRWCC4) on the wall of the midpoint landing of the stairs to the second floor.
- July 10, 2014
-
Bedroom 2
I picked up a Lutron Maestro MSCL-OP153M-WH occupancy-sensing dimmer at Home Depot for the middle second floor bedroom that I'm using as an office. It is now installed, with ALD (Ambient Light Detection) enabled.
-
Bedroom 2
-
Bedroom 1
I replaced the bulbs in the fixture in the large second floor bedroom with a pair of Cree 60W-equivalent bulbs I bought at Home Depot on my way home from work. This fixture needs to be replaced; the bulb socket wiring is severely oxidized stranded wire, one of which had come out of the wire nut in the ceiling box. Of course I need Julie to choose a fixture. -
Kitchen
The Lutron Maestro MA-FQ4FM-WH arrived from Amazon.I replaced the PAR30 incandescent bulb over the door to the garage with a Cree BR30 2700K LED bulb.
I replaced the Cree LED bulbs in the island light with Cree TW series LED bulbs. I like the higher CRI of the TW bulbs. One thing I don't like: they don't cooperate terribly well with the Lutron dimmers. They work, but if they've been off for a while and then the dimmer is activated, the bulbs flash briefly, then a second later the dimmer ramps them up.
-
Bedroom 3
I picked up a Lutron Maestro MSCL-OP153M-WH occupancy-sensing dimmer at Home Depot for the smallest second floor bedroom. It is now installed. Initially the dimming misbehaved, but it was due to the bulbs in the fixture (non-dimmable CFL). I replaced the bulbs with Cree 60W equivalent LED bulbs and all is well. These bulbs came from the kitchen island light, whose bulbs were today replaced with Cree TW series bulbs. -
Half bathroom
I picked up a Lutron Maestro MA-T51H-WH timer switch at Home Depot for the exhaust fan in the half bathroom. It is now installed.I also picked up a Leviton R12-X7592-00W guidelight GFCI outlet for this room. It is now installed, and I like it a lot. While I'm not a big fan of tamper-resistant outlets, it is VERY convenient to have a nightlight built into the outlet so I don't have to consume an outlet with a discrete nightlight. And it has a light sensor so it's only lit when it's dark. I will be using more of these or similar.
- July 9, 2014
-
Kitchen
I installed a Lutron Maestro MSCL-OP153M-WH for the recessed light over the door to the garage.
-
Kitchen
- July 8, 2014
-
Kitchen
I ordered a Lutron Maestro MA-FQ4FM-WH for the ceiling fan above the dining room table. It should arrive on Thursday.I installed a Lutron Maestro MACL-153M-WH digital dimmer for the back porch area recessed lighting.
-
Kitchen
-
HVAC
On the way home from work, I picked up another Lutron Meastro MSCL-OP153M-WH occupancy-sensing dimmer. This one will be used for the entrance light near the door to the garage. I also picked up two more Cree 2700K A19 60W-equivalent LED bulbs, which will likely go in the light in the large second floor bedroom's ceiling fixture.
- July 7, 2014
-
Bedroom 1
I installed my last Baldwin satin nickel switch plate in the largest second floor bedroom.
-
Bedroom 1
-
HVAC
The relay boards to isolate my Nest thermostat from my HVAC relays arrived. I have not had time to look at them to see if they have snubber circuitry. -
Full bathroom
I stopped at Home Depot on the way home from work and picked up another Lutron Maestro MA-T51H-WH timer switch. I installed it in the full bathroom on the second floor, replacing the exhaust fan switch. Now both full bathrooms have timer switches for the exhaust fans. -
Front porch
I installed a Cree 100W-equivalent LED bulb in the lantern on the front porch. The original clear bulb had burned out. With the new bulb, I confirmed that the third light switch in the 3-gang box in the foyer is for that light alone. -
Stairs to 2nd floor
I changed the settings of the Lutron MSCL-OP153M at the top of the stairs to the second floor. The timeout is now 1 minute instead of 5 minutes, the sensitivity is set to low instead of high, and ALD (Ambient Light Detection) is enabled. I suspect I'm going to change the sensitivity back to high, but I want ALD enabled.
- July 6, 2014
-
Kitchen
I used some Dremel diamond cutting tools to make room for switch plate screws in the 4-gang cutout in the tile backsplash, and then installed a Baldwin 4-gang satin nickel wall plate. I no longer have any builder-grade switch plates for switches in the kitchen/dining, family room, foyer, master bedroom or upstairs office that I use daily. I still need to replace some in the kitchen, bathrooms and upstairs bedrooms.
-
Kitchen
- July 5, 2014
-
Kitchen
I installed the dimmers for the Ceiling fan light in the dining room: a Lutron Maestro MACL-153M-WH and a pair of Lutron Meastro MA-R-WH companion dimmers. After removing the original dimmer and switches, I realized why they didn't work correctly: the dimmer was miswired. I now have fully functional dimming for the ceiling fan light, island light and recessed lights, all with Lutron Maestro dimmers.I installed a Baldwin satin nickel triple-gang switch plate for the switches on the wall between the dining room and the family room, and another next to the door to the back yard. I have a 4-gang to install on the tile backsplash to complete the dimmer installation.
-
Kitchen
- July 4, 2014
-
Kitchen
I bought some Dremel diamond bits and cutting wheels to tweak the cutouts around the light switches in the tile backsplash in the kitchen.
-
Kitchen
-
Family room
I bought a Harbor Breeze Edenton 52" ceiling fan at Lowe's to replace the plain white ceiling fan in the family room. The original fan looks to have been in place sine the house was built, and it's ugly and making a noise on high that appears to be internal. It also has no light, and I want some more light available in the family room without adding a lamp. The new ceiling fan has a light kit, and its style is more appropriate for my end goal decor-wise.I also bought some LED candelabra bulbs at Home Depot to use in the ceiling fan's light kit.
I removed the old ceiling fan. I installed a new matchin 24" downrod on the new fan motor and installed it and wired it with the remote receiver for the Lutron MIR-LFQMT hidden in the canopy. I then removed the shipping blocks from the fan motor, and assembled and installed the fan blades. Finally, I installed the light kit, the glass shades and the new LED light bulbs. The fan works well and I like it much more than the one it replaced.

I buttoned up the 4-gang switch box in the family room with a Baldwin 4742.150.CD satin nickel wall plate. It now has two Lutron Maestro IR dimmers (for the recessed lighting and the wall sconce), a Lutron Maestro MIR-LFQMT IR dimmer and fan control for the ceiling fan and a Lutron Maestro MA-S8AM for the upper outlet in the receptacle near the stairs. It looks nice and provides all of the functionality I want.

Today I was reminded of a question that came up on houzz.com when I was looking for ceiling fan ideas. A homeowner asked if ceiling fans were "design suicide", I agreed with the designer's reply: "Design suicide? What could be worse than sweating in your own home? The designers who tell you otherwise place appearance before comfort and that's not good design, that's vanity." The discussion went on to mention that there are many stunning looking ceiling fans these days, and ones with DC motors are starting to appear. The DC fans are VERY efficient, silent, have 6 or more speeds, and can be reversed from a remote control instead of needing to flip a switch on the fan housing. My next ceiling fan will likely be one with a DC motor.
- July 3, 2014
-
Kitchen
I started to install the Lutron Maestro dimmers for the ceiling fan light, but ran into an issue with the 4-gang box in the tile backsplash. The cutout for that box doesn't accomodate the switch plate screws because it's too small. The screws hit the tile before they're anywhere near fully seated in the Baldwin wall plates. I can't seem to find any of my diamond cutters for my Dremel, so I'll have to get some more tomorrow at Lowe's.I installed one of the Baldwin satin nickel switch plates over the volume control in the kitchen.
-
Kitchen
-
Family room
The Baldwin switch plates arrived, along with the Lutron Maestro MIR-LFQMT-WH, MA-S8AM-WH and MA-AS-WH. On my way home from work, I picked up another Lutron Maestro MA-RR-WH companion dimmer so I can replace the dimmer and switches for the ceiling fan in the kitchen. I also picked up a Lutron Maestro MA-T51H-WH timer switch for the master bathroom exhaust fan, and another Lutron Maestro dimmer. Finally, I picked up another Cree 2700K BR30 LED bulb, to complete the transformation of the stairway and 2nd floor hallway lighting to LED.I installed the Cree 2700K BR30 LED bulb in the last spot in the 2nd floor hallway. So nice to be rid of the slow-to-brighten CCFL bulbs, and to know I won't need to change the bulbs again for a VERY long time.
I installed one of the single-gang Baldwin wall plates, over the audio volume control in the family room (which will likely be removed at some point). It's not quite as nice as the Amerelle Madison plates, but I like it nonetheless. Despite Baldwin's advertising touting their American roots, the plates are made in China and hence the price isn't justified. The base price isn't much higher than the Amerelle Madison plates, but they're not available with free shipping like the Amerelle plates were. Hence they're $5 more per plate, which is expensive.
I installed the Lutron Meastro MA-S8AM-WH and MA-AS-WH switches in the family room to replace the toggle switches that control one of the outlets in the receptacle near the stairs. It was more work than expected due to the 4-gang switch box in the family room being shallow. I needed to add a neutral wire connection, so I had to remove all of the other dimmers to add a connection to the neutral wire bundle.
-
Front foyer
I installed a triple-gang Baldwin satin nickel switch plate near the front door, and a double-gang outside the den. There are now no builder-grade plastic switch plates in the foyer.
- June 30, 2014
-
Family room
I ordered some Baldwin satin nickel wall plates to replace the hideous almond builder-grade plastic switch plates. I'm doing this now because I want them here before I do any paint work, and it doesn't look right to have high quality Lutron Maestro switches and dimmers surrounded by very low-grade switch plates. I also ordered a Lutron Maestro MIR-LFQMT-WH 300W IR dimmer and fan speed control. While my current ceiling fan doesn't have a light kit, my next one probably will. And I want the IR control so I can dim all of the lights at once via remote control when we want to watch a movie, without going to the switches. I also ordered an MA-S8AM-WH 8-amp switch and MA-AS-WH companion switch to replace the switches that control the top outlet in two of the receptacles in the family room.
-
Family room
- June 28, 2014
-
Bedroom 1
I made a second pass at cleaning the carpet, focusing on the areas that were high traffic. I made a dent in it, but it's unlikely that it will come completely clean. I was on my hands and knees for a while scrubbing with a stiff brush and LA's Totally Awesome before using my carpet cleaning machine. It appears that the previous owners never cleaned the carpet, so some of what look like stains is probably the color being ground out of the carpet by dirt that was trapped for many years. The good news is that I'm not grossed out anymore since the waste water in my carpet cleaner is coming out clean.I installed Lutron MIR-600THW dimmers in the family room for the sconce and recessed lights. They have IR receivers and can hence be controlled by a remote. Remotes are included, but eventually I'll opt for a new learning remote or a piece of hardware that lets my iPhone act as a remote.
-
Bedroom 1
- June 27, 2014
-
Bedroom 1
I spent several hours making the first pass at cleaning the carpet in the large upstairs bedroom. It will need more passes, but it's gone from disgusting to not so disgusting. To truly get it clean is likely not possible, and it's fairly worn in what was the high traffic area for the previous owners. There isn't a chance in hell that I plan to keep this carpet, it'll be replaced by engineered hardwood. I just want to not be grossed out when I walk in there.
-
Bedroom 1
-
Family room
I stopped at Home Depot for some Durham's Rock Hard Water Putty and some sanding sponges to fix the various holes and gouges in the interior doors.
- June 25, 2014
-
Family room
I finally set up and connected some of my audio/video in the family room. I haven't placed the surround speakers, and the cable TV box isn't connected in the basement, but I can now watch things with my Apple TV with 3 front channels of audio plus my subwoofer.Since my long-term intent is to finish the basement and have the theater room there, I will eventually go much sparser in the family room: a flat screen 1080p LCD on the wall, in-wall speakers, and a small subwoofer. My only components will be a cable TV box, a small receiver, an Apple TV and a BluRay player.
-
Family room
- June 23, 2014
-
Family room
I wired the two new Cat5e cables into Cat5e jacks in the Leviton panel in the modular box in the basement. I tested the runs with my cable tester, they're good to go. Next up will be the new RG6 cable, then I'll run some Cat5e for the master bedroom.
-
Family room
- June 22, 2014
-
Yard
I mowed the lawn (the typical weekend work), and weedwacked. I also cleaned all of the front gutters, which were a mess due to the previous owner apparently never cleaning them. He had shoved some gutter screen guard in most of the gutters, which turned out to be more of a problem than a solution. The guard mesh still collected debris, and prevented sunlight from drying the gutters. Even though it hasn't rained in days, there was water and mud in the gutters, and plants growing! Sigh, I don't know why semi-annual gutter cleaning is such a big deal.
-
Yard
- June 21, 2014
-
Family room
I installed the RJ45 jacks on the end of the new Cat5e cables in the family room. I crimped a new RG6 connector on the new RG-6 cable. I installed RG-6 jacks on the pair of RG6 cables (one new, one old). I then inserted all 4 jacks into the new 4-port wall plate and installed the plate on the wall.I fixed the new RG6 cable to the ceiling in the basement.
I need a Leviton 47693-16P to clean up the RG6 cabling in the basement. The previous owner had 5 or 6 splitters strung together in a huge mess, just dangling from the ceiling. They're all disconnected at the moment since I intend to pull all of the RG6 cables into my structured wiring enclosure and plug them in to a Leviton 47693-16P.
-
Family room
- June 19, 2014
-
Family room
I cut a new hole for a rework box in the family room. However, I haven't populated it. It's adjacent an existing box that had a single RG-6 cable in it. By cutting the adjacent hole, I was able to fish a pair of Cat5e cables and an RG-6 cable into the existing box. I will use the new box too, but what I have now is enough to get my audio/video gear set up in the family room.
-
Family room
- June 18, 2014
-
HVAC
The new Nest backplate arrived. As near as I can tell, there's no appreciable design change from the original back plate. This means that it's likely that the new backplate will eventually fail if no protection is provided.I ordered two MRB-4 relay boards to isolate the Nest from my HVAC system. One to use, One as a spare. They appear to have snubber circuitry on the coils, but it doesn't say so in the brochure and the picture is too small to be certain. I will likely add a TVS for each relay coil if there doesn't appear to be protection from back-EMF built into the MRB-4. I'll use Panasonic ERZ-V20D470 or EPCOS S20K30AUTO or Bourns MOV-20D470K. They're all 20mm radial discs, which is large but I want to be fairly certain that I use ones that can absorb the energy from coil de-energization again and again for as long as I have the Nest thermostat. The Panasonic is rated for 34 Joules, the EPCOS for 26 Joules and the Bournes for 33 Joules.
-
HVAC
- June 17, 2014
-
HVAC
I measured the voltage at my thermostat. It's 28.8V RMS nominal. So, the open question... is this too high for the Nest, or are transients the cause of its backplates death? I personally believe it's transients from the switched loads (relay coils). Some examples of protection: coil indication and EMC suppression modules)
-
HVAC
- June 16, 2014
-
HVAC
My Nest thermostat has been having issues for a while. It has been running the blower non-stop, and then tonight the blower relays started buzzing, indicating that the Nest was either toggling them very quickly or wasn't giving the relay coils enough voltage.I popped the Nest off of the wall, and my blower continued to run. That indicated a short of some kind to the fan wire (green). It turns out that Nest decided to use FETs instead of relays, and they're in the base plate. And the design is not robust enough for a typical HVAC installation; many people have had problems with the FETs frying, leaving their fan or compressor on full-time. I'm thankful that in my case, it was the fan. The base plate was warm near the fan wire, which explains why my temperature seemed to be a little off (high) the last couple of months.
Nest hasn't said much publically about this issue, which sucks IMHO. Their support forum indicates that some "beta testers" got some modified base plates to protect for overvoltage, but Nest won't tell me if the new base plate they're sending to me is any different than the one that fried. Which leaves me thinking it's not, and I'll have a ticking bomb waiting to damage my air conditioning compressor by running it at 100 percent duty cycle for a full day (or longer if I'm not in town). I will of course compare the two when the new base arrives, but I like the thermostat and want to make sure this doesn't happen again. Some people have been through more than one base plate with no resolution.
I intend to isolate the Nest using a relay board, and I'll probably put transient protection across the furnace transformer outputs. MOVs are probably sufficient, say S20K30AUTO.
-
HVAC
- June 15, 2014
-
Family room
I've been looking for a new ceiling fan for the family room. The existing one appears to be original (20 years old), and has no light kit. It wobbles, and it's ugly. But the light kit is the most important part to me, I want a fan with a light. I'd also like one that's more efficient and looks nicer. I really like the Harbor Breeze Slinger 72-in Brushed Nickel Indoor Downrod Mount Ceiling Fan with Light Kit and Remote. It has 6 speeds, a DC motor, and is Energy Star rated. I would want the Fanimation TW30WH 6 Speed DC Reversible Fan and Light Wall Control to go with it, since I'm not fond of not having a wall-mounted control.I also like the Pilot 60 in. and 52 in. Brushed Nickel Ceiling Fan, but its reversing switch is manual and it's not Energy Star rated.
-
Family room
-
Yard
I filled the hole from the stump I chopped out. I movwed the front yard, but haven't mowed the back or done any weed wacking.
- June 14, 2014
-
Kitchen
I installed a Lutron MACL-153MH-WH digital dimmer for the light fixture over the island. It matches the occupancy sensing dimmer that I installed for the recessed lights.
-
Kitchen
-
Master bedroom
I bought some Zep carpet shampoo and some Febreze in a large refill bottle from Home Depot, to try to get rid of the pet smell in the bedroom. -
Yard
I chopped out most of the stump of the tree I brought down last weekend. I later started a small fire in the hole to burn some of it out. Tomorrow I'll chop out a bit more if possible, then rebury the hole and plant grass seed.I bought some mole traps at Home Depot.
I installed a Cree BR30 5000K LED bulb in one of the three recessed fixtures behind the dining room where a deck should be. All three bulbs had burned out, which made for more difficulty in figuring out my wall switch mysteries. I've identified the wall switch now, and bought two more Cree BR30 5000K LED bulbs to replace the remaining burned out bulbs. I noticed that Home Depot now carries the Cree PAR38 flood and spot lights, which are rated for wet locations. I will probably use them for something outside at some point. they're only available in 3000K color temperature, but they're 1500 lumens.
I installed the two additional Cree BR30 5000K LED bulbs, so now the covered area behind the dining room has good lighting.
-
Family Room
I returned the flex drill bit kit I bought last night since it was missing the bit end. I replaced it with a 9/16" flex bit. I don't think I need the rest of the kit. I also bought a 4-port keystone wall plate for the family room.I removed the main wall plate in the family room to identify the circuits (single-pole versus multi-location). The working light circuits (wall sconce and eyeballs) are both single-pole. The mystery switch... I'm assuming it is wired to the ceiling fan box for a light kit. The existing ceiling fan doesn't have a light kit.
- June 13, 2014
-
Kitchen
I finished installing the paper towel holder in the kitchen. It took me a couple of days due to needing to put multiple coats of polyurethane on the piece of oak plywood I needed to mount it to the cabinet. The plywood is adhered to the cabinet with Loctite PL Premium 3X, and the paper towel holder is screwed to the plywood. I like the holder, it's a Simple Human with a very easy mechanism to replace the roll; squeeze and click instead of screw. I bought it at Bed, Bath & Beyond last week. I have another one that I intend to install in the laundry room.
-
Kitchen
-
Basement
I ordered two occupancy-sensing switches from Home Depot for the basement stairwells. This will help prevent me from leaving them on. I picked them up on my way home from work. -
Family room
I ordered a 1/2" installer drill bit and flex drill bit kit from Home Depot to try to get ethernet into the family room. I picked it up on the way home. -
Master bedroom
I ordered some Behr paint samples from Home Depot: Parchment Paper for the walls, Innocence for the trim and Bavarian Cream for the doors.
- June 8, 2014
-
Yard
Despite having a lot of tooth pain, I managed to bring down the dead ash tree in the front yard and get it all cleaned up. Took the last of my energy to do it, hence I didn't mow the lawn.
-
Yard
- June 7, 2014
-
Kitchen
I bought a SimpleHuman paper towel holder for the kitchen. I haven't decided where to mount it, but it will be under one of the cabinets.
-
Kitchen
-
Laundry Room
I bought a SimpleHuman paper towel holder for the laundry room. I haven't installed it yet. -
Bedroom
I bought a new duvet cover, sheet set and extra pillow cases at Bed, Bath and Beyond. They were all on clearance. -
Living Room
I bought another Cree BR30 LED bulb for the recessed lights above the fireplace.
- June 3, 2014
-
Yard
I installed a Hunter Stonington 46" brushed nickel ceiling fan in the kitchen. I like it. It replaces the brass Craftmade that was originally in the kitchen. The Craftmade was a nice fan, but two of the bulb sockets in the light kit had severely corroded contacts. One of them was a fire hazard so I had removed the bulb. It's possible that I'll repair it and use it in another room.I put Cree TW series LED bulbs in the new ceiling fan. They're a bit odd looking when off due to the blue tint to their glass, but when on they are very nice. With a CRI of 93, they render colors nicely. I wish Cree would make some BR30 bulbs with a CRI this high.
I installed an inexpensive brushed steel 3-light fixture over the island to replace the sagging brass 2-light fixture. I'd prefer pendants, but I haven't found ones I like in my current price range. This is a low-grade fixture, but it'll work for now. My main complaint about the old one was that it hung too low, and since it was on only a couple of inches of chain, couldn't be raised enough. It also was always moving out of position since it had a single chain. The new fixture doesn't have these problems.
-
Yard
- May 31, 2014
-
Yard
I installed a new mailbox and post today. It was a lot of work, but it's done. I had to remove the old mailbox and the lump of concrete that was holding it, and there were many big rocks that made it hard to dig. New setup... treated 4x4, two 80 lb. bags of concrete, an aluminum sleeve-type post that slides over the 4x4 and is bolted to the 4x4, then the new mailbox.

-
Yard
- May 26, 2014
-
Garage
I cleaned up more of the yard today. I cut up two more large ash trees that had fallen near the driveway and moved the wood to the wood pile. I cleaned up two more piles of sticks in the yard that were here before I bought the house, then raked them clean of leaves. I raked up five other areas where I had removed stumps or stick piles left by the previous owner. I filled one of the stump holes with dirt from the fire pit, and planted new grass seed and added fertilizer. I did the same where one of the stick piles formerly resided. I will try to put some grass seed and fertilizer on other areas tomorrow.I cut some of the vines that were strangling trees on the east edge of the lot. Some of them are too big to but with my loppers, I'll need to get those with the chainsaw next weekend.
I have been on my feet the entire day, starting with the parade this morning. My feet are very sore since my work boots are not comfortable enough for all-day work and I did a lot of stomping on branches to break them.
-
Garage
- May 25, 2014
-
Garage
I trimmed and mowed today. I cleaned up most of the fallen tree mess near the road, but I have more to do tomorrow. I had a fire in the fire pit to get rid of some wood. No leaves or brush, just a nice smoke-free fire.
-
Garage
- May 24, 2014
-
Garage
I bought a propane weed torch and chainsaw blade sharpener from Harbor Freight. I bought a 20 lb. propane tank from Home Depot and had it filled at the Mobil at the corner of M59 and Teggerdine. I also bought 10 gallons of 91 octane gas for my yard tools.I sharpened my chainsaw's chain. The Harbor Freight chain saw sharpener is rickety but it works fine for my purposes. The saw cut through wood like a new blade after sharpening, and I think I removed less blade material than what Weingartz usually removes. And given the price of the Harbor Freight chain saw sharpener ($35), it will have paid for itself after the second sharpening.
I spent several hours torching dandelions and weeds in the driveways. The weed torch works fine, but given that it can blow itself out fairly easily, I'm glad I got the one with the piezo igniter.
I cleared more of the fallen tree messes on the west side of the driveway. I still have plenty to do here, but I made a decent dent in it. Many trips with the John Deere dump trailer full of wood. I have several more fallen trees to cut up, and I want to clear out the saplings in front of the rock near the fork in the driveway.
-
Garage
- May 18, 2014
-
Garage
I've been spending time getting the tractor ready to mow. See my SLTX1050 diary.
-
Garage
- May 12, 2014
-
Second floor hallway
I installed a Lutron Maestro MSCL-OP153MH-WH occupancy dimmer at the top of the stairs to the second floor, a Lutron Maestro MA-RR-WH companion dimmer at the bottom of the stairs and a Lutron Maestro MA-RR-WH companion dimmer at the end of the hallway upstairs. This is a multi-location setup for the recessed lights in the hallway and stairs. The MSCL-OP153MH-WH replaced the old 4-way switch that was dead, and the MA-RR-WH companion dimmers replaced the 3-way switches. Now when I walk out of one of the rooms upstairs, the lights come on. This is very useful since the only two rooms I use upstairs are the middle bedroom and the bathroom. There is no light switch for the hallway lights near either of these rooms. The lights turn off when the hallway is unoccupied.I replaced one of the four BR30 bulbs with a Cree LED BR30, 2700K temperature. I will eventually replaced the three remaining bulbs with the same.
I installed Amerelle Madison nickel-plated brass wall plates on the three dimmers I installed tonight. I also installed one on the occupancy switch near the Nest thermostat. I have two single-gang rocker plates left, which I'll use in the middle upstairs bedroom.
-
Second floor hallway
- May 9, 2014
-
Laundry room
Two Stoko Vario dispensers are now installed above the utility sink in the laundry room. A third is on its way from jdindustrialsupply.com. These dispensers will hold Kresto (for typical hand cleaning), Cupran (for paint, glue and tar) and Reduran (for dyes and inks). I already have Kresto and Cupran, and I ordered a 1000ml soft bottle of Reduran. Having these dispensers on the wall will help keep clutter out of the laundry room; no soap bar or bottles of soap on the tiny edge of the utility tub. They're also useful on work jeans and coveralls.
-
Laundry room
- May 7, 2014
-
Laundry room
I put a coat of paint on the oak plywood on which I intend to mount some Stoko Vario dispensers in the laundry room. I mounted the plywood to the wall above the utility sink.
-
Laundry room
- May 6, 2014
-
Laundry room
I cut, routed, sanded and primed a piece of oak plywood on which I intend to mount some Stoko Vario dispensers in the laundry room.
-
Laundry room
- May 5, 2014
-
Miscellany
I installed a Lutron occupancy-sensing light switch in the hallway near the Nest thermostat. I can now use most of the first floor without ever touching a light switch or being in the dark. However, I might replace the one in the master bedroom, or put it in vacancy mode. It occasionally turns on while I'm sleeping (when I'm having a fitful sleep).
-
Miscellany
- April 30, 2014
-
Miscellany
I finally got Comcast to correctly provision my Motorola SB6141 modem. I'm now getting 56 Mbits/sec download speed. It was a hassle due to my AT&T cell phone service bineg flakey tonight, but it held up the call long enough to get the provisioning started before it dropped my call. I didn't need to call back, the person on the other end finished the provisioning despite the call dropping. It took almost 2 hours to get things right, but it's all set now.Nice to finally be able to have a 50 Mbit/sec service at the new house. Now if I can just get them to bury the cable from the new cable head to the house... it's been sitting on top of my lawn for many months.
-
Miscellany
- April 26, 2014
-
Roof
I looked at one of the failed pipe vent boots on the roof the other day. Not only has the boot failed, but the flashing was not installed correctly. It is not under the shingles, it's just nailed on top. Sigh, I hate hack roofers. Of course, I desperately need a new roof; the granules of the shingles are completely gone on most of the south side, probably from fungus. My intent is to have Certainteed Landmark Pro or Certainteed Highland Slate installed to replace the existing roof.
-
Roof
-
Basement
I installed the mounting board for the fire extinguisher and flashlights at the top of the basement stairwell near the master bathroom. I installed the metal strap mounting bracket for a Kidde Pro 340, which I'll buy soon. I also installed two Maglite D-cell mounting brackets. One of my Maglite 2D Pro flashlights is now mounted. -
Yard
I spent over 7 hours working in the yard today. I removed three more of the miscellaneous piles of tree branches left by the previous owner, and burned most of it. I cut up more of the large oak and ash tree messes near the driveway and moved the pieces to the back yard near the fire pit. I split some of it, but the ash is wet and still stringy so I'll need to wait a bit longer to split the rest of it. I blew off the driveway with the gas-powered leaf blower, but I need to take a look at it because it's only running properly at half choke. I suspect the fuel pickup tube that has given others trouble. Husqvarna claims the problem is ethanol, but that's an incredibly ignorant response; it's near impossible ot buy gas in the U.S. without ethanol and that's been true for almost a decade. My leaf blower is only 2 years old.
- April 23, 2014
-
Garage
I put the first coat of paint on the corner protectors and sill trim of the window. It will need a second coat. I also notices a spot I missed on the window trim (lower left corner), which I'll paint with the Rust-Oleum door paint.
-
Garage
- April 22, 2014
-
Garage
I received a 3-pack of ProSlat heavy-duty locking hooks for the ProSlat slatwall. The intent of these at the moment isn't confirmed, but I may use two of them to hang my Bosch jobsite radio when it is not hanging on GearWall.
-
Garage
-
Basement
The fire extinguisher mounting bracket arrived today, which I will be using at the top of the stairwell to the basement. This location is readily accessible from anywhere on the first floor, and is right outside the master bedroom. I had originally considered a semi-recessed fire extinguisher case, but the location in the wall where I want the extinguisher contains cold air return that I don't want to block. So I'm mounting on the wall using a piece of 3/4" thick plywood. I cut the piece of plywood, and routed the edges. Unfortunately this piece of plywood has many voids, so I had to spend some time filling with wood glue and sawdust. Once that dried I sanded it and then primed with Zinsser B-I-N.I also received a pair of Maglite D-cell mounting brackets so I can mount a flashlight too.
- April 21, 2014
-
Garage
I cut and installed the piece of FRP near the door to the house using 3M 90 spray adhesive.
-
Garage
-
Yard
I had to get some stitches on the big toe of my left foot yesterday, which has slowed me down a little bit. But I wanted to try out the Fiskars X27 splitting axe, and I wasn't able to shower this morning so it was a good time to try it. It works well, it's a keeper. I split some oak that's not yet seasoned, up to 20" in diameter, along with some seasoned ash. Both were easy. When my toe has healed, I should be able to breeze through the wood that needs to be split. The X27 is easier to use than any maul I've owned, and I like the 36" long handle. The X27's head is about half the weight of the last maul I owned, and is hence easier to swing again and again. I have the Fiskars sharpener for it, so it won't be difficult to keep it sharp. And the carrying case for the X27 works well for hanging it in my garage.
- April 19, 2014
-
Yard
I cut up more of the very large oak tree bough that fell last fall, along with some of the ash tree that fell. I moved some of it to the back yard but still have a lot more to cut and move.I started filling the hole from the septic pipe repair. It seems that my rakes are MIA form the move, so I'll need to buy more. I could use a hoe as well.
I ordered another fire extinguisher mounting bracket from Amazon, along with another pair of Maglite D-cell mounting brackets. The next fire extiniguisher will be mounted at the top of the stairwell from the interior of the house to the basement, and a Maglite 2D Pro flashlight will be mounted there as well.
-
Yard
- April 17, 2014
-
Garage
I grouted the joints of the tiles on the window sill, using the special grout for vinyl flooring.
-
Garage
- April 16, 2014
-
Garage
I cut and installed vinyl floor tiles on the window sill. The deciding factors versus porcelain were labor and cost. The vinyl tile was free since it was leftover from my laundry room. And easy to cut and fit, and no need to retrim the edge. I'll grout it tomorrow, I have plenty of vinyl tile grout left over from the laundry room.

I removed the masking tape from the window.
-
Garage
- April 15, 2014
-
Garage
I caulked the top of the window trim and most of the east side. I caulked both of the drywall corner protectors that I crafted and installed months ago.I laid out some 18" vinyl floor tiles on the cove sill. Five tiles will do the job exactly. However, I'm still considering porcelain tile since it would withstand abuse better. It's not like it would cost a fortune to do such a small space... $40 for the tile, and probably around $25 for epoxy grout.
-
Garage
- April 14, 2014
-
Garage
I put the second coat of paint on the drywall in the window cove. I also lightly sanded the first coat of paint that was on the window casings, and put the second coat of paint on them. While I was at it, I put a coat of paint on the surrounding window trim. I decided to use the Rust-Oleum Door Paint on the surrounding trim, mainly because it's very durable, but also because it means I don't have to fuss with transition lines by using the Olympic ICON semigloss. This trim probably doesn't need a second coat, since it was painted before I started and I then primed it. So all I have left to do on the window is paint the corner protectors, caulk, paint the panelizers and tile the sill. I've decided I'm going to use vinyl tile on the sill since I have plenty left from the laundry room project and I can install it without special tools. It also saves me a little bit of money, and will save me a lot of time since it's so easy to install.
-
Garage
- April 13, 2014
-
Garage
I put the first coat of Rust-Oleum Door Paint on the window casings. It might not need a second coat, given that I put a coat of Zinsser B-I-N primer on them first.
-
Garage
-
Yard
One of the dead ash trees in the center of the yard came down in the high winds last night. I didn't see it when I came home last night and cleared the two trees that had fallen across my driveway. I cut it up with the chainsaw and burned the small stuff. I also removed two rotted stumps from the front yard, and removed several of the wood piles left by the previous owner.
I had to wheelbarrow all of this stuff to the back yard where the fire pit is located. I'm sore and physically exhausted, this being the first real physical labor of the year. I have a ton more of this kind of work in the next month; the yard was quite a mess when I bought the house and I didn't have time to deal with it last summer since I had to remodel the laundry room. There are the trees that have fallen across the driveway since, much of which still needs to be cleaned up (it's all off the driveway, but it's a mess in the woods). There are two ash tree stumps to remove in the front yard, and a dead ash tree that needs to come down. The whole yard needs to be raked of twigs and the like, and I need to fill the holes left by the stumps and put down grass seed and fertilizer.
- April 12, 2014
-
Garage
I put the first coat of paint on the drywall in the window cove.Two trees came down across my driveway late in the evening. We had 55 mph winds, the two trees were dead ash trees. I had to cut the parts that were across the driveway with my chainsaw, in the dark and in the rain. It was fast and easy, just not something I had foreseen. I knew we had thunderstorms in the forecast, but not 55 mph winds.
-
Garage
- April 11, 2014
-
Garage
I taped off the windows and primed them along with the surround trim, using Zinsser B-I-N. Normally I'd use a more flexible primer here, but I wanted to stop the mildew in its tracks without multiple coats of primer. I also sanded and primed the plywood sill, despite the fact that I'm just going cover it with tile. I'm hemming and hawing on the tile; I don't want to buy a tile saw yet, and I have a good amount of vinyl tile left over from the laundry room work. But I did see some through-body porcelain tile that I like at Home Depot in White Lake tonight that I could likely lay without a saw since it's 2x1 tiles on 12x12 sheets. The color scheme would go well with the FRP panels. I believe it's a discontinued tile, so I would need to buy it soon.Tomorrow I'll paint the bit of drywall in the window cove, and put the first coat of paint on the window and trim. The window itself will get Rust-Oleum door paint, since it's very durable and easy to clean. The surround trim will get Olympic ICON semi-gloss to match the other trim in the garage.
-
Garage
- April 10, 2014
-
Garage
The window surround trim at the top of the window is not flush with the wall. As near as I can tell, it's been this way since installation, and is the fault of the drywall crew (like most of the issues in the garage). The top surround trim was about 3/16" further away from the wall at the top edge than the vertical surround trim. I fixes it with some Loctite Premium 3X adhesive, and a pair of finish nails. The adhesive was necessary because there's no wall stud nearby and it was the outer edge of the surround (hence not tacked into the window frame). Plus I wanted to fill some of the gap. To hold it in place while the adhesive set up, I used one of my wood clamps that doubles as a spreader, bracing it against the corner guard I installed a while ago. It worked well, the trim is now even.
-
Garage
- April 9, 2014
-
Garage
Second night of cleaning the window cove area in preparation for primer and paint. I had to do a little spackling work, hence couldn't prime tonight. The faux panes are off the windows, so I wiped the glass (but didn't really clean it). The third faux pane has been MIA since I bought the house, so I'll be leaving the center window pane-free for now.This window cove was a mess. Not sure what the previous owner did in this area, but there were greasy handprints on the trim almost to the ceiling. Many dark scuff marks everywhere. And a lot of dead mildew on the lower parts, probably form the windows being left open in the rain too many times. The sill, which is just painted plywood, is heavily stained. I'll be putting porcelain tile on the sill, with epoxy grout. I haven't decided how I'm going to adhere it yet. Thinset with polymer additive is the obvious answer, but there's probably no reason I couldn't use Loctite PL Premium 8X.
-
Garage
- April 7, 2014
-
Garage
I cut and installed a piece of FRP below the ProSlat on the east wall. I expect to install shallow fold-down benches here, but I also wanted to protect this wall from dings.
-
Garage
- April 6, 2014
-
Garage
An 84" long piece of FastTrack is now installed below the window. It is currently holding my 4' stepladder and my small Shop Vac.After a trip to Lowe's, I put the first coat of Rust-Oleum Door Paint on the inside of the door the back yard. I later applied a second coat. It's not perfect, but that wasn't my objective; I just wanted a cleanable surface (satin paint) versus the very scuffed flat paint that was on it before.
I put two coats of Olympic ICON semigloss on the trim around this door. More work needs to be done here; on one side, there was never any paint on the portion between the foundation and the door. That will need a good primer (probably Zinsser B-I-N) before painting.
-
Garage
- April 5, 2014
-
Garage
I removed the 32" section of FastTrack from the north wall, and replaced it with an 84" long piece. I then reinstalled the 32" piece lower on the wall, along with a second 32" long piece.I then reorganized the items on this wall a bit to accomodate my grain shovel, push broom and furniture dolly that I use for the tractor's snowthrower attachment.
-
Garage
- April 4, 2014
-
Garage
I bought a quart of Rust-Oleum door paint (white) and a quart of Zinsser B-I-N. I also bought another 84" piece of Rubbermaid FastTrack and another 5 lbs. of 2.5" long coated Torx-drive construction screws since I was running low.
-
Garage
- April 3, 2014
-
Garage
I installed some 1x2 pieces on the wall in the stairwell to the basement to serve as a ledger to install a full sheet of slatwall. I then installed the slatwall. It was NOT easy; the sheet weighs 85 lbs, and a lot of the work was over my head. I managed to get it installed without damage, other than squishing the pinky on my right hand. The lower edge of the sheet is just above the handrail at the top of the stairs, and the sheet is level. Hence the sheet is high on the wall by the time you reach the bottom of the stairs. This is fine, I will be putting shorter tools near the top of the stairs and longer tools like brooms at the bottom. Nothing heavy will be here; paintbrushes, drywall joining knives, paint rollers, caulk guns, etc. I suspect the slatwall sheet weighs more than the total of what will be hanging on it.I used my new iPhone holder on the wall of the garage tonight. It works well.
-
Garage
- April 2, 2014
-
Garage
I started marking the location of the studs in the east wall of the stairwell from the garage to the basement. I'm going to install slatwall here. I'm not all that excited about the slatwall here, it's more about getting the slatwall sheets out of the garage so I can finish the garage work. the sheets are in my way at the moment.I glued one of my homemade iPhone holders to the wall above one of my tool cabinets. It should work fine for my purposes. Gravity will keep it in the mount while it's plugged in to one of the USB charging ports in the nearby AC outlet. It's at a somewhat odd angle, but that was intentional. It's easy to get the iPhone in and out of the mount, but it shouldn't fall out.
I washed the houseward side of the door to the basement, in preparation for painting. I'm going to put a piece of pegboard on this side of the door, which will likely hold more can racks. Unfortunately, Racor no longer makes the racks I have now. Griot's has the same design, but they want $25 each. That's about 4X what I paid for the racks I have now. Rockler has the same design for $20.99. The Allstar Performance ALL12200 holds six cans instead of 5, which would be nice. $28.99 at Amazon. But at these prices, it's pretty tempting to make my own. I can get a 10' long piece of 4" base, 1.125" legs FRP U-channel from McMaster-Carr for $68. Or I could just make one out of plywood and pine. I could borrow the design of the Pitpal one to achieve high density storage: PIT-V99
-
Garage
- April 1, 2014
-
Garage
I installed a 48" x 45" piece of FRP on the wall in the stairwell to the basement. I then installed a 32" long piece of FastTrack and two double S-hooks on the FastTrack. My mops are now hanging here.
-
Garage
- March 31, 2014
-
Garage
I cut a hole for the outlet in the piece of FRP I trimmed yesterday, and then installed it behind the filter and regulator between the garage doors.
-
Garage
- March 30, 2014
-
Garage
I did some cleaning last night. Unfortunately I got a little compulsive and spent entirely too much time cleaning the expansion joints in the south half of the garage. But I'm glad I did it, since there were a few screws deep in the expansion joints (from before I bought the house). I'd like to install some slab gaskets, but they're pricey and at the moment I have more important things on the to-do list.I cut and framed two pieces of FRP today. One is going behind the filter and regulator between the garage doors. I still need to cut the hole in this one for the electrical outlet. The second one is larger, and will be installed on the wall in the stairwell from the garage to the basement. I intend to hang my mops on this wall, and I want to be able to hang them wet without damaging the wall. They don't drip after wrung out, but they will be damp. Of course I still need to tile the sill at the bottom of that wall.
-
Garage
- March 29, 2014
-
Garage
I cut the Great Stuff foam at the bottom of the drywall between the garage doors. I wanted it flush with the wall, so I used my Bosch oscillating tool with a round cutter. I then installed the piece of FRP I had prepared last night. I used 3M 90 spray adhesive to adhere it to the wall, since it's still cold here in Michigan and FRP adhesive doesn't like to cure correctly in cold temperatures.I installed the obstruction detectors on the north garage door. I put them at about the level of the M Roadster's bumper, since I've seen cases where a car has been hit by a closing garage door due to the beam going under the rear bumper.
I started to install the obstruction detectors on the south garage door. The one near the center of the garage is installed. I needed to spray some Great Stuff on the other side of the door, so I'm waiting for it to dry before installing the detector on that side. I also fixed the door seal on that side of the garage, whose bottm had curled away from the trim. I just put a few 1-5/8" deck screws in it to keep it in place until I install new seals.
I broke up the old piece of unfinished pegboard that I removed from the wall a very long time ago, and put it in a box for trash collection.
I'm going to do some more cleanup tonight and possibly get to work painting the window cove and trim. I need to move some full sheets of slatwall to the basement, which won't be easy alone. Given that I don't currently have plans for these sheets, I may cut them down to 4' x 4' before moving them.
-
Garage
- March 28, 2014
-
Garage
I installed some ProSlat next to the door to the house. This will likely be used to hang gloves and safety glasses and maybe some of my flashlights that have lanyards.
I cut a piece of FRP to 34" x 22.5" to install on the wall between the garage doors. This piece will be placed at the bottom of the wall to protect the drywall from dings and moisture. I drilled two holes in it for the wires to my garage door opener obstruction detectors. I cut trim pieces for the top and side edges, and pre-glued them to the FRP just ot make the installation easier. I'll be installing this pieces with 3M 90 spray adhesive, so there won't be any time for shifting it around and fussing with the edge trim.
I sprayed some Great Stuff Pest Blocker expanding foam between the edge of the drywall and the concrete floor. There was a 3/4" gap there, and the fiberglass insulation in the wall doesn't meet the concrete. The foam should help prevent drafts and help keep insects out of the garage. When it dries, I'll trim it flush before installing the FRP. Of course, I still have other areas to foam and caulk, namely between the cinder blocks and sill plates. In the summer I intend to install all new garage door seals and Green Hinges. I also want brush-type garage door seals.
-
Garage
- March 27, 2014
-
Garage
I installed some ProSlat above the garage door openers.
-
Garage
- March 26, 2014
-
Garage
I mounted the Kidde Pro 340 fire extinguisher and a pair of 3D Maglite flashlights.

-
Garage
- March 25, 2014
-
Garage
The mounting bracket for the Kidde Pro 340 fire extinguisher arrived. It fits fine. The Maglite mounting kit arrived too, along with some ProSlat locking 8" hooks. I like the ProSlat locking hooks, I will be buying some of the 4" ones.I cut a piece of 3/4" plywood to 16.5" x 48" to mount on the east wall next to the ProSlat. This is where I will be mounting the Kidde Pro 340 and some flashlights. I routed the edges of the plywood and put a coat of Zinsser B-I-N on it. I later put a coat of Olympic ICON semigloss on it, and mounted it to the wall. I put the first coat of spackling on the screw heads to hide them. I'll sand tomorrow and put another coat of paint on it before mounting the extinguisher and flashlights.
-
Garage
- March 24, 2014
-
Garage
I put two coats of paint on the poplar 1x2's I will be using to mount a piece of pegboard to the south of the ProSlat on the east wall. I also put a coat of paint on the back of the pegboard piece.I installed a piece of GearTrack up high in the southwest corner of the garage and my 2' stepladder is now hung there.
I installed the pegboard to the south of the ProSlat on the east wall.
-
Garage
- March 23, 2014
-
Garage
I finished the air tool rack on the south end of the garage.I picked up a Kidde Pro 340 fire extinguisher at Home Depot. I also bought some 2" long panhead screws to install more ProSlat.
The crossbeam adapter for my floor jack is now mounted above the door to the basement with a section of FastTrack.
I did a bit of cleaning up, but I have a lot more to do.
-
Garage
- March 22, 2014
-
Garage
I put a coat of Zinsser B-I-N and a coat of Olympic ICON semigloss on the plywood for the air tool rack support for the south end of the garage. I put two coats of Olympic ICON semigloss on the 2x2 pieces that will support it.I cut five ClosetMaid Maximum Load shelf standards to 29.25" in length and then installed them above the ProSlat on the wall shared with the laundry room. I then installed ten brackets and two shelves. No idea what I'll be putting on these shelves, but I wanted to stop hemming and hawing about what to do with this space. The lowest shelf is high enough to never be an issue for someone walking under it unless they're an NBA center.
Tomorrow I will finish the air tool rack on the south end of the garage and start the rack for the north end of the garage. I will also be doing some cleanup and install some more of the ProSlat and GearTrack. I also need to pick up a Kidde Pro 340 fire extinguisher at Home Depot and install it.
I ordered a metal mounting bracket for the Kidde Pro 340, a Maglite flashlight mounting set, and some ProSlat double 8-inch locking hooks from Amazon.
-
Garage
- March 21, 2014
-
Garage
I put 2 coats of Olympic ICON semigloss on the remaining air supply supports. I then intalled them. All of the filters and regulators are now supported, as well as all of the automatic drains.I installed 1/8" NPT to 3/8" barbed fittings in all of the automatic drains at the filter/regulator drops. I then attached some 3/8" ID, 9/16" OD PVC tubing with hose clamps. This is probably temporary, but for now it will keep any drain water off of the walls and sill plates.
I started creating the air tool rack support for the south end of the garage.
-
Garage
- March 20, 2014
-
Garage
I put the second coat of Olympic ICON semigloss on the 2x2 support for the filter and regulator at the north end of the garage.I put two coats of Olympic ICON semigloss on the support for the filter and regulator at the south end of the garage.
I created the supports for the drains at the north and south ends of the garage. I also created the support for the drain at the input from the compressor; that one is a 1x4 oak piece with a 1x3 oak piece on top. All of these pieces now have a coat of Zinsser B-I-N on them.
-
Garage
- March 19, 2014
-
Garage
I cut and routed a 2x2 to support the filter and regulator on the north end of the garage. I primed it and put the first coat of Olympic ICON semigloss paint on it.I cut, routed and glued some 1x2 pieces to support the filter and regulator on the south side of the garage. I didn't use a 2x2 because I need to bend the support very slightly since it's going over the edge of the FRP trim. I glued a piece of 1/4" thick plywood on the back of the 1x2 where it transitions to the wall, just to avoid crushing and cracking the FRP trim. It's all clamped and drying now.
I ordered some more silicone-cushioned pipe clamps from McMaster-Carr. P/N 3225T67 are for the 3/4" pipe, P/N 3225T65 are for the 1/2" pipe. I also ordered some brass 1/8" NPT to barbed fittings for 3/8" ID hose (P/N 5346K17). For now I'll be putting these on the automatic drains and using flexible hose to run into catch bottles. I ordered some worm drive hose clamps (P/N 5415K11) to hold the hose on the barbed fittings, but I probably won't really need them. There's not a ton of pressure involved when the drains open, and with 3/8" ID hose fed by a 1/8" NPT fitting, there would be a pressure drop even if there was something on the other end of the hose. I think I have some 3/8" ID clear hose in my PC watercooling supplies.
-
Garage
- March 18, 2014
-
Garage
I secured the automatic drain that's between the garage doors. It's fastened to the wall via the 1x2 pieces I painted yesterday.I finished mounting the second air tool rack between the garage doors. I'm done with the air supply in this area but for deciding what to do with the output of the automatic drain and fastening the 1/2" piping on the output of the regulator.
-
Garage
- March 17, 2014
-
Garage
I put two coats of Olympic ICON white semigloss on the front of the 3/4" oak plywood piece for the second air tool rack. I also put two coats on the front of the 1x2 pieces I'm going to use to secure the center automatic drain to the wall. When these pieces dry, I can install the air tool rack on the plywood and install the plywood on the wall, and install the support for the automatic drain.I would have done more, but I was sidetracked by light switch work in the master bedroom.
I am planning to intall an H3R HalGuard fire extinguisher on the wall next to the center air drop. Probably an HG250B (black) or HG250C (chrome). I don't really care much how it looks, I just want it to be a color other than red since I intend to also install a dry chemical extinguisher that will most likely be red. I don't like using dry chemical extinguishers on cars since they leave a corrosive mess, but it's good to have one when needed. I'm more interested in saving lives and the house than an engine bay. The halotron extinguisher would be my first grab for a minor engine bay fire. A primary extinguisher should be rated at least 2-A:10-B:C, and the Kidde Pro 340 would fit the bill.
-
Garage
-
Master bedroom
I installed a Lutron Maestro MSCL-OP153M-WH occupancy sensing dimmer in the master bedroom, along with a pair of companion dimmers. I'm not sure I'm going to keep this setup indefinitely, especially since I don't know if tossing and turning in the bed will set off the sensor. Regardless, I will definitely keep the companion dimmers, and would only replace the occupancy sensing dimmer. These dimmers are much nicer than the contractor-grade switches they replaced.It took me hours to complete this work due to an unlabelled or color coded 4-way switch on the wall and trouble with the wall plate and el-cheapo fan switch near the bed. It also doesn't help that the original contractor used drywall screws to mount switches, ruining the threads in the switch boxes for normal switch mounting screws.
- March 16, 2014
-
Garage
I put a coat of Olympic ICON white semigloss on the back of the 3/4" plywood piece I am going to use to mount an air tool rack above the filter and regulator between the garage doors. Once it dried, I measured and mounted the air tool rack on the plywood. It is ready to be installed to the mounts on the wall. But I need to prime and paint the mounts first.I'm going to create another air tool rack mounting board below the filter and regulator between the garage doors.
I went to Home Depot for some more items to finish my air supply work. Some 2x2's, some copper pipe straps and some more 3.5" long #10 torx head construction screws. I also bought another Lutron Maestro occupancy-sensing dimmer and two companion dimmers for the master bedroom, since they had the companion dimmers in stock (very rare at my nearby stores).
The first air tool rack is mounted. I like it.

I secured the input of the air plumbing using two pieces of oak (routed, sanded, primed and painted) and a silicone-cushioned pipe strap.
I secured the plumbing above the center filter and regulator with some pine 1x2's (primed and painted).
I cut, primed and painted the 2x2 mounting pieces for the second air tool rack. I cut, routed and sanded the piece of plywood for the second air tool rack. I cut, routed, sanded, glued and primed pieces of 1x2 to support the center air drop's automatic drain. I put a coat of primer on the plywood for the second air tool rack.
I mounted the support 2x2 pieces for the second air tool rack, above the center automatic drain.
Tomorrow I should be able to wrap up the second air tool rack installation and secure the center drain.
-
Garage
- March 15, 2014
-
Garage
I put the first coat of Olympic ICON white semigloss on the front of the 3/4" plywood piece I am going to use to mount an air tool rack. I used a small roller to apply it. After drying, I can still see the grain of the wood, which I like. I may or may not apply a second coat.
-
Garage
- March 14, 2014
-
Garage
I finished the plumbing of the Parker 06D1NA automatic drain at the northwest corner of the garage.After much internal debate, I decided how to mount a piece of oak plywood above the air filter and regulator between the garage doors. I want a board here so I can mount one of my air tool racks on it to hang the common air tools: blow guns and tire inflator with gauge. I will be hanging another rack in a similar manner below the filter and regulator but above the automatic drain. That one will hold things like die grinder, ratchets, or whatever I happen to be using on a given project.
Since the air piping is 1.5" from the wall and is 7/8" in diameter, I used stacked pieces of 1.5"x1.5" select pine to space the board 3" out from the wall as to not interfere with the piping. I mounted the first pair to the studs using 3.5" long screws that I countersunk, then mounted the second set to those using 2.5" long countersunk deck screws. The board itself is 18" tall by 24" wide, 3/4" thick oak plywood. I ran a 1/4" roundoff bit around the edges that will face the garage, just to help prevent chipping. I sanded it lightly and applied a coat of Zinsser B-I-N to the back. When it dried, I applied a coat on the front and edges. It will later get Olympic ICON white semigloss paint. I'll mount the air tool rack on it before mounting the plywood to the pine standoffs that are already on the wall.
I need to order more pipe mounting straps from McMaster-Carr so I can finish strapping the air piping in place.
-
Garage
- March 13, 2014
-
Garage
I sweated a 1/2" threaded to 3/4" cup fitting on a piece of 25.675" long 3/4" type L copper pipe. I sweated a 3/4" threaded to 3/4" cup fitting on the other end. I then used this piece to connect one of my Parker automatic drains to the valve in the leg for the south air filter and regulator.I did the same with a 31.675" long piece of 3/4" type L copper pipe for the drain for the center filter and regulator. I want this one a little lower because I intend to place some panels in this area to install air tool racks and I don't want the drain to be in the way of the bottom panel.
I fabricated a similar setup for the Norgren automatic drain at the input leg from the compressor. I need to fabricate one for the remaining Parker 06D1NA at the north drip leg. I will then have automatic drains at each leg, and should have water-free air at every location. I'll need something more elaborate for a blast cabinet or any serious painting, but for now the drains and drip legs are sufficient.
-
Garage
- March 12, 2014
-
Garage
I mounted the third hose reel and connected it. No leaks found.I created a short piece of 1/2" copper to feed the north hose reel and connected it.
All three air hose reels are now mounted and functional. I still need to connect the automatic drains and decide whether or not I'm going to exhaust them outdoors. I also need to install supports for the filters and regulators.
-
Garage
- March 11, 2014
-
Garage
I finished enough of my air plumbing to pressurize the main runs and the drops to check for leaks. No leaks found at 125 PSI. Hence I firmly attached the portions near the ceiling with the silicone-cushioned metal pipe straps I've been using. I installed the first support for the center drop, and connected the hose reel since I can't go any longer without air supply in the garage.I'm good to go on finishing the remaining air supply work: install some supports for the filters and regulators, install the third hose reel, install the couplers in the manifolds for the remaining two hose reels, and install the lead hoses to the remaining two hose reels.
-
Garage
- March 10, 2014
-
Garage
More work on the air plumbing...I put a second thin coat of Olympic ICON semigloss on the 1x2 pieces I intend to use to support the piping on the south wall.
I suspended the pipe near the ceiling on the south wall, just to make sure it's the correct length. It looks OK.
I attached some of the output piping on the regulator in the northwest corner: the tee, the short downpipe with a ball valve, and the short upward pipe with the manifold.
I removed my old filter and regulator from the temporary black iron setup, as well as my old 4-port manifold. I then assembled the output for the southwest corner of the garage, and installed the input valves, filter, regulator, output ball valve and my old manifold on the drop there. Now all three drops have filter, regulator, ball valves and manifolds.
If it was not going to snow tomorrow, I'd say I could finish things up tomorrow night and pressurize the system to check for leaks. Unfortunately it looks like we're going to get a lot of snow, which means I'll be preparing to clear snow and installing the new snow tires on the MINI.
-
Garage
- March 9, 2014
-
Garage
I continue to work on the air plumbing. I thought I had more threaded ball valves, but needed to go to Home Depot to buy more. I also bought some Rectorseal Tru Blu sealant, which is a soft-set sealant that allows easy disassembly long-term. Finally, I bought a 12-pack of Dremel EZ-Lock cut-off wheels since I was running low.I soldered together another 3/4" feed and drain valve setup: a 3/4" ball valve followed by a 3/4" x 1/2" c 3/4" tee. Out of the 1/2" part of the tee is a very short piece of 1/2" pipe with a female threaded connection that will connect to a filter. Out of the 3/4" leg of the tee is a short pipe of copper, a 3/4" threaded fitting and a 3/4" ball valve. Out of this ball valve I will connect more 3/4" pipe, a 3/4" to 1/2" adapter and a Parker automatic drain.
I connected the filter and regulator to the center drop.
I connected the filter and regulator the north drop.
I put a coat of Zinsser B-I-N on a couple of 1x2 pieces of pine to use as supports for my pipe hangers near the ceiling on the south wall. I later put the first coat of Olympic ICON semi-gloss on these pieces.
I installed a 45-degree brass elbow on the center hose reel. It's not really necessary on this reel, but it's also harmless.
I soldered together the piece that will run along the ceiling on the south wall. The union on one end, a coupler in the middle, then a 90-degree elbow, a short piece of pipe and a female threaded adapter. The threaded adapter will let me put the input together piecewise, and I can then tighten the union at the southwest corner.
I have some more 1/2" work to do for the south drop. I also need to decide what I want to do for input at the compressor. I don't need a manifold or output here, but it would be wise to have a drain. In other words, I should pipe in my old Norgren drain here.
I need to take stock of my various connectors to figure out if I have enough to complete my work. I have the connectors to do the input in the manner I would like (a 3/4" x 1/2" x 3/4" tee), but I think I need more 3/4" solder to 1/2" NPT adapters for my drains.
-
Garage
- March 8, 2014
-
Garage
I cut, join and soldered a bunch of copper today. I now have the west wall air piping up, with the three drops in place. The clamps are still loose and I have not placed them all, because I know I need to be able to swing the drops a bit to attach the filter/regulator/drain setups. But it feels good to have the hardest part done. This work has been holding up a lot of other work, and if I finish it tomorrow, I can do some real clean-up in the garage. Fingers crossed that none of the joints leak...
-
Garage
- March 6, 2014
-
Garage
I mounted the protective piece of oak to the bottom front of the laundry room overhang. Loctite PL Premium adhesive, finish nails driven with my pneumatic finish nailer. I caulked the top edge with DAP 3.0 exterior white caulk. I wish I had been fussier about the protector height on the north corner, since it extends beyond the bottom of the wall. Maybe I'll cut it off later. At the moment, I'm just happy to have all of the garage-facing drywall edges protected from being crushed.I mounted the main mounting board for the air hose reel at the north end of the garage. I used 3.5" long Spax lag screws with stainless steel large diameter washers to prevent crushing the plywood. I need to figure out where on this board I will mount the secondary board that has the carriage bolts to hold the hose reel. I need to leave room for the 45-degree adapter and lead hose.
My plan for the space above the door to the basement: two strips of GearTrack. One will hold my floor jack's crossbeam adapter, the other will likely hold my moving dolly or Festool carts.
-
Garage
- March 5, 2014
-
Garage
Change of plans for tonight. A nasty pothole on I75 gave me a flat tire and a bent and cracked wheel on the way home from work. It happened near my exit, only a few miles from home. My sweetie was kind enough to pick my grumpy butt up at the gas station and take me to fetch my jack and a spare wheel. Unfortunately, said spare wheel is wearing a summer-only tire and we continue to have snow in the forecast. Hence I had no choice but to order new snow tires. It's not that I didn't need them (I'm due for new tires), but no one sells snow tires for 17" wheels that will fit the MINI anymore, and TireRack no longer has a 17" Sport Edition CD for the MINI to replace my destroyed wheel. So it wasn't an option to buy a single replacement wheel and 4 tires; I had to buy 4 new wheels (16" instead of 17") and have those shod with snow tires. I ordered the cheapest alloy wheel available: the Rial Milano, painted silver. For tires I went with the Blizzak WS70.
-
Garage
- March 4, 2014
-
Garage
I attended George Miller's funeral today. I'm so sad for Craig and Sandy. :-( But the service was nice. The military part at the cemetery was nice also, though it was very cold outside.I removed the hose reel from my old cart and then traced its mounting hole pattern o a piece of 3/4" plywood. I drilled the holes for the M8 carriage bolts, countersinking the heads. I cut this piece to size, and then cut the larger piece of plywood to which it will be mounted. I put two coats of Zinsser B-I-N on these pieces. Why two coats of primer? Over the years I've learned that when priming wood for a light colored paint, two coats of primer (letting the first one cure before the second coat) is a good idea. It greatly decreases the odds of wood tanins staining the final coat. I consider it cheap insurance.
I later put two coats of Olympic ICON exterior semi-gloss on these pieces. This is different than what I had done for the other two hose reel mounts, where I painted them after installation and used the same paint as the ceiling. Painting these pieces on the ground is much easier, and the semi-gloss will be easier to clean if needed. They're now ready to be screwed together and mounted on the ceiling.
I put the second coat of Olympic ICON semi-gloss on the protective piece of oak for the bottom of the laundry room overhang. When it dries, it will be ready for installation. I will of course be touching it up after installation, but it's nice to have it mostly painted before installation. I expect this piece to get a little abuse, since I'll probably store some things under the overhang. At the moment my intent is to build a pair of shallow roll-out boxes to go under the overhang. These would be a good place to store things like body tools, hammers, chisels, files and shop supplies like paper towels.
I need to think about where I'm going to store my jack's crossbeam adapter. It weighs around 25 lbs, so I can certainly hang it on ProSlat, Gladiator GearTrack or Gearwall, or Rubbermaid FastTrack. I don't use it very often, do I have room at the top of the Gearwall by the door to the basement?
I need to make some progress on my air supply setup so I can ditch the carts in the garage as well as the black iron piping and filter/regulator/drain that's hanging in an awkward place on the south wall. Tomorrow I should be able to mount the pieces for the third air hose reel, mount the guard for the bottom of the laundry room overhang, and do a little air plumbing work.
I keep forgetting that I need to leave room in the garage to stash my sliding compound mitre saw and a Bosch 4100-09 table saw. Hence I think I should not put another piece of pegboard in the southeast corner, and I should use a 48" long bench there instead of a 60" long bench. Or buy another Vika Twofold?
-
Garage
- March 3, 2014
-
Garage
I installed the power strip mounting board and a power strip in the southeast corner. This power strip was one I had from my previous workbench, and was lightly used. It matches the one I have near my dock fan now.I installed a piece of GearTrack on the south wall of the laundry room overhang, near the ceiling. I installed a short piece between the new shelving and the wall, from which I'll probably hang my axe. I installed one of my framed 2'x4' pieces of white pegboard below the GearTrack on the south wall of the laundry room overhang. I then installed the 4' shop light on the underside of the lowest shelf in this corner. This corner is now ready for a bench and probably one more piece of stainless steel pegboard.
-
Garage
- March 1, 2014
-
Garage
I finally installed a 15" x 26" piece of FRP below the bit of ProSlat in the west corner of the south wall. This area has the potential to get a little wet since there will be an air supply automatic drain here. The FRP will prevent the drywall from getting wet and/or banged up. I installed it using 3M Super90 spray adhesive, since it's much faster than using FRP adhesive. It is very unforgiving though, since it doesn't allow movement while installing. Not advised for large pieces of FRP, but for small pieces it works fine.I am preparing some more pegboard for the stairwell to the basement. I primed the wood of a framed 2' x 4' piece of pegboard. I went to Lowe's and bought 13 poplar 1x2 pieces, an 8' long 1x3 piece of oak to protect the laundry room overhang at the bottom, a 6' long 1x3 piece of oak to mount another power strip, some cheap 2" paint brushes, five more ClosetMaid Maximum Load shelf brackets, another 6' ClosetMaid Maximum Load shelf, and a 3/4" brass union that I think I can use to help make my air piping easier to finish.
I framed two more pieces of 2' x 4' pegboard, and then primed the back of them with Zinsser B-I-N to help prevent deterioration from moisture. While I really like the look of the stainless steel pegboard from diamondlifegear.com that I've used elsewhere, I like the flexibility of having pieces of regular pegboard that I can cut to size and frame as desired.
I cut a piece of 1"x3" oak to 45" to make a mount for a power strip in the southeast corner. I ran a roundoff bit around the edges and sanded it, then put 2 coats of Zinsser B-I-N on the back (that will be in contact with the wall). I'll prime the front tomorrow and mount it to the wall.
I cut another piece of 1"x3" oak to 95.5" to serve as protection for the bottom edge of the drywall on the laundry rooom overhang. I ran a roundff bit on the edges of the piece too, sanded it, and put a coat of Zinsser B-I-N on the back. I'll prime the front and install this piece tomorrow.
-
Garage
- February 26, 2014
-
Garage
I installed two more pieces of GearTrack in the southeast corner, next to the shelves.I finally spent some time to find the studs in the south side of the laundry room abutment. I can now install whatever I'd like there. I'm leaving toward another stainless steel pegboard at the same height as those on the southeast wall, and some GearTrack above it. I'd also like a third piece of stainless steel pegboard on the southeast wall, next to the two pieces I installed recently.
I replaced the dedicated single outlet for central vacuum with a duplex GFCI outlet. I'm not a fan of central vacuums and hence don't intend to install one. A GFCI outlet here is much more useful to me.
-
Garage
- February 25, 2014
-
Garage
It's all in the details...I improved my Gladiator Clean-Up Racks. for each one, I cut a piece of 3/4" PVC pipe to 26.2cm and a 1/4"-20 316 stainless steel threaded rod to 29.0cm. I installed a 1.5" diameter black threaded ball on one end of the stainless steel rod using Loctite blue thread locker. I drilled a 5/16" hole in the center of each of the paper towel holder nubs on the Gladiator Clean-Up Rack.
The PVC gets dropped into the new paper towel roll when replacing a roll, then placed in the Clean-Up Rack. The stainless steel rod then gets run through, and I screw on a 1.5" diameter red threaded ball on the other end (no Loctite). It works perfectly, and the total cost to do two of them was $14.18 plus the PVC pipe (cheap, but I don't have a price since I had some 2' pieces on hand). So $7.09 to resolve the issue that has drawn complaints from reviewers (the paper towel roll can come out of the holder too easily).


-
Garage
- February 24, 2014
-
Garage
I installed a second 4' long shelf in the southeast corner, on the standards I installed last night.I installed the remaining two pieces of stainless steel pegboard below the shelves in the southeast corner. A rolling bench will later be installed below the pegboard.
The stainless steel threaded rod, threaded ball ends and UHMW tube to improve the Gladiator Clean-Up Racks arrived from McMaster-Carr. Unfortunately, the UHMW dimensional tolerance is terrible; I should have looked at the numbers before ordering. The inner diameter is MUCH smaller than .25" and hence I can't easily use it. Looking at the tolerance listing, it says +/- .17". Yikes! For now I'll use some 3/4" schedule 40 PVC I have on hand.
-
Garage
- February 23, 2014
-
Garage
I went to Lowe's and bought 4 more pieces of Gladiator GearTrack, and some 2" long #10 screws to install my second ProSlat kit.I started executing a plan for the southeast corner of the garage. I installed three ClosetMaid Maximum Load standards after cutting them to 34" length and drilling an additional hole in each one. I then installed a single 4' shelf. I need a second 4' long shelf to go above it. I will be hanging a 4' long quad T8 light from the bottom shelf, and installing my remaining two stainless steel pegboards on the wall under the shelves. This area is where I intend to put a rolling bench of some sort. I like the WB253975BTN from globalindustrial.com; the height is fixed, but it has 2" square 14 gauge tubular steel construction with a weight capacity of 2000 pounds. It also has a power apron with 3 15A duplex outlets.
-
Garage
- February 22, 2014
-
Garage
I installed two strips of GearTrack above the ProSlat on the south wall. There is now more stuff hung from the wall; my long Irwin clamps, my small corner clamps, my 4' ladder, my levels and carpenter square, and some other miscellany.
I cleaned up a litle bit, but still have a lot more picking up to do. I did not get to the installation of the ClosetMaid Maximum Load shelving, mostly due to debating what I want to do with the remainder of the wall shared with the laundry room. There's a lot of empty wall space above the ProSlat. Originally I was going to install shelves there, but now I'm considering more ProSlat. It's not as if I'm short on shelving, especially if I put some in the southeast corner. Of course I could just install GearTrack, which gives me the option of using Gladiator shelves.
-
Garage
- February 21, 2014
-
Garage
I stopped at Sears right before closing (8:45PM) and picked up a second Gladiator Clean-Up Rack (paper towel holder with shelf) and a Gladiator S-hook.The set of three ProSlat baskets arrived from Amazon. I now have 5 of them, and they will be handy for holding various cans of cleaning chemicals. I still need some of the ProSlat hooks, but will buy those later. I would like some of the 4" locking double hooks for axe, sledges, drilling hammer, etc.
I finished installing a ProSlat kit on the south wall. I also installed a GearTrack and the Gladiator Clean-Up racks on this GearTrack. I now have 6 paper towel holders in the garage, and might install two more. It might seem like overkill, but I don't like to have to walk too far to get paper towels when I spill something.
Tomorrow I will try to install the remaining ClosetMaid Maximum Load shelving I have on hand, and do some shuffling and cleaning. I want to get going on the remaining work on the air lines and third air hose reel.
I need some more Sterilite Stackers from Walmart. I need a 7.5 gallon for cargo and tow straps, a 7.5 gallon for masking and duct tape, a 7.5 gallon for light bulbs, a 4 gallon for electrical outlets/switches/wallplates/etc., a 4 gallon for low voltage rework boxes and plates, and a 7.5 gallon for Romex wire.
-
Garage
- February 20, 2014
-
Garage
I stopped at Lowes to buy some more ClosetMaid Maximum Load shelf brackets. I then stopped at Home Depot and bought some 2" long #8 panhead sheet metal screws. Not ideal (thread pitch and height), but they'll work for the ProSlat.I started the installation of the ProSlat on the south wall. I got five of the ten slats installed, including the two trickiest ones that required cutting for the AC outlet on that wall. The remainder will be easy in comparison; the initial layout and measurements and the cutting of the two pieces for the outlet were far and away the most difficult parts.
I decided against running the ProSlat over the 240V outlet, since I will probably later want to add another 240V outlet on that wall. I also decided to not run past the 3-gang box for light switches, since it would make future door and trim replacement more difficult and leave the end of the ProSlat unsupported.
-
Garage
- February 19, 2014
-
Garage
I put the final coat of joint compound on the window corner protector, and a coat of Kilz Original primer.After much hemming and hawing, I decided on a layout for the ProSlat on the south wall. I marked the wall, including the stud locations. Unfortunately, ProSlat didn't include screws with my new kits.
-
Garage
- February 18, 2014
-
Garage
I ordered some parts to improve the Gladiator paper towel holder. 1/4" threaded rod, UHMW pipe and some threaded ball ends. As is, it's way too easy to pull a paper towel roll right out of the holder while using it. Having a fastened threaded rod through the roll will prevent this from occurring.
-
Garage
- February 16, 2014
-
Garage
I sanded the piece of oak I installed yesterday on the window corner protector. I don't think it needs a second coat of joint compound; I can prime it now.I installed GearWall under my dock fan. 4' vertically, about 22" wide. This wasn't trivial due to several cuts to go around things, plus a cutout for an electrical outlet. I used an Arlington BE3 box extender to bring the outlet out to the surface of the GearWall, instead of having it recessed. This was necessary to accomodate 90-degree wall plugs, including the plug for the power strip that I installed in this area. I will likely be hanging my Bosch jobsite radio on this GearWall, though it's possible I will instead hang it on the south side of the garage. Speaking of which... I need a new battery for the remote control.
-
Garage
- February 15, 2014
-
Garage
I cut and routed a piece of oak to tidy up the transition from the window corner protector to the dock fan mounting boards. I installed it with Liquid nails and finish nails. I then filled the joints with the first coat of spacking compound.I caulked the corner protector in this area, but only on the wall part. I will do the cove part when I am ready to finish the cove. I did the wall part now because I'm preparing to install some GearWall here that will abut the corner protector. I don't want insects to be able to nest in the small gaps, especially mud wasps that are prevalent in this part of the country. I had some mud wasp nests in the flourescent lights that were originally installed on the ceiling.
Tomorrow I will install GearWall under the dock fan and work on the south wall ProSlat and/or the shelving I'm going to put in that area.
-
Garage
-
Kitchen
I installed a Lutron Maestro occupancy sensor dimmer and companion dimmer for the main recessed kitchen lights. The occupancy sensor is in the one nearest the door to the garage. -
Half bath
I installed a Lutron Maestro occupancy sensor light switch in the first floor half bathroom. Due to the small size of this room and the mirror, I set the sensitivity on low. It works well in this room.
- February 14, 2014
-
Garage
I stopped at Lowe's on the way home from work and picked up 5 more ClosetMaid Maximum Load shelf standards, 5 more shelf brackets, a 6' shelf and a 4' shelf. duh, I must be exhausted... I needed 9 brackets. No big deal, I'll pick them up at a later date. I also picked up another Lutron Maestro occupancy switch, this one will probably go in the first floor half bath. I wanted to get companion dimmers, but Lowe's doesn't carry them. I picked up another Rubbermaid FastTrack dual S-hook since I will need one for mops once I get around to putting a FastTrack in the stairwell from the garage to the basement. I also bought a 2' long piece of 1x2 oak to modify the window corner protector setup near my dock fan.While I was at Lowe's, I checked out the Gladiator wire baskets. They're a little bit wider than the ProSlat ones, and could be handy in the areas where I have GearTrack and GearWall. I have found the ProSlat baskets to be incredibly handy for things like 1-gallon cans of mineral spirits, acetone, MEK, brush cleaner, denatured alcohol, etc. Due to the nice fit, they can't tip over in the baskets but they're still easy to get in and out of the baskets.
I ordered a 3-pack of the ProSlat baskets from Amazon. I also ordered some 12" pull chains for the shop lights, since I know the strings I have won't last. I also ordered a Gladiator Clean-Up Caddy, since the ProSlat one would take 2 to 4 weeks to arrive.
-
Garage
- February 13, 2014
-
Garage
I sanded the second coat of spackling compound on the window corner protectors, and applied a coat of Kilz Original. I don't think I'll be painting these for a while, since I'd like to paint the window frames at the same time and I need to remove window hardware to do it. Not something I can do in February.I installed the second cord reel. I now have matching cord reels behind the garage door openers.
I'm still in the process of figuring out how I'm going to utilize the ProSlat kits. The issue is the lack of trim pieces to do anything other than a rectangle per kit. I ordered additional trim pieces: 3 L-trim pieces and 6 J-trim pieces. Shipping was pricey since no one offers these except ProSlat themselves, and they're in Quebec. But now I can use up the trim pieces from both of the kits I have without worrying abut running out of trim; more is on the way. I think I will use one whole kit beneath the shelves on the south wall, perhaps minus one slat so I can put GearTrack at the top (to hang heavier items).
I think I'm going to use my remaining GearWall on the north wall under my dock fan. It will give me a place to hang a few more items and will cover the remaining drywall in that area (for protection).
-
Garage
- February 12, 2014
-
Garage
I was at work until almost 9PM, since we're running behind on our project and I was in late.I went to Sears right before closing and picked up another 2-pack of 4' long GearWall panels. These will be installed above the ones I previously installed near the door to the basement.
Tonight's agenda was pretty short: I sanded the window corner protectors and applied another round of spackling to cover the countersunk screws. I installed the 2 new pieces of GearWall, which allowed me to hang both of my rolling tool holders near the door to the basement, along with my halogen work light.
I want to do something about the ugliness created by my dock fan mount. Back when I mounted it, I didn't have plans for the corner guards. So the mounting boards for the dock fan are flush with the edge of the window cove. Hence I had to cut out a section of the corner protector on that side of the window.
-
Garage
- February 11, 2014
-
Garage
I installed the corner protectors on the drywall corners of the window cove. One of these corners was pretty beat up, and both of them had cracks around the original drywall corner supports. With the new solid oak protectors, these corners are now very well protected from any mishaps. I installed them with Loctite PL Premium and 2" finish nails from my pneumatic finish nailer, and filled the countersunk screw holes (that hold the pieces of oak together) with spackling compound. They match the other corner protectors I've installed. There are now no outside corners of drywall in the garage that are not protected up to at least 6' from the floor. I'll sand and reapply spackling tomorrow, and later put another coat of primer on them and paint them.I need to move the wood slatwall pieces to the basement or install them somewhere useful. They're in my way and taking up a lot of space.
I'm going to install two more pieces of GearWall in the area by the door to the basement. This will let me hang some items up high.
-
Garage
-
Master bedroom
I stopped at Home Depot on the way home to pick up another Lutron Maestro companion dimmer for the master bedroom. Unfortunately, they don't have them at the Auburn Hills location. I picked up another Cree BR30 2700K LED bulb, to replace the one Philips bulb I have in the kitchen. The Philips bulb will be moved to the basement stairwell, since the CFL there now is VERY dim, especially in cooler temperatures.
- February 10, 2014
-
Garage
My cold took a turn for the worse, I feel awful. I'm staying home from work today to not spread my germs around. And probably spending much of the day in bed.I did do one thing just so I wouldn't feel like a completely useless lump: I made a trip to Home Depot to pick up some things I need. Candelabra bulbs for the master bedroom ceiling fan, a Lutron Maestro companion dimmer (though I need more than one), some #6-32 screws to use with the Arlington box extenders, some 1/4" diameter 2&qout; long Spax lag screws, some 2.5" long cabinet screws, #10-24 locknuts to fix my cord reel, some 15" long by 1/2" wide Velcro One-Wrap straps, a pair of CE Tech USB to 40-in charging cables, a 3-pack of shop towel rolls and an 8-pack of Bounty select-a-size paper towels.
I repaired my first cord reel and installed it on the ceiling behind the north garage door opener using four Spax 1/4" diameter, 2" long lag screws. The matching reel I bought today will go behind the south garage door opener.
I finished assembling the corner protectors for the window. I had a little trouble with the first one, since I had forgotten that my impact driver will easily break wood screws when driving them into oak. I'll have to tweak that corner protector a bit once the glue sets up. Not a big deal since I fill all the countersunk screw holes during final installation.
I put a coat of Zinsser B-I-N on the window corner protectors. I can install them soon. The one on the west side of the window will need to be shimmed; the drywall corner there has some curvature to it. I'll probably pre-install the shims using my straightedge and level.
-
Garage
-
Master bedroom
I finally replaced the three very dim bulbs in the master bedroom ceiling fan. They were 25W candelabras, and as the primary lighting in the bedroom, they were nearly useless. I installed three 60W candelabra bulbs, so now I have sufficient lighting in the master bedroom and can actaully effectively use the dimmer. I replaced the glass dome, which had been sitting in the closet since July.
- February 9, 2014
-
Garage
I'm at about 70% capacity due to a nasty cold. Hope I feel better tomorrow.I put a coat of polyurethane on the bottom of the new fold-down benchtop.
I marked and drilled three 3/16" diameter holes in the 1x4 oak piece I'm using as a mounting pad for a power strip near my dock fan. These holes are countersunk with a flat profile (using a Forstner bit). I then drilled 5/8" diameter holes in the wall for the toggle bolts, using the oak pad as a template. I put the 3/16" x 3" toggle bolts through the oak board, then put the toggles on. I then put a ring of Loctite PL Premium around the holes in the wall and a bead of it up and down each side of the back of the oak board. I installed the board on the wall and snugged it down. When the PL Premium dries, it will be very firm. It's primed, but I still need to paint it before attaching the power strip. I decided to reuse my old power strip because its color scheme matches my dock fan (yellow and black). I need the power strip in this area because I've got my dock fan, my neon BMW clock and a 4-tube T8 shoplight here. There's only a single gang outlet in this area, and three items that will always be plugged in. Then I'll need outlets for plugging in tools when I'm using the fold-down workbench.
I ran a 1/4" roundoff bit around the edges of the boards I'll be using as wall support for the fold-down bench. I then sanded them. They're poplar, so I'm just going to prime and paint them instead of using stain and polyurethane. They won't be very visible, but I want primer and paint on them to protect them and I rounded the edges in order to help prevent them from being chipped when I shove things under the bench. White paint will blend the boards into the wall. I put a coat of Zinsser B-I-N on these boards, then applied the first coat of Olympic ICON Exterior paint (white semigloss).
I put a coat of paint on the mounting pad for the power strip. It will need a second coat.
I later mounted the fold-down bench. The Knape & Vogt folding L-brackets are finicky alignment-wise, and hence it's not that easy to fold down the bench top. I'm not terribly bothered by the fussing required, since I don't expect to fold the bench up and down very often. Right now it's folded down.
I put paint on the spots I patched for the outlet installation above my tool cabinet. I then reinstalled the wall plate and put the tool cabinet back in place.
I created a shopping list for Home Depot and Lowe's for tomorrow.
-
Garage
- February 8, 2014
-
Garage
The Arlington BE3 and BE2 arrived today from Platt. Unlike the 2-packs of BE1's I got locally, they did not come with long screws. I will need to buy some locally.I did a little bit more work on my fold-down workbench. I cut all of the edges of the sandwiched plywood square, then cut and attached select pine 1x2's to the edges with Gorilla wood glue and finish nails (using my finish nailer). I then ran a 1/4" roundoff bit on all of the edges and corners, and sanded the top and sides.
I started some repair work on the cord reel I bought months ago that had a broken guide roller right out of the box. I drilled a pair of holes in the sides and ran a 4" long #10-24 machine screw through it and put some nylon spacers on it. It should work, we'll see. However, what I really want are 1/4"-20 stainless, which I can get from McMaster-Carr.
I sealed the top of the fold-down workbench with a coat of polyurethane. I expect to put coin-pattern PVC on it later, but I wanted a sealing coat on it for now.
-
Garage
- February 7, 2014
-
Garage
The ProSlat slatwall kits finally arrived after several days of weather-induced delays. I found them outside my garage door when I got home from work. Yay!
-
Garage
- February 5, 2014
-
Garage
Snowed in again. Argghh, brutal winter. I met another one of my neighbors while digging my car out: Laurel. I cleared part of her driveway with my tractor after clearing a path down the road so I could get out. She was out shoveling it. So I've now met 4 of my neighbors: Chris, Linda, Paul and Laurel. Writing it here because I'm terrible at remembering names.I cleared a path down the road, but I don't know if I can drive Oak Hill. Sigh, I wish I had bought a 4WD truck this year.
Evening... I did eventually get out today. On the way home I picked up the fourth shelf bracket I needed for the new shelf above my Wright wrench displays. I also picked up the 84" Rubbermaid FastTrack that I need under the window. And some pegboard hooks that were on clearance.
I also bought another 5 gallons of kerosene for my heater and 5 gallons of gasoline for the tractor.
I installed the fourth shelf bracket above my Wright wrench displays, and installed the ClosetMaid Maximum Load shelf. I then installed a four tube T8 shop light that is hanging from the underside of the shelf. Since I'm installing a fold-down bench under this area, I needed some light here.
I started making a pad to mount a power strip between my dock fan and the Wright wrench displays. There is no stud here, so I need to use toggle bolts to mount the pad to the drywall. I will also be using polyurethane construction adhesive. The pad is a piece of 1" x 4" solid oak, whose edges I rounded with a 1/4" roundoff bit in the router. I was originally going to reuse an old power strip I have, but it's old enough that I'm not confident about the state of its contacts. I'm going to order another power strip like the one Julie bought for me for Christmas. It's robust, has 12 outlets, and as a bonus it's reasonably attractive. It also has a long cord.
-
Garage
- February 4, 2014
-
Garage
I ordered a new lift cable for my snowthrower attachment. This will replace the one I broke last weekend.I stopped at Lowe's on my way home from work. I bought a ClosetMaid 4' long Maximum Load shelf, three Maximum Load brackets and three Maximum Load standards. This shelf will go above my Wright wrench displays on the north wall near the door to the basement. I bought another box of Gladiator J and L hooks. I bought two 2' x 4' pieces of 3/4" thick birch plywood to make my fold-down bench on the north wall near the door to the basement. I bought some short 1" x 4" pieces of poplar to space the bench out from the wall a bit and to provide some support to the drywall. I also bought a 6' long piece of 1" x 4" oak to create a pad on which to install a power strip in this area. There's only a single gang outlet here, and I need to plug in my dock fan and the shop light I'm going to hang from the new Maximum Load shelf.
As far as the fold-down bench goes, I intend to sandwich the two pieces of birch plywood together with wood screws and wood glue, then trim the edges with 1x2. I haven't decided on a finish, but I'm leaning toward just putting some raised-disc rubber on it, the same stuff I used on my carts I made years ago. It holds up well to abuse, and it's easy to clean.
The Arlington BE3 won't be here until at least Saturday, so I may or may not install the ProSlat on the south wall this week. Of course it's not like I don't have other things to do...
I glued and screwed together the two pieces of birch plywood for the fold-down bench. I marked it for the installation of the Knape & Vogt 206 ZC 15 206 folding L-bracket before installing the sandwiching screws, so I wouldn't put any screws in the way of the L-brackets.
I put the second coat of joint compound on the hole I'm patching from my electrical work for the new outlets above my tool cabinets. It will need a third coat, which means I need to buy more kerosene to keep the garage warm.
I installed four ClosetMaid Maximum Load shelf standards above my Wright wrench displays. One of the studs in this wall is 12" away from the adjacent stud, which is what allowed the four standards to be used for a 48" shelf. Unfortunately I need one more shelf bracket, which I'll pick up tomorrow. I can then put the shelf up and hang a shop light from it.
-
Garage
- February 3, 2014
-
Garage
I sanded the spackling that I applied yesterday around the new outlets above the tool cabinets.I put the first coat of setting-type joint compound in the hole I created to run the wiring for the new outlets above the tool cabinets.
I put cable ties on the 12-2 wire in the basement near the breaker box, to tidy it up a tiny bit. It's now bundled with some other 12-2 wire and the wire to the load box.
I reinstalled the northmost shelf above the north garage door and wiped it clean.
I installed the remaining trim rings and baffles in the recessed lights. I also removed some more masking tape but still need to remove some in the north half of the garage.
I ordered an Arlington BE3 and BE2 from Platt. I need the BE3 to allow me to install the ProSlat over the 3-gang switch near the door on the south wall. I bought the BE2 just in case I need it elsewhere, since they're not available at the local big box stores.
It looks like the ProSlat kits will be here on Wednesday.
-
Garage
-
Full bathroom
I installed an occupancy-sensing light switch in the second floor bathroom. This bathroom does not have a switch on the entrance wall; the first switch required you to enter the room and walk to the right side of the vanity to hit the switch on the wall to the right of the vanity. It was awkward at best, dangerous if there was something on the floor. Wth the occupancy-sensing switch, the light comes on as you pass the doorway, even with the sensitivity set low. I will probably experiment with putting tape over the sensing lens to reduce the sensitivity a bit. But for now I have the timer set to 1 minute, and hence I shouldn't be wasting a lot of power by walking by the bathroom a few times a day.I'd like to install occupancy-sensing switches in the other half of this bathroom.
- February 2, 2014
-
Garage
I put some Great Stuff fireblock expanding foam in the holes I created to run the wiring for the 2-gang rework box for outlets above my tool cabinets. I also put a bit of spackling compound around the area I had damaged near the new rework box. When the Great Stuff dries, I'll fill the hole on the garage side with joint compound and prime and paint it. It's a small hole, about 3/4" wide and 2" tall.I installed two very small shelves above the new outlets. Mainly so I can put an iPhone dock above the outlet with USB charging ports.
-
Garage
- January 31, 2014
-
Garage
I ordered two more ProSlat slatwall panel kits. I like them, and this was the last day of Home Depot's 10% off sale on ProSlat. One of these panels is likely going on the south wall of the garage. The other is likely going in the stairwell to the basement, but I may split it up. I will need more trim pieces if I split things up.The replacement impeller arrived for my snowthrower attachment. I removed the whole auger set, impeller and driveshaft as a single unit after removing the flex coupler. I drove out the roll pins with a roll pin punch, then removed the old impeller from the driveshaft. I then installed the new impeller and drove the roll pins in. I put everything back together, but I'm concerned about the soft part of the flex coupler. It has clearly flattened and elongated after minimal use. I should see if I can find replacement lovejoy coupler parts somewhere; MTD doesn't sell the parts individually. Given what I've seen with the couplers from MTD, I think I want to switch to a split type with retaining ring. But I don't see size D split spiders at McMaster-Carr. I could theoretically switch to a size E coupler at some point. If I do, I'll probably go with stainless steel.
-
Garage
- January 28, 2014
-
Garage
I finished running the wire for the new outlets above my tool cabinet. I installed the new breaker, and the circuit is now live. It will be nice to have these outlets in the garage, since it's a 20A circuit with nothing else on it and having the USB charging ports will be nice for my cell phone when I'm in the garage.I finished the electrical diagram for the garage, but I haven't mapped the devices to the breakers. I'll do that soon. I did start creating the cheat sheets for the breaker boxes.
-
Garage
- January 27, 2014
-
Garage
I drilled a hole to pass the new 12-2 wire through the floor joists in the basement. I hit my head on the CFL bulb in that area and broke the bulb and cut my scalp a bit. Doh.I'm waiting for a phone call before returning to complete the breaker installation and the wiring.
I need to start documenting all of the breakers correctly. Right now, I can't trust the main breaker panel labelling, and in some cases I can't read it due to small handwritten labels and ink fading. I want diagrams of all rooms with easy-to-read labels on all breakers. Since I already have some overhead diagrams of the garage for other purposes, I will start there.
-
Garage
- January 26, 2014
-
Garage
It turns out that my MTD 190-032 snowthrower attachment has a very bent impeller from whatever I hit last week, and it was weakened to the point where it fatigued further and started dinging the head of the bolt I used to repair the broken stud. I ordered a new impeller from Weingartz for in-store pickup. The impeller in this thrower is all stamped steel and not very strong. I'm going to need to be very careful with it for the rest of the season, and make some improvements to it during the summer. I'll probably bend the old impeller back into shape and then weld a few small gussets on it and keep it as a spare.I put most of my yard tools back on the Rubbermaid FastTrack rails on the north wall: both of my leaf blowers and their bags, the gas hedge trimmer, the weed wacker, the post hole digger and the small gas can I use for gas/oil mixture.
I removed the tape from the shelf standards above the north garage door and reinstalled all of the shelf brackets. I installed one of the two shelves and put my chainsaw on it.
I put the baffles on all but two of the recessed ceiling lights.
I completed a layout for RibTrax tiles in the garage. I'm still hemming and hawing over how I want to finish the garage floor. On the one hand I'd like to have epoxy, but until warm weather arrives, I can't conduct a reliable vapor transmission test. And I know I'll want some tiles or mats to park on in the winter, it's just a matter of how many and how to keep the underlying concrete from not becoming a complete mess over time if I use flow-through tiles.
I need to start cleaning up in the garage; it's a complete mess and I'm tired of things being all over the floor.
-
Garage
- January 25, 2014
-
Garage
I ordered two True Lock Plus Premium Ribbed tile samples from garageflooringllc.com: one pearl silver and one pearl gray. I can't decide what to put on the floor without some samples. One thing I don't like about these and the RibTrax: they don't interlock with anything else, which means my whole floor would need to be ribbed (flow-through), or I'd have to have separate sections of flooring. This has me leaning toward RaceDeck XL, which would allow me to mix ribbed and solid tiles.I finished reassembling the tractor snowthrower attachment, and reattached it to the tractor. I then spent a couple of hours clearing snow, from my driveways and some of the road. I will have to do some of it again tomorrow since we're supposed to get more snow tomorrow. I will be happy when this winter is over, it's been rougher than recent winters in terms of snow and cold. We broke the record for snowfall in January, and we've had many days of below 0F temperatures and -20F wind chill temperatures.
-
Garage
- January 22, 2014
-
Garage
I put 2 coats of Eastwood Rust Encapsulator and one coat of Eastwood Chassis Black on the area of the snowthrower attachment where I had to grind off a welded stud that broke.I used the new ship auger bit to finish a hole the previous owner had started to get wire into the wall behind my tool cabinet. Due to available angles for drilling, and a horizontal wall plate that's almost 2' above the garage floor, I wound up needing to make a small access hole in the wall in the garage. I will patch it later. I pulled 12-2 wire through with my fiberglass fish tape, installed the wall box, and installed two outlets: a 20A GFCI outlet and a Hubbell 15A outlet with a pair of 3.0 amp USB charging ports. The Hubbell outlet is ganged from the GFCI outlet so I have GFCI protection on both outlets. Tomorrow I'll finish running the wire in the basement, and install the new QO circuit breaker.
-
Garage
- January 21, 2014
-
Garage
The flex coupler for my tractor's snowthrower attachment arrived. In the process of reinstalling it, one of the welded studs for the gearbox bracket broke. I was using my air ratchet, which isn't capable of more than about 35 ft-lb. Sigh, this means those studs are probably grade 2, or that this particular one was weakened during manufacturing of the snowthrower attachment. It is 5/16"-18.It was a real pain in the ass to get this stud out, since the welded part is in the deepest part of the impeller housing. I had to go at it from both sides, but eventually got a new 5/16" hole. I will replace it with an M8 size 316 stainless steel socket head cap screw with a button head and a 24mm diameter 316 stainless steel washer. Not the easiest thing to assemble, since I need to access both sides of the blower at the same time, but it shouldn't be a big problem using a long ratchet extension. I need to apply some rust encapsulator and paint first to the areas I beat up on one side with the drill bits and the other side with the Dremel's cutting wheel. After the screw is installed I will probably put a but of rubberized undercoating around it.
I ordered the stainless steel washers from McMaster-Carr. I also ordered some class 10.9 button-head M8 cap screws, but they won't be here for a couple of weeks. The 316 stainless that I have on hand should be fine until then.
This MTD 190-032 snowthrower attachment is a piece of crap compared to my old Craftsman 2-stage. I don't like the way it's assembled, and parts break too easily. It's only been used twice, and it's already had a pricey ($100) part break and now the welded stud that forced me to compromise the powdercoating to repair.
-
Garage
- January 20, 2014
-
Garage
I picked up the Milwaukee 3/4" x 18" ship auger bit, two cans of Great Stuff expanding fireblock foam, another Hubbell AC outlet with 3.0 amp USB charging ports and a few more of the 3M adhesive-backed hooks at Home Depot. I wanted to pick up some 2' x 4' pieces of 3/4" thick oak plywood for my fold-down bench project, but they had none. They also had no 1x4 oak boards in lengths shorter than 10'. Looks like I'll need to go to Lowe's for those items since they do a better job of keeping smaller pieces in stock.I installed another 84" FastTrack rail on the north wall. This one is only a couple of feet off of the ground, and now has 5 utility hooks installed. I have a 5-gallon fuel can on each of these hooks. I'm trying to keep as much as I can off of the floor so that it will not be difficult to clean the floor, especially once I have new flooring.
-
Garage
- January 19, 2014
-
Kitchen
I started to install the dual-gang outlet box above my tool cabinet, but it turns out that the hole in the sill plate in the basement doesn't actually make it all the way into the wall cavity. I'm not sure what the story is here, but I think I'll need a long auger bit. My guess is that this hole only enters the space between the sill and the floor, it doesn't actually penetrate the floor or the wall plate. I've already cut the hole for the 2-gang outlet box.I replaced 3 old outlets with new decora-style outlets, and installed solid brass nickel-plated wall plates (satin finish) on them (the Amerelle Madison series). They look better, and more importantly the outlet contacts are new and the wall plates can't crack like the nylon ones they replaced.
I ordered a 3/4" diameter auger bit, another Hubbel AC outlet with 3.0 amp USB ports, and 2 more cans of Great Stuff Fireblack expanding foam from Home Depot for in-store pickup. While I'm there I'll likely get an oak 1x4 to make small shelves for the kitchen. I should also pick up some more adhesive-backed hooks.
-
Kitchen
- January 18, 2014
-
Garage
I bought some things from Home Depot via in-store pickup. 5 single-gang Amerelle Madison decorator wall plates to replace the remaining single-gang plastic ones in the garage. A stainless steel wall plate for my 240V outlet. A 2-gang old work outlet box so I can put outlets above my tool cabinet, and a stainless steel 2-gang decorator wall plate for it. A SquareD 20A QO breaker for this new circuit. A Hubbell 15A outlet with a pair of 3.0A USB charging ports so I can charge my phone in the garage without a wall wart. 5 Rubbermaid FastTrack multi-purpose hooks so I can suspend my gas and kerosene cans off the floor.I also picked up some replacement shear pins for my MTD 190-032 snowthrower attachment. I broke one this week and now only have one spare.
I installed the 240V wall plate.
-
Garage
-
Kitchen
I ordered some things from Home Depot for in-store pickup. A Leviton 4-port decora USB charging outlet to replace the cable TV outlet above the counter; I have no need for cable TV in the kitchen, but do need more USB charging ports. A nylon ivory wall plate for this new outlet. A pair of small floating shelves for this area of the kitchen so I can put my devices on the shelves while charging: phone with Elevation Labs dock, Mophie battery case, Plantronics headset charging case, etc. I also ordered a pair of plastic adhesive-backed hooks for this area to hang my headset for charging. I'm only installing one in this area, the second will go in the garage.I installed a Hubbell AC outlet with two 3.0 amp USB ports in the kitchen using 3M mounting tape since I didn't want to drill holes in the backsplash tile for a cheap shelf that may or may not be used long-term. I installed one of the floating shelves to hold my Elevation Labs dock, and one of the adhesive-backed hooks for my headset. I now have a place for my phone and headset to charge in the kitchen.
- January 12, 2014
-
Bedroom 2
I continue to replace incandescent bulbs with LED. Tonight I replaced the two 75W incandescents in the overhead light in the bedroom I am using as my office with CREE 9.5W LED bulbs (60W equivalent, 2700K color temperature). They work fine with my Lutron Maestro dimmer, and at full brightness they're brighter than the 75W incandescents that I removed. Of course I run them MUCH lower than full brightness to avoid computer screen glare.
-
Bedroom 2
-
Garage
Well, no work done on the garage today. I spent the day helping mom pick up a 46" snowthrower attachment for her tractor. It was on craigslist, and is the same thrower I had on my Craftsman many years ago. It appears to be in excellent condition, but a few minor parts are missing. Hopefully I can finish putting it together for mom before we get more snow. To be honest, I'm somewhat envious; she paid less than I did for my thrower, and the 46" Craftsman unit is noticeably better than mine. The auger is much larger in diameter, the sheet metal is thicker, and the left/right chute adjustment works much more smoothly thanks to a single universal joint instead of two universal joints.
- January 11, 2014
-
Garage
Late last night I glued together some small pieces of 1/4" plywood as an iPhone holder. The intent being a place to put my iPhone on the wall for charging when I'm in the garage. I may or may not use it, but it cost me nothing since it was created from scrap.I put the first coat of paint on the remainder of the ceiling and the wall above the north garage door. It might not need a second coat, but I'll likely apply one anyway.
I ordered a factory-second Elevation Labs dock. This may or may not be related to the garage, depending on where I use it. But I needed a second dock since I have only one and it's in my office on the second floor. The second one will either live in the kitchen or move between the kitchen and the garage.
Tomorrow I intend to mount another Rubbermaid FastTrack on the north wall to hang fuel cans, continue painting and hopefully start fabricating the corner protectors for the drywall around the window well.
-
Garage
- January 10, 2014
-
Garage
The 2" and 4" slatwall hooks arrived from ULINE. They work fine in the ProSlat slatwall, which confirms that I can use generic slatwall hooks as long as they don't need a second slot. Most slatwall hooks and accessories use only one slot. I like the ULINE ones because they're priced lower than most other online options, and they're chrome plated so they should hold up well. And I need a lot of them for the slatwall I intend to put in the stairwell to the basement as well as some other spots, so inexpensive is good. The 2" hooks were $22.00 for 50, which works out to 44 cents each. The 4" hooks were $13.00 for 25, which works out to 52 cents each.
-
Garage
- January 7, 2014
-
Garage
Snow updates...As of this morning, my road had not been plowed. And due to the wind, it was deeply drifted. Even my neighbor with a 4WD lifted truck could not get out.
I dried my winter clothes, bundled up and went out with the tractor and new snothrower attachment with corrected extension spring setup. Wow... now it throws snow 50' easily, even when I ram it into 18" of snow. I cleared the remainder of my circle driveway, then cleared the cul-de-sac. Since I was tired of being stranded, I also started to clear my road thoguh I knew I did not have enough gasoline to finish. I got about halfway down the road on my first pass when I spotted a land mover on Oak Hill. He was just sitting there. I waited a couple of minutes, then he started to move. He was trying to make the corner to clear my road! I retreated, and 20 minutes later he made the first pass. Ugh, he buried the driveways in 4' of snow. Fortunately when he got to my driveway, there wasn't enough snow to bury me since I had cleared the cul-de-sac. But it was now 2PM, so I did not attempt to get to work since I'm told by friends that Ortonville Road is a sheet of ice in spots. But tomorrow I should have no trouble getting to work.
For what it's worth, the new snowthrower attachment is fabulous. It throws the snow a LONG way, in fact I have to be careful when doing the circle drive since it can throw it so high that it will settle on the other part of the driveway if there is any wind. That's nearly 100 feet! So now I'm prepared for any kind of snow conditions, as long as I keep a good amount of gasoline on hand. I could even clear a path on my road if necessary.
Since I had to write off the day of work, I headed out again and unburied all of the driveways on my road from the plow snow. I also cleared all of Linda's driveway (she was out shoveling), and all of Chris and Brenda's upper driveway. I'm not sure if Chris and Brenda are not home or if their tractor is having trouble. He was out plowing with it over the weekend, but his upper driveway was not clear today. Maybe it just drifted over again. I tried to blow the snow far away from their driveway so it'll stay relatively clear tonight and tomorrow.
In any event, it was nice to meet some of my new neighbors and I am SO glad that my road is clear! I can finally go to work tomorrow!
-
Garage
- January 6, 2014
-
Garage
Snow storm total was about 18" here. I am snowed in; Rama Ct has not been plowed, and Oak Hill was not plowed as of this afternoon.In the process of trying to clear the new 8+ inches of snow on my driveways, my plow blade broke. A weld on the lift mechanism that's not really reachable with a MIG torch. And of course it's not like I was going to have much luck moving this much snow; I had basically run out of space around the driveways. Craig brought me some gasoline, but he almost got stuck twice on my road. And that was this morning, and it was still snowing. Later it started blowing around and drifting.
I called the local Tractor Supply store in Ortonville and they had one MTD 190-032 snowthrower attachment in stock. I had just looked for this attachment online yesterday, and everyone wanted $1349 or more. I reserved the one at Tractor Supply and mom came and picked me up in her 4WD truck. I got the attachment for $999 plus tax.
Of course, typical of the big box stores... missing parts. Two retaining clips, a cotter pin, zip ties. I scavenged two retaining clips from the lift arms of my mower deck. I used a stainless steel M4 screw and bent it to replace the cotter pin. Got the snowthrower working, and cleared my main driveway, an area in the cul-de-sac around my mailbox, and part of my circle drive. At that point the windchill was -18F and it was dark outside, so I stopped.
There is an issue with the idler pulley on the upper drive belt; the tension spring is too long and doesn't provide much pressure. This causes the belt to slip fairly easily when throwing in deep snow. Unfortunately this spring sits close to the idler pulley, so I can't just use a slightly larger idler pulley. It is of course possible that I swapped the extension springs...
Indeed I had swapped the upper and lower extension springs. The reason: the diagram in the instructions shows a belt keeper pin that does not exist. There's only one other belt keeper pin that can be used to hold one end of the extension spring, and it's too close to the idler pulley bracket to provide tension when using the correct spring. So I had assumed I needed to use the shorter, smaller diameter keeper spring. What I really needed to do was to attach the correct, larger upper extension spring to the slotted fitting that's intended for the PTO cable on tractors with manual PTO. This appears to work, I'll test it tomorrow. Hopefully I will no longer experience slow blowing in deep snow. There is now some tension on the idler spring without the PTO engaged, and the auger appears to spin consistently when I engage the PTO. I'm betting that my work will go faster tomorrow.
-
Garage
- January 5, 2014
-
Garage
As of 6PM, we had 12" of snow on the roads here and it was still snowing. The National Weather Service said my area could get up to 18". Yikes! I spent 4.5 hours and an awful lot of gas clearing the driveway before 6PM, only to have it buried again. The road has not been plowed, so I'm probably snowed in for a while. I though I could put off buying the snowthrower attachment for the tractor for a year, but this is the worst winter we've had in a long while. We're already well above double our average snowfall for this time of year. I used my dozer blade on the tractor to clear snow, but it takes forever to move this much snow off of the driveways.I installed the FRP panel to the south of the south garage door. This will protect the wall from abuse from the filter/regulator/etc. that will be on this wall. And I wanted to get rid of the piece of FRP; it was a 21" wide leftover from other work.
I installed the leftover ProSlat between the back door and the west wall. Depending on whether or not I can use regular slatwall hooks in the ProSlat, I may buy more of it. It looks nice and it doesn't weigh down the walls like MDF slatwall. It also won't be adversely affected by moisture, and it's significantly less expensive than GearWall.
-
Garage
- January 4, 2014
-
Garage
I installed a 64"W x 48"H section of ProSlat slatwall on the wall shared with the laundry room. I like it; it's easy to install and isn't super heavy like MDF slatwall. It's also impervious to moisture and rot.I will be installing the leftovers elsewhere, posssibly on the space between the back door and the south garage door.
I ordered some slatwall hooks from ULINE. I ordered 50 2" hooks and 25 4" hooks. These are much less expensive than the ProSlat kits, but I don't know if they will work in the ProSlat slatwall. I think they will, but I still have regular slatwall to install in the stairwell to the basement and I can use them there. they should arrive sometime this week, but the weather we're getting will probably slow things a bit.
-
Garage
- January 3, 2014
-
Garage
The ProSlat slatwall kit arrived. I need to buy some panhead screws to mount it. Home Depot SKU 726538 should work.I can't really use the full 96" on the wall shared with the laundry room. The stud spacing in this wall will not allow it, the ends would be unsupported. I will probably trim it to 64" length, and use the remaining 32" elsewhere. Of course I don't have sufficient edge trim to split up the pieces in this manner, but there are some locations where this will not matter. For example, between the west wall and the back door.
I installed two stainless steel pegboards above my tool cabinets. I also attached one of my 4-tube T8 shop lights to the underside of the wire shelving above my 52" tool cabinet. This will provide extra light when I need to work on something on the top of the cabinet.
I rewired the new 20A GFCI outlet in the garage between the garage doors. I had miswired it the first time; it cares which wires are input versus downstream load (any ganged outlets). I don't have anything ganged from this outlet.
-
Garage
- January 1, 2014
-
Garage
I primed the remainder of the ceiling and the wall above the north garage door.I then put the first coat of paint on the edges above the north garage door, around the northwest fluorescent light, and on the north and center air hose reel mounts.
-
Garage
- December 31, 2013
-
Garage
I ordered more screws and spacers from McMaster-Carr to install pegboard. I needed 5/8" spacers for the stainless steel pegboard versus the 3/4" spacers I use for my framed hardboard pegboards.The 32 square feet of ProSlat slatwall should arrive on Friday.
I primed the remainder of the edges on the wall above the north garage door, and around the northwest fluorescent light, north garage door opener, and the recessed lights. I need to tape off the northmost garage door hardware to prime around it and along the remainder of the north wall before I can get out the roller to prime the remainder of the ceiling.
Once I finish this priming and painting, I will start completing my air plumbing.
-
Garage
- December 30, 2013
-
Garage
I sanded remaining patched areas on the north half of the ceiling and the wall above the north garage door. I taped off all of the shelf standards on the wall above the north garage door. I primed the mounting base of the center air hose reel and the edges around half od the standards above the north garage door. Given that I'm still sick, that's about all I could do.
-
Garage
- December 28, 2013
-
Garage
I ordered an 8' x 4' ProSlat kit from Home Depot. It should arrive in a week or so.I received many nice Christmas gifts from my loved ones for the garage. Festool Sys Carts, Talon pegboard hooks, Wallpeg pegboard hooks, Proslat shelves and baskets, a power strip, a 32-gallon Rubbermaid BRUTE trash can with domed lid and casters, a Stanley Fatmax magnetic level, a Festool Maxi Systainer, a Festool Sys Toolbox, a Newborn Brothers 250 caulk gun, a Tajima CNV-100SP caulk gun, a Lehigh power drill holder, a Knape & Vogt 206 ZC 16 206 Series Adjustable Folding 16" L-Bracket, a pair of Amerelle polished nickel wall plates... I'm probably missing something. To all those I love, thank you SO much for the gifts for the garage! I can't wait to get over the flu and get back to finishing the garage work!
-
Garage
- December 27, 2013
-
Garage
I have electricity again, after a 5 day power outage. I don't think of my area as particularly rural, but this is the third multi-day power outage I've had in the 6 months I've owned the house. Of course I need a standby generator, but it hasn't been at the top of my list of priorities. Perhaps that needs to change. This ice storm wasn't all that bad compared to storms of the past. The real truth is that the electrical grid in the U.S. is in a sad state of decades-long neglect while demand continues to rise. The local utility company appears to have very little monitoring other than smart meters. Each day of the outage, they would call and send me a text message to tell me that my service would be restored by midnight. And obviously for four of the five days, that was untrue. The story becomes tiresome. And they continued to send the same text messages after my power had been restored.My sister's power was out for the same amount of time. On the fourth night of the outage, there was a DTE truck parked outside her home for several hours. My sister's boyfriend went out to talk to them and see if they would like some hot coffee. He asked what they were doing. They answered, "We're waiting for our next call." Umm, OK. So the automated system that tells me that there are 1,500 employees working 16 hour shifts on repairs... are the guys parked for hours in areas where there is no cell phone reception included in the 1,500? I'm not calling out the linemen... I've no idea if they were avoiding work or not. But it seems to me that the whole system is terribly inefficient for the 21st century. It should not take a week to restore 1,800 downed lines (the number given to me by the utility company) when you've reportedly drafted crews from multiple surrounding states. When hundreds of thousands of customers are without electricity for 5 days in the winter in Michigan, crews shouldn't be sitting idle for hours on end. How does this happen? Is monitoring and dispatch so poor that the utility company doesn't even know where to send crews? In the age of the Internet of things, why would companies with electricity and tons of rights of way not have reasonable monitoring technology?
-
Garage
- December 21, 2013
-
Garage
I taped off the garage door mounting on the ceiling in the north half of the garage. I removed one of the shelves and the brackets above the north garage door, and put some additional setting-type joint compound on the areas that needed it. I want to get this area primed and painted this weekend if possible.We're under a winter storm warning, so I might lose power again. We could get up to 1/3" inch of ice. Sigh, we're only in December and it's already been a fairly brutal winter.
I primed the frames of two of the pegboard assemblies I had put together months ago. I used Zinsser B-I-N. I will paint them with Olympic ICON Exterior semigloss late tonight. One of them will be installed below my Wright wrench displays.
I'm leaving space below my Wright wrench displays for a fold-down bench. A fold-down bench is the best solution for bench space in this area, as opposed to a rolling bench. There will be times when I need the space to move something to/from the basement, and I don't want to have to roll a bench into the garage to make room. I'm leaning toward the bench from Bench Solution becuase it's reasonably attractive and it has the best lock and release mechanism I've seen. This isn't the only folding bench I'll be installing; I'm going to make my own for another location.
I put two thin coats of Olympic ICON Exterior semigloss on one of the pegboard frames, and one coat on a second frame.
The joint compound I applied earlier in the day wasn't drying fast enough, probably due to the weather (wet, cold). I used my heat gun to assist it. Hopefully I can sand it tomorrow so I can tape off the remaining areas and start priming and painting the remainder of the ceiling.
At 12:39AM, my power flickered quite a bit. Sigh, the ice storm is taking its toll...
I installed one of the framed pegboards below the Wright wrench displays. Obviously the tricky part is getting the nylon spacers I'm using to stick to the back of the pegboard while installing. I used 3M Super 90 contact adhesive, after trying SuperGlue without success. The Super 90 worked fine.
-
Garage
- December 20, 2013
-
Garage
I stopped at Sears while Christmas shopping and picked up 4 more Gladiator tool hook for my jackstands. I also picked up a 2-pack of 4' long GearWall panels and another pack of 4 J-hooks and 4 L-hooks. I could probably use more GearWall, but I'm still debating where everything should be located.I rearranged things on the GearWall near the basement door, to keep my jackstands, wheel chocks, MityVac 7201 and creeper together. Nice to have this stuff off of the floor, even though it's all still covered with joint compound dust (I'll clean up when the garage is closer to completion).

I will be installing wire shelving above this location. The top of the GearWall it at the same height as the top of the basement door trim, so shelving above it will not conflict with the door.
I created a wide French cleat to hang my Wright combination wrench boards. I used the wood from the shelf I removed from the east wall. I primed it with Zinsser B-I-N, and mounted it with 2.5" long deck screws. I installed the Wright combination wrench boards, and cleaned them up a bit. They were very dusty, and one of them had paint spatter on it from painting the south half of the garage.

-
Garage
- December 19, 2013
-
Garage
I installed a single GearTrack below the GearWall in the cove near the door to the basement. My Vika Two-Fold is now hanging from it. I then hung my old creeper, my large rubber wheel chocks, a shovel, a dustpan/brush, and one of my jackstands on the GearWall. The GearWall works great for my jackstands, so I'm going to pick up another 16 square feet of it and 5 more tool hooks. It's great to get this stuff off of the floor and out of my way, and the GearWall is very durable. I wish it was less expensive.I put a coat of semigloss on the plywood mounting for my dock fan. This is because I expect it to get dirty and want it to be easy to wipe off.
I climbed into the attic and sealed the remaining recessed lights with Great Stuff Fireblock expanding foam. The lights don't get hot at all with the Cree LED bulbs in them, so it should hold up. Expanding foam doesn't hold up to heat, the point of Fireblock foam is to prevent fire from spreading quickly. I tried using some fireblock caulk from the finished side, but it is not very sticky and of course nothing sticks well to exposed gypsum. The Great Stuff Fireblock foam is sufficient, and certainly better than nothing.
I wish I was ready to blow in the attic insulation, but the reality is that there is electrical work that I should do beforehand.
-
Garage
- December 18, 2013
-
Garage
I installed a 4' by 4' section of Gladiator GearWall on the east wall in the cove by the door to the basement. This is probably where I'll hang some extension cords, work lights, mechanic's gloves, broom and dustpan. Tomorrow I'll install a GearTrack below it where I can hang my Vika Two-Fold.
-
Garage
- December 17, 2013
-
Garage
I covered my tool cabinets with el-cheapo drop cloths, and put the second coat of paint on the cove area by the door to the basement. I put the second coat of paint on the ceiling in the northeast quadrant. Tomorrow I will install the GearWall in the cove area and start taping off the rest of the ceiling and above the north garage door. I was able to locate the studs in the cove area with my magnetic studfinders.
-
Garage
- December 16, 2013
-
Garage
I installed the remaining 9 shelf standards on the east wall, and installed twenty shelf brackets and four 6' long shelves. I have not installed the pegboard yet because I haven't decided on the layout. It depends on the location of the studs versus my cabinets. At some point I'll be replacing my tool cabinets to gain a bit of bench space (get heavier-duty cabinets and ditch the top chests), but right now I have a total of 93 inches of top chests and a tall locker that will block wall space for pegboard.I put my tool cabinets in place, but I might shuffle them around a bit. For now I just want them out of the way of continuing to prime and paint the north half of the garage.
At least it's starting to look like a garage instead of a hoarder's pigpen...

-
Garage
- December 15, 2013
-
Garage
Sidetracked by snow. It took me a long time to find the chains for my tractor. I could not find the threaded rod and nuts to mount the wheel weights. I wound up having to go to Home Depot to buy four 1/2" thick threaded rods, nuts, washers, lockwashers, locknuts, etc. I converted the tractor over for winter duties and cleared the main driveway and the loop around the yard. A 2 hour project turned into a 6 hour project. We were only supposed to get 3 to 5 inches, but my yard appears to have more. The road was not plowed, so I cleared a bit of the road too.I need to buy some rubber tire chains. The driveway needs resurfacing anyway so I didn't worry about it today/tonight, but once resurfaced I don't want to be scarring it up with the steel tire chains.
I cut 10 ClosetMaid Maximum Load shelf standards to 39" for the east wall above my tool cabinets. The 39" length was determined by subtracting the height of a typical tool cabinet and 36" of pegboard from hy ceiling height, and also making sure I could mount a shelf on the lowermost holes and still open my Craftsman tool cabinet lids.
I mounted the first ClosetMaid Maximum Load standard, and checked that I'll be able to install all 10 of them. That's 5 for each 72" shelf. At the moment I intend to install four 72" shelves. I might wind up with another one or two later, depending on how I want to organize items on these shelves.
I hope to install the remaining standards tomorrow night, along with my stainless steel pegboards. I desperately need to get my tool cabinets back into place and I can't do that until the shelves and pegboard are mounted.
-
Garage
- December 14, 2013
-
Garage
I put the first coat of paint on the main part of the northeast wall, as well as about the first 20" of the ceiling near the wall.I went out for more kerosene. The roads were very slippery.
I moved some more things out of the way, and primed the edges of the cove area near the door to the basement. I also primed the plywood that serves as the mounting pad for my dock fan. I taped off the northeast fluorescent ceiling light.
I primed the walls in the cove area and the northeast part of the ceiling. I then put the first coat of paint on these areas. I also put the second coat of paint on the northeast wall where my tool cabinets will be located. When it dries, I can install the ClosetMaid Maximum Load shelving and stainless steel pegboard, and put my tool cabinets back into place. Once I get a second coat of paint on the cove area, I can install the GearWall panels there.
Tonight I realized that that the paint I applied weeks ago in the south half of the garage has yellowed. This is probably from running the kerosene heater. Not much I can do about it but hope that eventually the paint I'm applying now will yellow a bit to match. In tne end, it's a garage; it's not that critical to me to have all the walls match. I am more interested in having the moisture protection of the primer and having the holes and joints patched. The reality is that most of the wall space will be hidden when I'm done (shelving, cabinets, GearWall, GearTrack, slatwall, etc.).
I'm starting to wish I wasn't using Kilz Original primer; it demands ventilation, which isn't convenient when the temperature outside is 17F.
-
Garage
- December 13, 2013
-
Garage
I caulked the edges of the panel for the garage door openers with DAP 3.0 White Window, Door, Trim and Siding Sealant. I put a thin coat of caulk on the remainder of the gap between the trim for the door to the basement and the east wall. I wish I had used this caulk in the first place; the caulk I used originally shrunk too much.I put some touch-up caulk on a few narrow gaps in the door trim. Once it gets tacky, I'll be priming the door trim with Kilz Original. I'm also going to start priming the north half of the ceiling.
The trim around the door to the basement is beat up beyond patching. However, since it's not very visible to the outside world, I'm not going to bother replacing it. I'll just prime and paint it as is for now.
I taped off the weatherstripping around the frame of the door to the house, then primed it with Kilz Original. I later put the first coat of Olympic ICON semigloss paint on the trim. After that dried, I put the second coat on. It could probably use a third coat, but I'm moving on.
We're supposed to get 3 to 6 inches of snow tomorrow, which means I need to prepare the tractor to plow snow. Wheel weights, chains and plow blade. At the moment I don't know where I'll store my mowing deck; the intended location would put it in the way of the priming and painting I need to do.
-
Garage
- December 12, 2013
-
Garage
I removed the baffles and trim rings from the 4 northeast recessed lights so I can prime that part of the ceiling.I mounted my garage door openers to the panel I created for the long ago, then mounted the panel on the wall. Since I could only hit studs on one side of the panel, I used a bit of the Loctite PL Premium to adhere the panel to the wall. I leaned my heavy ladder against the panel for the night to keep it pressed to the wall while the Loctite cures. I'm also going to caulk the edges of this panel. It will not be fun to remove it if necessary some day, but I didn't want to impinge on another stud that I may want to use for shelf or pegboard mounting and I didn't want a huge panel just for garage door openers.
I spot primed the door trim with Zinsser B-I-N, just a thin coat on the areas where bare wood was exposed, on stains that might not be covered by a single coat of Kilz Original, and on the exposed nail heads.
-
Garage
- December 11, 2013
-
Garage
I cleaned up the door trim. I'm going to keep it for now. I caulked the gaps that had developed over the years, with the DAP 3.0 White Window, Door, Trim and Siding Sealant. Tomorrow I'll spot prime it with Zinsser B-I-N and then prime it with Kilz Original.I put 2 coats of Olympic ICON Exterior semigloss paint on the corner guards. I had forgotten how much I dislike painting trim with cheap brushes. I have some good brushes, but I've been saving them for interior work. I did the second coat with foam brushes, since I wanted a thin coat. They might need a third coat (keep in mind I started with bare red oak), but I'm going to leave them with two coats for now.
Tomorrow I hope to move on to brush priming the rest of the east wall and to get started brush priming the ceiling in the north half of the garage. The weather hasn't been cooperative, it's been bitter cold and hence I've had to run the kerosene heater a lot.
-
Garage
- December 10, 2013
-
Garage
I stopped at Home Depot on the way home and bought some DAP 3.0 White Window, Door, Trim and Siding Sealant. I also bought a new caulk gun that's better than the el-cheapo stamped steel ones I've been using. It's not as nice as the ones on my Amazon wish list, but it will do for now.I caulked the edges of the corner guards. This was mainly to compensate for uneven walls. I don't want bugs and dust going between the corner guards and the wall. The corner guards are now ready for paint.
I think I should replace the trim around the door to the house. It's very beat up, and semigloss paint is only going to highlight the damage. I'll see what I can do with sandpaper and filler, but I suspect it won't be enough. I did clean it up a bit, and with the exception of a large dent on one edge, it's probably usable. The downside is that it was installed with giant-headed nails, and they were not concealed in any way.
I need to get some kick and push plates for the doors. I need 4 kick plates and 4 push plates. I need them on both sides of the door to the basement, the inside of the door to the house and the inside of the door to the back yard. I'd like the stainless steel ones from diamondlifegear.com; they're less expensive than others I've looked at, and don't have screw holes (I intend to use adhesive to install them).
-
Garage
- December 9, 2013
-
Garage
I sanded the joint compound on the corner guards. I then taped off the two on the laundry room wall in preparation for caulk, and primed them with Zinsser B-I-N. I also primed the one near the door to the basement with Zinsser B-I-N.I don't have the caulk I want to use on-hand: DAP 3.0 White Window, Door, Trim and Siding Sealant. I'll pick some up at Home Depot tomorrow.
-
Garage
- December 8, 2013
-
Garage
Last night I sort of had a disaster with one of my stainless steel pegboards. I tried to use 3M Super90 to adhere the backing board, but the backing board is very difficult to install between the flanges of the stainless steel pegboard. I wound up having to tear it out, which broke a few small areas of it. I then had to remove the Super90 from the stainless steel, which is NOT fun (lots of 3M General Purpose Adhesive Cleaner, and some acetone). I might be able to still use the backing board, but I'm tempted to scrap it.I wish diamondlifegear.com would adhere the backing board with a temporary adhesive so I wouldn't have to mess with this. The problem is that the backing board is so flexible that it doesn't stay against the stainless steel pegboard when inserting a hook. Their solution is to bolt the backing board to the pegboard at the corners, which is nowhere near sufficient given the flexibility of the backing board. The whole point of the backing board is hence defeated.
I'll find a solution, but in the meantime I'm moving on to other things.
I put the second coat of joint compound on the joint and corner near the door to the basement.
I created wall corner guards for the corner near the door to the basement and the laundry room wall corners. They're 6' long, made from 1x3 oak boards screwed and glued together at a 90 degree angle. I rounded the edges with a 3/8" roundoff bit in the router. These could have been done with pine since I'll be painting them, but the oak should hold up better to being bumped by hard objects. I'm going to attach them to the corners with polyurethane construction adhesive and finish nails. I need to do all 3 at the same time so I don't waste a bunch of adhesive (it's in caulk gun tubes). That means I need to wait until I'm done patching the corner by the garage door.
I sanded the joint and corner I repaired near the basement door.
I sanded the new corner protectors. It took a while (oak is hard, duh).
I mounted the corner protectors using the Loctite PL Premium polyurethane construction adhesive and my finish nailer with 2" nails. While the nails are a bit short since they were driven through 3/4" of wood and 5/8" of drywall, they should be sufficient to hold the pieces in place until the polyurethane cures. In the end I don't want a super-firm attachment since the wood will expand and contract at a different rate than the drywall, and I want the construction adhesive to handle the movement. The objective here is just to prevent bashing drywall corners which crack easily (joint compound is not flexible and crumbles if smacked). All of these corners were severely damaged when I bought the house because they're in areas with a high probability of being bumped.
Later this week I will caulk the edges of the corner guards. There's a decent gap in some spots on each one because the drywall corners are not straight. But I'm very happy I put these in place; they'll prevent drywall damage and are hard, strong and repairable when necessary.
I put a second layer of caulk on the gap by the door to the basement. The first coat cracked from shrinkage.
I put some spackling compound over the countersunk screw heads in the corner protectors. I'm not going to fuss too much over the heads, I just wanted to hide them a bit.
I made an adjustment on my kerosene heater. It was not burning the fuel cleanly, and was producing a nasty smell. It's much better now.
I spent another 30 minutes doing a second round of cleaning adhesive from the stainless steel pegboard I thrashed last night. I need to remove the4 plastic protective cover and hit the front with adhesive remover, it should then be good to go (though sans the backing board).
-
Garage
- December 7, 2013
-
Garage
I bought 10 gallons of kerosene at Speedway. I bought 2 tubes of Loctite PL Premium polyurethane construction adhesive and a 4-piece roundover router bit set at Home Depot so I can create my corner protectors for the wall corner by the door to the basement and the corners on the wall shared with the laundry room. I bought six pieces of 6' long 1x3 oak boards at Lowe's to create to corner protectors, along with a gallon of Olympic ICON exterior semigloss paint to paint the door trim, window trim and corner protectors. I also bought some more painter's caulk.Late tonight I intend to finish patching the joint and corner near the door to the basement, and start taping off things in the north end of the garage so I can finish priming and painting the ceiling and walls. Tomorrow I will hopefully seal the remaining recessed lights with fireblock foam and/or fireblock caulk, and get much of the priming of the ceiling done. I'd also like to get the east wall painted so I can install the shelves and pegboard and put my tool cabinets back into position.
-
Garage
- December 6, 2013
-
Garage
I cleaned the old joint compound from a 12" drywall joint by the door to the basement, along with the corner protector on that wall. I then applied the first coat of joint compound.I caulked the gap between the basement door trim and the east wall with painter's caulk (acrylic latex with silicone, paintable).
I put a second coat of paint on the panel I created for the garage door openers. I need some construction adhesive to install it; while there will be two screws into a stud, they will not be at the center of the panel.
-
Garage
- December 5, 2013
-
Garage
I put a coat of Zinsser B-I-N on the joint on the east wall. I then put a coat of Kilz Original on the whole wall and part of the ceiling above the wall.
-
Garage
- December 4, 2013
-
Garage
I sanded the first coat of joint compound on the joint on the east wall. This joint is somewhat of a mess due to uneven drywall, and not that easy to repair since there are multiple cutouts from the narrow piece of drywall (about 12") that runs horizontally.I put the second coat of joint compound on the joint on the east wall, and patched the dents and holes on the rest of the wall. I don't expect to apply a third coat of joint compound, mostly because I don't have time to do it but also because this joint will mostly be covered by tool cabinets and pegboard.
I put a coat of Zinsser B-I-N on the panel I made for my garage door openers way back when. I later put a coat of gloss white enamel spraypaint on it ("Appliance Epoxy", which is just a hard enamel). I want a gloss paint here, this panel will be visited by dirty hands and I'll need to be able to clean it easily.
I sanded the second coat of joint compound on the east wall. I'm not going to put a third coat on it. I do need to put another coat on some of the deep dents I patched, tomorrow.
I removed the hideous, rickety handrail from the steps to the house from the garage. I don't know who put this on, but I suspect it was monkey boy (Howard Graves). The fastening to the wall was terrible and almost pointless since he split the wood with the screws. It would not have held anyone that put their weight on it. Plus I don't believe code calls for it; there are only 2 risers. Since I will have my tool cabinet with tall locker next to these steps, there's no need for a handrail since there won't be anywhere to step off the side of the stairs.
-
Garage
- December 3, 2013
-
Garage
I took a closer look at the failing drywall joint on the east wall behind my tool cabinets. Leaving the original tape in place was not an option, it had lost its bond in a few places. I moved my tool cabinets out of the way, pulled the tape and cleaned the joint of old joint compound. I retaped the joint with new tape and the first coat of setting-type joint compound. This is the main hurdle to completing the work on this wall, including installing the new shelving. I need to get it done quickly.
-
Garage
- December 2, 2013
-
Garage
I continue to be sidetracked with the MINI. I replaced the passenger side rear wheel bearing tonight. Nice to be rid of the grinding noises from the rear, though I know they'll return eventually. I also tweaked the exhaust a bit since it was rattling my bumper cover a bit.
-
Garage
- December 1, 2013
-
Garage
Today was a clean-up day of sorts. I moved slatwall reinfoircements, wood, my pushmower, my powerwasher, my mop bucket, some PVC pipe and other miscellany to the basement in order to make room to paint the ceiling in the north half of the garage. I moved the copper pipe for my future air lines to the shelves above the south garage door. I moved some spare T8 light bulbs to the new shelves, but they'll be moved to the basement soon. I need to keep reminding myself that my garage is a workspace, not a storage space. Anything that's a supply I don't use regularly in the garage or yard should be stored in the basement.I found the location of one of the studs in the wall above my tool cabinets. It wasn't easy since there is OSB behind the drywall and I don't know how the drywall was attached to it (there are no screws or nails to be found); I suspect it was all just glued, which is probably part of the reason one of the joints is failing. But I can now prime the ceiling over the tool cabinets.
I primed the edge of the ceiling over my tool cabinets, in the cove near the door to the basement, and part of the north wall. I'll probably get the priming done in the next couple of days, and hopefully be ready to paint sometime late in the week.
I am sidetracked tonight... I'm replacing rear wheel bearings in the MINI. I replaced the original driver side rear bearing first, since it was the one with play in it. It was a rusted mess. Normally I'd call this an easy job, but MINI didn't make the bolts easy to access. Not terrible, but not trivial. I didn't have time to do the passenger side, which is also making noise. I'll replace that one tomorrow night.
Funny, I just realized this was the first time I had one of my cars in the garage. I moved in during the first week of July. It has taken me 5 months to redo a laundry room and do the work in the garage that I've done so far. Not exactly speedy, but it's progress. And it was very nice to have a car in the garage. I can't wait to finish the garage so I can park cars in it.
-
Garage
- November 30, 2013
-
Garage
Since it was a little warmer today, I decided it was time to do some of the work in the attic. Namely install the support pieces for the last fluorescent light so I could stop tripping over it in the garage. After some measurements, I installed the first of three 22.5" long 2x4 pieces in the attic using Simpson Strong-Tie connectors. I then installed the new electronic 0F-rated HO ballast in the old fluorescent light housing, then hung the light with a screw going into the new support. I then drilled two holes in the light housing and through the ceiling drywall, to let me position the remaining two support 2x4's exactly. I then installed the remaining 2x4 supports and then screwed the fluorescent light housing to them through the drywall. I cleaned the old light housing covers, but they need to be primed and painted (they're rusting). I replaced the bulbs and plugged the light into the outlet on the ceiling. I flipped the light switch on, it works. Now all of the fluorescent lights are properly installed into framing instead of being hung with toggle bolts. They're also MUCH lighter than they were with the old magnetic ballasts, and they're audibly silent. Yes, they emit a lot more RFI, but that's the tradeoff. I honestly don't care; they won't be used often.I then used Great Stuff Fireblock expanding foam in the attic to help seal the recessed lights to the ceiling. I didn't get all of them, but I managed to get 18 of them done before running out of the first can of foam. I also sprayed some around the gaps around the ceiling outlet boxes. I'll try to do the remainder tomorrow.
I removed the long, warped wood shelf from the north part of the east wall. It was hideous and mostly unusable. I will be putting 24 feet of ClosetMaid Maximum load shelving on this wall, up high so I can install pegboard below them and also still open the tops of my tool cabinets. Of course my long-term plan is to buy two new 56" tool cabinets for this wall, without anything on the top of them. That will give me bench space I don't have right now.
I'm still debating where all of my pegboard and GearTrack will be installed. I also need a French cleat somewhere to hang my Wright combination wrench displays, or I need to build a hinged cabinet for them as I had planned at my previous residence. The advantage of a hinged cabinet would be keeping dust out and using up less wall space. The disadvantage would be depth. However, if I offset the displays inside the cabinet, the cabinet doesn't need to be much deeper than one of the displays.
Given how much of the east wall on the north half of the garage will be covered with shelving and pegboard and hidden by tool cabinets, I might not completely redo the drywall joints that are having trouble. I might leave the old tape in place and simply replace the outer layer of joint compound. I won't know for sure until I dig into it.
Late at night, I confirmed that the 21.5" wide piece of FRP left over from the piece I put below the north window will work fine to protect the piece of wall between the south garage door and the south wall. I also confirmed that the shelving that I intend to install above my tool cabinets will not cross the joint that needs repair. Tomorrow I will prepare to prime the ceiling in the north half of the garage, but I need to take a break to try to install the rear wheel bearings on the MINI.
-
Garage
- November 29, 2013
-
Garage
I went to Lowe's today. I bought 8 more pieces of 4' long Gladiator GearTrack and end caps for them, two more packs of the L and J hooks, three of the wide hooks (for hoses and the like), two utility hooks, and three big hooks. I bought three more 4' long ClosetMaid Maximum Load shelving standards, and six more of the 16" shelf brackets. I also bought a 5 lb. container of #9 x 2.5" Torx-drive polymer-coated deck screws, a 1 lb. container of #10 x 3.5" Torx-drive polymer-coated deck screws, two DAP 3.0 exterior caulk tubes (clear) and a Stanley FatMax 24" level since the windows on my el-cheapo 24" beam-style level have become near impossible to read (cloudy) and I don't trust it (the vial retainers are loose). The windows are so cloudy that I sometimes can't tell if I'm getting the same reading when flipping the level over.I finished patching the spots of drywall that broke while installing shelf standards on the south wall. I primed them with Zinsser B-I-N. I'm still working on a plan for the remainder of storage on this wall.
-
Garage
- November 27, 2013
-
Garage
I went to Lowe's after work to get another 5 gallons of Olympic ICON Exterior Flat paint, tinted to Snow Storm. They did not have the Ultra White base (base #1), so I had it mixed from the #3 base. Hopefully it matches... I'll do my best to use the remainder of the first bucket on the ceiling to increase the odds of not having a mid-panel mismatch. Of course it's possible I'll run out, but it's also possible that I won't need the second bucket for the remainder of the garage. I got the second bucket to be sure, and because I need to paint the walls in the stairwell from the garage to the basement.I also picked up two more ClosetMaid Maximum Load shelves and 8 brackets to mount them. I already have the standards, this is to allow me to have two tiers of shelves above my tool cabinets and on the south wall.
I also bought 4 pieces of 4' long Gladiator GearTrack, end caps for them, and a small number of hooks for them. I also bought 2 more ladder hangers for my Rubbermaid FastTracks. I intend to hang my 2', 4' and a future 6' ladder on the wall in the stairwell from the garage to the basement. This keeps them easily accessible without consuming garage space. The west wall in the stairwell is set back about 4" so the ladders won't intrude much into the stairwell.
The CH Hanson 03040 magnetic stud finders arrived from Amazon. I need these to deal with walls where my studfinder doesn't work due to sheathing underneath the drywall. The walls between the garage and the laundry room, for example. I tested one, it works well. Gotta love the inexpensive, truly simple tools that don't require batteries.
I put a second coat of paint on the south wall. Unfortunately I can tell where I primed and where I didn't prime. I'm not going to sweat it, it's a garage after all and slatwall is going to hide most of this wall.
I put the first coat of paint on the wall between the garage doors. I used the new paint that has base #3 instead of base #1. It looks like it matches, but I won't really know until I use the two paints right next to each other. I'm still hoping that I won't need to do that on the ceiling. The smart thing to do would be to use the new paint for the first coat on the north half of the ceiling, then use the first bucket of paint for the second coat.
While painting the south wall, I noted a lot of cold air drafting between the sill plate and the foundation. I need to foam and/or caulk there.
I installed two of the ClosetMaid Maximum Load 6' long shelves on the south wall. I need them so I can migrate some things to the shelves from the north half of the garage before starting to prime and paint the ceiling in the north half. The shelves over the north garage door need to come down while I prime and paint.
Unfortunately, due to the drywall being bowed and poorly installed, it broke out in 3 spots when installing the shelf standards. I cut the paper around these areas (2" holes) and removed the crumbled parts of the drywall. I then filled with setting-type joint compound. I wish I had some Durabond compound on hand, but the easy-sand type should be sufficient. It's not like this wall space will ever be moving around again; it now has 5 ClosetMaid Maximum Load standards on it and 2 shelves. I may add a third shelf later. These shelves will mostly be used to hold tools that I have in Festool Systainers. Nail guns, pneumatic staplers, etc. Eventually most of my woodworking type tools will be in Systainers. I don't use them every day, so having them up high on shelves is perfect for me. As is being able to latch them together to take them outside to work in the driveway when desired.
I had forgotten the superiority of the ClosetMaid Maximum Load shelving since I haven't installed any in several years. It is MUCH stronger than the Rubbermaid shelves I put over the garage doors. The wire is much thicker, and there are three thick lengthwise wires on a 16" deep shelf versus the two longitudinal wires on a 20" deep shelf on the Rubbermaid. Further, I've always liked the way the ClosetMaid shelves latch into the brackets; it makes them very rigid. And finally, nothing protrudes through the wires of the ClosetMaid shelves, unlike the Rubbermaid whose brackets stick up through the wire shelf and make it harder to move things around. In summary, there's no comparison... the ClosetMaid is hands-down MUCH nicer than the Rubbermaid. Unless you desperately need the 20" depth of the Rubbermaid, don't think twice... buy the ClosetMaid Maximum Load shelving.
I cut the four pieces of Gladiator GearTrack to fit on the east end of the south wall. I installed 3 of them, and I'm not sure I'll use the fourth one here. I intend to hang my spare air hoses and extension cords here, and possibly my saw horses. I will likely do something similar on the north wall to hang my creeper and Systainer Carts.
-
Garage
- November 26, 2013
-
Garage
I primed the south wall with Kilz Original. I then put the first coat of paint on it. Tomorrow I'll put the second coat on it, and Friday I hope to install shelves on that wall and put the FRP panel in the corner.
-
Garage
- November 25, 2013
-
Garage
I removed the old unfinished pegboard from the south wall. I cleaned the wall, then spackled it twice to fill the holes. I then removed the electrical wall plates and sanded. It can be primed tomorrow. I intend to cover this wall with slatwall or the like, and it will have shelves up high.
-
Garage
- November 24, 2013
-
Garage
I started to prime the area near the back door, but wound up doing a lot of fiddling around with miscellany. I moved my rolling wash buckets to the basement. I am moving some more items to the basement shortly. I moved my Lista cabinet next to the laundry room wall. I taped off one of the fluorescent lights on the north half of the garage so I can prime the ceiling in that half. I have a lot more to tape off in that half of the garage.I need to reinstall the fluorescent lights in the south half of the garage. The new ballasts need to be installed, and I need to install some supports in the attic for the southeast light. Unfortunately I misplaced the nut holding the ballast in one of the lights. Hence I had to go to Lowe's to get one, since it's a #10-24 and I don't have many non-metric fasteners on hand.
I reinstalled the fluorescent light nearest the south garage door. I have not yet put supports in the attic for the installation of the remaining fluorescent light.
I primed the wall area between the garage doors and the wall area between the south garage door and the back door.
-
Garage
- November 23, 2013
-
Garage
I put the second coat of paint on the south half of the ceiling, the wall above the south garage door, the southeast wall, and two of the walls shared with the laundry room. I put the first coat of paint on the bit of wall to the south of the door to the house. I installed baffles and trim rings on ten of the twelves recessed lights in the south half of the garage. I removed the masking tape from the shelf stays above the south garage door and reinstalled the shelf brackets and the two shelves.
-
Garage
- November 22, 2013
-
Garage
I put the first coat of paint on the rest of the south half of the ceiling, the wall above the south garage door, and the southeast wall. I also put the second coat of paint on all of the edges. I can use the roller tomorrow to get the second coat on the bulk of the south half of the ceiling and install the baffles and trim rings in the recessed lights and reinstall the shelves above the garage doors.The south half of the ceiling now looks a lot better than it did when I bought the house. No more failed ceiling drywall joints, no more drywall falling off of the ceiling, no more dead garage door opener with risky mounting, and all new recessed lights.
-
Garage
- November 21, 2013
-
Garage
I finished the edge priming of the south half of the garage ceiling, as well as edges of the 8' section of the southeast wall and the wall area above the south garage door. I primed the remainder of these areas with rollers. I also primed the door to the attic, which will likely get a semi-gloss paint since it gets marked up with dirty fingerprints when used.I got the first coat of paint on the edges of the south half of the ceiling. I also started putting the first coat on the rest of the south half of the ceiling, but will need to finish the first coat tomorrow.
-
Garage
- November 20, 2013
-
Garage
Well, we did get the severe weather on Sunday. My power was out for 3 days, and I exhausted my supply of kerosense (twice) just keeping the house warm so my pipes wouldn't freeze and so I could sleep at night without freezing. I lost two trees in the high winds, across my driveway. One of them took out a large bough from one of the very old oak trees adjacent the driveway. Part of that bough spiked into the ground and may have damaged my underground power line. DTE was out today to look at it but they have to come back after I finish clearing the tree debris. The ash tree crushed my temporary broadband cable line that Comcast has not yet buried, but it appears to be working despite being somewhat flattened.Here's a picture after I had cut some of the mess up and hauled some of it away. That's not an optical illusion; the trunk of the oak tree is almost as wide as my MINI Cooper. The fully felled oak tree on the other side of the driveway (not pictured) is larger; its trunk is wider than my height. I'm leaving that one be since it'd be a significant undertaking to remove it and it fell away from the driveway. Sad to see the old oak trees go, hopefully the one in the picture will survive despite losing a large bough. I need to make a clean cut of the remaining bough and treat it.

-
Garage
- November 17, 2013
-
Garage
I disassembled my old large workbench and moved the parts to the basement. I may or may not reassemble it; I don't really need it in the basement and I want a rolling bench in the garage.I went to Home Depot and bought some more masking tape, painter's caulk, fire block caulk, replacement springs for the Halo recessed light baffles, paint roller covers, paint brushes, paint cup liners, some more pegboard to cut for small areas, six 6' long 1x2 select pine boards, and four more Simpson RTC42 corner ties. I now have a sufficient number of RTC42 to make the rolling bench I need. I will later buy the lumber and Colson Total Lock 5" x 2" casters to build the bench.
I moved all of my detailing Systainers to the basement to get them out of my way. I also moved my small detailing cart to the basement.
I removed the second shelf above the south garage door and started taping off more things on the ceiling so I can finish priming that half of the garage.
We had severe weather this evening, and we're due for more later tonight. We're anticipating 55 mph winds and we're under a tornado watch. Very odd for this time of year.
-
Garage
- November 16, 2013
-
Garage
I primed most of the south half of the ceiling with Kilz Original. I need to tape off some more areas in order to prime the remainder. I also primed the remainder of the wall shared with the laundry room.I put one coat of the Olympic Icon paint on the wall shared with the laundry room and a bit of the ceiling, just to see what it will look like when dry. I'm mainly looking for flash-through from the Zinsser B-I-N.
I need to make a trip to Home Depot for some supplies like masking tape and more economy paintbrushes and 3/8" nap roller covers.
Late at night, I took a look at the coat of Olympic Icon paint I put on the wall and a bit of the ceiling. Flash-through of the Zinsser B-I-N is essentially nil, probably thanks to the Kilz Original. I'm confident that I won't have any problems once there are two coats of paint applied.
-
Garage
- November 15, 2013
-
Garage
I removed the utility sink from the wall. Piece of cake since I had long ago removed the plumbing. The only thing holding it to the wall was a galvanized steel french cleat. I then cleaned that small piece of wall and applied spackling compound to the holes from the french cleat's lag screws and other dings in that section of wall.I started wiping the edges of the ceiling in the south half of the garage so I can apply primer around all of the edges and obstacles with a brush. In the process I found a few more areas where the ceiling drywall needed to be shored up with drywall screws and the nails re-driven. I spackled over those areas, I'll need to sand them tomorrow before I apply primer. Tonight I should get some of the edge priming done. Part of the reason I'm using an oil-based primer is to help prevent bleed-through of rust from the original drywall nails, which were uncoated nails.
I also taped off some things... half of the shelf standards above the south garage door and the galvanized angle of the garage door opener mounting.
My focus remains on the ceiling. I still have plenty of wall work to do, but there's little sense in starting it until the ceiling is done. Tomorrow I hope to get the south half of the ceiling primed, and possibly get the first coat of paint on it.
-
Garage
- November 14, 2013
-
Garage
I'm exhausted, but since I don't like to let a night go by without doing some work, I started some spot priming with Kilz Original. I primed around all of the recessed lights in the south half of the garage, the ceiling at two edges of the wall shared with the laundry room, and around the door to the attic.Tomorrow I need to bear down on preparation to prime the ceiling in the south half of the garage. I should remove the non-functional utility sink since it's in my way, and take apart my old workbench and move it to the basement. Then wipe the ceiling with a sponge and water with a bit of TSP in it.
I am starting to think I want some fold-down benchtops using the Knape & Vogt 206 ZC 16 206 folding L-brackets. They are strong, and having benchtops that aren't always intruding into parking space would be a good thing. And for the one beefy rolling bench I intend to build, I can have a fold-down extension that lets me use it as an outfeed table or just larger worktop when dealing with large sheet goods.
.
-
Garage
- November 13, 2013
-
Garage
I sanded the second coat of joint compound on the 12" ceiling joint by the air hose reel, the second coat of joint compound on the wall joint above the north garage door, the third coat of joint compound on the wall joint above the back door and the second coat of joint compound on the south corner of the laundry room wall. I then sealed these joints with Zinsser B-I-N, and put the first coat of Kilz Original on the wall shared with the laundry room. The Kilz was to seal the wall joints, since I didn't want to use B-I-N on such a large patch.At this point, all major drywall joint failures are repaired. There is a horizontal joint on the east wall in the north half of the garage that needs repair, but I can't address it right now because my tool cabinets are in the way and I have nowhere else to put them. I will probably prime and paint the south side of the garage, then move my tool cabinets there for a bit to let me get at the east wall in the north half of the garage.
My large workbench will become a real hindrance to priming and painting. I need to take it apart and move it to the basement in pieces.
-
Garage
- November 12, 2013
-
Garage
I sanded the first coat of joint compound on the 12" ceiling joint by my center air hose reel. I sanded the first coat of joint compound above the north garage door. I sanded the second coat of joint compound above the back door. I also finished sanding the third coat of joint compound on the joints on the wall shared with the laundry room. I sanded the first coat of joint compound on the south corner of the laundry room wall.I applied the second coat of joint compound to the 12" ceiling joint by my center air hose reel and the wall joint above the north garage door. I applied the third coat of joint compound to the wall joint above the back door. I applied a second coat of joint compound on the south corner of the laundry room wall. I don't expect to put more compound here since I'll be installing corner protection.
-
Garage
- November 11, 2013
-
Garage
I stopped at Lowe's in Madison Heights on my way home from work. I picked up two more 16" x 72" ClosetMaid Maximum Load shelves, eight more brackets, and eight more standards. But the main reason for my visit was to see if the Holland Panel slatwall inserts slide into their slatwall easily. They do; I easily slid one into one of the panels in the store with no tools. Lowe's only carries the painted panels (not laminated), but I'm OK with that. The Madison Heights store only had two panels in the store, both of them damaged badly enough that they would not be worth buying or even taking for free. They also only had a handful of the inserts. If I order 4 panels and 64 inserts at the White Lake store, I suspect I'll have to wait a while. I wish Lowe's would get its act together on its website with respect to these types of products; they don't show store inventory. Home Depot's web site is an order of magnitude better in this respect.I taped the wall joint above the back door, the 12" ceiling joint by my air hose reel, and the wall joint above the north garage door using setting-type joint compound. I used a little more water in the mix than I normally use, in order to give me a little bit more work time. I also put some joint compound on the south corner of the wall shared with the laundry room.
-
Garage
- November 10, 2013
-
Garage
I sanded the third coat of joint compound on ceiling joints 6, 7, 15 and 16. That's the last of the ceiling joint sanding, whew.I sanded the second coat of joint compound on the joints on the wall shared with the laundry room. I then applied a third coat of joint compound.
I sealed ceiling joints 6, 7, 15 and 16 with Zinsser B-I-N. In the process, I realized that I missed the repair of one small joint: 12" of joint 5 between my air hose reel mount and the west wall. I will start repairing this joint when I start repairing a nearby joint above the north garage door.
I started sanding the third coat of joint compound on the wall shared with the laundry room. I'm not done since the compound is not completely dry yet.
I straightend the beat-up drywall corner guard on the wall shared with the laundry room, and cleaned the joint compound out of it. It had very few nails in it; I put some more in it. I'm going to install beefier corner guards on this and the other corner, but I needed to get this corner guard straightened up a bit so I can mud it again and hence have a decent base unerneath corner guards. I was going to buy metal corner guards, but I've changed my mind... it will be easier for me to just use wood, which will be easier to repair in the future and a lot less expensive.
I cleaned the joint above the back door, the 12" joint on the ceiling near my air hose reel mount, and the failed joint above the north garage door. Damn lazy drywallers... every wall joint I've repaired has failed because the joint isn't at a wall stud. Which means they'll likely fail again at some point. Not much I can do about it without rpelacing drywall, and I don't have time to do that right now. I might later put FRP panels over those areas.
I spent the entire day in the garage, and feel like I didn't get all that much done. Ceiling work is very time-consuming.
.
-
Garage
- November 9, 2013
-
Garage
I primed the patch on the wall shared with the laundry room with Zinsser B-I-N.I primed ceiling joints 8, 9, 17 and 18 with Zinsser B-I-N. The repair of these joints is now complete, and I'm getting closer to having the ceiling joint repair done.

I also primed the joint on the wall above the south garage door.
I sanded joints 6, 7, the rest of joint 16 and the two joints I created with the patch from my ceiling fall. These are now ready for the third coat of joint compound.
Late at night... I applied the third coat of joint compound on the remaining ceiling joints. I put a second coat of joint compound on the joints of the wall shared with the laundry room. I should be able to sand and prime the ceiling joints in the morning, at which point all ceiling joint repair will be completed. I need to finish repairing wall joints that touch the ceiling (two above the north garage door, one above the back door), and I can then prime the ceiling.
-
Garage
- November 8, 2013
-
Garage
I taped the joints on the wall shared with the laundry room, using setting-type joint compound.I sanded the third coat of joint compound on ceiling joints 8, 9, 17 and 18. They are ready for primer. I'm aiming to get all ceiling joint compound done this weekend. I'd really like to get all the wall work done too, except for the south wall since messing with that wall means turning off my air compressor; I can't do that right now since I'm using the blow guns to get rid of joint compound dust. Hopefully I can get the east and west walls done, though tonight I realized I need to redo the joint above the back door of the garage; like other joints, its tape has failed.
I'm rambling... I will continue to focus on the ceiling until it's fully primed and painted. It's the hardest work and the job I started first. Tomorrow I'll sand the second coat of compound on joints 6, 7 and 16 and apply the third coat of joint compound. On Sunday I can hopefully seal up all joints in the south half of the garage with Zinsser B-I-N, and start priming the ceiling with Kilz Original. Given that there's already paint on all of the ceiling except my patch, I should only need one coat. Especially since I'm using Olympic ONE Exterior paint/primer as the top coat. The main reason for the Kilz Original is to add a layer that's not vapor permeable.
-
Garage
- November 7, 2013
-
Garage
I stopped at Home Depot and picked up new 12" and 4" joint knives. My old ones have just about had it at this point, the 4" has rusted heavily and I'm tired of cleaning the rust off. The new 12" is stainless steel, hopefully it'll last a bit longer.I also bought another 18 lb. bag of setting-type joint compound, two cheap 9' x 12' drop cloths, three Cree LED 2700K bulbs for the master bedroom closet, and a pair of 6' long select pine 2x2's that I might use to mount things between the garage doors. Using them should allow me to utilize wall space obscured by air plumbing.
I put the third (final) coat of joint compound on ceiling joints 8, 9, 17 and 18. I used pre-mixed joint compound here.
I removed the tape from the two bad joints on the wall shared with the laundry room. I cleaned the joints, and will soon retape and mud them.
-
Garage
- November 6, 2013
-
Garage
I started to sand the second coat of joint compound on ceiling joint 8. But I'm tired, so I didn't get very far. Too many days/weeks/months burning the candle at both ends, I may need a break.Bah, I don't have time to be a wimp. I got out the palm sander and sanded the second coat of joint compound on joints 8, 9, 17 and 18. VERY dusty job. I need to do something about my lack of sealed eye protection. I ordered various safety glasses and a pair of goggles from Amazon, and a Festool Systainer SYS 1 to keep them in. I keep trashing my various safety glasses by keeping them with other items in a tool drawer. It was time to buy dustproof storage for them where I can also stash a few microfiber towels to clean them.
-
Garage
- November 5, 2013
-
Garage
I sanded joints 9, 17 and 18, then put the second coat of joint compound on them. I did the same for the joint on the wall above the south garage door.I then sanded joint 8 and put a second coat of joint compound on it. I also put a little bit of a third coat on joint 7 in part of the problem area.
At this point, the ceiling joints in the south half of the garage all have a second coat of joint compound. They'll all need a third coat. Most of the third coats will be light since they're pretty good after the second coat, except for joint 7 which will need a 4th coat. Since I'm running low on setting-type compound, I will likely use pre-mixed compound for the third coat on all joints except joint 7.
I really want to get joints 7 and 8 done so I can put the flourescent lights back on the ceiling. I don't need them for light right now, but the fixtures are in my way.
-
Garage
- November 4, 2013
-
Garage
I stopped at Lowe's and bought a 5-gallon bucket of Olympic ONE Exterior Flat White paint, tinted to Snow Storm white. I will be using this on the ceiling after I prime with Kilz Original. It should be about double what I need, or in other words, it should provide two coats.I also bought some paint brushes, tray liners, foam brushes, and a roller set with plastic pan.
I sanded ceiling joints 6, 7 and 15 and applied the second coat of joint compound. Joint 7 is going to need 4 coats, since the two pieces of drywall are very uneven in one spot (the spot where I patched in a new, straight piece of drywall after I fell through the ceiling). Nice to have a diagram that no longer includes ceiling joints whose repair has not been started.

I sanded the final coat of joint compound on the patch on the wall shared with the laundry room. It's not perfect, but it's damn close. It's ready for Zinsser B-I-N primer.
Tomorrow I will continue working on the ceiling drywall joints.
-
Garage
- November 3, 2013
-
Garage
I went to the Marathon station in Ortonville and bought 10 gallons of kerosene for my torpedo heater. While I don't want to run it a lot in the garage without insulation, I need it to help keep the temperature up while I finish doing joint compound, priming and painting.I moved a bunch of stuff to the north half of the garage to make room to work on the south half. I then shored up the remaining ceiling drywall on the south half, and taped and mudded a 16' joint, two 4' joints and a short joint above the garage door. I later taped and mudded the final joint, which was 19' long. At this point, all of the ceiling joints have been retaped. However, the whole south half of the garage still needs second and third coats of joint compound. Hopefully I can get much of that done this week and get them sealed up with Zinsser B-I-N. I will then be ready to prime the ceiling with Kilz Original and paint it.
-
Garage
- November 2, 2013
-
Garage
I ordered some things for local pickup at the Lake Orion Home Depot:- 3 gallons of Kilz Original Primer
- 8 48" ClosetMaid Maximum Load standards
- 2 72" x 16" ClosetMaid Maximum Load shelves
- 8 16" ClosetMaid Maximum Load shelf brackets
- 12 Cree BR30 5000K LED bulbs
The shelving is going above my tool cabinets, up high. Of course I first need to patch, prime and paint that wall. I don't like my paint options at Home Depot, so I'm going to make a trip to Lowe's for some Olympic ONE soon. I want eggshell finish, in the Snow Storm color. Even though I'm priming with Kilz Original, I like the Olympic ONE paint and primer in one product. I used it in the laundry room.
I picked up the Home Depot order, and installed the 12 Cree BR30 LED bulbs. I then wired the feeder for this half of the garage. I now have reasonable automated lighting throughout the garage. I will not need the fluorescent lights very often, and the power consumption for the 24 LED lights is only 228 watts total. Since they are automatically turned on and off by the occupancy sensor, I also don't need to go to a light switch to turn them on or off. There is no light switch for these lights because I don't need one. The occupancy sensor works great, I've essentially completely forgotten about it because it just works.
-
Garage
- October 31, 2013
-
Garage
I put the tape and the first coat of setting-type joint compound on two of the long joints in the south half of the garage. I also taped one of the 4' joints.
-
Garage
- October 30, 2013
-
Garage
Slight change of plans due to a weather change... it was warm today and will be warm tomorrow. So I'm trying to knock out the taping and first coat of joint compound on the remaining ceiling joints.I removed the tape from the remaining ceilign joints and cleaned the old failed joint compound out of all of them except the half of the last joint that isn't easy to get to at the moment (lots of stuff in that corner of the garage). Hopefully tomorrow night I can get some of the taping done.
I tried installing the reinforcements in the slatwall. It's not possible, which means they were a complete waste of money :-(. They just don't fit. If you try to force them in with a lot of hammering, they end up breaking the slatwall. The only way I could envision installing them would be to cut them in half lengthwise and install each half from the front. I'm not going to try, I've already wasted too much time on them.
What this means is that I'm back to square one on slatwall. I need the weight capacity of slatwall with slot reinforcements. Which means the sheets I have aren't useful to me on the walls of the garage. And one of them now needs to be cut down to less than 4' width to be useful at all.
I think I'm going to buy some Proslat slatwall instead. It's PVC which means it won't suffer from humidity, and it's strong. It's also lightweight and looks nice since the fasteners are all concealed. It also doesn't weigh a ton like wood slatwall, so it's easy to install and doesn't add a lot of load to the wall. $149 per 32 sq. ft. kit, and free shipping from Home Depot. And given that each section is installed individually, I don't need to do any horizontal cutting and I can easily install it alone.
As for the slatwall I already bought... I will find a use for it. I would not mind having some in the master bathroom closet, and a sheet on the wall in the stairwell to the basement would be very handy. I could also use some to make a rolling tool board and storage, though pegboard would work just as well.
-
Garage
- October 29, 2013
-
Garage
I put a third coat of setting-type joint compound on the patch on the wall shared with the laundry room. Due to the warped sheathing underneath the drywall, it needed it. If I were not covering this part of the wall with slatwall, I'd be doing a third coat with a 14" knife. But it's even enough with the third coat to support the slatwall, so tomorrow I'll sand it and and probably seal it with Zinsser B-I-N.I put tape and the first coat of setting-type joint compound on one of the short joints of the patch piece I had to put in the ceiling over the weekend (the spot I fell through). I need to clean the remaining joints in that area so I can tape and mud those as well.
I need to get some of the slatwall out of my way, so tomorrow I'll experiment with greasing the metal slot supports to install them. I was unable to install them dry, they get wedged tight about 12" into the slot.
-
Garage
- October 28, 2013
-
Garage
I stopped at Home Depot for some more setting-type joint compound, a bucket, and some Simpson RTC-42 braces. I want the RTC-42 braces to build the only permanent workbench that will reside in the garage. Unfortunately I need 8 and they only had 6. I bought 4, since I will use them in multiples of 4. Other Home Depot stores nearby have more of them. This bench will be on lockable casters, but I haven't chosen the casters yet. I do know that I want all swivel casters, since I don't want to have to fuss with direction when moving it. I'd like casters whose direction can be locked though, which limits my choices. This bench will hold one of my large vises, and ideally would be the same height as a Bosch 4100-09 table saw so I can use it as an outfeed table when I buy the table saw. It's possible that I'll build 2 benches, 48" x 24" each. One of them will go in the nook in the southeast corner of the garage. I may not need a second one, since my sister is buying a Vika Two-Fold for my birthday. If it weren't for needing a place for a vise, I wouldn't need a heavy permanent bench at all.I put another coat of joint compound on the patch on the wall shared with the laundry room. The joint compound doesn't particularly like to dry in the cold. I used the heat gun to get it started, and put a 500W halogen light near it to keep it going.
The Owens-Corning insulation calculator says I'll need about 30 bags of blown-in insulation to complete the attic. That comes to around $750. But before I do that, I need to create the storage area by using batts and laying down plywood, and creating a thin wall to keep the blown-in insulation off of the storage area. I'll likely just use 1/4" plywood ripped to 16" width.
-
Garage
- October 27, 2013
-
Garage
I stumbled in the attic and fell through the ceiling (by stepping on the drywall). I think I'm OK, other than some bruises, a sore wrist and a tweaked back. Of course I need to keep working; thank goodness for vicodin. I'm thoroughly annoyed that I created more work for myself (replace some drywall on the ceiling), but I'll get it done. No time for wiring today, I need to fix the 4' x 4' hole in the ceiling first. Not yet sure if I can get the piece up there by myself, but I think I can.Update: I managed to get the drywall replacement piece in place by myself. I wish I could have replaced the whole sheet, but I can't manage a full sheet of drywall over my head without a drywall jack and I'm not going to buy or rent a drywall jack for a single repair.
I'm sore from falling through the ceiling, but since I was cutting up a piece of drywall, I finally cut and attached a piece of drywall to the spot the previous owner had removed on the wall shared with the laundry room. I also taped and mudded it (first coat). I'm installing slatwall on this wall, so this patch doesn't need to be perfect; it just needs to be sealed up.
I almost finished wiring the recessed lights in the south half of the garage. The only thing remaining is to connect the feeder wire to the output of the occupancy sensor.
-
Garage
- October 26, 2013
-
Garage
I removed the plywood in the garage attic that was in the way of installing the recessed lights in the south half of the garage.I removed the 8' long T12 HO fluorescent fixture near the attic stairs.
I cut all 12 holes for the recessed lights in the south half of the garage, and nailed 11 of the fixtures into place. I then removed the final 8' long T12 HO fixture. Finally I nailed the last recessed light fixture into place.
Given my back issues, this was very hard work. But I couldn't wait any longer, it's too cold in the attic at night to do this kind of work. So I had to do it during the day in order to not freeze. I'm taking a break to type this blog entry and rest my back.
The hardest part was the lights nearest the south wall, since there is no headroom there. It's not easy operating a large hole saw while carefully laying on your stomach on a 2' x 3' board on top of 2 x 4 truss bottoms. It's also not easy to swing a hammer in this position. But those fixtures are all in place now, I just need to wire them.
I will order 12 more of the Cree BR30 LED bulbs in 5000K temperature soon. It will be nice to have the lighting done and be close to ready for insulation. It has been very cold in the garage at night and it's only going to get colder for the next four to five months. I can't run a heater in there until the attic is insulated, since it would cause condensation problems if there is no insulation. It would also be nearly futile since there's no insulation over the garage.
I pulled the failing tape on some of the ceiling joints in the south half of the garage and scraped off some of the old joint compound. Tomorrow I hope to get started retaping these joints with setting-type joint compound.
I finished about 2/3 of the wiring of the recessed lights in the south half of the garage, including much of the difficult part (the cans with no room to work). I need to finish this work so I can seal the cans to the drywall. It will then be possible to insulate the garage attic, though I really should address the electrical issue with the circuit that's shared between the fluorescent lights and the outlets before I blow in insulation.
Of course, it's probably worth noting that I have not used the fluorescent lights since I put bulbs in the 12 recessed cans in the north half of the garage. It will likely turn out that I almost never use the fluorescent lights. The Cree BR30 LED lights are providing enough light to do most things in the garage. Given some task lighting, I suspect my use of the fluorescent lights will be rare.
I've had two people suggest that I put boxes over the recessed lights in the garage before insulating. I don't need them with the 9.5W LED bulbs. Their argument is that the next owner might replace the LED with hot incandescents. I don't see that happening. 100W incandescent bulbs were banned in 2012. 75W incandescents were banned in January 2013. 60W and 40W will be banned in 2014. It's federal law (Energy Independence and Security Act of 2007). And would anyone replace very good, long-lasting LED bulbs with incandescents or CFL? The bulbs I have installed should last more than 20 years. By then, the replacements will likely be brighter and use even less power. They will definitely be more efficient (lumens per watt), and probably have an improved CRI. LEDs have been improving rapidly, with both Philips and Cree leading the way. And unlike CFL, they like cold temperatures and start instantly. They're ideal for a garage in Michigan.
-
Garage
- October 25, 2013
-
Garage
I stopped at Home Depot to get the things I forgot to buy last night:- 3/4" copper elbows
- Denatured alcohol to clean Zinsser B-I-N off of the FRP panels
- Klean-Strip brush cleaner
- Another gallon of Liquid Nails FRP adhesive since one of the 3.5 gallon buckets I bought appears to be bad.
- 3M Super 90 Spray Adhesive to attach backing board to stainless steel pegboard from diamondlifegear.com. The backing board comes attached with 4 bolts and acorn nuts, which isn't very effective at keeping the backing board snugly against the stainless steel pegboard over the entire area.
- More white pegboard, so I can put some on the west wall behind the air drops.
- 1x2 select pine boards to frame the pegboard.
- Two 4-piece sets of 1/4" male couplers since I needed some for the new blowguns and was out of spares.
- bleach
-
Garage
- October 24, 2013
-
Garage
I stopped at Home Depot and picked up some copper pipe fittings to continue the plumbing for air in the garage. I forgot to buy some other things I need, I'll have to get them tomorrow.
-
Garage
- October 23, 2013
-
Garage
I duplicated a second set of regulator output plumbing for an air drop. 1/2" tee, three 1/2" sweap to NPT fittings, a ball valve and pipe connecting it all. I attached one of the air manifolds.
-
Garage
- October 22, 2013
-
Garage
The silicone-cushioned band clamps arrived from McMaster-Carr, along with the 45-degree 3/6" NPT elbows for the hose reels and some UV-resistant cable ties.To take some measurements for my air drops, I suspended the overhead copper with a pair of the band clamps. I then cut a piece of 3/4" copper pipe for one of the drops: the piece from the overhead tee to the first ball valve. I then soldered a 3/4" sweat to 3/4" NPT fitting on this piece. I also cut a piece of 3/4" copper pipe for the piece after the second ball valve that leads to the automatic drain, and soldered a 3/4" sweat to 1/2" NPT piece on it (to connect to the automatic drain). I haven't decided how far off of the floor I want the drain, so this piece might get shortened later. Hence I haven't soldered the fitting on the other end yet.
I duplicated the input side plumbing I did the other night: the 3/4" sweat to 3/4" NPT fittings, the 3/4" NPT ball valves, a 3/4" x 3/4" x 1/2" tee and a 1/2" sweat to NPT fitting to go into a filter/regulator. I need to duplicate this drop piping for one more hose reel, and duplicate the output side 2 more times.
I need to decide how to connect the compressor to the plumbing. If I use my existing connection, I'll have some restriction right out of the compressor since I have 3/8" fittings. I should probably change to a 1/2" coupling on the compressor (to 1/2" NPT), and put a 1/2" coupling on the end of the leader hose. I can then use a 1/2" male to 3/4" female NPT plug on the end of the copper piping (McMaster-Carr 6534K44). On the other hand, 3/4" NPT isn't very convenient if I ever need to replace the plug. 1/2" male coupling to 1/2" NPT is fine here, and I can put a 1/2" NPT male to 3/4" sweat adapter on the end of the copper.
-
Garage
- October 20, 2013
-
Garage
I sanded the second coat of setting-type joint compound where the next piece of FRP will be installed. I then put two coats of Zinsser B-I-N on it. I also put one coat of Zinsser B-I-N on the air hose reel mount on the north end of the garage.Once the Zinsser B-I-N dried, I installed the FRP panel. It wasn't easy, since a full sheet of FRP isn't easy to handle on a ladder and it's difficult to put pressure on the roller when you're off the ground. It's not perfectly aligned with the panel below it, but it's close enough for my purposes. Of course I wish I had planned to install this piece when I installed the first panel so I could have used a panel-to-panel trim piece. But I'm OK with the final result, and the objective has been met (provide a robust, easy to clean surface underneath hanging lawn tools).


I later remounted the 84" long FastTrack, and also mounted a 32" one up high.
I did some more work on the air line plumbing. I soldered two 3/4" diameter 10' long pipes into a 3/4" tee and suspended it by setting it on my shelves above the garage doors. This was just to figure out where the drop between the garage doors can be located to avoid the electrical outlet in that wall. I'm going to put that drop to the left of the electrical outlet.
I soldered together a bit more of the piping for the second air drop. I put together the 1/2" side that has a valve for drainage or future expansion, a tee, a 1/2" pipe to NPT adapter from the regulator output, and a 5" section of pipe to another pipe to NPT adapter for the 2-port manifold. I also put together part of the 3/4" side: a pair of ball valves (one for the whole drop and one for the automatic drain), a 3/4" to 1/2" tee between them, and a 1/2" sweat to NPT adapter to connect the filter and regulator. I used sweat the thread adapter on the pipe leading to the valves as well, so I didn't have to heat up the valves with the torch.
I ordered some silicone-cushioned band clamps from a< href="http://www.mcmaster.com">McMaster-Carr to support the air pipe. I also ordered 45-degree 3/8" NPT male to female elbows to use on the air hose reels, and a pack of UV-resistant cable ties. I to use a somewhat temporary mounting of the pipe for now, since I expect to need to move it in the spring to finish ceiling drywall joint repair in the south half of the garage. I don't expect to get that work done this year, but we'll see.
Tomorrow I'm going to clean up a bunch of things in the garage and shuffle things around a bit so I can do the drywall patch work on the wall shared with the laundry room and start shoring up the drywall and installing the recessed lights on that side of the garage.
-
Garage
- October 19, 2013
-
Garage
I cut the piece of FRP to go above the first piece I installed below the FastTrack for yard implements. I then removed the FastTrack and marked the location of the studs on the top of the lowr FRP panel. In the process I realized that the drywall joint near where the FastTrack was installed was failing. I hence removed the tape and old joint compound, and set new tape with setting-type compound. This joint doesn't need to be perfect, since it'll be covered with FRP. But it needs to be flush and sealed up, which means it'll need more coats, sanding and Zinsser B-I-N primer.Later I sanded this joint and applied the second coat of joint compound. This coat will be sufficient under the FRP once it dries and is sanded. However, there's a bit of it that will not be covered by FRP, near the window. I may need a third coat there, even though that drywall corner will eventually get corner protection.
-
Garage
- October 18, 2013
-
Garage
I finally got around to creating a thin mounting panel for the garage door opener control pads. The idea here is to conceal the old wiring, which I can't shove in the wall (it won't move for some reason) and don't want to cut short since the wire passes through fire barrier and hence would not be fun to rerun. Using some leftover 1/4" thick plywood underlayment from the laundry room remodel, I created a panel with a hollow back to conceal the wires. It's glued and clamped at the moment, and once it's dry I will sand it and install it. It will get primed with Zinsser B-I-N and painted when I paint the wall. I can fasten one side of it with drywall screws since there's a stud nearby. I need to get some drywall anchors to fasten the other side, or I could just use a dab of adhesive.I need to remove the rickety shelf on the east wall in the north half of the garage and spackle the holes. Eventually, ClosetMaid Maximum Load shelves will be installed here, up high. But the shelf that's installed right now is mounted too low, very warped, too shallow, and looks awful.
-
Garage
- October 17, 2013
-
Garage
I stopped at Home Depot on my way home from work to buy some DAP 3.0 window caulk, three cap trim pieces for FRP, a chuck key for my drill guide and a 90-degree 3/8" male-to-female NPT brass elbow. The elbow is to experiment with the mounting of the coupler on my air hose reel. I wanted a 45-degree elbow, but Home Depot doesn't have them in the store. The 90-degree may or may not provide enough clearance to prevent the lead hose from being rubbed by the reel.I got home very late, but I managed to install the FRP panel below the window. I also assembled the two new leader hoses for the air hose reels. Each leader hose is 1/2" in diameter and 5' long, with a 3/8" male coupler on one end and a 3/8" female push-on coupler on the other end. Some would say I've gone overboard with couplers, but I've always done my leader hoses in this manner because it allows for easy disconnection at either end of the hose (with the rest of the air system remaining pressurized), and allows for easy hose replacement should one ever spring a leak or be damaged. Planning up front reduces my future downtime and frustration.
In addition to the leader hoses, I received the M10 carriage bolts to assemble the third hose reel mount.
I've concluded that I don't really need an elbow at the inlet to the hose reel between the garage doors, but it would be nice. I definitely need one for the hose reel at the north end of the garage, and I will need one for the reel at the south end of the garage.
I need to remember to add some tools I need to my tools wish list. I will soon desperately need the Bosch 4100-09 table saw that's been on my wish list for years. I also need an air chisel and a pneumatic needle scaler for some car and tractor work.
-
Garage
- October 16, 2013
-
Garage
Tonight was trash night, and I had a lot of coardboard to cut up and pack into a large trash bag. Mostly from the pegboard delivery, but also an air hose reel box and other items.Couplers and related parts arrived from McMaster-Carr. I also received M10 locknuts and M10 stainless steel washers, but the M10 carriage bolts were shipped separately and have not yet arrived. I need them to assemble the third air hose reel mount. The lead hoses for the hose reels were also shipped separately and have not arrived yet. I suspect those were the holdup on the second part of my order; I think they're made-to-order.
I moved the remaining recessed light fixtures into the garage attic.
I swept enough of the floor to make room to cut FRP. I cut the piece of FRP for the spot below the window. I shored up the drywall under the window (it had nowhere near the required number of drywall nails at the base plate), sanded the compound I had used to patch a big dent in it weeks ago, and washed the wall and the back of the FRP. I cut two of the three cap trim pieces for the panel. Tomorrow I'll cut the third piece of cap trim, slightly trim the length of the FRP panel (it's about 1/4" longer than I'd like), mark the location of the studs, and adhere the FRP and cap trim to the wall. I need to buy some more DAP 3.0 clear caulk to seal the cap trim to the wall and the FRP to the cap trim.
-
Garage
- October 15, 2013
-
Garage
I decided that the piece of plywood for the second hose reel was unnecessarily long, so I cut it shorter. Not a perfect cut since I did with the piece still partly mounted on the ceiling (but propped away a bit to avoid cutting the drywall). But good enough and I am filling the plywood edges before priming anyway. I then mounted the hose reel with its sandwiched mounting block. It's a bit in the way of mounting the next FRP panel, but it's manageable. It's also a bit in the way of my yard tool rack, but only for those tools that require me to lift them way above the rack to get them in their hooks. Namely my leaf blowers. I'm probably going to tweak the hooks for those tools, and in the meantime I'll move them to the other end of the rack. The odds are good that I'm going to lower the rack anyway after I install the next FRP panel, since it's currently higher than necessary.Tomorrow I want to move a bunch of things to the basement that are in my way:
- All of my Systainers for detailing, motor oil and filters.
- Jackstands.
- Tire chocks.
- Stools.
- Detailing carts.
- Anything else that's not needed for the next 2 weeks and can be moved without assistance.
I then want to cut and install an FRP panel below the window. 26.25" x 96". I also want to cut one for above the first yard tool piece, and one for above the second yard tool piece. And finally cut one for the location between the garage doors.
-
Garage
- October 14, 2013
-
Garage
Due to the odd framing layout at the north end of the garage, I had to play around a bit with how to mount the second air hose reel. The two supports above the drywall ceiling there are only 13.75" apart center-to-center, and the next one is above the top plate of the west wall. I worked up a plan, but it's possible I'll execute something different.I drilled the holes in the two sandwiched pieces of plywood that hold carriage bolts for the reel. I then applied wood glue between the pieces and then bolted the reel to them while the glue sets up. I should not have used 1/2" carriage bolts; they were a VERY tight fit in the reel mounting plate, I'm not sure I'll ever get the reel off of them without a pry bar. I had to hammer it on, and that was after reaming the holes in the hose reel mounting plate a bit. Of course, I wanted 7/16" carriage bolts, but Home Depot did not have them. I'm going to use M10 carriage bolts on the next one, which I ordered from McMaster-Carr. I also ordered locknuts and washers, some of the couplers I need to connect the hose reels, two 5' long rubber leader hoses for the hose reels, and some brass compression tube fittings to connect tubing to the automatic drains (which will eventually be run to the outdoors). I thought I had added tubing to my cart, but I missed it. Not a big deal, I'll order some later. I should probably order NPT to barbed fittings while I'm at it, in case I don't want to use compression fittings and hard tubing. Say McMaster-Carr 5346K17.
I drilled 5/16" holes in the top piece of 3/4" plywood for the second hose reel and mounted it to the ceiling.
-
Garage
- October 13, 2013
-
Garage
I went to Home Depot to get some small items: hardware to mount my remaining cord reels, and more economy paint brushes. I bought more of the Spax 5/16" x 3.5" lag screws, some 1/2&qout;-13 x 2" carriage bolts, 1/2" washers, and 1/2-13 locknuts. I also bought more Great Stuff expannding foam: the pest blocker version (one can) and the fire block version (2 cans).I started building the ceiling mounts for the remaining cord reels. I considered just using Unistrut since it would be much faster, but I prefer the look I've acheived with the plywood mounts. I cut the 6 pieces I need to mount the remaining two overhead self-retracting reels. I marked the hole pattern for one of them. The other reel is still on my reel cart that I plan to decommission or retask and I'm not sure the hole pattern is the same.
-
Garage
- October 12, 2013
-
Garage
My back is still a significant hindrance, but I managed to get the remaining ceiling joints on the north half of the garage sanded and sealed, except joint #15 which needs another coat of joint compound. Some of the joints don't look great, but my time is very limited and my back problem makes sanding very strenuous. I can't spend the time to make perfect joint repairs. What matters is that they're sealed up and the drywall has more fasteners to keep it on the ceiling.
I mounted the junction boxes in the attic for the Leviton OSC20-M0W and OSP20-D0. They're mounted flush with the ceiling drywall, and I drilled the hole through the ceiling drywall for the OSC20-M0W wiring.
Sigh, the garage has poor electrical distribution for a garage. The previous owner tapped the circuit for electrical outlets to feed the HO fluorescent lighting. This is bad because that lighting totals 880 watts, which means you can't really run a significant power tool and the lighting at the same time. I will need to address this problem later (moving the unused, incorrectly wired subpanel from the basement to the garage would be a good idea). In the meantime, I am feeding the new recessed lighting (which is a small load) from the garage door opener circuit. The feed is wired from the south opener's outlet, and I wired the 3 rows of lights on the north side of the garage together and ran the wire to the new junction box.
Late at night I wired the remainder of the recessed lighting to see how much light I get from the Cree BR30 9.5W 5000K LED bulbs in the recessed fixtures and to test the Leviton OSC20-M0W. I like the lighting, and if I had installed a handful more, I could probably have ditched the fluorescent lights. But what I have will work great for the intended purpose: enough light to easily find things in the garage at night and well-lit conditions when getting in and out of the cars. And the OSC20-M0W is fantastic. The range covers the whole garage, and it's sentitive enough to stay on regardless of where I am in the garage. Tomorrow I'll button up the junction boxes until I install the lights in the south half of the garage, and remove the bulbs and trim rings so I can prime and paint the ceiling in the north half of the garage. I might get started on removing the plywood in the garage attic and start putting in the lights for the south half of the garage.

My back actually appreciated the hard work crawling around in the warm/hot attic. I suspect it was all about the stretching, not the heat, since heat has generally aggravated it in the past and the hot shower yesterday morning gave me trouble.
-
Garage
- October 11, 2013
-
Garage
Darn, had a bad back episode late last night and this morning. It took me over an hour just to get from my bed to the kitchen for some vicodin and a muscle relaxer. Mad at myself for putting the meds in my backpack last night instead of putting them on the nightstand. Very poor planning on my part.I can't drive at the moment since the spasms escalate when I sit in the driver seat of my car and I can't depress my clutch or brake pedal without uncontrollable spasms. Sent email to work once I could get to my computer (second floor and stairs are a b**ch). Hopefully I can loosen it up enough to get to work this afternoon since I need to fetch a requirements document and get going on an interface specification. I _think_ I'll be able to drive in an hour or two.
-
Garage
- October 10, 2013
-
Garage
I stopped at Home Depot and picked up 3 junction boxes with covers, more wire staples, and 100 more feet of 14/2 wire to continue wiring the recessed lights.The first 12 Cree BR30 5000K LED bulbs arrived for the recessed lighting.
My back problem flared up last night, and I'm sort of out of commission. It had been at least a year since I had an issue, but today was a lot of pain and hence I'm tired. I sanded ceiling joint #4, which will need some touch up tomorrow. It took all I had to just sand this one joint, my back is killing me. Ceiling joints #4, #5, #14 and #15 are hence still in progress.
On Friday I hope to nearly finish the ceiling joints in the north half of the garage. If my back feels better, I also hope to install the Leviton OSC20-M0W and OSP20-D0 and wire the feeds for the three rows of recessed lights in the north half of the garage. Each row of four lights are already wired to each other.
-
Garage
- October 9, 2013
-
Garage
I applied the third coat of joint compound to ceiling joint #4, #5 and #14. I applied the second coat of joint compound to ceiling joint #15. I used pre-mixed joint compound, mostly because I aggravated my old back problem and hence didn't feel like mixing the setting-type compound. Since this is a top coat, it'll be fine. It'll all get sealed up with Zinsser B-I-N shortly anyway.I reinstalled the second 8' long T12 HO fluorescent light with the new electronic ballast on the north half of the garage. I consider these ballasts a tradeoff. They produce a lot more RFI than the old magnetic ballasts, making radio reception near impossible when they're on. But they're audibly silent. Given that a lot of my live radio listening these days is streamed over the Internet, it's a tradeoff I'm willing to make. And I will not have them on all of the time once I complete the installation of the recessed lighting.
I know a lot of people consider recessed lights evil. And they are from an HVAC perspective. That's why I bought IC-rated air-tight fixtures. Yes, they'll still leak some air between the fixture and the drywall, and they're not absolutely air-tight. But the holes I cut for them are very snug, and I can caulk the gap if desired. More importantly... in a garage, I like to have lights that are flush with the ceiling. It greatly reduces the chances of breaking a bulb when handling long pieces of dimensional lumber, pipe or whatever. It also gives me several more inches of clearance for a car lift.
The Leviton OSC20-M0W and OSP20-D0 arrived from Amazon. I need to buy a few junction boxes and more wire to get started on the installation. The first set of twelve Cree BR30 5000K LED bulbs should arrive tomorrow and I'm somewhat anxious to see what the lighting looks like in the north half of the garage. It's one thing to know the lumens/sq.ft., it's another to actually experience it. This isn't going to be work lighting, it's just everyday lighting (operated solely by the OSC20-M0W, no light switch).
-
Garage
- October 8, 2013
-
Garage
The four pieces of stainless steel pegboard arrived from diamondlifegear.com. It's very nice, I suspect I'll order more once I have a completed storage plan.The 3/4" threaded ball valves and fittings I need for my air drops arrived from McMaster-Carr, along with some military grade premium pipe thread tape in light green.
I took a slight break from garage work to listen to the last 2 innings of the Detroit Tigers game (ALDS game 4); the Tigers are down 2-1 in the series and hence this was an elimination game.
I then sanded the second coat of joint compound on ceiling joints #4, #5 and #14. I sanded the first coat of joint compound on joint #15. Tomorrow night I'll put another coat of joint compound on these joints, along with the wall joint above the north garage. Once these joints have their final coat of joint comopound and are sanded, I can prime all remaining joints in the north half of the garage and call that half done in terms of ceiling joint repair. I can then prime and paint the ceiling in that half of the garage. The other half is probably going to have to wait for the springtime.
Tonight I realized that the wall between the garage doors is severely bowed. At the moment I'm not sure why, since the drywall is in place. It might just be from settling. But it throws a wrench in my plan to mount stainless steel pegboard on that wall. I can of course shim it, but we're talking about 3/4" or more of bowing. It has me thinking that I should remove a section of the drywall to see what's going on, or at least be prepared to do so. I can of course just put thick furring strips (probably 2x2 poplar) on the drywall, which might not be such a bad idea; it would let me conceal some of the air piping. behind it and hence allow me to use more of the pegboard.
-
Garage
- October 7, 2013
-
Garage
I sanded the first coat of joint compound on ceiling drywall joints #4, #5 and #14. I removed the failed tape and compound from joint #15. I taped and mudded joint #15 and put a second coat of compound on joints #4, #14 and most of #5. I'm calling joints #1, #10 and #11 done as far as joint compound is concerned. They just need some Zinsser B-I-N.

I received a shipping confirmation from diamondlifegear.com for the 4 small pieces of stainless steel pegboard that I ordered. It will arrive tomorrow.
I downloaded the installation instructions for the Leviton OSC20-M0W occupancy sensor and put it in my Manuals collection.
Amazon says the OSC20-M0W and OSP20-D0 should arrive on Wednesday.
-
Garage
- October 6, 2013
-
Garage
I cleaned the old joint compound out of ceiling joints #5 and #14. I taped and mudded the east half of joint #4. I then shored up the drywall around ceiling joints #5 and #14 with drywall screws.I sanded the second coat of joint compound on ceiling joint #10. I may or may not put a third coat of joint compound on this joint. I need to see it during daylight hours since it's above the window.
I taped and mudded ceiling joints #5 and #14 with setting-type joint compound.
I sanded and sealed ceiling joint #3; it is now done. I sealed joint #1 except near joint #10 since I'm not sure I'm done with joint compound there.

As an aside, the Zinsser B-I-N continues to impress me. It dries fast and hard, and seals very well. If it were not so expensive, I'd prime the whole garage with it instead of just using it to seal my joint compound and wood. On the other hand, until I have the garage heated regularly, shellac based primer like B-I-N would be a bad idea for large surfaces since it's brittle compared to latex and oil based primers. I'm only using it to spot-prime the joint compound.
I ordered the Leviton OSC20-M0W occupancy sensing switch and OSP20-D0 power pack from Amazon. This is for the recessed lighting.
I also ordered twelve of the Cree BR30 5000K LED bulbs for the recessed lighting. I will need twelve more once I install the remaining recessed lights, but I want to get one half of the garage lit soon so I can stop using the power-hungry fluorescent lights all of the time.
-
Garage
- October 5, 2013
-
Garage
I installed the metal-reinforced edge trim on the exposed steel angle of the garage door tracks. This will protect my ceiling-mounted air hoses from being scraped by the steel angle if the hose whips around when retracting and when I pull hard on the hose at a severe angle.
I ordered some more valves and fittings for my air supply from McMaster-Carr. This time I ordered threaded valves. After last night's soldering, I've decided I just don't enjoy the care required to solder valves with 95/5 solder. You have to be very careful with the torch to not cook the PTFE ball seal. I don't think I cooked the ones I soldered last night, but I don't have the time to be doing a bunch of these.
I shored up the drywall around another 18' long ceiling joint, and taped and mudded a little more than half of it. Unfortunately I can't do the whole joint at once due to space constraints. I'll do the remainder tomorrow.
I taped and mudded a very bad joint above the northmost garage door. This joint had a 1/2" gap between the sheets of drywall. My new shelving is in the way of doing the finish coats, I'll need to take that shelf down to complete the job.
I sanded the second coat of joint compound on another 10' ceiling joint. This joint will need a third coat of joint compound.
I put the second coat of joint compound on the ceiling joint above the window. This joint was tricky due to a very uneven intersection with the very first joint I had done. It won't be perfect no matter what I do, I have to keep reminding myself that it's a garage and that my main objective is to seal the joints to prevent air and moisture from entering the attic. I was hoping to finish the joint compound work in this half of the garage this weekend, but it's not going to happen.
I created a diagram showing all of the ceiling drywall joints, mostly so I can keep track of my progress. Right now, joint #2 is done. Joints #1 and #3 are mostly done. Joint #11 is done except near joint #10. I'm working on joints #10, #3 and #4. I'd like to get the initial mud and tape in the rest of joint #4, joint #14 and joint #5 tomorrow. However, joints 14 and 5 have not been cleaned of the original compound yet. I'd also like to get the rest of joint #1 and joint #3 sealed with Zinsser B-I-N tomorrow.

I need to decide what I'm going to do with the output of my automatic drains on the air drops. I'm not excited about having buckets under them. I think I'd like to put compression adapter fittings on them and run the tubes through the wall to the outdoors. No space consumed in the garage, and no buckets to tip over.
-
Garage
- October 4, 2013
-
Garage
I made a late night trip to Home Depot for 3/4" copper pipe, 1/2" copper pipe, three more FRP panels, FRP adhesive, some 3/4" copper elbows, and 3 more pieces of 3/4" thick 2' x 4' plywood. I forgot to buy Quikrete for mom. :-( I'll make a trip in the morning for mom's Quikrete.The hose reels and filter/regulator combos arrives from Northern Tool. Automatic drains, 3/4" ball valves, 1/2" ball valves, solder, flux, edge trim (to protect my air hoses from garage door angle iron) and a slew of plumbing fittings arrived from McMaster-Carr.
I started a bit of the copper pipe soldering for the air drops, just so I could get a feel for the flux and solder I'm using and figure out how narrow I can make the drops to conserve wall space. In doin this, I realized I should probably buy more 3/4" ball valves so I can individually disable each drop and also shut off the automatic drains individually for servicing. Of course, as it stands today, I've never had water reach my tools since I have an automatic drain on my tank, another automatic drain on the drip leg near my tank, and the Milton filter that drains when pressure drops below 5 PSI.
-
Garage
- October 3, 2013
-
Garage
I sanded the final coat of joint compound on two ceiling joints, and primed one of them with Zinsser B-I-N. I'm not thrilled with parts of the second joint, but my time is limited and the drywall is crooked enough that it would take a lot of work and joint compound to make it look great. And it's a garage, after all. My main goal is to get the joints sealed so I don't have major moisture penetration once the attic is insulated.I sanded the first coat of joint compound on a third joint. I then put the second coat of joint compound on it.
I taped and mudded the 4' long joint near the window.
I added some of the remaining parts to the air plumbing wish list. Lead hoses, couplers, and the 3/4" and 1/2" copper pipe that I need. I need to add some elbows and figure out how I'm going to connect the compressor. I think I have most of what I need on hand to connect the compressor, it's just a matter of the plumbing configuration.
-
Garage
- October 2, 2013
-
Garage
New Milton 1108 Air filters/regulators should arrive on Friday, along with another self-retracting hose reel, a manual hose reel, a pair of telescoping blow guns and a pair of Milton pushbutton safety couplers. I need to complete my air plan (couplers and whip hoses) so I can start working on it soon. It's become a pain to drag hoses around in the garage. I ordered a slew of parts from McMaster-Carr tonight that I know I need. I will later order the lead hoses and the like. The most important things in this order were the automatic drains, 95/5 (tin/antimony) solder, Nokorode solder flux and the ball valves with T-handles. I also ordered the edge trim to protect my air hoses from the angle iron of my garage door tracks, and most of the copper fittings I need except 3/4" couplers and elbows since I can get those locally at Home Depot.Tonight I sanded the second coat of joint compound on another ceiling joint. This particular joint will need a third coat, which I'll do with pre-mixed joint compound.
I do not have any shipping status from diamondlifegear.com on my stainless steel pegboard order. Kind of disappointing that an online store doesn't provide order status. Hence I can't complete my plan for the bit of wall space between the garage doors. I need to have parts in hand to decide how that wall will be laid out. I may not put much FRP on it if I decide I'm going to have some of the stainless steel pegboard mounted there.
-
Garage
- October 1, 2013
-
Garage
I installed the second piece of FRP near the Rubbermaid FastTrack that holds my yard tools. This FastTrack is normally completely full, I had to empty it to install the FRP. I put one of my leaf blowers (the electric one) and my post hole digger back in place for the picture below just so you can see the purpose of the FRP. It protects the drywall, and it's very durable and easy to clean.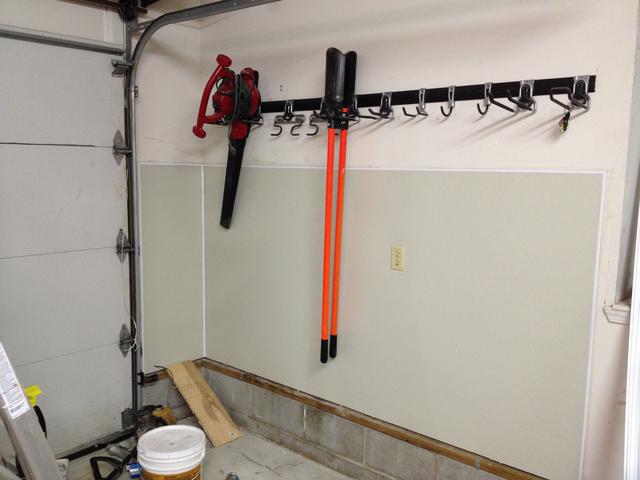
-
Garage
- September 30, 2013
-
Garage
I installed an FRP panel under the Rubbermaid FastTrack that will hold my yard tools. I had forgotten how much work it was to roll this stuff flat after applying the adhesive; I'm tired. :-) I'll cut and install the second piece soon.The ATR19S-SO air tool holders, ten extra ATRA-12 swivel adapters to place on my tools for the holders, and a DAHLDR2-RED air sander holder arrived from VIM Tools. I'm not ready to install them yet.
I ordered four 3' x 2' stainless steel pegboards with backing board from diamondlifegear.com. Two of these will likely go between the garage doors. The other two will likely go on the garage door wall, south of the south garage door. They were not cheap, but I will definitely use them.
I also ordered two Milton 1108 air/filter regulators, another 50' ReelWorks air hose reel with 50' of 3/8" rubber hose, two Milton M-style safety couplers, two more telescopic air blow guns, and a manual air hose reel from Northern Tool. The manual reel will hold 100' of 3/8" hose, though I don't expect to put 3/8" hose on it. I'm expecting to put 1/2" hose on it for the times I need to extend a lot of hose outdoors.
-
Garage
- September 29, 2013
-
Garage
I sanded the two joints I taped and mudded yesterday, and applied the second coat of setting-type joint compound. I taped and mudded another 10' joint using setting-type joint compound.Given that some of my air tool hangers arrive tomorrow, I'm going to take a short break from drywall tomorrow to install two or three pieces of FRP panel. Today I cut one of the pieces: the one that will protect the wall beneath the Rubbermaid FastTrack rail that holds my yard tools. I need to cut a second piece for that area, to go between the edge of the garage door and the north wall. Another piece will be used to protect the wall between the garage doors where I intend to install some air tool hangers.
-
Garage
- September 28, 2013
-
Garage
I moved a few more items to the basement to make it easy to move one of my benchtops around in the garage for taping joints on the ceiling.USA Insulation was here for an estimate to insulate the garage ceiling. I'm happy with the estimate, but I won't be executing it for at least a few weeks.
I taped and mudded two more 10' long ceiling joints. They'll need sanding and a second coat, of course. I also pulled the loose tape from an 18' joint, and cleaned about 1/3 of it. There's another one of these to be done, and then I can tape and mud the remainder of the north side of the garage ceiling.
Tonight I intend to start ordering parts to plumb for air. Tomorrow I'll probably borrow mom's truck and pick up the copper pipe and maybe some more FRP panels. I need 5 10' long pieces of 1/2" pipe and 9 10' long pieces of 3/4" pipe.
-
Garage
- September 27, 2013
-
Garage
I've completed a basic air line plan.
-
Garage
- September 25, 2013
-
Garage
I now have three more 10' long joints cleaned up and ready for taping and jointing. I shored up all of the drywall with drywall screws, and tapped in the nails that had backed out a bit. Hopefully the nails will stay put since there are now screws holding up the drywall.I finally cut up and threw out the three big boxes that were laying on the floor: the boxes for the washer and dryer and the box for the laundry room cabinet.
I didn't get much done for the last two days due to dealing with Comcast problems (my service was down for 5 days and there was the usual trail of fiascos: different story every time I called, which was different from what the automated system was telling me, and as usual the technicians didn't show up for scheduled appointments (first on Saturday September 21 at 2PM, then on Tuesday September 24 at 4PM). They wound up sending an escalation technician after I kept complaining, but he couldn't get here until 9PM. He was here until 2AM last night running new RG-11 cable all the way from the road to the back of the house (over 300 feet), then new cable in the basement since it previously entered the front of the house and I did not want to move my server rack and my modular wiring box that feeds the rooms in the house. While my Internet connection is now working, there are still some issues they need to address at the road. Tests look OK at low and high frequencies with a new amplifier installed in the basement, but middle frequencies (for video services) are still down a lot (like 30dB). Thankfully I'm not using television services at all at this point, but I will be in the future. Once the line technicians fix the issue at the road, I'll probably call the tech back to check my signal strength in the basement. It might wind up way too hot at the low and high frequencies with the amplifier installed. Unlike the zany previous owner, I won't have cable going to every room in the house. I don't need cable in my kitchen, for example.
-
Garage
- September 23, 2013
-
Garage
I cleaned the loose joint compound from another 10' joint in the northwest corner of the garage, in preparation for new tape and compound. This one had a wide swath of joint compound that wasn't adhered to the drywall. I then did the same for the next 10' long joint. I have more of them to do before I start taping and mudding again.I removed the second fluorescent light in the north half of the garage, and removed its ballast. Like the first light, this one will get a new electronic 0F-rated ballast. It saves a lot of weight, and I'm growing very tired of the buzzing noise of the remaining magnetic ballasts.
I shored up some of the sagging drywall with new drywall screws, then tapped in the popped nails with a nail set. Hopefully they won't pop up again. They hadn't come out far enough to pull them without damaging the drywall, and they're rusty so they probably won't come out easily. I still can't believe how few nails are in the garage ceiling drywall; nowhere near enough to meet code requirements.
I was hoping to do some taping and mudding tonight, but it took too long to remove the loose mud in the damaged joints.
I ordered a few things from the Red Hot Deals at VIM Tools: four more ATR19S-SO air tool holders, ten extra ATRA-12 swivel adapters to place on my tools for the holders, and a DAHLDR2-RED air sander holder. I've had one of the ATR19S-SO holders for ages and I really like it. At $11.50 with 5 swivel adapters, they're a steal. I'll likely mount two of them on the wall near my existing air hose reel, and the other two on my air tool cart if I don't ditch it in the name of saving space.
I've decided I'm going to mount two more air hose reels, one at each end of the garage. I don't frequently need more than one air tool at a time, but sometimes I do. More importantly, this is a convenience thing; when there are cars in the garage, it's not always easy to pull an air hose from a single location. By having all 3 reels near the same wall, the plumbing is straightforward.
-
Garage
- September 22, 2013
-
Garage
I cut two pieces of 3/4" thick plywood to 2' x 2'. I drilled holes for my dock fan, and countersunk some 3/8"-16 1.75" long armor-coated bolts from the back in a pattern matching my dock fan's mounting brackets. I then mounted the fan to these pieces. With some assistance from Julie, I mounted the whole assembly on the north wall, right next to the window.
With the dock fan on high and my portable dual fan stand at the garage door threshold, I sanded the 10' drywall joint that I had mudded on the 18th. I then put a coat of Zinsser B-I-N over the sanded joint compound to seal it from moisture until I get around to priming the whole ceiling with KILZ Original oil-based primer.
Sanding the ceiling by hand is exhausting. To sand two of the other joints, I used my palm sander. It's a bit heavy to be holding over my head for long periods of time, but it saves a lot of time. I sealed these joints with Zinsser B-I-N.
I cut a piece of 3/4" plywood to 2' x 3' and mounted it to the ceiling between the garage doors with six 3" long Spax lag screws and four 2.5" long deck screws. I then mounted my 1.5" thick plywood block for my air hose reel to the aforementioned plywood, then mounted the hose reel to the 1.5" thick block. It seems very solid, but only time will tell. I liker this location because it's the center of the garage north-to-south, and with 50' of hose, I can easily get air to any location in the garage from here. I can also easily get air outside from here. The only downside is that if I pull hard to the north or south, there is the possibility of the hose scraping the edge of the angle iron for the garage door tracks. The easy solution to this problem is edge trim on the angle iron. I'll order some from McMaster-Carr.
I have not plumbed for air yet, having not decided if I want copper or black iron or RapidAir.
Given that the cord reel I bought the other day from Home Depot is broken, I'm not going to mount it to the ceiling. It looks like I'll invest in a beefier one, probably with 12/3 wire.
-
Garage
- September 21, 2013
-
Garage
I moved my second computer rack to the basement to get it out of the way.I sanded the joints on the ceiling near the area where the fluorescent light was installed. I then primed these spots with two coats of Zinsser B-I-N. I reinstalled the 8' long T12 HO fluorescent light, with the new electronic ballast installed. Unlike the previous homeowner, I put the screws into the joists above the ceiling so it will not pull the drywall off of the ceiling. I like the new electronic ballast; it will work in very cold temperatures, it's silent, and it weighs a lot less than the old ballast.
The drywall joints on the ceiling that I've redone look quite good. I have a lot more to do, and it's slow going, but at least it's turning out nicely. Of course, to keep them that way, I need to get oil-based primer on the ceiling and insulation in the attic.
I installed one of the pegboard panels in the stairwell to the basement. I then installed four of my spraycan racks on it.
I gathered the parts to install my dock fan. Given the location of electrical outlets in the garage, there's really only one place to put it: east of the window, near the stairwell to the garage. This is a good thing, it will allow me to draw air from the basement when I want to exhaust dust from the garage. I will probably install the fan late tonight, since it's been in my way on the garage floor for a long time.
-
Garage
- September 20, 2013
-
Garage
I put together three more pegboard panels. I put a coat of Zinsser B-I-N on the back of them to help prevent deterioration from moisture and prevent tanins from seeping through paint. I'll prime the sides with Zinsser B-I-N later.I started sanding more of the ceiling joint compound, in preparation for another round of taping and mudding. I'm trying to finish the northeast part of the ceiling so I can put the fluorescent light back in place. I'm not aiming for perfection here, I just want the attic to be sealed off from the garage better than it was with all of the failed joints. So far the setting-type compound is working well for that purpose. It'll be better once I have some decent primer on and get the recessed lights fully installed.
I put a second coat of mud on more of the ceiling joints. I used pre-mixed joint compound on one, mostly due to not feeling like mixing more of the setting-type compound. I'm not worried about moisture causing a problem here, since the first coat was setting-type compound and I intend to use KILZ Original primer on the ceiling, which is oil-based and works very well at sealing out moisture.
I installed the final shelf above the south garage door.
-
Garage
-
Utilities
My Comcast internet connection is still down. They were completely unhelpful when I called earlier today. They're sending a technician out tomorrow, but I don't believe there's anything wrong at my home; it's upstream. I have no signal strength coming in to my modem, and it's the only thing connected, literally a few feet from where the cable enters my home.
- September 19, 2013
-
Garage
I stopped at Home Depot and bought some inside corner trim for FRP panels. I also bought some panel joining pieces, since I expect to protect more of the drywall with FRP panels than just lone panels. I bought some more setting-type joint compound, as well as a bucket of pre-mixed joint compound which I might use as my top coat since it's a little easier to sand. If I were not working on a 10' ceiling with existing paint and compound, I would be using Durabond. But it's a waste of effort on old dirty imperfect joints. I don't have the time to remove a whole lot of old joint compound.I forgot to buy some replacement springs for my recessed light housings; one was missing in the shipment from platt.com due to poor packing. I also forgot to buy a drywall sanding tool with vacuum attachment. I'll get these tomorrow so I can start sanding the first pass of joint compound and start the second pass.
I taped and mudded a few more of the joints in the garage using the setting-type joint compound. I sanded the joint above the south garage door and applied the first coat of primer to it (Zinsser B-I-N). Tomorrow I'll put the second coat of primer on it so I can install the second shelf above that door.
I cut the wood for two of my pegboard frames. I assembled one of the pegboards on its frame. I'll assemble the second one tomorrow. One of these will hold some of my spraypaint can racks, and probably be mounted in the stairwell to the basement from the garage. It will not be heavily loaded, and I don't need spraypaint, Rust Encapsulator, undercoating, etc. very often. And I'd rather have it in a climate controlled environment.
My Internet connection is down, so I can't check the stock levels at Menard's for the Rubbermaid Tough Stuff shelving. However, I've concluded that it's not as strong as the ClosetMaid Maximum Load. In fact it's not even as strong as the regular ClosetMaid stuff. The brackets are OK, but the shelves themselves are fairly flimsy in comparison (much thinner wire lengthwise). Hence for the shelves above my workbenches, I'm probably going to use ClosetMaid. I'm OK with the Rubbermaid Tough Stuff over the garage doors, since they're 20" deep and I need the depth for some things.
-
Garage
- September 18, 2013
-
Garage
The Halo ERT707WHT trim rings arrived for the recessed lights. They will work fine, I fitted one to check. They're simple and plain, but that's just what I wanted for the garage and the price was right. Especially considering that the LED light bulbs are going to cost a small fortune.Screws and spacers arrived for building and mounting framed pegboard panels.
I scraped more of the old joint compound off of the ceiling, and put the first coat of mud and tape on another joint (a 10' section). I think I now have a pretty good idea of how much of the setting-type mud I can mix at a time and use before it becomes unworkable: about 4 cups. I could do a lot more if I was working on scaffolding or drywall stilts, but I'm using a ladder and spending a lot of time moving the ladder. The joint I filled tonight was a disaster due to poor drywall installation; there was a 1/2" gap along most of the 10' span.
I'm a little bit sidetracked tonight by iOS 7. I'm patiently waiting for the download and installation to finish on my iPhone.
-
Garage
- September 17, 2013
-
Garage
I put the second coat of mud on the drywall joint above the garage door. I used my 10" knife and don't expect to use my 12" knife. It's not worth the effort in a garage. And until I have the ceiling insulated and a heater in place, cracks are likely going to reappear.I also put the second coat of mud on the small section of the ceiling I worked on yesterday, and the first coat on a nearby section. I don't expect these areas to remain uncracked either, but the original tape had no mud under the tape in several areas.
I moved one of my computer racks to the basement. It's been in my way sine I bought the house. I will move the other one to the basement tomorrow. Not so easy doin it alone, but it's manageable.
I put some drywall screws in the ceiling drywall in the northeast quadrant of the garage, wherever it was obvious that the drywall was loose. This is in preparation to tape and mud the drywall joints that have failed (which is all of them in this quadrant). I expect to do a decent amoun of taping and mudding in this part of the garage over the next 2 days.
I removed the hooks that were screwed into the ceiling between the garage doors. I'll be putting a cord reel and air hose reel here. It's a good spot for them since it's the center of the garage from north to south and overhead space is already constrained here by the garage door tracks. I need to add an outlet in the ceiling for the cord reel. In all likelihood I'll just branch from one of the garage door opener outlets, sine those are the only things on that circuit and I won't be opening and closing garage doors while operating anything connected to the cord reel.
On Saturday the 28th, USA Insulation is coming out to help me figure out what to do with garage attic insulation. I want closed-cell foam to be sprayed in, but I know it's not cheap. However, it's the best route to a reasonable R-value at low thickness. The main issue here is the fact that I'm not done planning electrical work in the attic.
-
Garage
- September 16, 2013
-
Garage
I taped and mudded the failed drywall joint above the south garage door. I used setting-type joint compound. I'll need to sand and put a second coat on tomorrow. With what I had left in my mud tub, I taped and mudded a short section of a failed ceiling joint. This was a section under the fluorescent light I removed a while ago and intend to put back. I'd like to fix more of the ceiling joints, but at the moment I don't have enough room to move around easily in the garage. I need to move some more things to the basement, especially the big space hogs like my old computer racks. I am trying to do some planning. I think I want to get rid of almost all of my benchtops. They take up tremendous amounts of space, and I don't use them often. All I probably need is a Vika TwoFold or two. And I don't really need my Lista fastener storage in the garage; it would be fine in the basement. I definitely don't need my 8' workbench in the garage, thought it might be nice to cut it shorter and keep it tucked in the awkward corner that once held the utility sink. Especially if I keep it high enough that I can roll some things under it. I do need a place for a vise, of course.I ordered 24 steel slot reinforcements for my slatwall panels. This is enough to do every other slot. I don't need reinforcements in every slot. These will be delivered to my local Do-it-Best hardware store and I'll pick them up there. Avoids the shipping cost.
I also ordered screws to build my pegboard frames and screws and spacers to mount them to the walls. I need to do this soon, I have a lot of tools that I previously had hung on pegboard, which currently have no home.
-
Garage
- September 15, 2013
-
Garage
While marking the wall above the south garage door for shelf uprights, I pulled the joint tape for one of the many drywall joints that have failed. None of the joints in the garage that I've looked at so far were done correctly, including this one. There is no joint compound under the tape. It's no wonder that most of the joints have tape that's falling off; there's nothing holding the tape to the drywall underneath the tape, and the joints themselves have no mud in them. Sigh, shoddy drywall work. I'm going to need to fix it soon, probably starting today. On some of the walls, I'm not so concerned, since I'm probably going to cover the drywall with FRP panels (much more durable than a painted drywall surface, and easy to clean). For this particular joint, I'm going to use setting-type joint compound. Note that like many other joints in the garage, this joint is unsupported at the edge. Very sub-par drywall job by someone. :-(I went to Home Depot and bought a bunch of supplies for various projects. A sheet of 5/8" drywall to replace the sheet destroyed by the previous owner's dryer duct hackery, four sheets of textured FRP for drywall protection in various places, a large bucket of FRP adhesive, 16 Spax 5/16" diameter 3.5" long corrosion-resistant lag screws, two more 2' x 4' pieces of 3/4" thick B/C plywood, four pieces of 2' x 4' pegboard, six 8' long 1x2 pieces of select pine to mount pegboard, twelve cap mouldings for FRP panels, a Husky 50' cord reel, two gallons of Kilz Original oil-based primer, a small bucket to mix setting-type joint compound, and a couple more economy-grade paint brushes.
I put two coats of Zinsser B-I-N on the four pieces of 2' x 4' x 3/4" sanded plywood. I know I'm going to cut these pieces, but I figured I might as well get a head start on priming them and I used the B-I-N because it's better than anything else for priming wood.
-
Garage
- September 14, 2013
-
Garage
I finished installing the south garage door opener, except for the obstruction detectors. For now I'm using the old ones, which work but are so loosely mounted that they have no chance of staying aligned. I'll need to remount them, or install the new ones that came with the garage door opener.I adjusted the torsion springs on the south door and replaced the old door rollers with new 13-ball nylon rollers. The door is now quiet and smooth.
I cut twelve more pieces of Rubbermaid Tough Stuff upright to mount the shelves above the south garage door. I mounted six of them to the wall and installed one of the shelves.
-
Garage
- September 13, 2013
-
Garage
I almost finished installing the south garage door opener. It's mounted to the header and the ceiling, in the same manner as the north door. It is rock solid. I still need to adjust the springs on the south door, attach the garage door opener to the door and adjust it, and install all of the obstruction sensors. I need to install the new rollers in the south door, and install the new garage door seals.I also need to officially mount the control pads on the wall by the door to the house; I have the one for the north door just temporarily mounted at the moment. And I need to install the keypads outside.
I am preparing to order G-Floor for the garage floor. I wanted to wait to do this, but Home Depot has a really good price right now on what I want (hundreds of dollars cheaper than anywhere else): 9' x 44' industrial grade coin pattern in slate gray. I also need to be realistic: if I wait, winter is going to make a complete mess of the concrete floor from parking a wet, snowy, muddy car. Two of these will cover the entire garage floor. I will buy edge trim this time, instead of using tape to mate pieces together. The industrial grade is 13% thicker than what I've used before, which will help prevent stretching from jacking cars. I may later put RibTrax on top of it, but having something that makes spills easy to clean is a very good thing.
-
Garage
- September 12, 2013
-
Garage
I stopped at Home Depot on the way home from work. I bought five Arlington BE1 electrical box extenders for areas where I might install slatwall around an existing electrical outlet.I removed the old garage door opener's header bracket from the wall above the south garage door. It was installed directly on the drywall, not recommended. The lag screws holding it were loose, probably due to compression of the drywall. I cut two pieces of 3/4" thick oak plywood as a pad and used 3" long lag screws to hold the first one to the stud behind the drywall. The second piece of oak plywood is screwed to the first with deck screws. I then used lag screws to mount the bracket for the new garage door opener to the second piece of oak plywood. It should be plenty solid. Note that unlike the north door, this bracket is centered on a wall stud. Since I didn't want a 33.5" log support piece up there, I opted for about 8" of width for the plywood pieces. Given that I'll be mounting the opener motor to the ceiling in a much firmer manner than the previous owner, and installing all new 13-ball rollers, I think it will be good for a very long time.
The trim rings for the recessed lighting shipped today and should arrive next Wednesday. I picked out the motion detection unit and power pack that I want to use to operate the recessed lights, but have not ordered it yet. I need to look at the installation instructions to figure out where I should place it, keeping in mind that I intend to insulate the garage ceiling and that I need to hang hose reels and a garage heater from the ceiling. A garage heater will pose two problems: it will block the infrared vision of the unit and when on it will likely trip the ultrasonic sensing of the unit.
-
Garage
- September 11, 2013
-
Garage
I ordered 24 Halo ERT707WHT trim rings with metal baffles from platt.com. These are for the new recessed lights in the garage. Slightly cheaper product price than Home Depot, but more importantly, they had plenty of them in stock. Home Depot has none in stock. I hope they fit OK. These were far and away the least expensive trim rings I could find, so at least it won't be a big loss if there's an issue with them. And unlike most of the baffled ones I've seen locally, the baffles are metal instead of plastic. The rings are high gloss, which I'm not excited about but it does make them easier to clean. And for $3.16 each, I can't complain.I installed one of the 84" Rubbermaid FastTrack rails and got most of my yard tools off of the floor.
I removed the south garage door opener. It has not been functional since I purchased the home, and Iv'e had the replacement (new, still boxed) for months. It's time to start installing it.
I disassembled both of the old garage door openers and put them in the trash. I have no idea if my trash collection service will take them, but it was worth a try.
-
Garage
- September 10, 2013
-
Garage
I stopped at Home Depot on the way home. I bought two pieces of 3/4" thick plywood, 2' x 4'. One of these will be cut up to support the incorrectly sized 32" Rubbermaid FastTrack rails. The other will be used to mount air hose reels. I bought a gallon of Zinsser B-I-N to seal and prime the plywood, as well as other things. I've found nothing that works as well as Zinsser B-I-N when it comes to sealing wood for painting. It's expensive, but my time is worth more than the price difference versus products that don't work. I bought some economy paintbrushes to apply it.I also bought two 84" long Rubbermaid FastTrack rails, another FastTrack power tool holder, a pair of FastTrack ladder hooks, a pair of FastTrack multi-purpose hooks, a pair of FastTrack hose hooks and a pair of FastTrack dual handle hooks. I'm sure I'll buy more, but Combined with the FastTrack kits I bought from Menard's, I think this is a good start. It will let me get many items off of the floor without impinging on garage space as much as shelves.
Speaking of shelves, I installed the second shelf above the north garage door tonight. I'm liking this storage since it's out of the way but I can easily see what's up there. I will be buying more of these shelves in the future, to go above my tool cabinets.
Tomorrow I hope to start working on the installation of the second garage door opener. I need to finish that before I install the shelves above that door. I also need to start doing some of the drywall joint repairs, but it was too hot tonight and will be too hot tomorrow to work with setting-type joint compound.
-
Garage
-
HVAC
My Nest Energy Report for August shows that I'm in the top 5% of Nest users for energy saved. I believe it has paid for itself at this point, so I've crossed the break even point. It didn't take long; two months of air conditioning savings was sufficient.
- September 8, 2013
-
Garage
I went to Menard's in Davison and bought some Rubbermaid Tough Stuff 20" wire shelving to go over the garage doors. I also bought three sheets of slatwall and two Rubbermaid FastTrack 8-piece kits to hang some of the yard tools.I cut some 25" pieces from the Tough Stuff 70" uprights with my chop saw. These 25" pieces are to mount a single shelf above one of the garage doors. For now I've only cut enough to install one of the 96" shelves, so I can get an idea of what the 20" shelves will look like in this location. I have ceiling and wall finish work to do, so I can't leave the shelves loaded up for long. But once I have more of them up, I can use them to move things around to make working in the garage easier.
After mounting the uprights, I put 20" shelf brackets in and placed a shelf on them. At the moment, I like the 20" deep shelves here. This is space that is typically not utilized. I have of course seen many examples, this idea isn't original. Many examples show a much larger loft, hung from the rafters. Given that I intend to have a car lift, I don't want the ceiling lowered for more than a small amount. This is why I might eventually wind up with 16" shelves instead of 20" shelves here. I will eventually have a separate 20' x 20' garage built to house a lift and my automotive tools (and the lawn tractor), but I intend to always have a MaxJax in the main garage.
The slatwall from Menard's is the Anchor Core slatwall from Wind Mill, redistributed by garageescape.com. I can buy reinforcing inserts for it at Do-It-Best, though they don't seem to have it in stock (I need to order it for pickup in the store). I will probably cover many of the walls with slatwall, since it gives me a lot of options for hanging things as well as rearranging as needed. That included cabinets.
-
Garage
- September 7, 2013
-
Garage
I partially wired twelve of the recessed lights. I wired three rows of four together. These rows will later get feed wiring. The wiring done today is neatly stapled to the sides of the bottom of the roof trusses. This was a lot of work, mostly because it was warm/hot in the garage attic today.I put drywall screws in a bit more of the drywall that had sagged. I still have a lot of work to do on this front.
-
Garage
- September 5, 2013
-
Garage
I installed six more of the Halo IC-rated recessed light fixtures in the garage ceiling. These went faster than the first six due to not working in cramped quarters. So there are now twelve of them on the north half of the garage. I have twelve more to install in the south half of the garage, then I need to wire all of them. I also have not purchased trim rings yet. I need to do that soon so the garage isn't leaking heavy amounts of air into the attic.This lighting may seem like overkill, but I consider it a necessity. This will be the everyday lighting, and I want Julie to be able to see well when she pulls into the garage. Her vehicle is tall, and will block most of the light from the garage door openers. That's one of the reasons I crawled around on my hands and knees with no head room to get the cans in near the north edge of the garage. Those will light a path for walking even if she is parked in the northmost parking spot in the garage. The two rows of lights near the center of the garage are a little closer together than others to give more light on the typical path from the door to the house to the outdoors.
I have decided that I'm going to use heavy-duty wall-mounted wire shelving at about 8' height around much of the perimeter of the garage, including above the garage doors. This will give me a lot of storage space for things I don't use frequently, without infringing on space for tool cabinets, vehicles and walking.
I need to do something about my old workbench. It's too long to use anywhere in the garage, but I like its design. I'm not sure whether or not it can be transported to the basement, it's tall. If not, I will likely cut it in half and make two 4' long workbenches.
-
Garage
- September 4, 2013
-
Garage
I stopped at Home Depot in Auburn Hills on the way home from work. I bought twelve more Halo IC-rated recessed lighting fixtures for the garage ceiling. Since I couldn't find my old drywall screw setters, I bought a 4-pack of the DeWalt ones. These make it easy to sink drywall screws to the right depth without breaking the drywall backing paper. For $4.97, a worthwhile thing to have to make drywall screw driving a fast operation.
-
Garage
-
Kitchen
I bought four more Cree BR30 LED bulbs and installed them in more of the recessed light housings in the kitchen. There are now six of them in the kitchen, along with one Philips that I don't like as much and two compact fluorescent BR30 bulbs. I'll later replace the remaining bulbs with the Cree BR30 bulbs. The light quality is better than any other energy-saving BR30 I've tried, and they come on instantly (no delay like other LEDs, and of course no warm-up time).
- September 3, 2013
-
Garage
I cut the holes for four more of the recessed light fixtures and mounted them. Due to the roof framing, the lights closets to the north wall of the garage had to be placed a little oddly. Not a big deal, functionality is the objective.I spent an hour removing one of the pieces of plywood from the roof trusses so I can install more of the recessed light fixtures. I carefully pried it up one nail at a time. For the other pieces, I think I'll use my oscillating tool to cut the nail heads off. It will save a lot of time, and time is worth more than the plywood I was trying to save.
I submitted a request for information on closed-cell foam insulation to USA Insulation. It's what I would prefer to use in the garage attic. Though I know it's expensive, it yields a much higher R-value per inch than my other options, and it's much less affected by moisture. Since I intend to install a natural gas garage heater at some point, I need insulation; it's not optional. I also want to retain some of the garage attice storage space, and since the trusses are 2x4 construction on 24" centers, I don't have the space for a lot of depth. However, I could feasibly use the closed cell foam only in the areas where I want to keep storage floor, and blow in cellulose everywhere else. The main issue there is the 24" centers; the drywall won't hold a lot of mass. Especially since it wasn't installed correctly in the first place. There are about half the number of nails that there should be, maybe less. With nails, there should be a nail about every 7 inches. In most of the drywall, there's a nail every 16 to 20 inches. Yikes, this wouldn't even be OK with drywall screws. With all of the other issues, it's no wonder that the drywall joints are failing.
-
Garage
- September 2, 2013
-
Garage
I bought four new GE 72109 high-output ballasts at Home Depot. These are electronic ballasts, and should be silent. They will replace the old magnetic ballasts in the 8' long HO fixtures on the ceiling. They were not cheap, so I hope they work well.I also bought some new work electrical outlet boxes, some electrical outlets (GFCI and non-GFCI), some wall plates for the outlets, some 1x2 poplar, some Strong-Tie #10x2.5" screws and some 3M Extreme mounting tape. The mounting tape is unrelated to the garage; it's for mounting my Kresto dispensers in the laundry room and/or kitchen.
The new ballasts fit fine in the old fixtures. They are much lighter in weight, which will make it easier to remoun the fixtures.
I broke one of the bulb connectors when installing a new ballast in one of the old fixtures. I could not find any of my super glue, so I used Loctite 325. I don't know if it'll work, but I suspect it will. The part that broke is part of the wire guide, and not part of the bulb retention. It is not exposed to much force.
I spackled the holes in the ceiling the previous owner made for his toggle bolts. They'll take a while to dry, since they were almost 1" in diameter.
I moved a few more items to the basement to make more room to work in the garage.
I think I've completed the layout for the recessed lighting. I cut the holes for two of them, and installed the cans in the ceiling. Very easy with the hole saw for recessed lighting.
-
Garage
- September 1, 2013
-
Garage
I removed one of the 8' long fluorescent lights from the ceiling. It was mounted ot the drywall with toggle bolts like the others, and had pulled the drywall off of the trusses. So this is what it looked like. Fairly obvious why I need to install some braces in the attic to bring the drywall flush again before I redo the joints.
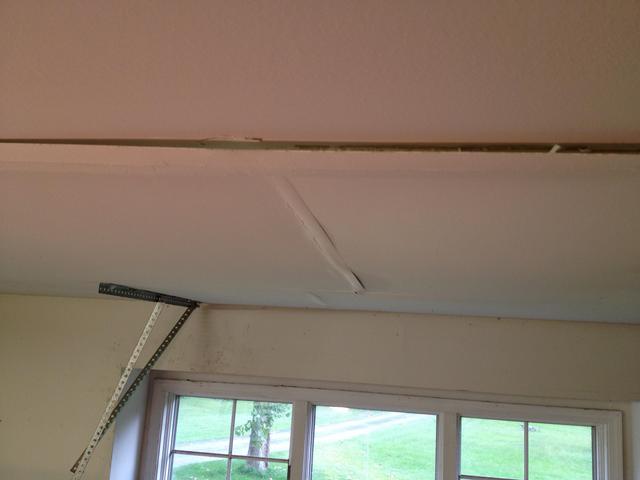
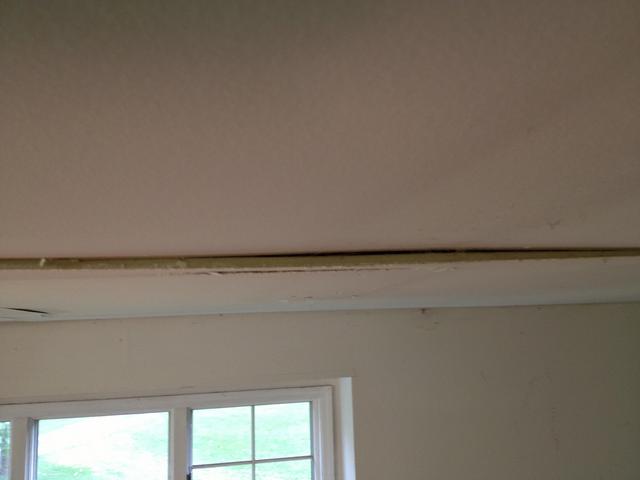
I removed the tape and some of the mud from this joint and another, then drove some drywall screws in a few places just to get an idea whether or not I can get the drywall back into a position I can accept. I think it's OK, but it's going to take a decent amount of work to retape and mud the joints. I'm not going to do that work until I have the recessed lights positioned and some insulation installed. Otherwise I'll just be risking cracking the joints when I'm working in the attic.
I'm going to firmly attach the new fluorescent lights to the ceiling instead of using the included hanging chains, but I'll space them from the ceiling with some oak pieces just so they aren't flush mounted. The instructions don't say whether or not it's acceptable to flush mount them, but I think it's wise to allow a small amount of air to pass over the top of the ballast housing.
I disassembled one of the new Lithonia Lighting 1284GRD RE lights I bought at Home depot. I could hardwire them if desired, but I think I'll use the cords. The 8' lights that were poorly hung in the garage were concealing outlet boxes. So all I need is the outlets (preferably GFCI), and I can simply plug in the new lights. That will make it easier to replace them in the future if necessary or desired.
I spent a few hours creating a rough drawing of a top view of the garage ceiling so I can plan my lighting layout. It's unfortunate that the pull-down stairs for the garage attic conflict with a good plan for the number of fluorescent lights I want to install; it's right where I'd like one of the lights. I could move it, but that would mean more ceiling drywall and trim work that I'm loathe to do right now. Given that I'm increasing the lumens of fluorescent light in the garage from 70,400 to 94,400, I think I'll be OK with one light being a couple feet away from its ideal position.
However, it's worth noting that the original lighting in the garage has T12HO bulbs. They're 110W each, and theoretically should emit over 8000 lumens each. They do illuminate the garage nicely, my main complaint with them (other than the horrible mounting) is the noise from the ballasts. I could easily remedy that problem by replacing the ballasts with GE 72109 ballasts (Home Depot SKU 714264). This also potentially eliminates some of my layout issues.
-
Garage
- August 31, 2013
-
Garage
I went to Home Depot in Auburn Hills and bought a 6.375" diameter Milwakuee hole saw for recessed lighting. This will be much faster than using a drywall saw to make the holes for the recessed fixtures, and will create a near-perfect fit. I also bought some screws to fasten the Strong-Tie brackets to the 2x4 braces I'm making to repair the sagging drywall issues created by the previous owner's cluelessness in hanging fluorescent lights. I bought some setting-type joint compound and joint tape to repair the joints on the ceiling. I bought ten more 5000K T8 bulbs to fill the new 4' lights. I also bought some white Rust-Oleum Appliance Epoxy to paint the underside of the hoods of the new lights to get more reflected light.I painted the underside of the hoods of the new fluorescent lights with the Rust-Oleum white appliance epoxy. They were originally painted with a gray reflective paint, but when I tested one of the lights earlier this week, it didn't seem very effective. At a minimum, I think they look better with white-bottomed hoods. I wish I had left one of them with the gray paint so I could do an A/B comparison, but to my eyes, they look like they're giving off more light with the white paint versus what I saw last night with the original gray paint.
When it cools off a bit tonight, I hope to start working on fixing the ceiling drywall issues. I also need to take one of the new fluorescent lights apart to see how hard it would be to wire them directly instead of using the included cords. Of course there are upsides to using the cords; it makes it easier to replace an entire fixture should it ever be necessary.
I created four support braces for the garage attic, to shore up the areas with sagging drywall. These are 22.5" long with Simpson Strong-Tie brackets on the ends. I have a fifth one cut, but I ran out of battery in my impact driver before I could mount the Strong-Tie brackets to it.
I need to start considering tool cabinet positioning and air line setup. Right now I have my air compressor roughly where it needs to be, dictated by the location of the 240V outlet. Of course I could run another 240V circuit, and in fact I'll need to do that at some point for welding. But aside from that, I need to run air throughout the garage, with more drip legs than I have now. I really like the Norgren automatic drain I have now; in combination with the filter I have and the automatic drain I have on the compressor, I've never had water enter my hoses. But with more iron pipe through the garage, I'll need more drip legs and I'll also need a more effective filtering setup in one location for paint guns.
-
Garage
-
Master bathroom
I bought a new 6x10 wall register at Home Depot to replace the severely rusted one near the toilet. It's the same one I used in the laundry room: the frount louvers can be individually adjusted to pount in any direction left to right, and the on/off lever is directly attached to the inner louvers and recessed. Hence panting it is of no consequence to its operation. It's also a high-flow unit, the front louvers are further apart than typical.
- August 30, 2013
-
Garage
I stopped at Home Depot in Auburn Hills on the way home from work. I bought twelve Halo IC-rated recessed lighting fixtures and two more Lithonia Lighting 1284GRD RE 4-light T8 heavy duty shop lights with 0F-rated electronic ballasts. I did not buy trim rings for the recessed fixtures since the reflective/specular ones in the store are expensive. These will be installed in the garage, though I have yet to decide on a layout for lighting. Given that I will be loading these with LED bulbs (probably the new Cree BR30 9.5W bulbs), power consumption will be very low. I could easily run a lot more of them on a single circuit, but at the moment I don't anticipate needing more than twelve of these for what will just be ambient lighting. Fluorescents will be my work lighting.
-
Garage
- August 29, 2013
-
Garage
New garage door rollers arrived. I installed them on the door with the new opener. I used the method that the professional installers use: I bent the lower part of the track (the U-shaped retaining part of the track) out a bit a few inches above the topmost roller when the door is closed. That allowed me to pop out each roller by positioning the door with the roller at the bent part. That includes the lowermost roller, whose bracket holds the cable that's attached to the torsion spring. This is far and away the easiest way to replace garage door rollers; I was done in 10 minutes (both sides), including the lowermost roller that you can't do by just removing the bracket (it's under tension from the torsion springs). And if you have a fiberglass or wood door, it's not all that advisable to take out the lag screws for the brackets anyway; I've seen people strip the wood or fiberglass when replacing them.. Once all the rollers are installed, you just bend the track back. I used an adjustable wrench to do the bending, but vice grips or a Knipex plier wrench will work too. A little tapping with a hammer might be needed to get it perfectly straight again. Seek forward about 6 minutes into this video by a nice gentleman at ddmgaragedoors.com to see how it's done.While I was at it, I put a little more tension on the torsion springs. The door is now almost effortless to open without the assistance of the garage door opener, and is VERY quiet when operated with the opener. It's mechanically near perfect. Now I just need to install the new door seals and start working on the other door.
I've decided to brace some of the areas in the garage ceiling where the drywall joints have failed. This is largely because the drywall has bowed from the previous owner's terrible decision to hang heavy 8' long fluorescent lights from the drywall alone using toggle bolts (and only one on each end). While I'd like to replace the drywall, I just don't have the time to prepare the garage for it right now. I already have some 2x4 hangers I can use.
When I get around to repainting the garage, I think I'm going to use Olympic ONE paint in a satin finish, white.
-
Garage
- August 28, 2013
-
Garage
I verified that the previous owner mounted the fluorescent lights in the garage using toggle bolts. Which is why they're pulling the drywall off of the ceiling. Sigh, stupidity reigns. He could've moved them just a few inches and caught the bottom of the joists, but instead chose to mount them to just the drywall. They'll all have to be remounted properly. I'm also going to buy more of the Lithonia Lighting 1284GRD RE 4-light T8 heavy duty shop lights with 0F-rated electronic ballasts. Eventually I'd like to replace all of the garage lighting with these since they're somewhat protected (wire cage), will work in the winter, don't buzz, bulb replacement is easier (4' bulbs instead of 8' bulbs), and they look nicer than bare fixtures. Plus they're easier to fit wherever I need them.Since I've bought several new tools recently, I finally got around to printing and sealing some label cards for new Systainers for my old Bostitch pneumatic narrow-crown stapler and my new Hitachi N5008AC2 7/16" crown pneumatic construction stapler. These are both in SYS 1 T-Loc Systainers. I need to print labels for the Systainer Maxi that is holding my old Senco FramePro 701XP pneumatic framing nailer. And I need to buy more Systainers for many other tools. The idea here is to get most of my power and air tools into Systainers so they'll stack nicely on shelves, many of them above the garage doors. Having a bunch of differently-sized blowmolded cases with rounded corners that don't latch together makes for terrible storage. The Systainers are expensive, but they work so wonderfully as a system and I like being able to make my onw label cards that can be inserted on 3 sides of the T-Loc Systainers (and easily swapped when I rearrange).
I also need to buy some foam to protect some of them inside the Sysytainers. The cheapest option that's easy to cut to shape is Kaizen foam.
The next tools to be placed in Systainers will be the Bosch MX30E oscillating tool, Bosch PS21 and PS41 set with charger, and my Bosch jigsaw. I use the PS21 and PS41 fairly regularly, so those will likely wind up on a 495020 Systainer cart. The MX30E and jigsaw will wind up on a shelf.
-
Garage
- August 27, 2013
-
Garage
I stopped at Home Depot in Auburn Hills to get more garage door seals. Unfortunately, despite looking similar to the ones I bought at the White Lake Home Depot, these are different. They're better (sturdier, and the sealing flaps are wider). Hence I will likely buy more of them and use them on both doors. They also have 16' long ones, which the White Lake store did not have. Of course I can't transport the 16' long ones in the MINI Cooper. :-)
-
Garage
-
Laundry room
The chrome foldable laundry valets arrived. I like them, despite the fact that the engineer that designed them isn't terribly smart. The spacing of the mounting screws is such that you'll only get one into a stud. Logically the right place for that screw would be the center top of the mount, since that's where the most load would be experienced. But he didn't put a screw hole there. There are 3 holes at 120 degrees from each other on the circular mounting plate, with one at the bottom (which will essentially carry no load at all). If he flipped the mounting plate over, it'd be a near perfect design. Instead it's just OK. I'll probably use them anyway, but I wish I had noticed this before I ordered them.
- August 25, 2013
-
Roof
I took a look at the vent pipe in the garage attic, in the interest of preparing to replace its boot on the roof. This vent is the vacuum breaker vent for the utility sink in the laundry room. It is 1.5" almost all the way to the roof, then transitions to 3". I'm not sure I can fit a coupler in the 3", there might not be enough room. To remove the 3" section while replacing the boot, I might need to cut and couple the 1.5". At the moment I don't have a 1.5" coupler.I went to Lowe's in White Lake and bought a Bosch MX30EK-35 oscillating multi-tool kit. I see no other way to cut the vent pipe in the garage attic cleanly, and I've needed one of these tools for a long while (grout, door jams, etc.). In fact I'll likely be using it to fix grout issues in the master bathroom shower before the year is out.
I wish Bosch would just stop putting their tools in one-off blow-molded cases. Half of the case is empty, and of course you can't stack it with any other case. They've been making their L-Boxx cases for years now, why can't they use these for all of their tools that come with cases? Of course I'll just buy another Festool Systainer to hold it.
-
Roof
-
Garage
I removed the switch cover plate by the back door to look at the switches. Two of them are 3-way, one of them is single-pole. That means I need another 1223-0LC switch. I still don't know what's connected to some of the switches in the garage; nothing visible occurs when I toggle one near the door to the house.I sprayed some EEZOX Cycle Tune-Up on the torsion springs of one of the garage doors. This was just to prevent rust. As near as I can tell, the Cycle Tune-Up is extremely similar to their Gun Care product. Goes on wet, but dries.
I went to Home Depot and bought another 1223-0LC switch and four strips of 7' long garage door seal to replace the damaged ones on one of the garage doors. Unfortunately they didn't have more, so I'll have to wait to replace the seals on the second garage door.
I installed the new light switches at the back door. Two 1223-0LC and one 1221-0LC. And now I know why one of the old decorator switches I replaced did nothing: it had failed. Though it wasn't cheap, I'm glad I replaced all of the garage switches with Leviton industrial grade switches. They're rated for a minimum of 50,000 cycles. I expect them to still be working 20 years from now. And I really like the amber illumination when the switches are off.
- August 24, 2013
-
Garage
I ordered some 13-ball nylon rollers for the garage doors from Amazon.I want to build some shelves over the top of the garage doors. This is typically space that's difficult to utilize, but shelves will make it usable. To get to them, I'll probably buy an Xtend & Climb ladder; they take up very little space when not in use.
-
Garage
-
Laundry room
I ordered some laundry valets from Amazon. I'll use these to hang clothes fresh out of the dryer. -
Septic pipe repair
I put the second coat of sealant and reinforcing fabric on the foundation where the septic pipe exits the wall. The first coat had not completely dried; I guess it never completely dries.
- August 23, 2013
-
Garage
I stopped at Home Depot and bought another triple-gang stainless steel switch cover plate for the garage. This one will go by the door to the back yard. I also bought more of the GE Reveal 100W-equivalent light bulbs, mainly because I know they will not last long. Hopefully by the time I burn them all out, LED replacements will be a little cheaper. Right now, a Philips 422220 (75W equivalent) is $38.50 and a Philips 423535 (100W equivalent) is $70. Not worth it to me in the garage door openers.I lubricated the hinges on the left garage door and looked at the rolloers. Both of my garage doors need new rollers. I'll order some tomorrow.
-
Garage
- August 22, 2013
-
Garage
I stopped at Home Depot and bought two more 1223-0LC light switches. I also bought some GE Reveal 100W equivalent bulbs for the garage door openers, even though they're halogen inside and will not last all that long. I'll probably eventually replace them with Philips LED bulbs, but these will do for now. They consume 72W of power each.I installed the three new light switches by the door to the house. Two were 3-way and were replaced by 1223-0LC switches. The other was a single pole switch and was replaced by a 1221-0LC. I then installed the new stainless steel triple-gang cover plate. Yay, no more decora switches on the garage side of the door to the house. The new switches were expensive, but they're industrial grade and should outlive me. Several of the decora-style switches in the house have failed because they're cheapies. I tend to use my garage a LOT and hence need switches that will last.
Tomorrow I'll work on installing the obstacle sensors and install the keypad. I might even start installing the second opener, but I need to move quite a bit of stuff out of the way to do it. Of course, it's high time to get stuff out of the way in the garage so I can put my cars in it.
-
Garage
- August 21, 2013
-
Garage
I stopped at Home Depot and bought the 1223-0LC light switch I need for the garage. I also bought more hardware so I can install the second garage door opener (lag screws, galvanized angle, galvanized flat pieces).I now have a functioning garage door opener, but I have yet to correctly position the obstacle sensors. They can't be effectively track-mounted due to the track being right against the cinder blocks on one side of the door. If I mounted them on the tracks, they'd be too high. The previous owner taped his together on one side of the door so they're effectively disabled. I've disabled mine for now, but I will be mounting them soon.
I'm not happy with the wiring to the control pad. It is jammed in the wall somewhere so I can't easily replace it, but it's longer and thicker than I'd like (or need) at the wall while being shorter than I'd like at the motor. And I will need to reroute it in the garage when I insulate the garage.
It turns out I need some more of the 1223-0LC or similar switches. I didn't realize that the fluorescent lights in the garage are on 3-way switches (one of the switches by the back door to the garage is for the fluorescent lights). If I had been smart, I'd have bought all 3-way switches, even though they're $4 more each.
-
Garage
- August 20, 2013
-
Garage
I stopped at Home Depot and bought two Lithonia Lighting 1284GRD RE 4-light T8 heavy duty shop lights with 0F-rated electronic ballasts. I also bought a 10-pack of 5000K bulbs to populate them. If I like them, I'll probably buy six more. Not that I normally need it, but it would be nice to be able to get to 100 lumens per square foot in the garage when necessary. Of course, that's a pretty penny in electricity... at 1024 watts or so for eight of these, and assuming 10 cents per kilowatt hour, we're talking about 10 cents an hour to run them. And that's not including any of the recessed cans I intend to install. But I won't be working in the garage every day, nor for 8 hours a day. If it costs me an extra $6 to $10 a month (worst case) to have this lighting, I'm not going to fret. Good work lighting is an important part of avoiding mistakes and injuries.Anyway, I also bought five Leviton 1221-0LC 15/20 amp industrial toggle switches. These are illuminated when off, so they're easy to find in the dark. Two are to disable the garage door openers, the other three are to replace light switches. Of course it turns out that one of the ones I need to replace in the garage is a 3-way switch, so I'll need to go back to Home Depot and get one of the 1223-0LC switches.
I also bought two stainless steel wall cover plates for the new switches; a double-gang for the garage door opener switches and a triple-gang for the light switches. Nothing exciting about these, I just wanted stainless steel for cleanability and durability.
While I was there, I also picked up a set of Ridgid cobalt drill bits and some spares of the small size DeWalt split-point Ti-coated bits that I seem to break once in a while.
My original plan for tonight was to put the second coat of sealant on the outside of the foundation. However, the weather forecase for tomorrow night nixed that plan. The stuff takes 48 to 72 hours to cure, and there's a 60% chance of thunderstorms tomorrow night. Looks like I might have to wait until Thursday night.
I cut, drilled and installed the header support over the garage door, and installed the door opener mounting bracket. The center of the door is almost exactly between two studs in the wall, so the support header is a necessity. I used two pieces of 3/4" thick treated plywood here, stacked to get 1.5" thickness. Four 3" long 5/16" diameter lag screws hold the first piece to the studs in the wall, with their heads counersunk to be flush. The second piece is held to the first with two 1.675" long 5/16" diameter lag screws and four deck screws. Two more 1.675" long 5/16" diameter lag screws go through the opener mounting bracket and into both pieces of the plywood. It's rock solid. I dind't worry about some of the lag screws penetratin the drywall behin the header support, because the previous owner riddled the drywall with holes behind it (apparently searching for studs). I'll be caulking the edge of the header support at the wall anyway.
I then played around with positioning the opener motor. Normally I'd put it as close to the top of the door (when the door is open) as possible, but given how high I had to place the mounting bracket above the door, it looks awful that way. So I'm going with having it positioned such that the track is nearly level. I don't think this is going to be a problem, given that the openers are stronger than I need (3/4 HP versus 1/2 HP) and that I'm using strong galvanized angle to keep the motor from moving around. It's relatively easy to lower the motor if necessary.
I cut the angle iron pieces and mounted the opener motor securely. I also added two flat pieces of galvanized steel in an X pattern in the trapezoid formed by the garage ceiling, angle iron and top of the garage door opener. The mounting is VERY solid. I'll be repeating the same process for the other door, except I think it will need a longer header support due to it being nearly centered on a wall stud. I think I have enough treated plywood for the job.
I tightened all of the screws that hold the door hinges to the door panels. A few of them were loose.
Tomorrow I'll mount and wire the trip eyes and indoor control pad and adjust the opener. I'll also mount the outdoor keypad if I have time and it's not raining. Hopefully I'll have one fully functioning garage door tomorrow night.
I used up some of the hardware I had bought to reinforce the bottom edge of the garage door (it sags a bit). I'll need to replace it. I need to buy some for the other garage door opener too.
I ordered 2 cans of EEZOX Cycle Tune-Up to coat the torsion springs above the door.
-
Garage
- August 19, 2013
-
Garage
Old garage door opener #1 is now removed. Given that the holes for the new header bracket do not align with the holes of the old header support board, I need to replace the old header support board. Instead of 2x6 lumber, I'm using stacked 3/4" thick treated plywood. Same thickness, but more dimensionally stable and will not split from the lag screws. I may not get to cutting those pieces tonight.I'm very lucky that the garage door opener motor did not fall on my head. As if it wasn't bad enough that the metal angle holding it was not done properly (vertical pieces were parallel and did not form a trapezoid), the moron that installed it attached the outlet box in the way of the angle iron attached to the ceiling (on the same truss). So when he went to install the angle on the ceiling, THE LAG SCREWS DIDN'T PENETRATE WOOD AT ALL BECAUSE THE OUTLET COVER IS IN THE WAY OF PLACING THE ANGLE DIRECTLY UNDER THE TRUSS! THE LAG SCREWS WERE ONLY IN THE DRYWALL! They flew right out when I put my tiny 12V cordless Bosch impact driver on them, without the impact mechanism activating. Sigh, how can people be so dumb as to buy a perfectly good house and then proceed to destroy it and create very dangerous hazards? A garage door opener falling from 8 feet could kill someone at worst and severely injure them at best. And all he really had to do was use two pieces of iron angle instead of one, or take a notch out of the iron angle to accomodate the outlet cover plate. I chose to do the latter (using my chop saw), and I now have a 36" long piece of galvanized angle with 4 lag screws holding it to the truss. The same problem exists with the other opener, so I'll have to do it there too. And I need to remove the other opener ASAP so it doesn't fall on its own.
A similar problem existed at the header support over the garage door. The lag screws he used did not penetrate the drywall, they were too short. And his header was a piece of decking which had cracked. The lag screws holding the garage door opener bracket to the piece of decking were both loose. The only thing holding the piece of decking to the wall were four deck screws. Amazing that people can let these kinds of disasters-in-the-waiting hang over their head (literally). The garage door opener of Damocles.
Worth noting from my laundry room work: the previous owner's decision to pump all the moist air into the garage from his hokey dryer vent hack (vented directly into the garage) caused all of the taped drywall joints on the garage ceiling to fail. When the house was built, I don't know if today's setting-type joint compound was available. Regardless, that's not what was used and I can't blame the contractors; it's more difficult to apply due to the dramatically shorter work time and greater sanding difficulty. It didn't help that the previous owner hung 8' T12 fluorescent lighting on the drywall and not the trusses; one of them has pulled part of a sheet of drywall away from the truss. It's dangerous, the light will have to come down. Not a huge deal, I plan to redo the lighting in the garage anyway. But it stinks that I'm going to have to retape and mud all of the drywall joints (with setting-type joint compound). Or hire someone to put new 5/8" drywall in. Not a hot idea at the moment since I need to be able to use the garage; I vote for retaping the joints when I have time.
-
Garage
- August 18, 2013
-
Roof
I bought some 3" couplers at ACE Hardware in Ortonville so I can cut the pipe vents before replacing the boots. This makes it easier to replace the boots without damaging shingles.
-
Roof
-
Garage
I started installing one of the new garage door openers. I may not have enough lag bolts to finish. At the moment I have the opener all assembled, laying on the floor. The original openers were very poorly installed, which killed one of them. The other one is on the blink for the same reason. They're not supported properly at the motor end. Obviously I'm going to fix that problem with the new openers. The old openers also had no keypads, which is inconvenient for some activities. They're also connected to switches to disable them, but those switches are ancient 600W decora switches. That's not sufficient for the new openers. I'll replace them with Leviton R54-01221-20G switches (Home Depot SKU 739732 or 162677). While I'm at it, I'd like to replace the light switch for the fluorescent lights. Decora switches are not very nice in the garage. -
Laundry room
I put expanding foam around the dryer vent in the interior. I insulated the joists overhanging the garage floor, and installing the plywood panels on the bottom of the joists. The insulation and plywood panel installation took a long time because there is no room to work under there. It was not easy using the staple gun to hold the insulation in position, and I had to use my floor jack to hold the panels in position while I drove screws with my small Bosch impact driver with my arm fully extended to my side while lying on my back.I cut and installed a new piece of 1/2" thick hardwood plywood to replace the piece of sheathing the previous owner had cut out of the wall. The laundry room is all buttoned up now except for a little more insulation work in the basement and some expanding foam to seal joints from insects and mice. I bought the GreatStuff Pest Prevention formula for that task. Given how long mice were inhabiting this area, I expect them to relentlessly pursue reentry. I need to make sure that something that tastes awful is on all edges they could get their teeth in. And of course I need to get around to installing new garage door seals and my new garage door openers.
-
Septic pipe repair
With a little help from mom, I put the first coat of sealing tar on the hydraulic cement on the outside of the fundation, with the first layer of reinforcing fabric. I'll probably do a second coat on Tuesday if the weather cooperates. Tar is not fun to work with, but at least it cleans up fairly easily with mineral spirits.
- August 17, 2013
-
Laundry room
I taped the remaining joints on the dryer duct. It is very rigid now, I don't think I need to worry about the joints separating.I went to Home Depot to get new longer water source lines for the utility sink, DAP 3.0 outdoor caulk for the dryer vent and a 24" T12 bulb for the pantry light. It appears that the ballast in the pantry light is going south, it flickers even with a new bulb. I intend to replace this lighting with LED, so it's not a big deal.
I hooked up the utility sink. I had trouble with the el-cheapo trap that was included with it. I wound up using the old one. All is well for now, I don't see any leaks.
I installed the dryer duct and caulked it. After it sets up well, I will use expanding foam on the inside just to provide a little bit more barrier and support and to seal off the joint. I really like the new dryer vent, it is less constricting than any other design I've seen and will make it trivially easy to clean the dryer duct.
I installed the outlet box for the outlet in the basement for the pipe heaters. This will also serve as the junction box for the new outlet in the laundry room. I then drilled 5/8" holes through the few joists where I needed to pass 12/2 wire, and ran the wire through it. I then connected everything at the outlet for the pipe heaters, and buttoned up the outlet. I then connected the wiring to the ground bar, the neutral bar, and finally to a 20A breaker in the secondary load box. I turned the load box back on and tested the GFCI on both of the outlets. It's all good. The washing machine and pipe heaters are now on their own 20A circuit with GFCI outlets, while the dryer is on a separate circuit with a GFCI outlet.
The previous owner installed D-Squared HOM spacers in the QO load box, and they don't fit correctly at the face plate. I'll pick up some QO spacers at Home Depot the next time I'm there.
At this point, I have a functional laundry room. I just need to finish up the work under the joists and foam the dryer vent area in the interior. I should be good for many years once that's done. Of course I still need some laundry valets to hang things in the laundry room, and a pull-out drying rack to dry sweaters and the like (maybe over the utility sink). I also need a new fluorescent light fixture; the existing one has a broken cover and a magnetic ballast that buzzes annoyingly.
-
Laundry room
- August 16, 2013
-
Laundry room
I stopped at Lowe's on Telegraph in Bloomfield Hills on my way home. I was so annoyed by the service at the checkout that I walked out and left my cart. First it was the cashier taking 10 minutes to check someone out with two items, while three other Lowe's employees stood behind her and did nothing. Her aisle was the only one open. Then she allowed someone to cut in front of everyone. I asked if it was store policy to allow people to cut in line. No response. So I left my cart where it was and walked out. I won't be returning. My experience at this store has been abysmal compared to the store in White Lake. Poorly staffed and poorly managed.I then went to the Home Depot down the street and picked up a piece of oak for my threshold transition, some clamps and foil tape for the dryer ductwork, and some large hammer-in insulated staples for some of the electrical work that remains. I used the self-checkout.
I installed the threshold transition by caulking the underside and then nailing it with my pneumatic finish nauler. I then installed the door casing.
I finished assembling the utility tub cabinet and positioned it. It's ugly but it'll work for now. However, the water feed hoses are too short. I'll need to get some longer ones tomorrow. Given the reviews for this sink, this is a good thing. Many complained about the included lines leaking at the crimps. I think Home Depot SKU 405183 is long enough.
I taped and clamped the remaining dryer duct joints in the basement. The duct is good to go there. I need to do the same for the area under the floor joists.
-
Laundry room
- August 15, 2013
-
Laundry room
I stopped at Home Depot to look for a transition piece for the door threshold, to replace the old one. They didn't have anything in the store that matched. I may have to get something different, or order from Lowe's.I finished working out all of the dryer ductwork. All solid, no flex hose. I need at least 3 more 4" clamps to get it all fastened together, and I need some aluminum foil tape.
I put a second coat of polyurethane on the door casing. I also put a second coat on the exposed MDF edges on the bottom of the utility sink cabinet.
-
Laundry room
- August 14, 2013
-
Laundry room
I opened the subpanel in the basement, and found a pile of breakers in the bottom. Only one of them is a single-pole for 120V, and it's 20A. I'll try it for the circuit I ran into the laundry room, which will also likely be used for the pipe heaters on the washing machine water lines.I cut the pieces of door casing for the laundry room door, and put the first coat of polyurethane on them.
I started to assemble the utility sink cabinet. I put a coat of polyurethane on the exposed MDF edges on the bottom, just to help prevent water damage. The cabinet is flimsy, as I expected for the price (cheap). I will be improving it a tiny bit by adding a back; it doesn't come with one. I might just use the extra underlayment left over from the floor work, and staple it on or nail and glue it on (and paint it white). I don't really expect to keep this cabinet indefinitely, I'll be making my own at some point out of hardwood plywood.
-
Laundry room
- August 13, 2013
-
Laundry room
I stopped at Home Depot on the way home to pick up a 4" tee and cap to try my lint cleanout trap idea, a 24" long piece of 4" diameter duct, six worm-drive clamps and a flex pipe just to temporarily fit all of the pieces in the basement until the 45-degree long-sweep ell arrives.I removed the plywood panel I installed last night, and cut and refit the duct into the dryer box after disconnecting it from the dryer's transition duct. I believe my new plan is going to work fine, and I will not have any ductwork in the garage. And it'll all be fairly accessible for cleaning, even the transition duct, without moving the dryer.
To put the cap on the bottom of the tee, I used a Malco 5-blade crimper that I bought at Home Depot to crimp one end of the tee. The cap fits snugly, and will be mostly concealed once I put the plywood back in place.
I connected some of the ductwork, and connected an aluminum flex hose for the remainder until the 45-degree ell arrives. I did my first load of laundry, and all went well. I still need to install the new dryer vent, and of course I stilll have plenty of buttoning up to do on the underside of the floor.
-
Laundry room
- August 12, 2013
-
Laundry room
I removed the remaining moisture and mouse damaged insulation from the floor joists overhanging the garage floor. I then cut and installed a 2x4 on one of them so I can use two pieces of outdoor plywood to cover the joists and have a good piece to screw to for both panels. I then took a measurement of where the hole for the dryer duct needed to be, and cut the first piece of plywood and the hole (4.5" diameter). I then installed new pipe insulation on the pipes for the utility sink, and filled the joist areas that would be covered by this first piece of plywood with fiberglass insulation. I then mounted the plywood using my floor jack to hold it in position while I drove Torx-head deck screws into it.Tomorrow I'll do the same for the second piece of plywood. I might just use 1/2" hardwood plywood here, since it'll be lighter to handle and I expect to pull this one off later to deal with the sprinkler system piping. However, it's worth noting that I plan to insulate the garage and install a natural gas heater with separate combustion. This will essentially prevent pipes from ever freezing in the garage, though that's not the objective (the objective is to allow me to work in the garage year-round in comfort).
Hmm... I finally figured out that the original dryer duct (which presumably went through the hole in the floor that I patched) took a much more direct route to the outside, by going between the cantilevered joists over the foundation, and out the edge joist under the laundry room window. And I measured, it meets code requirements (more than 3 feet from the window). I'm going to reconfigure my dryer duct (shorten it) and use this route. It means I have to remove the panel I just installed, but that's not a huge issue. This buys me precious space in the garage, and puts the duct completely out of any area that could get crushed. It also eliminates my condensation concerns. Best of all, I can temporarily run a flexible duct tomorrow so I can do a load of laundry (which I desperately need to do). And I can install my new outside vent without cutting another hole in the outside of the house. As a bonus, I believe I can install a tee right below the DryerBox in the joists, and hence have a way to clean out lint in the dryer flex hose without pulling the dryer out from the wall.
I ordered a long-turn 45-degree ell from dryerbox.com to facilitate the ducting in the basement.
God only knows why the previous owner hacked up the wall and sheathing to vent into the garage. He could have easily used the original dryer vent on the exterior. I'm assuming it's because he used up the space with his utility sink plumbing. But now that I've swapped the dryer and washing machine locations, that's not an issue. I could replumb the utility sink with a trap inside the basement, using pipe heaters on the water feed lines, and not have the issues he created. And in fact I may do that soon.
-
Laundry room
- August 11, 2013
-
Laundry room
Lynn and Craig came over to help me move the machines into the laundry room. It's done and they work. I need to do the ductwork for the dryer and finish the work on the garage and basement side.
-
Laundry room
-
Septic pipe repair
Craig and I reconfigured the inside waste piping a little bit. We wanted a slightly simpler run for the 2" waste pipe from the master bath shower, and to move the wye away from the wall further. So we went with a cleanout tee instead of a wye for the 4" waste piping, and reinforced the joint at the edge of the wall with an inner ring that Craig carefully tapered so there is no sharp transition for waste. We added a rubber coupler with clamps to provide cushion form the all and also as a double-preventative measure against leakage. The 2" run now just has a single 90-degree elbow and a single 45-degree elbow, and a coupler so we could get the length exactly right.We tested it, it is leak-free. Yay, no more sewage leaking into the basement.
- August 10, 2013
-
Laundry room
I cut all of the baseboard pieces. I also ripped the one door casing piece that needed to be ripped due to the door being too close to the wall for a full-width casing.I installed the baseboard. Before installing it, I ran a bead of roof sealant caulk (clear) along the edge of the floor to prevent any water on the floor from getting past the bottom edge of the baseboard. I also caulked the chair rail piece with DAP 3.0 Kitchen, Bath and Plumbing caulk. Finally I caulked the top of the baseboard with white DAP 3.0 Kitchen, Bath and Plumbing caulk.
-
Laundry room
-
Septic pipe repair
Craig and I finished most of the septic pipe repair. Long story...Several weeks ago, I noticed that the east wall in the basement was still wet, despite having a new foundation waterproofing system installed. It was below the main septic pipe. Originally we thought it was ground water coming in through a poor seal of the pipe to the foundation, but that should have been partially remedied by the new basement waterproofing system. So the next suspect was a septic pipe leak. And yes, it started to smell in the house, especially in the master bedroom that is directly above the septic pipe's exit from the foundation. So I opened the cleanout trap and took a look inside. Sure enough, the septic pipe had sheared off from the end of the wye, inside the foundation wall. I'd like to smack the idiot that embedded the wye in the wall and hence located the joint to the septic pipe right at a stress point.
The new wye is now not embedded in the wall, and instead is about half an inch from the interior side of the wall. 4" schedule 40 now passes through the wall with no joint inside the wall. We used rubber couplers with the clamps removed as a protective sleeve around the pipe where it passes through the foundation. On the outside, there was a slope mismatch, so we needed a rubber coupler. We installed two of them, about 6 feet apart, to split the slope change into two more gradual changes. And I wanted one close to the foundation to allow for a little flex from frost heave. Once the outside work was done, we moved inside and reconfigured the 4" PVC as well as a 2" waste run from the master bathroom shower and jacuzzi tub. Once that was done, we returned to the outside and applied hydraulic cement to fill the gap between the pipe and the foundation block (Craig had already ground and scored the wall to get good mechanical grip, and washed it with muriatic acid) . Tomorrow I'll apply the sealer and reinforcing fabric in layers, and do the hydraulic cement in the interior.
For now, I no longer have sewage dripping into the foundation blocks. I owe Craig big time, again. Note that the duct tape in the picture was just to help protect the stainless steel clamps on the rubber coupler from corrosion long-term. I'm not dumb enough to just use duct tape to hold septic pipe together. :-)

- August 9, 2013
-
Laundry room
I started grouting the floor. Given that the grout is acrylic based, I had to do only a handful of tiles at a time before going back to wipe with a grout sponge and microfiber towel. The grout has a very strong bond, you don't want to let it dry on the tiles. Especially vinyl tiles. With ceramic tiles, you can always go back with acetone to get haze off the tiles if necessary. That's not an option with vinyl tiles.I'll finish the grout tonight so it can cure for at least 12 hours before I consider moving the machines into the room.
I put a coat of stain on the oak door casing pieces, which have not been cut yet. I put a second coat of polyurethane on the baseboard moulding.
-
Laundry room
- August 8, 2013
-
Laundry room
I put four more coats of Henry 336 Bond Enhancer on the underlayment, allowing each one to dry to the touch before applying the next. Henry 336 Bond Enhancer is so thin that the underlayment soaks it up even after many coats. I wish I had put a coat of thick latex paint primer on as the first coat, it would have made for an easier job. It might need another coat before I can call it ready for the tiles. I guess the good thing about this process is that the Henry 336 Bond Enhancer should have a very solid bond to the underlayment since it penetrated so far. Not just a chemical bond but also a mechanical bond. And it dries fairly quickly.I was later able to lay most of the tiles (all but one) before suffering exhaustion. Tomorrow I should be able to cut the baseboard pieces, grout the floor, then possibly install the baseboard pieces and get some caulking done. The door casing can wait a day or two; the objective is to finish what can't be done once the machines are in place. Craig will likely be helping me move the machines into the room this weekend. I need to buy some shoe moulding, I forgot to buy some.

-
Laundry room
- August 7, 2013
-
Laundry room
I installed the new HVAC register that I bought yesterday.I patched and skimcoated more of the subfloor with Henry 547. I wanted to do more, but I've managed to misplace my second box of Henry 547.
I believe it's sufficient. I cut the underlayment pieces and stapled them down with the Hitachi N5008AC2 construction stapler. It seems plenty firm. Worth noting that most of the floor (all of if that will not be under machines and utility tub cabinet) is from a full sheet, so there are no seams where there could be foot traffic. That sheet doesn't end crosswise until near the middle of where the machines will be located, and lengthwise goes all the way from the door to the far wall. It is 88.5" x 48", and the other piece is only 86.5" c 18".
I put a coat of Henry 336 Bond Enhancer Self-Stick Tile Primer on the top of the underlayment. Here's a picture from when the Henry 336 was drying.

-
Laundry room
- August 6, 2013
-
Laundry room
I stopped at Lowe's and bought some oak door casing. I stopped at Home Depot and bought a 6" x 10" register to replace the one the previous owners painted thickly to the point where it didn't function correctly. The one I bought has a directly attached recessed lever to open/close the flaps (reliable), and the front louvers can be pointed in any direction left to right.I cut the chair rail moulding to use as my transition piece on the walls. I now need to put some polyurethane on it and the base moulding.
I also stopped at Performance Tool and bought a Systainer SYS 1 to hold my new pneumatic 7/16" crown stapler. I wanted a second one to hold my pneumatic narrow crown stapler, but they only had one in the store.
I cut the chair rail pieces. I put the first coat of polyurethane on them, and also on the base moulding pieces.
Where possible (joist underneath), I screwed down places in the subfloor that were moving or squeaking. I hope it's sufficient once I staple down the underlayment. I have my doubts, but the only certain way to find out is to continue. Probably worth noting that very little of the floor will be exposed once the machines and utility tub cabinet are in place.
I prepared to put a skim coat on the subfloor to even out the plywood seams that don't quite match up. All I did was vacuum and put the drill, mixer and bucket in the room.
I nailed up the chair rail. I'm debating whether or not I leave it stained. It looks lovely on its own, but I may later decide to paint it white. I won't be able to decide until the floor tile is in and the baseboards are placed. Of course, most of this piece is going to be completely hidden by the machines.

-
Laundry room
- August 5, 2013
-
Laundry room
Back to work today at my new job, so not much on the agenda.I stopped at Lowe's and bought some Minwax Early American stain, two pieces of oak chair rail to use as the transition piece between the FRP panels and drywall on the walls, and three tubes of white DAP 3.0 Kitchen, Bath and Plumbing caulk. I put a coat of the stain on the chair rail pieces, as well as on the oak baseboard pieces I bought weeks ago. Tomorrow I'll put the first coat of polyurethane on them.
I caulked the gap between the DryerBox and the plywood and FRP. I also caulked the rightmost edge of the FRP to the painted wall. The utility sink plumbing holes were filled with expanding foam. Hence the wall is pretty much impermeable at this point except for the 240V electrical outlet (which I'll likely cover with tape since I won't be using it) and the washing machine outlet box. I'm not very concerned about water in those locations, they're up high. I might foam tape the washing machine outlet box cover to the FRP, but water that enters the washing machine outlet box should just drain down the standpipe. My main areas of concern were the DryerBox and the utility sink plumbing, since they're low and near the sink where water may be splashed. As long as I do a good job caulking once the floor and baseboard are in, I should not have any problems with moisture for a long time to come.
I forgot to buy new door casing moulding pieces. I want the EverTrue 0.625" x 2.25" interior stain grain red oak casing moulding, pattern 356.
I'm starting to think I should replace part of the subfloor. It was poorly done by whoever added this addition, and it has some water damage. If I can get it to stop squeaking, I'll keep it. Otherwise I'm going to cut out a section of it and replace it.
-
Laundry room
- August 4, 2013
-
Laundry room
Well, I awakened to find a few vinyl tiles had fallen off the wall. I removed the remaining tiles. some of them were stuck to the wall very well, while others nearly fell off. I'm not sure what the problem was, since I rolled them with a heavy-duty floor roller with all of my strength. I suspect that the hardwood plywood just isn't the right surface, or that it needed more coats of Henry 336 (though I did two fairly liberal coats).I decided to execute the backup plan: FRP (fiberglass reinforced plastic) panels. The advantages: one large sheet and hence no gaps to worry about moisture permeation, and FRP adhesive troweled on with a 3/16" x 1/4" V-notch trowel. It's not going to come off the wall without me intentionally removing it. Remember there are two coats of polyurethane on the back and sides of the plywood, so it should not easily accept any moisture. And the adhesive should not be susceptible to moisture once cured (which takes a full week).
The panels I bought are scored to look like ceramic tile. of course they don't really look like ceramic tile if you look closely, since the grout lines are perfectly machined. I used Liquid Nails FRP-310 to adhere them to the walls, which is a specific adhesive for FRP. I used an inside corner piece made for the panels where the panels meet, and I caulked botht he outside of it where it meets the larger panel and the channel that holds the smaller panel. It should be watertight. Of course I had to make two runs to Home Depot to get this corner piece, since I just grabbed from the bin and ran on the first visit and the wrong pieces were in the bin and I didn't check. Sigh, too common at Home Depot due to lazy customers.
-
Laundry room
- August 3, 2013
-
Laundry room
I nailed the plywood to the walls using ring-shank drywall nails. The staples I used yesterday were just to hold it in place for nailing; they have little shear strength, and given that I can't find divergent staples locally, the ones I used would probably have a tendency to pull out.I sanded my spackling. I'm basically ready for paint.
I went to Home Depot and bought some Henry 336 Bond Enhancer, a paint tray and some 3/8" nap roller covers, paint tray liners and hydraulic cement. The hydraulic cement is for another project in the basement.
I put the first coat of Henry 336 on the plywood on the walls. Its consistency and color is like milk. Since the plywood was bare, it soaked it up. I should have read the coverage on the bottle; I bought 2 gallons and I'll be surprised if I use more than half a gallon on the walls and underlayment. Better to have too much than too little, of course.
While waiting for the Henry 336 to dry, I cut the plywood to go under the floor trusses in the garage.
I then put the second coat of Henry 336 on the plywood on the walls, and the first coat of Olympic ONE Snow Storm paint (eggshell finish) on the walls. I like the Olympic ONE so far; it's a paint and primer in one, and the coverage is very good and it's thick.

I later put the first coat of paint on the ceiling, then the second coat of paint on the walls, then the second coat of paint on the ceiling.
I started putting the vinyl tiles on the walls. I'm having second thoughts about it; I don't know that the adhesive will hold up over time. My backup plan is FRP (fiberglass reinforced panel).
-
Laundry room
- August 2, 2013
-
Laundry room
Insulation is now installed on the washing machine feed pipes in the wall.I moved the light switch upward to not interfere with the work of installing the plywood on the walls. This also means one less hole to cut in the plywood. This was a lot more work than it should have been; there were 4 circuits in the light box, and the ground wires were cut WAY too short and crimped and soldered with a ferrule deep in the box. Sigh, I hate dealing with other people's hackery. At any rate, the box is moved and the light switch is functional again.
I finished the remaining insulation in the wall. I then cut the hardwood plywood piece for it, whose backside was coated with hardwood floor polyurethane a week ago. Cutting this piece wasn't trivial since there are many cutouts in it... one for the washing machine outlet box, one for the DryerBox, one for the old 240V dryer outlet, and 3 for the utility sink. But I used a brand new plywood blade in my circular saw, along with my Bosch jigsaw. You kow what they say... measure twice, cut once. My first cuts were all perfect, except at the edge that touches the outside wall. That wall is incredibly crooked and I didn't feel like using craft paper or the like to match its curve. That joint will be caulked later, and will of course be completely hidden by the washing machine and its pedestal anyway.


I then installed the other piece of oak plywood on the wall with the door. The previous drywall there had a big hole cut in it and was water damaged near the floor.
I did some more spackling, this time with the 4" knife. This should be my last application of spackling. I'll sand and put the first coat of paint on tomorrow.
I need a gallon of Henry 336 Primer from Home Depot.
-
Laundry room
- August 1, 2013
-
Laundry room
I finished the gas line work, though I haven't leak-tested it yet. I cut and threaded the gas lines myself from black iron, since I didn't want to spend a bunch of time running back and forth to the hardware or big box store to have them cut and thread pipes for me. Plus there's a lot to be said for being able to measure and cut as you go when you need to weave around a few things. To do this work, I bought the pipe threader from Harbor Freight (not a great tool, but with lots of cutting fluid and patience, it does the job). I also finally bought a 14" Ridgid chop saw, which I've needed for about 10 years. It worked fine too, though the stock blade on it is pretty lousy. I did buy another blade (Diablo brand) since abrasive chop saws tend to go through blades quickly.I had to turn off the gas to the house at the meter, since there are no shutoff valves anywhere upstream of the old pipe I had to remove. But I'm done, the gas is back on and I'm fairly confident that my pipe connections will not leak (I used gas line thread tape, I've never liked plumbers putty).
I also cut the panel to cover the giant hole in the wall that went to the garage from the laundry room. I installed it temporarily using my new staple gun that shoots 2" long 7/16" crown staples. I need to tweak the framing I did, so I didn't install it permanently. Speaking of the staple gun, it didn't come with a case. I need to see what size Systainer it will fit in. It looks like it will fit in a Systainer 1.
I spackled some of the room. Mainly where the holes were left from the removal of the cabinets.
I forgot to buy pipe insulation today. I'll need to do that tomorrow.
-
Laundry room
- July 31, 2013
-
Laundry room
This was my plan for today:- dryer gas line plan and partial execution
- cut a piece of 1/2" oak plywood to patch the hole on the garage side of the wall and install it
- install pipe warmers and pipe insulation on washing machine hot and cold water feeds
- make plan for dryer duct routing under the floor joists so I can install new sheet of outdoor plywood to seal off the house
- install insulation
- cut plywood for bottom of floor joists
However, weather foiled the notion of cutting any plywood. So I'm working on moving the gas line and installing the pipe warmers. Yet another indication of hackery by the previous owner... he used the same Frost King pipe heaters that I bought. However, he violated the instructions in numerous ways. First, he coiled the cable around the pipe. Second, he used the same cable for two different runs. In the instructions, note the big warning at the bottom: "WARNING: Do not spiral cable around pipe or cross cable over itself. Do not use one run of cable for two different pipe runs. Failure to comply may result in overheating and fire." :-( During inspection, we noted that the sprinkler system was fed with PVC (which had burst). "NOT FOR PRESSURE APPLICATIONS" is written all down the side of the pipe. Is it possible that the person that did these things is illiterate? I've met a few people in my life that could not read, that's not a dig at the people but instead our lack of attention to literacy.
At any rate, the new pipe heaters are installed, correctly. They run from just over the top of the foundation all the way to the underside of the washing machine outlet box. Exactly 6 feet, which is the length of the heaters I bought. I used Nashua 557 duct tape (rated for 200F in-service temperatures and code-approved), then wrapped the duct tape in green powdercoating tape (rated for more than 400F).

I then installed pipe insulation on the pipes under the floor, to help retain heat from the pipe heaters and also help keep condensation away from the fiberglass insulation I plan to install. Unfortunately I forgot to buy pipe insulation for the wall today, I'll do that tomorrow.
Having very little space behind the DryerBox, there was no room for effective use of fiberglass insulation. So I foamed it in with Great Stuff expanding foam. It worked well. As a bonus, the duct to which the DryerFlex will be attached is now firmly held in place.
I finally got around to removing the remaining plumbing for the utility sink that was in the garage. When I went to remove it from the sink, it just fell off. Both hot and cold lines apparently froze and burst out of the compression fittings a long time ago. Sigh, why do people do such stupid things like run uninsulated and unheated water lines into an unheated space in Michigan? If there was one place that most needed pipe heaters, it was this sink. Of course they would have run for many months every year, but that's better than letting the pipes freeze, break and leak.
I still need to deal with the sprinkler system feed. Of course I've no idea where there are any sprinkler heads, or a sprinkler control box. The valves are behind the garage, which leads me to believe that for some ungodly reason, the back yard had sprinklers while the front yard did not. The previous owner was a landscaper; you'd think he'd know better than to use PVC to feed a sprinker system, but alas... he did not. In any event, I don't even see wiring for a control box anywhere. Hmm... I'll have to backtrack from the valves. I'm starting to think there was never any control box, but why bother having a PBV and valves with no control box?
-
Laundry room
- July 30, 2013
-
Laundry room
I put framing in the wall so I can fix the horrible hole the previous owner cut through the drywall and OSB sheathing with a demolition blade on a reciprocating saw. Sigh, some people are such impatient hacks...I removed the piece of plywood the previous owner used to cover the underside of floor joists that cantilever over the sill plate. I don't know what he was thinking. It was not outdoor-rated plywood, and was only 1/2" thick. But much worse was the fact that it didn't provide anywhere near full coverage. So essentially he built a mouse nest. And there was about 5 lbs. (not exaggerating) of mouse droppings on it, along with one mouse skeleton and a whole lot of seed shells. It was also damp from the standpipe trap inside the wall which cracked from freezing water. I have been seeing mice in the basement (from the basement side, on top of the sill) every day I've worked this week. One of my traps has disappeared, presumably it fell down inside the foundation cinder blocks. I had put one near the spot where the owner had cut out the sill plate and part of one of the cinder blocks for PVC for the utility sink in the garage... another bad move. He removed the PVC trap for it before he left, probably because it froze and burst. Just the same, there was no need to cut the sill plate or take a chunk out of the cinder block... all the other plumbing goes over the sill. Sigh, in the words of Ron White... you can't fix stupid. Note that all this hackery left the basement wide open to the garage. An adult raccoon could've climbed through if he got in the garage, because there was full inter-joist access to the basement. Lord only knows what the heating bills were like.
The PVC for the washing machine standpipe... I didn't realize that the 3" pipe it leads to was schedule 30 before I cut it. All of the new pieces I bought (as well as some of what I removed) are schedule 40. They don't fit together. Thankfully, Craig delivered an adapter for me and I've installed it along with the 3"x3"x2" schedule 40 wye. I also installed part of the cleanout trap, and made a piece with a coupling to drop in from above so I can take my final measurements for the standpipe run.
Before finishing the standpipe run, I finished the hot water feed for the washing machine. That's because the standpipe needs to run nearly parallel to the water feeds, at roughly the same height, and between them. All due to the way the washing machine outlet box is arranged (standpipe in center) and space constraints since we're running over the foundation sill.
I then did the same for the cold water feed, and finished the standpipe run. I tested the standpipe and the cold water feed by running a hose from the end of the cold water valve in the washing machine outlet box into the standpipe and opening the valve for 5 minutes. It works well, and the plumbing looks a lot tidier than what was there previously. Obviously it helps that I deleted the bursted PVC for the sink in the garage, and that I now have a 2" cleanout trap in the basement instead of a non-cleanout trap hidden in a poorly insulated exterior wall that had a large hole cut it in it.
Off-topic, but a big time-saver... Julie mowed my lawn for me. She's the best!
-
Laundry room
- July 29, 2013
-
Basement
Just a reminder that I need to take some measurements in the basement and figure out how to put an LVL beam in place of the wall I started removing. I will need to dig and poor footers, of course. I can get the LVL beams at Wimsatt.
-
Basement
-
Laundry room
The dryer box and other parts arrived from dryerbox.com. All of the parts are _very_ nice, I highly recommend them. The LT90 ells, once assembled, are so much longer and less restrictive than a typical 4" elbow. They're smooth, and there's a label on the side indicating that they add no restriction (U.L. tested and approved). Hence you don't need to subtract any more than their length when doing your run calculations, unlike a typical elbow. They're 18" long.The DB-480 dryer box is also very nice, as is the Dryer Flex hose. So is the DWV4W flush-mount dryer vent.
With some help from Julie, I removed the overhead cabinets. Only one of them will remain in the laundry room, but it will be relocated to be above the utility tub. This is because the cabinets were mounted too low to be used above the laundry machines; per their manuals, they require more ventilation space than was possible with the machines on the pedestals and the cabinets above them. There was essentially no space above the machines with the cabinets in place. Also, the GFCI outlets need to be accessible for the test and reset buttons. That wasn't possible with the cabinets in place. If I raised them, they would essentially be unusable. Finally, I want a longer closet rod than the extremely short one that was previously installed. With machines this size, a very large load of laundry might need to be removed from the dryer and hung. Much more than what could have been hung on the previous rod.
I needed to pick up some things from Home Depot:
        - (2) old work single-gang electrical outlet boxes
        - (2) paintable single-gang cover plates
        - GE 4 ft. stainless steel braided washing machine hoses (SKU 609922)
        - (2) Master Flow 4" x 5' round metal duct pipe CP4X60 (SKU 148644)
        - (2) 4" x 2' round metal duct pipe (BPC4X24, SKU 458813)
        - Milwaukee 49-56-949 4.5" hole saw (SKU 232679)
          to install the dryer venting
        - Milwaukee 48-22-1950 utility knife blades 50-pack (SKU 1000004423)
        - large hook utility knife blades
        - DeWalt DWHT20547L 12" 5-in-1 hacksaw (SKU 398701)
        - hacksaw blades
        - code-approved 14 mil duct tape
        - 3/16" x 2" zinc-plated toggle bolt with mushroom head screw 15-piece
          (SKU 261254)
And from Lowe's:- Style Selections 23720CHRLG 6' x 1.32" metal closet rod (item 179924) - Watts LA-686 90-degree brass washing machine connectorI sweated copper pipe to the washing machine outlet valves.
I cut the hole for the dryer vent and the gas line to enter the dryer box. Everything fits well.
I installed the two outlet boxes, with their bottoms approximately 55" from the subfloor. This should put them _just_ above the top of the laundry machines when I'm done. I ran the wire to them, and installed the tamper-proof 20A GFCI outlets. Note that right now, only the right outlet (intended for the dryer) is connected to the breaker box. I have not yet run the wire to the breaker box for the left outlet. I'm also not sure the subpanel in the basement where I intended to add the breaker is up to code. I haven't opened the breaker boxes yet, but it sure looks to me like the subpanel is wired in parallel from the utility company feeds. Potentially a disaster waiting to happen. This subpanel looks to have been installed by the previous homeowner and I'd bet it's done incorrectly. The fact that I don't see a breaker for it in the main panel is a dead giveaway, but the breaker labelling in the main panel is poor (difficult to read).
-
Septic
I finally removed the cleaning plug from the main septic line. Sure enough, the pipe is broken right where it meets the wye that's installed in the wall. Hence sewer water is entering the foundation blocks. :-( It's not expensive to fix, but I need to buy parts and it'll probably take a day to do the work. I need to replace the wye, and I'll likely put a rubber coupler on the pipe so that this doesn't happen again. The big problem here is that the wye is in the wall (bad idea), so when the house and ground move separately (normal in Michigan from frost heave), a tremendous amount of stress is placed on the joint between the pipe and the wye. This is exactly where it broke, cleanly with the joint line. Of course it did; schedule 40 wyes don't flex. Ideally I'd move the wye out of the wall a bit, put a schedule 40 pipe through the wall, and connect with a rubber coupler a few inches from the wall on the outside. Then frost heave won't crack the pipe, it'll just flex the coupler a bit.
- July 28, 2013
-
Laundry room
Another trip to Home Depot for a bunch more stuff:- NIBCO C4884 2" PVC DWV Hub x Hub x Cleanout P-Trap (SKU 640887) - (3) Shark Bite 1/2" disconnect clips - Ridgid 31025 18" long heavy duty pipe wrench (SKU 777117) - BrassCraft T392 24" long aluminum body pipe wrench - Sioux Chief 1/2 in. Insulating and Suspending Clamps (5-Pack) (model HD558-E2PK2, SKU 671081) - copper pipe strap - composite pipe strap - drywall nails - 2" PVC cap - (3) 2" PVC 90-degree elbows - (2) 2" PVC couplers - (2) 2" PVC 45-degree elbows - 3" x 3" x 2" PVC wye - (2) 3" PVC couplers - 3" PVC cleanout trap adapter - 3" PVC cleanout trap plug - PVC primer and cement - (3) GreatStuff expanding foam spray cans - 100' of 12-2 indoor wire - Square D 20A single-pole circuit breaker (model HOM120, SKU 576387) - 8' long 2x6 to cover holes in wall base plate and wall studs from previous owner's hackery - Leviton SmartLockPro 20A Slim Tamper-Resistant GFCI outlet 3-pack, white (model M22-X7899-03W, SKU 162677) - single-gang new work outlet box - paintable cover plates for GFCI outletsI set up my air compressor's filter and regulator temporarily on pegboard, so I could regulate the air pressure to my nail guns and staplers. I then nailed a piece of 2x6 on the top of each of the portions of the wall plate that the previous owner had cut big holes in for plumbing, standpipe and dryer vent. Using my new hole saws, I cut holes in the wall base plate for the new plumbing and standpipe for the washing machine. Since I couldn't find a template from Oatey, I used the holes in the bottom of the Oatey washing machine outlet box to make sure my holes were in the right places. I also oversized the holes for the water feed pipes, which I will gap-fill with Great Stuff expanding foam once all of the plumbing is in place.
I cut and capped the PVC for the previous standpipe. The previous standpipe went through one of the wall studs to a wye at the utility sink drain pipe. I'll be running it straight down and then above the sill to a P-trap with cleanout that's accessible from the basement. This allows more insulation in the wall than what the previous owner did (trap and lots of 2" PVC in the wall, impossible to clean the trap), and keeps the trap in heated space. Given how the old system was set up, I suspect the previous owner had problems with the water in the trap freezing. That would explain the water damage to the wall below the old washing machine outlet box.
I used Great Stuff expanding foam to fill remaining gaps from the previous owners wanton drilling of holes through the wall base plate and floor.
I took a look at what I need to complete plumbing-wise for the washing machine. It's not bad, assuming I use a SharkBite fitting as the last elbow fitting. The PVC for the standpipe will be a little trickier. In terms of order, I'll do the SharkBite elbows last, since they're the easiest to connect. I need to do some elctrical work first; both of the GFCI wall outlets I intend to use need to be raised above my intended trim strip between the tiled part of the wall and the drywall, so they're accessible for test/reset. I will also need an outlet in the basement for the pipe warmers. Ideally this outlet would be on the same breaker as the washing machine.
-
Laundry room
- July 27, 2013
-
Laundry room
Another trip to Home Depot to pick up my order of Shark Bite plumbing fittings, the Shark Bit safe seal tool, electric water pipe heat cables, a Rigid 104 tubing cutter, a plumb bob and some mason line (for the plumb bob). I gave up waiting for the pipes to dry in the basement. They continue to drip even after letting them drip overnight. That's with all of my shutoff valves closed, the pressure tank depressurized and the well pump unplugged.The LG WDP5W pedestals arrived.
I'm working on the plumbing for the washing machine. I've got the SharkBite tees installed on the supply in the basement. I created capped stubs for the garage utiliy tub feed, since I don't really anticipate using that tub but may change my mind later (it will need an indoor trap and supply line heaters to avoid freezing). Given that I'm not sure how much I can trust the SharkBite connectors on the old plumbing, I'm trying to use sweated connections where I can. So for now I've got the SharkBite tees leading to elbows and short connectors that I sweated together, and then SharkBite ball valves. I'm using the SharkBite ball valves due to being able to spin them if needed for access.
I turned the water back on, and all is well. The tees I capped (for the previous washing machine feeds) do not leak, nor do any of the fittings I installed today. Next up is placing the washing machine outlet box and plumbing to it. Unfortunately I haven't found my hole saw kit, so I'm not yet able to cut the hole for the 2" standpipe. And I've not yet figured out what I'm going to do with the mess the previous owner made with PVC for the standpipe, laundry tub and garage sink drains. There doesn't appear to be enough pipe left in that area to cut and couple, so I'll probably need to replace a decent amount of PVC. It also doesn't appear to slope correctly, but I haven't put one of my levels on it yet.
I went back to Home Depot after dinner with Julie to pick up a Milwaukee 49-22-4025 hole saw kit (3/4" - 2.5"). I also bought 10' of 2" Schedule 40 PVC to use as the washing machine stand pipe, and a 3"x3"x2" wye. I'll need more fittings, but these are ones I am certain I'll need and I need the 2" straight pipe now so I can get the washing machine outlet box installed and the holes drilled in the wall base plate for it. I want an accessible clean-out trap, the Nibco C4884 from Home Depot (store SKU 640887) looks like the answer. Ideally this trap would be somewhere that won't freeze. I need a waste water routing plan for the washing machine.
I removed the last two sections of the gas line that was sticking up through the floor. Fortunately it had a valve in the basement, and I also capped the line. I will be moving the gas line into the new dryer box when it arrives, so it'll be recessed in the wall.
I tested that the machines and the new utility tub cabinet will fit by using the pedestals and the cabinet base. It's a near-exact fit; a little over 1" between each item, and from the walls.

I verified that a typical Tide laundry detergent bottle fits in one of the pedestal drawers. This is good news, since it looks like I'm going to have to remove one of the wall cabinets and move the other to be located above the utility tub. This is because the machines are too tall on the pedestals to allow for proper ventilation.
Note that the electrical outlet in here is not GFCI. And though it's on a 20A breaker with the correct wire, the outlet itself is a 15A outlet. It would not pass an electrical inspection, and would not have passed inspection for the last decade. 2008 NEC and later requires receptacles within 6' of a utility sink to be GFCI. 2011 NEC 406.12 calls for tamper-proof GFCI in essentially all child-acccessible locations (not behid a difficult to move appliance or more than 5.5 feet from the floor).
-
Laundry room
- July 26, 2013
-
Laundry room
I made another trip to Lowe's for a bunch of stuff to move the plumbing for the washing machine. Benzomatic TS8000KC MAP Pro Torch Kit, Lenox 4.125" bi-metal arbored hole saw, fiberglass insulation batts, Oatey 38970 quarter-turn ball valve copper sweat washing machine outlet box with hammer arrestors, solder, solder flux, pipe cleaning tools, in-line gate valves, elbows, tees, couplings, caps, copper pipe, severe weather plywood.I will be doing some of the plumbing work tonight. At a minimum I'll get the existing plumbing removed and capped (I have no choice but to cap it, since the previous owner put no valves in the basement for it; the mains have to be shut off). Hopefully I'll get more done, but we'll see.
Sigh, 2 hours of my day wasted thanks to the lousy cashier at Lowe's. She didn't give me one of my bags, which had all of the important stuff in it for today: solder, solder flux, gate valves, copper end caps, etc. She could've called me (I used my MyLowes card), or just chased me out the door. But she didn't, so I spent an hour looking for the stuff thinking I had misplaced it then another hour going to the store and back.
Well, I've confirmed that the laundry room was an addition. Of course I suspected this all along, but it wasn't until I took a good look at the framing underneath that I realized it. Note this also explains the terribly positioned wall in the basement (that I removed because it severely constrained the entrance to the basement); that wall provided support for the hackery they did to the original floor trusses. I'll put an engineered beam or iron beam and jacks in its place.
As part of the terrible work that was done here, the sill was cut and a top brick was notched for the drain of the sink in the garage. And the hack work done here leaves the garage open to the basement for mice and cold air to enter (and yes, there are mouse droppings to prove it). And with the lack of insulation, the previous owner's plumbing had a plug-in pipe heater wrapped around the plumbing for the washing machine. However, it wasn't plugged in and I don't see where he had it plugged in.
This isn't trivial to fix correctly. I'm tempted to delete the room entirely and recapture the space where it intrudes into the garage. First floor laundry is nice to have, but not if it's a terrible hack that causes a lot of problems.
I'm going to disconnect the utility sink in the garage for now. The way it's plumbed, it's a frozen and burt pipe situation waiting to happen. The drain isn't connected right now, and I don't know if it was ever connected. I'll use SharkBite tees so it can be plumbed later if desired.
Given that I was unable to completely drain the pipes in the basement, I've decided to use SharkBite tees and elbows there. I'm also going to use SharkBite ball valves.
-
Laundry room
- July 25, 2013
-
Laundry room
I put two coats of polyurethane on the back of one of the 1/2" thick pieces of hardwood plywood that I'll be using for the drywall replacement.I went to Lowe's and bought parts to fix the hole in the floor. A 2' x 4' piece of 3/4" thick oak plywood, some exterior wood screws, a 6" long 3/8" diameter carriage bolt, nut and fender washers, and two pieces of 1"x3" solid oak. I cut a piece of the oak plywood to fit under the floor, to which I have limited access since it's beyond the sill plate. I cut a slot in it to allow for the gas line that's in the floor now (though it's likely I'll reroute the gas line to the new recessed dryer vent box from dryerbox.com once it arrives). I drilled a hole in it for the carriage bolt, then ran the carriage bolt through it from below. I put it in place from the basement, with the carriage bolt sticking up through the big hole I'm fixing. I ran the carriage bolt through the two pieces of solid oak I bought, then put a pair of fender washers and the nut on. This allowed me to squeeze the new piece of plywood tightly against the bottom of the subfloor.

I then drilled small pilot holes through the subfloor and the new piece of plywood, and installed exterior wood screws to hold the new piece of plywood snugly against the subfloor. Voila, I now have support for a plywood puck I'll install in the hole in the subfloor.

I then installed a puck made from 3/4" thick oak plywood, using wood glue and 4 countersunk screws. I filled the gaps and patched other spots in the subfloor with Henry 547. We'll see how things look once it dries.
I've decided I'm definitely going to move the washing machine to the left and the dryer to the right, which is opposite of how things are set up now. The reason: my new front-load washing machine (and most of them available today) has a non-reversible door with the hinge on the left. To swap clothes from the washer to dryer without having a door in the way, the washer needs to be to the left of the dryer. To do this work, I need to do a decent amount of plumbing, and it's not terribly convenient due to the laundry room being a hacked-in addition. But I need to do it, and it's not rocket science.
-
Laundry room
- July 24, 2013
-
Laundry room
I borrowed mom's truck (thanks mom!) to buy some sheet goods from Home Depot. Two sheets of underlayment to replace the underlayment I removed yesterday and two sheets of 1/2" hardwood plywood to replace the lower 4' of drywall that I removed today. I also bought new baseboard, solid oak. I bought contrasting 12" vinyl tiles to cover this plywood once it's installed. I will be installing oak trim as a transition from the vinyl tile to the existing drywall. I also bought more of the vinyl tile grout.At Lowe's I bought 1/8" tile spacers. I also bought a Hitachi N5008AC2 pneumatic stapler, which shoots 7/16" standard crown staples. This is the correct staple size for underlayment, unlike the narrow-crown staples that some moron used on the original underlayment (all of which shot through the underlayment and hence didn't hold it down).
I removed the lower 4' of drywall on the wall with the dryer duct and plumbing for the washer and dryer. This wall was not framed properly (no supporting stud for one of the drywall edges) and was hacked up by the previous owner. One hack was for the dryer duct which I'll fix, the other hacks were for unknown reasons.
I ordered the pedestals (LG WDP5W) for the washing machine and dryer from Home Depot. Basically, I couldn't resist their special price. The pedestals are normally $270 each. I got them for $134 each, with free delivery (this Saturday). This puts a slight crimp in my laundry room plans, but that's OK. Having the official pedestals gives me drawer space, which means I can probably eliminate one of the overhead cabinets and use a longer clothing bar above the machines. Even if not, it's nice to have the machines at a height that doesn't require a lot of stooping to move clothes from the washer to the dryer.
I also ordered some parts from dryerbox.com to make the ductwork and transition hoser installation for the dryer easier and more amenable to future changes. I ordered a K-DF-480-90 kit which includes a DB480 wall box, 48" DryerFlex hose, an LT90 long-turn ell and two 4" clamps. I also ordered two more LT90 long-turn ells, a DWV4V premium flush-mount metal dryer wall vent and a sheet of 6 dryer placard labels. These parts should arrive on Monday, July 29th.
-
Laundry room
- July 23, 2013
-
Roof
I bought some 4" PVC couplers so I can cut the vent pipes in the roof and re-install them. This will let me install the new pipe boots with the least amount of disruption to the roof.
-
Roof
-
Laundry room
I installed a Lutron occupancy sensing light switch in the laundry room. This is a good location for such a switch, since I'll typically have my hands full with laundry baskets when I enter. I have it set to turn off in 5 minutes, though I expect to turn the light off manually most of the time; I really only need it to turn the light on.I bought a simple utility tub and cabinet for the laundry room that will allow my new washer and dryer to fit. It's the Style Selections LT2026WWMV at Lowe's. The Lowe's item number is 185379. It was $199. Reviews indicate that the included hoses are problematic, but that's easy to fix.
I also bought some vinyl tiles and grout for the floor. While I would've liked to have ceramic, the subfloor in the laundry room is not sufficient for it (it's pieced together poorly with some edges unsupported). I also don't have the time to lay ceramic right now, I need a functional laundry room. However, I may wind up tearing out the subfloor anyway. When I removed the underlayment, I found ancient moisture had made its way to the subfloor. Not to mention the big hole in it that someone had cut for some reason (dryer vent?). The subfloor appears to be OK, except that it doesn't seem to be supported well in some spots. I need to look at the floor from the basement before I decide whether or not to tear it out and replace it.
I need a plan for the dryer ducting and moving the plumbing for the washing machine. I'm starting to think I want to replace the lower 4' or so of drywall on 2 walls of the room with 1/2" plywood, and put the vinyl tile on the plywood too. It buys me some additional structural integrity for the dryer duct and washing machine plumbing cutout, and should also be less susceptible to moisture issues if done correctly. In addition, it's less work than tearing out the drywall from floor to ceiling; I don't have to remove the overhead cabinets, nor deal with the drywall all the way around the door.
-
Paint
I have spackled many of the holes and dents in the walls in various rooms. There is of course much more to do, and I have not started sanding any of it. But at least I've gotten a start on the spackling.
- July 21, 2013
-
Family room
Form the basement, I can't see the phone line that leads to the phone jack in the family room. I have a sneaking suspicion that it was never wired. I'll remove the wall plate and check. That's where I'd like to have ethernet for my Apple TV and other things, if it's accessible. I had no trouble finding the RG59 for cable TV. However, that isn't an ideal location if I want my cabling to be somewhat hidden. Of course, I don't intend to keep this setup in the family room for all that long.
-
Family room
-
Master bathroom
Given the awkward location of the main light switch in the master bathroom, I installed a Lutron MSCL-OP153M occupancy sensing dimmer. Now the lights over the sinks come on when I enter the bathroom. I have them set to turn off 30 minutes after occupancy is no longer detected. The sensor will not detect me in the shower, hence the long timeout. There's a separate light for the shower, and I'll probably put that one on X10 and use an EagleEye near the shower to control it. Then I can reduce the timeout of the main light switch to 5 or 15 minutes.
- July 20, 2013
-
HVAC
I bought some PVC pipe to fix the issues with the condensation drain of the evaporator for the air conditioning. Unfortunately I bought the wrong size. I may or may not use it. What I need are cleanout traps, or even just valves to cut off the flow from the drip tray and blower areas so I can blow out the line.The original thermostat has been malfunctioning. It also has a broken cover latch and was barely holding on to the wall due to a broken mounting tab. I suspect it got knocked around when the previous owner moved out, since it's at the bottom of the stairwell to the second floor. I replaced it today with a Nest thermostat, which appears to be very nice. I had no problems installing it. I spackled over the holes for the old thermostat. Setup was easy since it leads you through it. It connected to my wireless network without problems. After it connected once, I found its MAC address by looking at the leases my DHCP server handed out. I then modified my DHCP server's configuration to always give it the same IP address, and updated my DNS server so I can identify it by name. I also have the online account set up. Finally, I installed the iOS app on my iPhone 4S and it appears to work fine.
-
HVAC
-
Yard
I started to do a little cleanup in the yard. Unfortunately the bar on my chainsaw is toast, I need a new one. I did manage to get most of one of the fallen trees cut up and moved. -
Office
I replaced the light switch in the office with a Lutron Maestro MA-600 I had in an old box of light switches and dimmers. I wanted dimming of the overhead light in the office. -
Networking
Comcast screwed up the provisioning of my modem again. It was quickly corrected, but they also informed me that it won't be long before they drop support for the old Surfboard modems and that I'm not getting my full bandwidth with the old modem. They are correct, of course; speedtest.net shows 34.86 Mbps down and 11.12 Mbps up. I purchased a new Motorola SB6141 today but haven't have time to set it up and have it provisioned.
- July 15, 2013
-
Office
I spent a little more time on my office. The rack with my UPS, gigabit ethernet switch and drawers is assembled. I put my HP 4000TN laser printer on top of it. I put all of the audio gear and power strips with rack lighting into my desk. Unfortunately, while trying to move my desk, I broke one of the adjustable legs out of the base. So now my desk is tipped on its side with some Gorilla Wood Glue and clamps to repair it. While it was tipped, I wired together the audio components in the desk racks. Tomorrow night I should be able to finish putting my office together. I have to admit that it's sort of a hassle having my office on the second floor, but it's also nice to not have it exposed all of the time.
-
Office
- July 13, 2013
-
Networking
I bought a 14" Leviton media distribution box at Home Depot, along with some cat6 jacks, F-connector jacks, single-gang rework boxes, 3-hole wall plates, etc. I used my fish tape to pull two cat5 cables into the attic from the basement, via the existing PVC raceway. It was HOT in the attic, but I managed to drill a hole through the top plate of the wall where I am placing my Middle Atlantic studio rack with gigabit ethernet switch. I used my usual trick to find the top plate in an attic with blown-in insulation: I drilled a small hole in the ceiling of the office, then pushed a wire coathanger through it.I mounted the Leviton media box on the wall in the basement, near the main electricity panel. I cut the hole in the wall in the office with my drywall saws and installed the rework box in it. I then wired up the cat6 jacks in the basement and the office and tested with my cable tester. It's good to go.
I installed a rework box and cat5 in the largest bedroom upstairs as well, in the wall that is shared with the office. This was easy since I already had the hole in the top plate and had already run the cat5 into the wall.
I then pulled a second set of wires through the raceway, using cat5e cable. These go into a second jack in the same faceplates where I just ran cat5. These jacks are blue instead of white. This gives me the flexibility of two separate physical networks if the need arises.
I can now finish setting up the office.
-
Networking
-
Appliances
The new washer and dryer are in the garage. Unfortunately there is too much stuff in the way for me to start looking at the dryer vent and plumbing.
- July 10, 2013
-
The Move
Last week was a blur. I am in the new house, but living out of boxes. Much remains to be done.I bought a new Miele Jazz vacuum cleaner. Not planned, but the belt broke on my old Eureka and I then discovered that some parts are no longer available. Including the motor prefilter that I need.
New washer and dryer will arrive on Friday, but they'll have to sit in the garage until the laundry room is ready to accept them. There is plumbing and dryer vent work to be done, and I need to replace the utility sink and vanity with a slightly smaller one.
-
The Move
- July 2, 2013
-
The Move
I was on my feet for 15 hours again today. I scrubbed the high-traffic areas of the master bedroom carpet. Wow, it was dirty. I had to get on my hands and knees for about an hour with a hand scrub brush, Simple Green and LA's Totally Awesome. I then spent a few hours on the carpet with the Hoover Steam Vac. It's not perfect, but it's a lot more livable.I then spent a couple of hours cleaning the carpet in the library. It is newer than any other carpet in the house, but was quite dirty. Sigh, none of the carpets in the house appear to ever have been cleaned.
B-Dry finished their work in the basement. Nice guys, job well done. Now I just need to check the septic line and reseal it on the outside. And of course have the septic tank emptied.
I went to Sears and bought two matching 3/4 HP garage door openers. 1/2 HP would be sufficient for my doors, but I may later add insulation or change the doors and I'd rather have the headroom of 3/4 HP units. Plus they open the doors faster. Each one comes with a pair of remotes and a keypad. They also have motion sensors for the lights and each one will accept a pair of 100W bulbs (which you can't buy anymore, but so be it). They're also HomeLink compatible, which means I can program the BMW to open them. Of course, I suspect that the decora switches used to disable the existing garage door openers will not handle the startup current of the 3/4 HP units. No big deal, I'll replace those switches.
I went to Home Depot and bought some plain steel slotted angle and various pieces of hardware to mount the new garage door openers. I also bought two new bottom door seals.
The reason I bought new garage door openers... I have no remotes for the existing ones, and one of them doesn't work. I suspect the terrible mounting done by the previous owner or builder is mostly the cause. That and the terrible adjustment... the one on the right is the one that's dead, and it swings all over the place when you touch it. The one on the left does too, and I noticed yesterday that it puts way too much pressure on the door when it's reactivated. Apparently its default action after being power-cycled (by the aforementioned enable/disable switch on the wall) is to close the door. When it does so, it bends the heck out of the track trying to close the door when it's already closed, then opens the door. Probably the overtorque safety is opening the door. If this has been done a whole bunch of times (no way for me to know), it has abused the motor and the track and mounting.
Given that I'll soon be moving heavy stuff into the house, I cleaned the slippery algae off of the front walk and steps. My powerwasher is misbehaving, the unloader valve isn't functioning. I used it a bit, but wound up mostly using a scrub brush and hose.
I made one pass at cleaning the carpet in the middle bedroom upstairs. The carpet in there shows a lot of wear, but I'll live with it for now. The other 2 upstairs bedrooms have nasty spills in many places on the carpet. I'll have to deal with those rooms later.
-
The Move
- July 1, 2013
-
The Move
Mom and I spent some time cleaning the master bedroom carpet. Ick, it was very dirty.Julie took me to the U-Haul place to pick up the U-Haul truck. It's small, and as usual with U-Haul, it has lots of problems. The parking brake is not functional, and the transmission doesn't like to go into Park (loose linkage, god knows what else). The rear door also jams when trying to close it, about 18" before it's closed. The driver side door crushes the front fender when you open it, due to some previous renter hitting something with the truck.
I took one small load to the new house: wheelbarrow, power washer, Werner convertible ladder, 2' ladder, one of my 26" tool cabinets with chest, my detailing cart, some of my Festool Systainers, etc.
Mom brought the Stihl 029 chainsaw to the house so I can take care of the downed tree in the yard as well as the other trees that were victims of ash bore.
-
The Move
- June 30, 2012
-
The Move
With the help of Julie, Craig, mom and Lynn, I got all the basement finish work demolition debris into the dumpster. I also removed the half-ass feeder duct that the previous owner had put in the finished area, and installed a new end cap so the master bedroom feeder duct is good as new.Craig and I broke apart the swingset and slide in the back yard and tossed it in the dumpster. Craig gave the slide a last hoorah by using it once. :-)
I made another pass at some of the areas of the family room carpet, but ran out of good lighting. I started to clean the carpet in the master bedroom, but the lighting in there is terrible (3 candelabra-based bulbs in the ceiling fan).
-
The Move
- June 29, 2012
-
The Move
I demolished the wet, moldy finished room in the basement. I'm sore, but it's mostly done. I need to haul all of the debris out to the dumpster in the driveway.I installed a new deadbolt and door handle on the front door.
-
The Move
- June 28, 2012
-
The Move
I called Comcast about moving my service. I talked to Amber. She said the line should be live, and they will check it on Monday. All I need to do to move my service: once I'm set up, just call them and they'll reprovision for my modem. My new account number will be 9558-269110-2.The 20 cubic yard dumpster was delivered.
I checked that the half bathroom's toilet is working properly.
I spent several hours cleaning the family room carpet. It went from thoroughly disgusting to livable. I'll clean it again just to see if I can remove the remaining traffic dirt. I just need it to be livable until I get a chance to install Kahr's hardwood in the family room.
I removed Monkeyboy's deadbolt stupidity. He had driven screws into the doorframe to prevent the deadbolt from working. Tomorrow I'll replace the front door knob and deadbolt.
I fired up the water heater.
I started the icemaker in the freezer. Given the work I'm doing this weekend, I'll want ice cubes for drinks.
I installed new batteries in the thermostat so I could run the air conditioning.
I started a cleaning cycle on the oven before I left.
-
The Move
- June 27, 2012
-
The Move
I closed on the house. Yay!I installed a Schlage doorknob on the door from the garage to the house.
Late at night, I cut back some of the trees lining the driveway so the dumpster truck could get down the driveway without too much trouble.
-
The Move
- June 25, 2012
-
The Move
I submitted a request for natural gas service to Consumer's Energy via their web site.Unfortunately I can't seem to do the same for electric service via DTE's web site.
-
The Move